


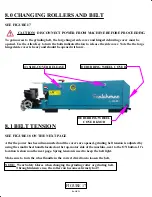


8.4 SETTING BELT TENSION
SEE FIGURE 21 BELOW
After changing the roller the belt can be installed. Slide the grinding belt over the drive pulley and the
grinding roller. Make sure it is installed so it rotates in the right direction as shown in Sect. 8.1
NOTE: If a roller smaller than 30mm (1-3/16") diameter is being used, use a grinding belt that has
been "broken in" meaning a belt that has been previously used on a roller with a larger diameter. A
new grinding belt is very stiff and may break if used on a grinding roller with a small diameter.
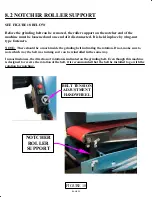
After installing the new grinding belt, the notcher roller support must be reattached via the (2)
wing-nut fasteners. See FIGURE 18
The belt must be tensioned properly. Turn the hand wheel to tighten the belt. To set the correct tension,
use the "Tension Gauge" located on top of the machine. It's on the motor side and directly above the
motor. the spring on the tensioning device should be compressed enough so there is a 8-10mm gap
(.5/16 - .3/8") between the two white indicators as shown below in FIGURE 21.
8-10mm GAP
(5/16"-3/8")
CORRECT
TENSION
FIGURE 21
PAGE 35
Содержание AL150-HS
Страница 2: ...PAGE 2 MODEL AL150 HS HIGH SPEED PIPE NOTCHER GRINDER...
Страница 11: ...6 2 3 5 7 8 FIGURE 2 4 1 PAGE 11...
Страница 19: ...PAGE 19 COVER SWITCH PLUNGER COVER SWITCH PUSHER HINGED COVER FIGURE 8 REAR COVER SWITCH...
Страница 21: ...FIGURE 9 MODEL AL 150 HS 1 2 3 4 5 6 7 8 PAGE 21 9 ITEM 7 DETAIL CONTROLS ADJUSTMENTS...
Страница 27: ...FIGURE 13 TOOL REST IS 3 8 AWAY FROM GRINDING WHEEL MOUNTING BOLT below IS TIGHT READY FOR USE PAGE 27...