


Commissioning and maintenance
48
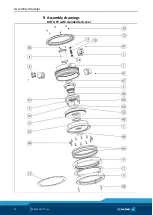
02.00|ROTA TP |en
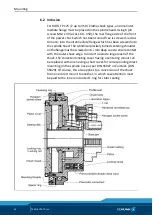
Disassembly
1 Unscrew both pneumatic angle swivel mounts at the distributor
ring, remove the front of the power chuck from the spindle
head.
2 After unscrewing the 3 hexagon socket head screws (item 38)
in 3 pieces (item 9, 11, 12), remove the distributor ring backwards
from the chuck.
Note
The chuck is pressurized! It is imperative that the valve sys-
tem (item 18) be removed before any further disassembly!
3 Remove the pilot-controlled double check valve system (item
18) by carefully unscrewing the plug screw with the O-ring
(item 13). Check all the O-rings in the valve system for wear
and replace them if necessary.
4 Unscrew the 6 hexagon socket head screws (item 39) at the
chuck mount (item 7), screw in 2 screws into the existing
threaded holes, pushing the mount down.
5 Disconnect the spring ring / retaining nut (item 40) in front of
the piston cover (item 6). Use the supplied mounting tool
(item 80).
6 Screw in the two hexagon socket head bolts into the existing
threaded holes of the piston cover (item 6) and pull out the
piston cover (item 6).
7 Chuck with distributor ring cover: Loosen the screws (item 35)
and remove the distributor ring cover (item 15).
8 On the front of the chuck, loosen the three hexagon socket
screws (36) of the sleeve (4) and pull out the sleeve toward
the front by lightly knocking from the back side of the chuck.
9 Disassemble the sealing disk (item 5) using the hexagon socket
head screws (item 37) and remove the O-ring (item 51) sealing
the pressure chamber.
Note
Do not lose the sealing rings (65) under the hexagon socket
head screws (37)!
7.5


