


Maintenance and Care
08.01|PFH 30-50|en
29
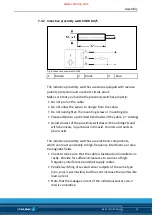
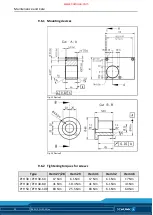
Version with gripping force maintenance device for I.D. gripping
1 Remove all air feedings.
2 Unscrew the screws (29). Draw off the guiding strip (3) to-
gether with the cyl. pins (44) now.
3 Remove the cyl. pins (44), the screws (35) and the strip (13)
out of the guiding strip (3).
4 Turn the set-screws (38) back and remove the cover strips (42).
WARNING
Risk of injury due to spring forces.
In case of version for O.D. gripping the cover plates (8) are spring-
tensioned (F 210 N).
•
Carefully disassemble the module.
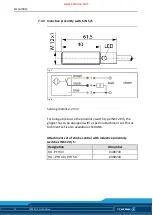
5 Remove the screws (32) except for the 4 pieces at the edges of
the cover plates (8). Clamp the gripper between the cover
plates in a way into the vice, that the remaining 4 screws (32)
can also be removed. Then, carefully open the vice.
WARNING
Risk of injury due to spring forces.
In case of the version for I.D. gripping, the piston (4) is spring-
tensioned (F ≤ 210 N).
•
Carefully disassemble the module.
6 Clamp the gripper between the piston (4) and the housing (1)
in a way into the vice, that the remaining screws (31) can also
be removed. Carefully unclamp the springs.
7 Take the piston (4) and the springs (43) out of the housing (1).
8 After removal of the screws (46) take out the drivers (7), pis-
ton rods (5) and the assembly groups consisting of toothed
rod (2), intermediate piece (12) and the pressure strip (18)
from the housing (1).
9 Remove the type lable by means of a screw driver or any simi-
lary auxilliary.
10 Turn back the set-screws (39) 3 mm back and take out the
bushing (6) from the housing (1).
The gripper can be maintained now
9.4.3
www.comoso.com


