background image

Nachdrucke, auch auszugsweise, bedürfen der Genehmigung. Technische Änderungen vorbehalten. Abbildungen beispielhaft!

Art.Nr.

5911241904

AusgabeNr.

5911241856

Rev.Nr.

17/08/2021

DE

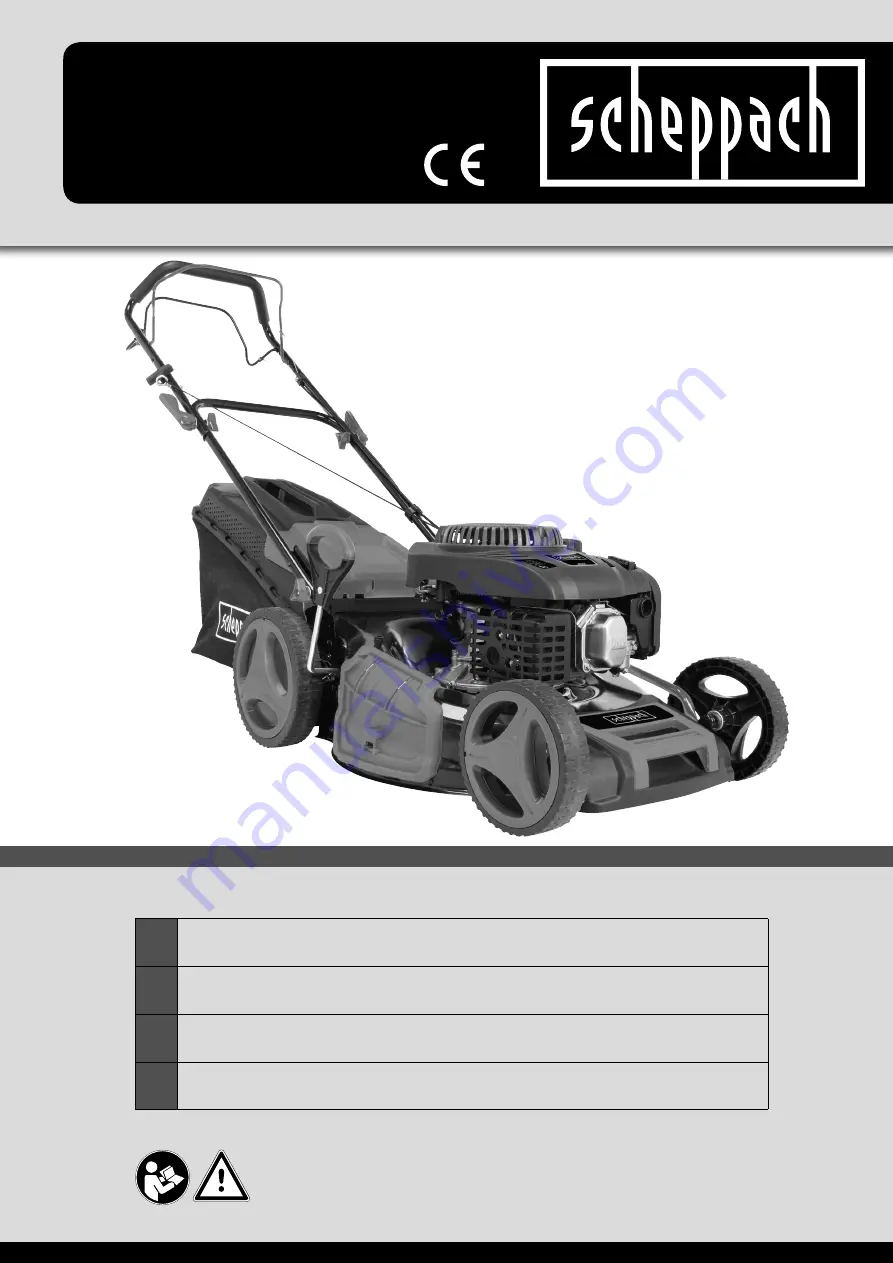
Benzin-Rasenmäher (angetrieben)

Originalbedienungsanleitung

06 - 19

GB

Petrol Lawn Mower (self propelled)

Translation of original instruction manual

20 - 32

FR

Tondeuese Thermique (tractée)

Traduction des instructions d’origine

33 - 46

CZ

Benzínová sekačka (pohonem)

Překlad z originálního návodu k obsluze

47 - 59

 www.scheppach.com

MS226-53 SE

ACHTUNG!: 

Vor Inbetriebnahme die Bedienungsanleitung genau durchlesen!

CAUTION!:


Read the manual carefully before operating this machine!

ATTENTION!:

   Lire attentivement la notice avant toute mise en route !

POZOR:  

Před uvedením do provozu si pečlivě přečtete návod k používání!

Содержание 5911241904

Страница 1: ...n of original instruction manual 20 32 FR Tondeuese Thermique tractée Traduction des instructions d origine 33 46 CZ Benzínová sekačka pohonem Překlad z originálního návodu k obsluze 47 59 www scheppach com MS226 53 SE ACHTUNG Vor Inbetriebnahme die Bedienungsanleitung genau durchlesen CAUTION Read the manual carefully before operating this machine ATTENTION Lire attentivement la notice avant tout...

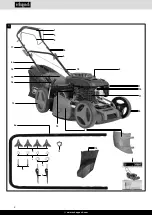
Страница 2: ... www scheppach com 2 1 2 3 4 5 6 7 9 13 10 12 11 14 15 16 17 1 18 8 4a e d c b 5 a 19 18 4a ...

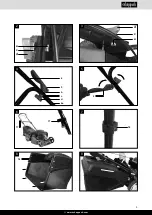
Страница 3: ... www scheppach com 3 18 8 16 4 4a d c 4 5 5 5 7 9 2 d a c 3 d c b a 6 17 17 ...

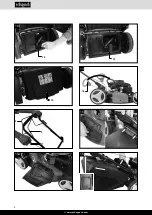
Страница 4: ... www scheppach com 4 12 11 10 19 15 15a 16 19 15 14 17 3 2 13 14 ...

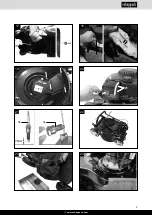
Страница 5: ... www scheppach com 5 17 21 10 10 23 22 22 24 w 20 20 19 18 12 m ax m in 21 ...

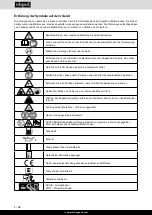
Страница 6: ...er geschleudert werden könnten Gefahr durch fortschleudernde Teile bei laufendem Motor Stellen Sie sicher dass andere Personen ausreichend Sicherheitsabstand einhalten Entfernen Sie den Zündkerzenstecker bevor Sie Wartungsarbeiten vornehmen Halten Sie Hände und Füße von den rotierenden Messern fern Wichtig Die Abgase sind giftig betreiben Sie den Motor daher nicht in unbelüfteten Be reichen Achtun...

Страница 7: ...8 3 Lieferumfang 8 4 Bestimmungsgemäße Verwendung 8 5 Sicherheitshinweise 9 6 Technische Daten 11 7 Auspacken 12 8 Aufbau Vor Inbetriebnahme 12 9 In Betrieb nehmen 13 10 Reinigung 15 11 Transport 16 12 Lagerung 16 13 Wartung 16 14 Entsorgung und Wiederverwertung 18 15 Störungsabhilfe 19 ...

Страница 8: ...hrem neuen Gerät Hinweis Der Hersteller dieses Gerätes haftet nach dem gelten den Produkthaftungsgesetz nicht für Schäden die an diesem Gerät oder durch dieses Gerät entstehen bei Unsachgemäßer Behandlung Nichtbeachtung der Bedienungsanweisung Reparaturen durch Dritte nicht autorisierte Fach kräfte Einbau und Austausch von nicht originalen Ersatz teilen Nicht bestimmungsgemäßer Verwendung Ausfälle...

Страница 9: ...onen ge nutzt gewartet oder repariert werden die damit vertraut und über die Gefahren unterrichtet sind Eigenmächtige Veränderungen an der Maschine schließen eine Haftung des Herstellers für daraus resultierende Schäden aus Die Maschine darf nur mit Originalzubehör und Ori ginal Werkzeugen des Herstellers genutzt werden Jeder darüber hinausgehende Gebrauch gilt als nicht bestimmungsgemäß Für darau...

Страница 10: ...ne und vermeiden Sie ein Einklemmen von Fingern zwischen dem sich bewegenden Schneid werkzeug und starren Geräteteilen Seien Sie besonders vorsichtig beim Mähen auf nachgebenden Böden an nahegelegenen Müllhal den Gräben und Deichen Während des Mähens sind immer festes Schuh werk und lange Hosen zu tragen Mähen Sie nicht barfuß oder in leichten Sandalen Überprüfen Sie das Gelände auf dem die Maschi...

Страница 11: ...g der Einstellung und der Bedienung ein schließlich verbotener Betätigungen geschult sein Überprüfen Sie das Gerät regelmäßig und stellen vor jedem Einsatz sicher dass alle Startarretierun gen und Tastschalter ordnungsgemäß funktionie ren Beachten Sie nicht ordnungsgemäßer Wartung die Verwendung der nicht konformen Ersatzteilen oder Entfernung oder Modifikation der Sicherheits einrichtungen können...

Страница 12: ...eils einer Schraube a einer Beilagscheibe klein c und einer Kunst stoffsternmutter d an beiden Seiten des Mähers festschrauben Achten Sie dabei darauf dass die Seilzüge die später befestigt werden nicht im Weg sind Abb 2 3 3 Oberen Schubbügel am unteren Schubbügel mit je einem Schnellspannhebel 5 einer Beilag scheibe groß b einer Beilagscheibe klein c und einer Kunststoffsternmutter d an beiden Se...

Страница 13: ...beginnt bei laufendem Motor zu fahren Lassen Sie den Fahrhebel rechtzeitig los um den fahrenden Ra senmäher zu stoppen Üben Sie das Anfahren und Anhalten vor dem ersten Mähen bis Sie mit dem Fahrverhalten vertraut sind Warnhinweis Das Schneidemesser rotiert wenn der Motor gestartet wird Wichtig Vor dem Starten des Motors bewegen Sie die Motorbremse mehrmals um zu prüfen ob das Stoppseil auch gut f...

Страница 14: ... Rasen mäher aus Sicherheitsgründen nicht gemäht werden Üben Sie besondere Vorsicht beim Rückwärtsbewegen und beim Ziehen des Rasenmähers Stolpergefahr Mulchen Beim Mulchen wird das Schnittgut im geschlosse nen Mähergehäuse zerkleinert und auf dem Rasen wieder verteilt Eine Grasaufnahme und Entsorgung entfällt m HINWEIS Mulchen ist nur bei relativ kurzem Ra sen möglich Um die Mulchfunktion zu nutz...

Страница 15: ...Mäher w auf setzen und den Wasserhahn öffnen Fig 24 Überprüfen Sie den Mäher das Messer und die anderen Teile wenn Sie in einen Fremdkörper ge fahren sind oder wenn das Gerät stärker als normal vibriert Machen Sie keine Einstellungsänderungen oder Reparaturen ohne den Motor vorher abzustellen Ziehen Sie den Zündkabelstecker Auf oder in der Nähe einer Straße achten Sie auf den Straßenverkehr Halten...

Страница 16: ...neidwerkzeuges dürfen nur Original Ersatzteile verwendet werden Tragen Sie beim Messerwechsel Handschuhe um Schnittverletzungen zu vermeiden Mäher starten und nach ca 30 sec den Mäher aus schalten Der rotierende Messerbalken schleudert das Wasser an die Unterseite des Mähers und rei nigt somit diese Wasserhahn schließen und Schlauch Anschluss Stück abziehen Oberseite mit einem Lappen reinigen kein...

Страница 17: ...nd kommen ist dies nicht der Fall darf das Gerät nicht verwendet Wen den Sie sich an einen autorisierten Fachhändler Stellen Sie sicher das während der gesamten Le benszeit sich das Gerät in einem einwandfreien Zu stand befindet Niemals ein anderes Messer einbauen Leeren Sie den Benzintank bevor Sie die Klinge entfernen Entfernen Sie die Schraube um die Klinge zu er setzen Setzen Sie wieder alles ...

Страница 18: ... sind Verletzungsgefähr dende Teile vor anderen Personen und Kindern un zugänglich aufbewahren Achtung Laut Produkthaftungsgesetz wird nicht für Schäden gehaftet die durch unsachgemäße Repa raturen oder durch Nichtverwendung von Originaler satzteilen verursacht werden Beauftragen Sie einen Kundendienst oder einen au torisierten Fachmann Entsprechendes gilt auch für Zubehörteile Betriebszeiten Beac...

Страница 19: ...müssen Störung mögliche Ursache Abhilfe Unruhiger Lauf starkes vibrieren des Gerätes Schrauben lose Schrauben prüfen Messerbefestigung lose Messerbefestigung prüfen Messer unwuchtig Messer ersetzen Motor läuft nicht Motorbremshebel nicht gedrückt Motorbremshebel drücken Gashebel falsche Stellung Einstellung prüfen Zündkerze defekt Zündkerze erneuern Kraftstofftank leer Kraftstoff einfüllen Verschm...

Страница 20: ...nning Make sure you keep a safe distance Make sure other people also keep a safe distance Remove the ignition cable before all maintenance work and read the instructions for use Warning Risk of injury Do not let your hands or feet come in contact with the blades when the motor is running Important Exhaust gas is poisonous do not operate in an unventilated area Danger Hot surface Wear ear muffs and...

Страница 21: ...ayout 22 3 Scope of delivery 22 4 Proper use 22 5 Safety instructions 23 6 Technical data 25 7 Unpacking 25 8 Before starting the equipment 26 9 Operation 26 10 Cleaning 29 11 Transport 29 12 Storage 29 13 Maintenance 30 14 Disposal and recycling 31 15 Troubleshooting 32 ...

Страница 22: ...liability laws the manufacturer of the device does not assume liability for damages to the product or damages caused by the product that occurs due to Improper handling Non compliance of the operating instructions Repairs by third parties not by authorized service technicians Installation and replacement of non original spare parts Application other than specified A breakdown of the electrical sys...

Страница 23: ...violently flung out of the chute Like stones toys sticks and wires etc The machine may only be used maintained or re paired by trained persons who are familiar with the machine and have been informed about the dan gers Unauthorized modifications of the machine exclude a liability of the manufacturer for damages resulting from the modifications The machine is intended for use only with original spa...

Страница 24: ...y use cutting equipment and accessories rec ommended by the manufacturer The use of other tools and accessories may result in injury to the operator m WARNING Petrol is highly flammable Therefore Only store petrol in containers designed to hold pe troleum based liquids Only refuel out in the open and do not smoke during the refuelling process Always refuel the lawn mower before starting the engine...

Страница 25: ...al parts Spare parts are available from your stockist Include our item number the device model and year of manufacture in your order m Attention The device and packaging materials are not toys Children must not be allowed to play with plastic bags film and small parts m Danger There is a risk of swallowing and suffocation Always keep the lawnmower in good operating con dition It is necessary to ta...

Страница 26: ...drive Engine brake 3 Use the lever to stop the engine When you release the lever the engine and the blade stop automatically 8 Before starting the equipment Assembling the components Some parts of the mower come disassembled For quick and easy assembly read and follow the instruc tions below Important You will need the following additional tools not supplied for assembly and also for maintenance w...

Страница 27: ...he engine before emptying the grass basket Always ensure that a safe distance provided by the length of the long handles is maintained between the user and the mower housing Be especially careful To mow hold the drive lever 2 in the working po sition Before you start to mow check the start stop lever several times to be sure that it is work ing properly Ensure that the tension cable can be smoothl...

Страница 28: ...ine if you pull the mower back approx 1 meter Do not use your hands or feet to remove clippings in or on the mower housing but instead use suitable tools such as a brush or a hand broom when mowing and changing direction on slopes and inclines Maintain a solid footing and wear sturdy non slip footwear and long trousers Always mow along the incline not up and down For safety reasons the lawn mower ...

Страница 29: ...to clean the entire machine to protect the paint Store the machine in a well ventilated place In order to ensure that the majority of grass clippings are picked up the inside of both the grass basket 16 and especially the air grill must be cleaned after each use Reattach the grass basket 16 only when the engine is switched off and the blade is stopped Using one hand lift up the chute flap 15 while...

Страница 30: ...oid objects falling into the air intake replace the air filter cover Fig 20 Important Never clean the air filter with petrol or in 13 Maintenance Regular careful maintenance is required to guaran tee the safety level and performance of the machine Make sure that all nuts bolts and screws are tight ened securely and that the machine is in safe work ing condition Routinely check the grass basket for...

Страница 31: ... 10 with a spark plug wrench Using a feeler gauge set the gap to 0 75 mm 0 030 Refit the spark plug taking care not to overtighten Engine brake lever Fig 1 The engine is equipped with a mechanical brake 3 which has to be checked regularly When releasing the brake lever the blade must come to a halt within 7 seconds If this is not the case the machine must not be used Contact an authorised speciali...

Страница 32: ... of oil and gas Fault Possible cause Remedy Loud while running ma chine vibrates heavily Screws are loose Check screws Blade fasteners are loose Check blade fasteners Blade is unbalanced Replace blade Engine does not start Brake lever not pressed Press brake lever Speed lever in wrong position Check setting Spark plug is defective Replace spark plug Fuel tank is empty Refill with fuel Contaminated...

Страница 33: ...léments projetés Veillez à ce que les personnes non concernées soient à bonne distance de l appareil Retirez le câble d allumage avant les travaux de maintenance et lisez les instructions d utilisation Attention Risque de blessure Ne pas mettre les mains et les pieds au contact de la lame lorsque le moteur tourne Important Le gaz d échappement est toxique ne pas faire fonctionner dans des zones no...

Страница 34: ...reil 35 3 Ensemble de livraison 35 4 Utilisation conforme 35 5 Notes importantes 36 6 Caractéristiques techniques 38 7 Déballage 39 8 Avant la mise en service 39 9 Utilisation 40 10 Nettoyage 42 11 Transport 43 12 Stockage 43 13 Maintenance 43 14 Mise au rebut et recyclage 45 15 Dépannage 46 ...

Страница 35: ...ésultats REMARQUE Selon la loi en vigueur sur la responsabilité du fait des produits le fabricant n est pas tenu pour respon sable de tous les dommages subis par cet appareil et pour tous les dommages résultant de son utilisation dans les cas suivants Mauvaise manipulation Non respect des instructions d utilisation Travaux de réparation effectués par des tiers par des spécialistes non agréés Rempl...

Страница 36: ... les caractéris tiques techniques Les consignes de prévention des accidents et les autres réglementations généralement reconnues doivent être respectées Seules les personnes compétentes ayant été ini tiées et informées sur les dangers possibles ont le droit d utiliser d entretenir ou de réparer la ma chine Toute modification de la machine effectuée sans autorisation entraîne une exclusion de la re...

Страница 37: ... avant de la redémarrer et de l utiliser Si la ton deuse à gazon commence à vibrer fortement un contrôle immédiat est indispensable Ne tondez jamais le gazon alors que dʼautres per sonnes particulièrement des enfants ou encore des animaux se trouvent à proximité Pensez au fait que lʼopérateur ou lʼutilisateur de la machine sera tenu pour responsable de tout préjudice cor porel ou matériel subi par...

Страница 38: ...ls de coupe et des pièces fixes de lʼappareil Soyez particulièrement attentif lorsque vous tondez sur un sol meuble à proximité d un amas de débris près des fossés et des buttes L utilisateur doit avoir été suffisamment informé au sujet de la fonction de la machine et formé à son réglage et à son utilisation il doit également connaître les manipulations interdites Vérifiez régulièrement la machine...

Страница 39: ... Pour tondre en utilisant l éjection latérale Soulevez le capot d éjection latéral et fixez la pro tection d éjection latérale 8 Fig 15 15a Une fois cette opération effectuée enlevez le bac collec teur et mettez le dispositif de mulching en place 9 Mulching Retirez le bac collecteur 16 s il est en place et positionnez le dispositif de mulching comme mon tré aux Fig 10 12 Mettez l appareil hors cir...

Страница 40: ...ez toutes les traces d huile et d essence Arrê tez le moteur avant de verser l essence et laissez le moteur refroidir quelques minutes Réglage de la hauteur de coupe m PRÉCAUTION Le réglage de la hauteur de coupe doit être seulement entrepris lorsque le moteur est arrêté et la cosse de bougie d allu mage débranchée Avant de commencer à tondre vérifiez si les outils de coupe ne sont pas émoussés ni...

Страница 41: ...marrage altèrent la qualité de coupe et entravent l éjection de l herbe Sur les pentes il faut suivre une ligne de tonte transversale par rapport à la pente Le glissement de la tondeuse à gazon est évité en obliquant vers le haut Démarrage du moteur Fig 14 Assurez vous que le câble d allumage est bien rac cordé à la bougie d allumage Tenez vous derrière la tondeuse Maintenez le le vier d arrêt mot...

Страница 42: ...is au même endroit afin de ne devoir couper à chaque fois qu au maximum 4 cm de gazon Avant tout contrôle de la lame arrêtez le moteur et débranchez la cosse de la bougie Pensez aussi que la lame continue à tourner quelques secondes après l arrêt du moteur N essayez jamais d arrêter la lame Vérifiez régulièrement si la lame est correctement fixée en bon état et bien affûtée Si tel n est pas le cas...

Страница 43: ...arburant à acheter dans les grandes surfaces de bricolage m ATTENTION N effectuez jamais de travaux de maintenance des m Attention Pour des raisons de sécurité débranchez le câble de bougie d allumage avant le nettoyage Il est préférable de basculer la tondeuse vers l arrière La bougie d allumage doit être orientée vers le haut pour éviter que de l huile de moteur ne pénètre dans le système d aspi...

Страница 44: ...ion Ne nettoyez jamais le filtre à air à l es sence ou avec du détergent inflammable Nettoyez le filtre à air uniquement à l air comprimé ou en tapotant dessus pièces conductrices de courant ou du système d al lumage lorsque le moteur est en marche Ne les touchez pas non plus Avant tous travaux de mainte nance et d entretien retirez la cosse de bougie d al lumage N effectuez jamais aucun travail d...

Страница 45: ...irez la bougie d allumage avec la clé à bougie Réglez la distance entre les électrodes à l aide d un cale de mesure à 0 75 mm Remettez la bougie en place et veillez à ne pas la serrer trop fortement Levier de frein moteur Fig 1 Le moteur est équipé d un frein mécanique 3 qui doit être vérifié régulièrement Lorsque le levier de frein est relâché la lame doit s arrêter dans un délai de 7 secondes si...

Страница 46: ...pareil Vis desserrées Contrôlez les vis Fixation de la lame desserrée Contrôlez la fixation de la lame Lame non équilibrée Remplacez la lame Moteur ne démarre pas Levier du frein moteur non appuyé Appuyez sur le levier du frein Mauvaise position de lʼaccélérateur Contrôlez le paramétrage Bougie dʼallumage défectueuse Remplacez la bougie dʼallumage Réservoir à essence vide Remplissez de carburant C...

Страница 47: ...tány do okolí Ohrožení vymršťovanými předměty za chodu motoru Zajistěte aby jiné osoby dodržovaly dostatečnou bezpečnou vzdálenost Vytáhněte konektor zapalovací svíčky než začnete s údržbou Nezasahujte rukama a nohama do prostoru rotujících nožů Důležité Výfukové plyny jsou jedovaté proto motor nenechávejte běžet v nevětraných prostorách Pozor horké povrchy nebezpečí popálení Používejte ochranu sl...

Страница 48: ...dodávky 49 4 Použití v souladu s určením 49 5 Bezpečnostní pokyny 50 6 Technické údaje 52 7 Rozbalení 52 8 Montáž Před uvedením do provozu 52 9 Uvedení do provozu 53 10 Čištění 56 11 Přeprava 56 12 Skladování 56 13 Údržba 56 14 Likvidace a recyklace 58 15 Odstraňování poruch 59 ...

Страница 49: ...9 D 89335 Ichenhausen Vážený zákazníku přejeme vám mnoho radosti a úspěchu při práci s no vým zařízením Upozornění Výrobce tohoto zařízení neručí podle platného záko na o odpovědnosti za vady výrobku za škody které vzniknou na tomto zařízení nebo jeho prostřednic tvím v případě Neodborná manipulace Nedodržování návodu k použití Opravy třetí osobou neoprávněnými odborníky Montáž a výměna neoriginál...

Страница 50: ...rat uzávěr nádrže nebo doplňovat benzin Stroj smějí používat udržovat nebo opravovat jen osoby které jsou s ním obeznámeny a jsou infor movány o nebezpečí Svévolné změny stroje vylu čují ručení výrobce za škody které takto vzniknou Stroj smí být používán jen s originálním příslušen stvím a originálními nástroji výrobce Jakékoli použití které toto nařízení překračuje je považováno za použití v rozp...

Страница 51: ...edbalé používání osobních ochranných pro středků OOP Pokud benzin přeteče je zakázáno zkoušet nastar tovat motor Namísto toho musí být stroj odstraněn z plochy znečištěné benzinem Je nutné se vyva rovat jakéhokoliv pokusu o nastartování než se benzinové výpary odpaří Z bezpečnostních důvodů musí být při poškození vyměněna benzinová nádrž a další uzávěry nádr že Nikdy benzin neuchovávejte v blízkos...

Страница 52: ...ly demontovány Montáž je jednoduchá pokud dodržíte následující pokyny Upozornění Při montáži a údržbě budete potřebovat následující další nářadí které netvoří součást dodávky plochá záchytná vanička na výměnu oleje odměrka 1 litr olej odolná proti benzinu benzinový kanystr 5 litrů postačí na cca 6 hodin provozu Nedbalé používání nebo vynechání osobní ochranné výstroje může vést k těžkým zraněním N...

Страница 53: ...h výšek sečení Vytáhněte nastavovací páčku směrem ven a na stavte požadovanou výšku sečení Páčka se za chytí v požadované poloze obr 13 Příprava sekané plochy Před sekáním pečlivě zkontrolujte celou plochu urče nou k sekání Odstraňte kameny klacky kosti drá ty hračky a ostatní předměty které by přístroj mohl odmrštit 9 Uvedení do provozu m Pozor Motor je dodáván bez oleje Před uvedením do provozu ...

Страница 54: ...obuv ne san dály nebo tenisky Zkontrolujte sečný nůž Nůž který je ohnutý nebo jakkoliv poškozený musí být nahrazen originálním nožem Naplňte benzinovou nádrž na volném prostranství Použijte k tomu nálevku a odměrku Setřete ben zín který přetekl Přečtěte si a dodržujte návod k použití i pokyny k motorům a příslušenství Uložte návod na místo dostupné i jiným uživatelům přístroje Výfukové plyny jsou ...

Страница 55: ...l zapalování Nikdy nedemontujte prvky které slouží bezpečnos ti Nikdy nenalévejte benzín pokud je motor ještě hor ký nebo zapnutý Vyprázdnění záchytného koše Záchytný koš 16 je vybaven ukazatelem plného sta vu obr 16 Ten se otevře proudem vzduchu který vytváří sekačka v provozu Pokud se víko obr 16 zavře během sečení je záchytný koš 16 plný a musí být vyprázdněn V zájmu bezchybného fungování ukaza...

Страница 56: ...pa livovou nádrž To se provádí odsávacím čerpadlem na benzín k dispozici v prodejnách stavebnin m VAROVÁNÍ Nikdy nepracujte se spuštěným motorem na vodi 10 Čištění Čištění Sekačka by měla být důkladně vyčištěna po každém použití Platí to zvláště pro spodní stranu a úchyt nože m Pozor Z bezpečnostních důvodů vytáhněte před čištěním kabel zapalovací svíčky Sekačku nejlépe převraťte dozadu Zapalovací...

Страница 57: ...te pomocí spárové měrky vzdálenost 0 75 mm 0 030 Znovu namontujte svíčku zapalování 10 a dbejte aby nebyla příliš utažená vých součástech zapalování a nedotýkejte se jich Před prováděním veškerých činností údržby a péče vytáhněte konektor zapalování ze svíčky zapalová ní Nikdy neprovádějte jakékoliv práce na zapnutém přístroji Práce které nejsou popsány v tomto návodu k obsluze musí provádět pouze...

Страница 58: ...pečnostních důvodů smí do servisní stanice posílat jen když neobsahuje benzín a olej Objednávání náhradních dílů Při objednávání náhradních dílů je třeba vyplnit tyto údaje Typ stroje Výrobní číslo stroje Náhradní díly příslušenství Nůž sekačky na trávu č výrobku 7911200618 Servisní informace Je nutno dbát na to že v případě tohoto výrobku ná sledující díly podléhají opotřebení které je dáno po už...

Страница 59: ...zařízení Povolené šrouby Zkontrolujte šrouby Uvolněný úchyt nože Zkontrolujte úchyt nože Nevyvážený nůž Vyměňte nůž Motor neběží Nestlačená páčka motorové brzdy Stlačte páčku motorové brzdy Nesprávná poloha plynové páčky Zkontrolujte nastavení Vadná zapalovací svíčka Vyměňte zapalovací svíčku Prázdná palivová nádrž Doplňte palivo Znečištěné palivo Vyprázdněte benzínovou nádrž a nalijte čisté paliv...

Страница 60: ... www scheppach com 60 A DV224 ...

Страница 61: ... www scheppach com 61 B DV224 ...

Страница 62: ...0 EU 2004 22 EC 2014 68 EU X 2011 65 EU 89 686 EC_96 58 EC 90 396 EC Ichenhausen den 17 08 2021 __________________________ Unterschrift Andreas Pecher Head of Project Managemet First CE 2017 Subject to change without notice Documents registar Stefan Hartinger Günzburger Str 69 D 89335 Ichenhausen X 2006 42 EC Annex IV Notified Body Notified Body No Certificate No Standard references EN 5395 1 2013...

Страница 63: ... www scheppach com 63 ...

Страница 64: ...ne inútil a causa de fallas de material o de fabricación Las piezas que no son fabri cadas por nosotros mismos serán garantizadas hasta el punto que nos corresponda garantía del suministrador anterior Los costes por la colocación de piezas nuevas recaen sobre el comprador Están excluidos derechos por modificaciones aminoraciones y otros derechos de indemnización por daños y perjuicios Garantia PT ...

Отзывы: