background image

 www.scheppach.com / 

 [email protected] / 

 +(49)-08223-4002-99 / 

 +(49)-08223-4002-58

30 | GB

m

 WARNING

Never work on or touch conducting parts on the ig-

nition  unit  with  the  engine  running.  Always  pull  the 

spark plug boot from the spark plug before starting 

any work of care or maintenance. Never perform any 

work on the machine while it is running. Any work not 

described in these Operating Instructions must be 

performed by an authorized service workshop only.

Cleaning

The lawn mower should be thoroughly cleaned after 

every use, especially the underneath and the blade 

mount. To remove the gras, tip the lawn mower onto 

its left side (the opposite side to the oil filling socket) 

or clean the mower with water as described below:

•  Remove the mulch unit / gras box.

•  Fit the hose connection to the mower and turn the 

tap on. (Fig. 23)

• 

Start the mower and switch off again after about 30 

seconds. The rotating blade bar throws the water 

onto the bottom of the mower and thus cleans it.

• 

Turn off the tap and remove the hose connection .

• 

Clean the top with a cloth (do not use any sharp 

objects).

• 

m

 Note!

 Before you tip the lawn mower onto its side, 

completely  empty  the  fuel  tank  using  a  petrol  suc

-

tion pump. The lawn mower must never be tilted by 

more than 90 degrees. Dirt and grass is easiest to 

remove immediately after you have finished mowing 

the grass. Dried on grass and dirt can result in poorer 

mowing performance. Check that the grass chute is 

free  of  any  residual  grass.  Remove  any  such  resi

-

due. Never clean the lawn mower with a water jet or 

high-pressure cleaner. The engine must remain dry. 

Do not use aggressive cleaning agents such as cold 

cleaner or petroleum ether.

Wheel axles and wheel hubs

• 

These should be lightly greased once a season.

Blade

For  safety  reasons  you  should  only  ever  have  your 

blade sharpened, balanced and mounted by an au

-

thorized service workshop. For optimum results it is 

recommended that the blade should be inspected 

once a year.

Changing the blade (Fig. 17)

Only ever use original spare parts when having the 

blade replaced.

Wear gloves when replacing the blade in order to pre-

vent injury.

Never have any other blade fitted.

• 

Empty the fuel tank before removing the blade

•  To replace the blade, undo the screw.

1 meter. Do not use your hands or feet to remove clip

-

pings in or on the mower housing, but instead use 

suitable tools such as a brush or a hand broom.

In order to ensure that the majority of grass clippings 

are picked up, the inside of both the grass basket (16) 

and especially the air grill must be cleaned after each 

use.  Reattach  the  grass  basket  (16)  only  when  the 

engine is switched off and the blade is stopped. Using 

one hand, lift up the chute flap (15), while grabbing 

onto the basket handle with the other. Hang in the 

basket from the top. Fig. 9

After mowing

• 

Allow  the  engine  to  cool  before  you  put  the  lawn 

mower in an enclosed area.

Remove grass, foliage, grease and oil before stor-

ing the mower. Do not place any objects on top of 

the mower.

•  Check all the screws and nuts once more before 

you start to use the lawn mower again. Tighten any 

loose screws.

• 

Also be sure to empty the grass basket (16).

•  Pull the spark plug boot to prevent unauthorized 

use.

• 

Ensure that you do not park the mower next to any 

source of danger. Petrol fumes can lead to explo-

sions.

• 

Only original parts or parts approved by the manu

-

facturer may be used for repairs (see address on 

the warranty certificate).

•  If the lawn mower is not going to be used for an ex-

tended period, empty the petrol tank using a petrol 

suction pump.

•  Oil and maintain the machine.

9.  Maintenance and cleaning

•  Regular, careful maintenance is required to guar-

antee the safety level and performance of the ma

-

chine.

•  Make sure that all nuts, bolts and screws are tight-

ened securely and that the machine is in safe work

-

ing condition.

• 

Routinely check the grass basket for signs of wear 

and impaired functionality.

Regularly clean the grass box with water and let it 

dry thoroughly.

• 

For  your  own  safety,  replace  worn  or  damaged 

parts without delay.

• 

If the fuel tank should require emptying this should 

only be done in the open air using a petrol suction 

pump (available from DIY shops).

• 
• 
• 
• 
• 

Содержание 5911240850

Страница 1: ...origine 34 PL Spalinowa kosiarka do trawy Tłumaczenie oryginału instrukcji obsługi 48 EE Bensiini muruniiduk Tõlge Originaalkasutusjuhend 62 LT Benzininė vejapjovė Vertimas originali naudojimo instrukcija 75 LV Benzīna zāliena pļaujmašīna Tulkošana no oriģinālā lietošanas instrukcija 88 ACHTUNG Vor Inbetriebnahme die Bedienungsanleitung genau durchlesen CAUTION Read the manual carefully before ope...

Страница 2: ... www scheppach com service scheppach com 49 08223 4002 99 49 08223 4002 58 2 ...

Страница 3: ... www scheppach com service scheppach com 49 08223 4002 99 49 08223 4002 58 3 19 1 3 4 5 6 7 9 13 10 12 11 14 15 16 17 1 18 8 21 18 4a 4a e c a d 5 d c b ...

Страница 4: ... www scheppach com service scheppach com 49 08223 4002 99 49 08223 4002 58 4 18 6 4 4a c b 2 4 5 5 17 3 5 7 9 17 c a b a c b 11 19 10 19 kein Bild vorhanden 8 16 ...

Страница 5: ... www scheppach com service scheppach com 49 08223 4002 99 49 08223 4002 58 5 12 13 15 14 17 1 3 17 18 12 max min 19 19 15a 16 ...

Страница 6: ... www scheppach com service scheppach com 49 08223 4002 99 49 08223 4002 58 6 21 10 10 19 23 21 20 20 22 22 21 25 w ...

Страница 7: ...n ausreichend Sicherheitsabstand einhalten Halten Sie nicht beteiligte Personen vom Gerät fern Entfernen Sie den Zündkerzenstecker bevor Sie Wartungsarbeiten vornehmen Halten Sie Hände und Füße von den rotierenden Messern fern Halten Sie Hände und Füße von den rotierenden Messern fern Wichtig Die Abgase sind giftig betreiben Sie den Motor daher nicht in unbelüfteten Bereichen Achtung heiße Oberflä...

Страница 8: ...zeichnis Seite 1 Einleitung 9 2 Gerätebeschreibung 9 3 Lieferumfang 9 4 Bestimmungsgemäße Verwendung 10 5 Sicherheitshinweise 10 6 Technische Daten 13 7 Vor Inbetriebnahme 13 8 Bedienung 14 9 Wartung und Reinigung 17 10 Lagerung 19 11 Entsorgung und Wiederverwertung 19 12 Störungsabhilfe 20 ...

Страница 9: ...er Hersteller dieses Gerätes haftet nach dem gel tenden Produkthaftungsgesetz nicht für Schäden die an diesem Gerät oder durch dieses Gerät entstehen bei unsachgemäßer Behandlung Nichtbeachtung der Bedienungsanweisung Reparaturen durch Dritte nicht autorisierte Fach kräfte Einbau und Austausch von nicht originalen Ersatz teilen nicht bestimmungsgemäßer Verwendung Beachten Sie Lesen Sie vor der Mon...

Страница 10: ...T Bei Nichtbeachtung dieser Anweisung besteht leichte bis mittlere Verletzungsgefahr m Achtung Gerät und Verpackungsmaterial sind kein Kin derspielzeug Kinder dürfen nicht mit Kunst stoffbeuteln Folien und Kleinteilen spielen Es besteht Verschluckungs und Erstickungsge fahr 4 Bestimmungsgemäße Verwendung Die Maschine entspricht der gültigen EG Maschinenricht linie Vor Arbeitsaufnahme müssen sämtli...

Страница 11: ... ändern Mähen Sie nicht an übermäßig steilen Hängen und nahegelegenen Müllhalden Gräben oder Deichen Seien Sie besonders vorsichtig wenn Sie den Ra senmäher umkehren oder ihn zu sich heranziehen m HINWEIS Bei Nichtbeachtung dieser Anweisung besteht die Gefahr einer Beschädigung des Gerätes oder ande ren Sachwerten m Achtung Beim Benutzen von Geräten müssen einige Sicher heitsvorkehrungen eingehalt...

Страница 12: ...er Ra senmäher angekippt werden muß bei einem Transport über andere Flächen als Gras und wenn der Rasenmäher von und zu der zu mähenden Flä che bewegt wird Benutzen Sie den Rasenmäher niemals mit be schädigten Schutzeinrichtungen oder Schutzgit tern oder ohne angebaute Schutzeinrichtungen z B Prallbleche und oder Grasfangeinrichtungen Ändern Sie nicht die Regeleinstellungen des Mo tors oder überdr...

Страница 13: ...igt einhängen 5 Die Seilzüge mit den beiliegenden Kabelclip 18 Abb 7 am Schubbügel fixieren 6 Fangkorb 16 aufklappen und die Kunststoffc lips am Rahmen einrasten Abb 8 7 Mähen mit Fangkorb Auswurfklappe 15 mit einer Hand anheben und den Fangkorb 16 wie in Abb 9 gezeigt einhän gen 6 Technische Daten Motortyp 4 Taktmotor luftgekühlt Hubraum 141 cm Arbeitsdrehzahl 2800 min 1 Leistung 2 5 kW 3 4 PS Kr...

Страница 14: ...Verwenden Sie bleifreies Normalbenzin mit max 5 Bioethanolanteil m WARNUNG Verwenden Sie immer nur einen Sicherheitsbenzinka nister Rauchen Sie nicht beim Einfüllen von Benzin Entfernen Sie jegliche Öl oder Benzinreste Schalten Sie den Motor vor dem Einfüllen von Benzin ab und lassen Sie den Motor einige Minuten abkühlen 8 Mulchen Fangkorb 16 falls angebracht abnehmen und Mulcheinsatz 19 wie in Ab...

Страница 15: ...ich diese Bahnen immer um einige Zentimeter überlappen damit keine Streifen stehen bleiben Motor starten Abb 14 Vergewissern Sie sich dass das Zündkabel an der Zündkerze angeschlossen ist Stehen Sie hinter dem Motormäher Eine Hand drückt den Motorbremshebel 3 zum Handgriff die andere Hand soll am Seilzugstarter sein Den Motor mit dem Seilzugstarter 17 starten Hierfür den Griff ca 10 15 cm bis ein ...

Страница 16: ...en ei ner Gefahrenquelle abgestellt wird Das Austreten von Gas kann zu Explosionen führen Die Unterseite des Mähergehäuses sauber halten und Grasablagerungen unbedingt entfernen Abla gerungen erschweren den Startvorgang beeinträch tigen die Schnittqualität und den Grasauswurf An Hängen ist die Schneidbahn quer zum Hang zu le gen Ein Abgleiten des Rasenmähers lässt sich durch Schrägstellung nach ob...

Страница 17: ...n dies verursacht Vibrationen und kann weitere Beschädigungen am Mäher zur Folge haben m Achtung Beim Arbeiten mit einem beschädigten Messer besteht Verletzungsgefahr Es dürfen nur Originalteile oder solche vom Her steller genehmigte Teile bei Reparaturen verwen det werden siehe Adresse der Garantieurkunde Bei längerem Nichtgebrauch des Mähers den Ben zintank mit einer Benzinabsaugpumpe entleeren ...

Страница 18: ...ch aufbewahren Achtung Laut Produkthaftungsgesetz wird nicht für Schäden gehaftet die durch unsachgemäße Repa raturen oder durch Nichtverwendung von Originaler satzteilen verursacht werden Beauftragen Sie einen Kundendienst oder einen au torisierten Fachmann Entsprechendes gilt auch für Zubehörteile Messer nachschleifen Die Messerschneiden können mit einer Metallfeile nachgeschärft werden Um eine ...

Страница 19: ...tte die gesetzlichen Bestim mungen zur Regelung der Betriebszeiten von Rasenmähern welche örtlich unterschiedlich sein können Wichtiger Hinweis im Fall einer Reparatur Bei Rücklieferung des Gerätes zur Reparatur beach ten Sie bitte dass das Gerät aus Sicherheitsgründen öl und benzinfrei an die Servicestation gesendet werden müssen Ersatzteilbestellung Bei der Ersatzteilbestellung sollten folgende ...

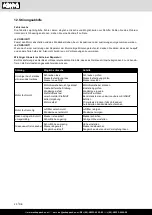
Страница 20: ...vicestation gesendet werden müssen Störung Mögliche Ursache Abhilfe Unruhiger Lauf starkes vibrieren des Gerätes Schrauben lose Messerbefestigung lose Messer unwuchtig Schrauben prüfen Messerbefestigung prüfen Messer ersetzen Motor läuft nicht Motorbremshebel nicht gedrückt Gashebel falsche Stellung Zündkerze defekt Kraftstofftank leer verschmutzter Kraftstoff kalte Umgebung Motor defekt Motorbrem...

Страница 21: ...ay Remove the ignition cable before all maintenance work and read the instructions for use Warning Risk of injury Do not let your hands or feet come in contact with the blades when the motor is running Warning Risk of injury Do not let your hands or feet come in contact with the blades when the motor is running Important Exhaust gas is poisonous do not operate in an unventilated area Danger Hot su...

Страница 22: ... 22 GB Table of contents Page 1 Introduction 23 2 Layout 23 3 Scope of delivery 23 4 Proper use 24 5 Safety instructions 24 6 Technical data 26 7 Before first use 27 8 Operation 27 9 Maintenance and cleaning 30 10 Storage 32 11 Disposal and recycling 32 12 Troubleshooting 33 ...

Страница 23: ...roduct liability laws the manufacturer of the device does not assume liability for damages to the product or damages caused by the product that occurs due to Improper handling Non compliance of the operating instructions Repairs by third parties not by authorized service technicians Installation and replacement of non original spare parts Application other than specified We recommend Read through ...

Страница 24: ... third parties in the area of operations All safety and hazard notices on the machine must be observed All safety and hazard notices on the machine must be kept in a completely legible condition Use the machine in a technically flawless condition only as well as for its intended purpose in a safe manner and being aware of dangers in compliance with the operating instructions Disruptions which can ...

Страница 25: ...er work on the lawn mower The following must not use the machine Children and other people who do are not familiar with the operating manual local stipulations may specify a minimum age for users People under the influence of alcohol drugs and medication as well as those who are tired or ill Safety instructions for handoperated lawn mow ers Note Readthedirectionswithduecare Familiarizeyourself wit...

Страница 26: ...ry repairs before restarting and continu ing to work with the mower If the lawn mower begins to experience exceptionally strong vibra tions immediately switch it off and check it Switch off the engine when you leave the lawn mower before you refuel Operation of the machine at higher than normal speed can lead to an increased risk of accidents Take care when carrying out installation work on the ma...

Страница 27: ...er you need to perform any kind of ad justment and or repair work on your lawn mower wait until the blade has come to a complete stop Always switch off the engine before carrying out any adjustments maintenance or repairs The following factors can influence the condition Circulatory problems in the user s hands Low outside temperatures Extended periods of use We therefore recommend you wear warm w...

Страница 28: ...be emptied and the engine is still running The rotating blade can cause serious injuries Always carefully fasten the chute flap and grass bas ket Switch off the engine before emptying the grass basket m Note Using the drive Engine brake 3 Use the lever to stop the engine When you release the lever the engine and the blade stop automatically Before you start to mow check the start stop lever severa...

Страница 29: ...oses off the rear chute opening If any grass remains in the opening it will be easier to restart the engine if you pull the mower back approx Always ensure that a safe distance provided by the length of the long handles is maintained between the user and the mower housing Be especially careful when mowing and changing direction on slopes and inclines Maintain a solid footing and wear sturdy non sl...

Страница 30: ...7 Only ever use original spare parts when having the blade replaced Wear gloves when replacing the blade in order to pre vent injury Never have any other blade fitted Empty the fuel tank before removing the blade To replace the blade undo the screw 1 meter Do not use your hands or feet to remove clip pings in or on the mower housing but instead use suitable tools such as a brush or a hand broom In...

Страница 31: ...ter any repair or maintenance work check that all safety related parts are in place and in proper work ing order All parts which may cause injury must be kept where they are inaccessible to children or oth ers Reinstall as illustrated in Fig 17 Tighten the screw properly Tightening torque 45 Nm When replacing the blade the blade screw should also be replaced Damaged blades Should the blade in spit...

Страница 32: ...ginal spare parts or parts approved by us In addition we are also not liable for any damages arising from improper repairs Such work should be performed by a customer services workshop or au thorized specialist The same applies to accessory parts Times of use Please comply with statutory regulations which may vary from location to location Important hint in case of sending the equipment to a servi...

Страница 33: ... equipment is sent back free of oil and gas Fault Possible cause Remedy Loud while running ma chine vibrates heavily Screws are loose Blade fasteners are loose Blade is unbalanced Check screws Check blade fasteners Replace blade Engine does not start Brake lever not pressed Speed lever in wrong position Spark plug is defective Fuel tank is empty Contaminated fuel Cold environment Engine faulty Pre...

Страница 34: ...enance et lisez les instructions d utilisation Attention Risque de blessure Ne pas mettre les mains et les pieds au contact de la lame lorsque le moteur tourne Attention Risque de blessure Ne pas mettre les mains et les pieds au contact de la lame lorsque le moteur tourne Important Le gaz d échappement est toxique ne pas faire fonctionner dans des zones non ventilées Ne touchez pas les pièces qui ...

Страница 35: ...age 1 Introduction 36 2 Description de l appareil 36 3 Ensemble de livraison 36 4 Utilisation conforme 37 5 Notes importantes 37 6 Caractéristiques techniques 40 7 Avant la mise en service 40 8 Utilisation 41 9 Maintenance et nettoyage 44 10 Stockage 46 11 Mise au rebut et recyclage 46 12 Dépannage 47 ...

Страница 36: ...tre nouvelle machine vous ap portera de la satisfaction et de bons résultats Remarque Selon la loi en vigueur sur la responsabilité du fait des produits le fabricant n est pas tenu pour responsable de tous les dommages subis par cet appareil et pour tous les dommages résultant de son utilisation dans les cas suivants Mauvaise manipulation Non respect des instructions d utilisation Travaux de répar...

Страница 37: ...ves blessures m ATTENTION L appareil et les matériaux d emballage ne sont pas des jouets Les enfants ne doivent en au cun cas jouer avec les sacs en plastique films d emballage et pièces de petite taille Il existe un risque d ingestion et d asphyxie 4 Utilisation conforme La machine est conforme à la directive machines CE en vigueur Avant de commencer à utiliser la machine toutes les protections e...

Страница 38: ...apport à la pente jamais en descendant ou en montant Faites particulièrement attention lorsque vous changez de direction sur une pente Ne tondez pas sur des pentes très raides m ATTENTION Le non respect de cette consigne peut être à l origine de blessures plus ou moins graves m REMARQUE Le non respect de cette consigne peut être à l origine d une avarie du moteur et d autres éléments m ATTENTION L...

Страница 39: ...rsque vous faites demi tour avec la tondeuse à gazon ou lorsque vous la tirez vers vous Arrêtez la lame lorsque vous devez incliner la ton deuse à gazon pour passer sur des surfaces sans lʼherbe et lorsque vous déplacez la tondeuse à ga zon dʼune surface à tondre à une autre Nʼutilisez jamais la tondeuse à gazon lorsque la grille de protection ou les dispositifs de protection sont endommagés ou sa...

Страница 40: ...r du guidon à l arceau in férieur à l aide d un levier de serrage rapide 5 une rondelle grande b une rondelle petite c et un écrou moleté en plastique d de chaque côté Fig 4 5 et serrez le 4 Accrochez la poignée du câble de lanceur 17 au crochet prévu à cet effet comme montré à la Fig 6 5 Fixez les câbles à l aide de clip 18 fournis au gui don Fig 7 6 Caractéristiques techniques Type de moteur mot...

Страница 41: ... utilisée en 30 jours afin d être sûr d utiliser du carburant récent Attention n utilisez que de l essence sans plomb contenant au maximum 5 de bioéthanol 6 Ouvrez le bac collecteur 16 et fixez les clips en plastique au cadre Fig 8 7 Pour tondre en utilisant le bac collecteur Soulevez le capot d éjection d une main 15 et accrochez le bac collecteur 16 comme montré en Fig 9 8 Mulching Retirez le ba...

Страница 42: ...ulching Lors du mulching l herbe coupée est déchiquetée dans le carter fermé de la tondeuse et redistribuée sur le gazon Le ramassage et l élimination de l herbe sont supprimés m REMARQUE Le mulching n est possible que sur des gazons relativement courts m ATTENTION Utilisez toujours exclusivement un jerrican d essence de sécurité Ne fumez jamais en versant le carburant Eliminez toutes les traces d...

Страница 43: ... main par la poi gnée et accrochez le par le haut Fig 9 Pour utiliser la fonction de mulching décrochez le bac collecteur 16 positionnez lʼadaptateur de mul ching fig 10 12 N 19 dans lʼorifice dʼéjection et fer mez le clapet dʼéjection 15 La tonte Tondez uniquement avec une lame affûtée de façon à ce que les brins d herbe ne soient pas effilochés et ne jaunissent pas Pour obtenir une tonte correct...

Страница 44: ...t le moteur et retirez la cosse de bougie d allumage Incli nez la tondeuse de côté et contrôlez si la lame n est pas endommagée Remplacez les lames déformées ou endommagées Après la tonte Laissez toujours refroidir le moteur avant de ranger la tondeuse à gazon dans un endroit clos Retirez l herbe les feuilles la graisse et l huile avant de la ranger Ne posez aucun autre objet sur la tondeuse Contr...

Страница 45: ...uvais entretien de la machine peut être à l origine de blessures mortelles Réparation Assurez vous après toute réparation ou travail de maintenance que toutes les pièces relatives à la sé curité sont bien montées et en état irréprochable Placez les pièces dangereuses hors de portée des autres personnes et des enfants Ne redressez jamais une lame déformée Ne travail lez jamais avec une lame déformé...

Страница 46: ...lastiques Eliminez les composants défectueux par le circuit d élimination des déchets spéciaux Renseignez vous dans un commerce spé cialisé ou auprès de l administration de votre com mune Attention Conformément à la loi sur la responsabilité civile nous ne répondons pas des dommages issus d une réparation non conforme aux règles de l art ou lorsque les pièces de rechange utilisées ne sont pas d or...

Страница 47: ...es fortes vibrations de lʼappareil vis desserrées fixation de la lame desserrée lame non équilibrée contrôlez les vis contrôlez la fixation de la lame remplacez la lame Moteur ne démarre pas levier du frein moteur non appuyé mauvaise position de lʼaccélérateur bougie dʼallumage défectueuse réservoir à essence vide carburant impur température basse moteur défectueux appuyez sur le levier du frein c...

Страница 48: ... pozwa lać zbliżać się do urządzenia osobom nieuczestniczącym w pracy Wyjąć końcówkę przewodu świecy przed przystąpieniem do prac konserwacyjnych Nie zbliżać rąk i stóp do obracających się noży Nie zbliżać rąk i stóp do obracających się noży Ważne Spaliny są trujące dlatego nie eksploatować silnika w niewentylowanych po mieszczeniach Uwaga gorąca powierzchnia niebezpieczeństwo poparzenia Używać oc...

Страница 49: ... Wprowadzenie 50 2 Opis urządzenia 50 3 Zakres dostawy 50 4 Zastosowanie zgodne z przeznaczeniem 51 5 Uwagi dotyczące bezpieczeństwa 51 6 Dane Techniczne 54 7 Przed uruchomieniem 54 8 Praca 55 9 Czyszczenie i konserwacja 58 10 Przechowywanie 60 11 Utylizacja i recykling 60 12 Rozwiązywanie problemów 61 ...

Страница 50: ...usen Drogi Kliencie Mamy nadzieję że nowe narzędzie zapewni Ci wiele radości i sukcesów Uwaga Zgodnie z obowiązującym prawem dotyczącym od powiedzialności za produkt producent urządzenia nie ponosi odpowiedzialności za uszkodzenia pro duktu lub szkody wyrządzone przez produkt które występują na skutek Niewłaściwego obchodzenia się Niespełniania wymogów instrukcji obsługi Naprawy przez osoby trzeci...

Страница 51: ... W przypadku nieprzestrzegania tej instrukcji istnieje zagrożenie lekkich i średnich obrażeń m UWAGA Urządzenie i materiały opakowaniowe nie mo gą służyć jako zabawka dla dzieci Nie pozwalać dzieciomna zabawę plastikowymi torebkami fo liami lub małymi częściami Istnieje niebezpie czeństwo połknięcia i uduszenia 4 Zastosowanie zgodne z przezna czeniem Maszyna odpowiada obowiązującej dyrektywie ma s...

Страница 52: ...rzeznaczoną do koszenia Nigdy nie używać kosiarki do trawy z uszkodzony mi urządzeniami ochronnymi lub kratkami ochron nymi lub bez zamontowanych urządzeń ochron nych np blach odbojowych i lub oprzyrządowania do wychwytywania trawy m UWAGA Jeśli ta instrukcja nie jest przestrzegana istnieje niebezpieczeństwo uszkodzenia silnika lub innych przedmiotów m OSTROŻNIE Podczas korzystania z urządzenia śr...

Страница 53: ...siarka wymaga podniesienia W takim przypad ku przechylić kosiarkę tylko na tyle na ile jest to bezwzględnie konieczne i podnosić tylko część niemającą kontaktu z użytkownikiem Nie uruchamiać silnika gdy użytkownik stoi przed kanałem wyrzutowym Nigdy nie prowadzić rąk ani stów przy lub pod ob racającymi się elementami Zawsze trzymać się z dala od otworu wyrzutowego Nigdy nie podnosić ani nie przeno...

Страница 54: ...ępna w marketach budowlanych olejarka z pompą ręczną dostępna w marketach budowlanych Olej silnikowy SAE 30 0 35 l Montaż 1 Wyjąć kosiarkę do trawy i elementy do montażu z opakowania a następnie sprawdzić czy nie bra kuje żadnych elementów 6 Dane Techniczne Rodzaj silnika 4 suwowy silnik chłodzony powietrzem Pojemność skokowa 141 cm Robocza prędkość obrotowa 2800 min 1 Moc 2 5 kW 3 4 PS Paliwo Zwy...

Страница 55: ... zaprojektowany do prędkości koszenia trawy oraz wyrzucania trawy do kosza na trawę i charakteryzuje się długą żywotnością Sprawdzić poziom oleju 2 Dolny pałąk do prowadzenia przykręcić przy uży ciu każdorazowo jednej śruby a 1 podkładki ma łej c 1 plastikowej nakrętki gwiazdkowej D po obu stronach kosiarki Zwracać przy tym uwagę aby linki które należy później zamocować nie stanowiły przeszkody ry...

Страница 56: ...ulczowania skoszona trawa zostaje roz drobniona w zamkniętej obudowie kosiarki i ponow nie rozdzielona na trawniku Zbieranie i utylizacja trawy nie są wymagane Otworzyć pokrywę zbiornika i napełnić zbiornik benzyny 6 do dolnego zaznaczenia na króćcu wlewowym zbiornika wlewając ok 1 4 l benzyny Do napełnienia użyć lejka i miarki Nie przepełniać zbiornika Stosować wyłącznie świeże czyste pali wo bez...

Страница 57: ...j przed składowa niem Nie składować innych przedmiotów na ko siarce m WSKAZÓWKA Mulczowanie jest możliwe przy względnie krótkiej trawie Aby skorzystać z funkcji mulczowania zdjąć kosz na trawę 16 i wsunąć adapter do mulczowania rys 10 12 19 do otworu wyrzutowego a następnie za mknąć klapę wyrzutową 15 Koszenie Kosić tylko ostrymi nożami bez uszkodzeń aby źdźbła trawy nie strzępiły się i trawa nie ...

Страница 58: ...m sprawdzić wszystkie śruby i nakrętki Poluzowane śruby odpowiednio dokręcić Opróżnić kosz na trawę 16 przed ponownym uży ciem Odłączyć końcówkę przewodu świecy zapłonowej aby zapobiec niedozwolonemu użyciu Zwracać uwagę aby nie ustawiać kosiarki w pobli żu źródła zagrożenia Wyciek gazu może prowa dzić do wybuchu Do naprawy można wykorzystywać wyłącznie ory ginalne części zamienne lub części zatwi...

Страница 59: ...ć się że przez cały okres użytkowania urzą dzenie znajduje się w nienagannym stanie technicz nym Nieprawidłowa konserwacja może prowadzić do obrażeń zagrażających życiu Uszkodzony nóż Jeżeli mimo zachowania ostrożności nóż napotka na przeszkodę natychmiast wyłączyć silnik i wyciągnąć końcówkę przewodu świecy zapłonowej Przechylić kosiarkę na bok i sprawdzić nóż pod ką tem uszkodzeń Uszkodzone lub ...

Страница 60: ...riałów jak np metal i tworzywa sztuczne Uszkodzone części dostarczyć do punktu utylizacji Proszę poprosić o informację w sklepie specjalistycznym bądź w placówce samorządu lokal nego Naprawa Po wykonaniu naprawy i konserwacji upewnić się że elementy istotne pod kątem bezpieczeństwa tech nicznego są założone i wykazują nienaganny stan techniczny Elementy mogące powodować obrażenia przechowywać w mi...

Страница 61: ...wnomierny bieg silna wibracje urządzenia poluzowane śruby poluzowane mocowanie noża niewyważony nóż sprawdzić śruby sprawdzić mocowanie noża wymienić nóż Silnik nie pracuje niewciśnięta dźwignia hamulca silnikowego dźwignia gazu w nieprawidłowej pozycji uszkodzona świeca zapłonowa pusty zbiornik paliwa zanieczyszczone paliwo chłodne otoczenie uszkodzony silnik nacisnąć dźwignię hamulca silnikowego...

Страница 62: ...ad kinni piisavast ohutusvahemaast Hoidke kõrvalised isikud seadmest eemal Eemaldage enne hooldustööde teostamist süüteküünla pistik Hoidke käed ja jalad pöörlevatest nugadest eemal Hoidke käed ja jalad pöörlevatest nugadest eemal Tähtis Heitgaasid on mürgised seepärast ärge käitage mootorit ventileerimata piirkondades Tähelepanu kuum pealispind põletusoht Kasutage kuulme ja silmakaitset TÄHELEPAN...

Страница 63: ...ord Lk 1 Sissejuhatus 64 2 Seadme kirjeldus 64 3 Tarnekomplekt 64 4 Sihtotstarbekohane kasutus 65 5 Ohutusjuhised 65 6 Tehnilised andmed 67 7 Enne käikuvõtmist 68 8 Käsitsemine 68 9 Hooldus ja puhastamine 71 10 Ladustamine 73 11 Utiliseerimine ja taaskäitlus 73 12 Rikete kõrvaldamine 74 ...

Страница 64: ...vime Teile uue seadme meeldivat ja edukat ka sutamist Juhis Kõnealuse seadme tootja ei vastuta kehtiva tootevas tutuse seaduse järgi kahjude eest mis tekivad sead mel või seadme tõttu alljärgnevatel juhtudel asjatundmatul käsitsemisel käsitsemiskorralduse eiramisel remontimisel kolmandate isikute mittevolitatud spetsialistide poolt mitte originaalosade paigaldamisel ja nendega väl javahetamisel mi...

Страница 65: ... eest Masin on välja töötatud käsitsemiseks ühe isiku poolt Järgige kõiki masinal olevaid ohutus ja ohujuhi seid Hoidke kõik masinal olevad ohutusjuhised tervikli kult loetavas seisundis Kasutage masinat ainult tehniliselt laitmatus sei sundis ja sihtotstarbekohaselt ohutus ning ohu teadlikult ja kasutusjuhendit järgides Kõrvaldage viivitamatult eelkõige rikked mis või vad ohutust halvendada laske...

Страница 66: ...e masina seadistustöödel ettevaatlik ja vältige sõrmede kinnikiilumist liikuva lõiketööriista ning jäi kade seadmeosade vahel Olge eriti ettevaatlik järeleandvatel pinnastel ja prü gidepoode kraavide või tiikide läheduses niitmisel Ärge lubage lastel või teistel isikutel kes ei tunne kasutuskorraldust muruniidukit kasutada Koha pealsed nõuded võivad määrata kindlaks miini mumvanuse Ärge niitke kun...

Страница 67: ...aarseid tööpause teha Kasutaja peab olema kasutamises seadistamises ja käsitsemises seadistus keelatud rakendused piisavalt koolitatud Kontrollige seade regulaarselt üle ja tehke iga kord enne kasutamist kindlaks et kõik käivitusfiksaato rid ning puutelülitid talitlevad nõuetekohaselt Pidage silmas et nõuetele mittevastav hooldus mitteühilduvate varuosade kasutamine või ohutus seadiste eemaldamine...

Страница 68: ...a tegemaks kind laks et kõik talitleb korrektselt m HOIATUS Iga kord kui peate oma muruniidukil mingeid seadistus ja või remonditöid teostama siis oo dake kuni nuga enam ei pöörle Seisake iga kord enne seadistus hooldus ja remonditööd moo tor ning tõmmake süüteküünla pistik maha 7 Enne käikuvõtmist Komponentide kokkupanemine Tarnimisel on mõned osad demonteeritud Kokkupa nemine on lihtne kui järgi...

Страница 69: ...llakutel ei tohi ohutusalas tel põhjustel muruniidukiga niita Harjutage erilist ettevaatust tagurpidiliikumisel ja mu runiiduki tõmbamisel Komistamisoht Ajami kasutamine Mootoripidur 3 Kasutage hooba mootori seiska miseks Kui lasete hoova lahti siis peatuvad moo tor ja lõikenuga automaatselt Enne tegelikku niitmist peaksite start stopphoova mitu korda üle kontrollima Veenduge et tõmbet ross liigub...

Страница 70: ...ühjendage püüdekorv 16 enne uuesti kasuta mist Vabastage süüteküünla pistik et vältida lubamatut kasutamist Multšimine Multšimisel peenestatakse lõikematerjali niiduki sule tud korpuses ja jaotatakse taas murule laiali Rohu kogumine ja utiliseerimine puudub m JUHIS Multšimine on võimalik ainult suhteliselt lühikese muru korral Haakige multšimisfunktsiooni kasutamiseks püüde korv 16 lahti ja lükake...

Страница 71: ...nu Kahjustatud noaga töötamisel valit seb vigastusoht Noa ülelihvimine Noaterad saab metalliviiliga üle teritada Viskumise vältimiseks peaks lihvimist läbi viima volitatud eriala töökoda Pöörake tähelepanu sellele et niidukit ei seisata ohuallika kõrval Gaasi väljatungimine võib põhjus tada plahvatusi Remondiks tohib kasutada ainult originaalosi või tootja poolt kinnitatud osi vt aadressi garantii...

Страница 72: ...me tüüp seadme artiklinumber Varuosad tarvikud Muruniiduki nuga artikli nr 7911200617 Õlitaseme kontrollimine m Tähelepanu Ärge käitage mootorit kunagi ilma õlita või liiga vähese õliga See võib põhjustada moo toril raskeid kahjustusi Kasutage ainult mootoriõli SAE 30 Õlitaseme kontrollimine joon 18 Seadke muruniiduk tasasele sirgele pinnale Keerake õlimõõtevarras 12 vasakpöördega välja ja pühkige...

Страница 73: ...niiduki ladustamiseks Hoiatusjuhis Ärge eemaldage bensiini suletud ruumi des tule lähedal ega suitsetamise ajal Gaasiaurud võib põhjustada plahvatusi või tulekahju Tühjendage bensiinipaak bensiini imupumbaga Käivitage mootor ja laske mootoril senikaua tööta da kuni ülejäänud bensiin on ära kulutatud Tehke iga kord pärast hooaega õlivahetus Selleks eemaldage vana mootoriõli soojast mootorist ja va ...

Страница 74: ...ike Võimalik põhjus Abinõu Seadme ebaühtlane töötamine tugev vibreerimine Poldid lahti Noakinnitus lahti Nuga viskub Kontrollige polte Kontrollige noakinnitust Asendage nuga Mootor ei tööta Ei vajutatud mootoripiduri hooba Gaasihoova vale asend Süüteküünal defektne Kütusepaak tühi Määrdunud kütus Külm ümbrus Mootor defektne Vajutage mootoripiduri hooba Kontrollige seadistust Asendage süüteküünal u...

Страница 75: ... ievēro pietiekamu drošības distanci Nelaidiet neiesaistītās personas klāt pie ierīces Noņemiet aizdedzes sveces uzgali pirms veicat apkopes darbus Sargājiet rokas un kājas no rotējošiem nažiem Sargājiet rokas un kājas no rotējošiem nažiem Svarīgi Izplūdes gāzes ir indīgas tādēļ nedarbiniet motoru neventilētās vietās Ievērībai karsta virsma apdedzināšanās risks Lietojiet ausu un acu aizsargus IEVĒ...

Страница 76: ...appuse 1 Ievads 77 2 Ierīces apraksts 77 3 Piegādes komplekts 77 4 Noteikumiem atbilstoša lietošana 78 5 Drošības norādījumi 78 6 Tehniskie dati 80 7 Pirms lietošanas sākšanas 81 8 Vadība 81 9 Apkope un tīrīšana 84 10 Glabāšana 86 11 Likvidācija un atkārtota izmantošana 86 12 Traucējumu novēršana 87 ...

Страница 77: ...ation von Holzbearbeitungsmaschinen GmbH Günzburger Straße 69 D 89335 Ichenhausen Godātais klient Vēlam prieku un izdošanos strādājot ar Jūsu jau no ierīci Norādījums Šīs ierīces ražotājs saskaņā ar piemērojamo Vācijas Likumu par atbildību par ražojumiem nav atbildīgs par zaudējumiem kas rodas šai ierīcei vai šīs ierī ces dēļ saistībā ar nepareizu lietošanu lietošanas instrukcijas neievērošanu tre...

Страница 78: ...ešo personu priekšā Ierīce ir izstrādāta vienas personas vadībai Ievērojiet visus drošības norādījumus un bīstamī bas norādes uz ierīces Uzturiet visus drošības norādījumus un bīstamības norādes uz ierīces pilnā skaitā salasāmā stāvoklī Lietojiet ierīci tikai tehniski nevainojamā stāvoklī kā arī atbilstoši noteikumiem apzinoties drošības aspektus un iespējamos riskus ievērojot lietoša nas instrukc...

Страница 79: ... labošanas darbus pirms atkārtoti to iedarbināt un strādājat ar zāliena pļaujmašīnu Ja zāliena pļaujmašīna sāk neparasti stipri vib rēt ir nepieciešama tūlītēja pārbaude Kurš nedrīkst lietot ierīci Bērni un citas personas kuras nepārzina lietoša nas instrukciju vietējie noteikumi var noteikt lieto tāja minimālo vecumu Personas kuras atrodas alkohola narkotisko vielu medikamentu iespaidā ir noguruš...

Страница 80: ...aujmašīnas pirms jūs papildināt degvielu Ierīces darbināšana pārmērīgā ātrumā var palieli nāt nelaimes gadījumu risku Esiet uzmanīgs veicot ierīces regulēšanas darbus un nepieļaujiet pirkstu iespiešanu starp kustīgo griezējinstrumentu un nekustīgajām ierīces daļām Esiet īpaši uzmanīgs pļaujot uz pakļāvīgām augs nēm pie tuvumā esošām izgāztuvēm grāvjiem un dīķiem Lietotājam jābūt pietiekami sagatav...

Страница 81: ...tt IEVĒRĪBAI Nogriešanas nazis rotē arī ar atlais tu motora bremzes sviru tiklīdz pavelk aiz auklas startera Uzmaniet lai neviena ķermeņa daļa sve ši priekšmeti neatrastos nogriešanas naža bīsta majā zonā Zema āra temperatūra Ilgstošs lietošanas laiks Tādēļ ir ieteicams lietot siltus darba cimdus un izdarīt regulārus darba pārtraukumus 7 Pirms lietošanas sākšanas Komponentu salikšana Piegādes laik...

Страница 82: ...pļaujmašīnas Nekad nepļaujiet sliktos redzamības apstākļos Pirms pļaušanas paceliet no zemes apkārtējus brī vi izvietotus priekšmetus piem akmeņus rotaļlie tas kokus stieples utt Pirms jūs sākat pļaut zālienu jums vajadzētu vai rākas reizes veikt šo procesu lai pārliecinātos vai viss pareizi darbojas m BRĪDINĀJUMS Katrreiz kad zāliena pļaujmašīnai jāveic jebkādi regulēšanas un vai labošanas darbi ...

Страница 83: ...15 ar otru roku aiz rokturi pārnē sāšanai izņemiet savācējgrozu 16 16 att Atbilsto ši drošības noteikumiem izsviešanas vāks 15 savā cējgroza atkabināšanas laikā aizkrīt ciet un noslēdz aizmugurējo izsviešanas atveri Norādes par pareizu pļaušanu m Ievērībai Nekad neatveriet izsviešanas vāku kad iztukšo savākšanas ierīci un motors vēl dar bojas Rotējošais nazis var radīt savainojumus Vienmēr rūpīgi ...

Страница 84: ...ža nomaiņa 17 att Nomainot griezējinstrumentu drīkst izmantot tikai ori ģinālās rezerves daļas Naža nomaiņas laikā lietojiet cimdus lai nepieļautu grieztus savainojumus Ja turklāt atverē aizķeras zāles paliekas tad motora vieglākai iedarbināšanai ir lietderīgi pavilkt zāliena pļaujmašīnu atpakaļ par apt 1 m Nopļautā materiāla paliekas pļaujmašīnas korpusā un uz darba instru menta nenoņemiet ar rok...

Страница 85: ...7 sekunžu laikā ja tas tā nav ierīci izmantot nedrīkst Vērsieties pilnvarotā tirdzniecības uzņēmu mā Pārliecinieties vai visa darbmūža laikā ierīce atrodas nevainojamā stāvoklī Nelietpratīga apkope var radīt dzīvībai bīstamus savainojumus Nekad neuzstādiet citu nazi Pirms asmens noņemšanas iztukšojiet benzīna tvertni Izņemiet skrūvi lai nomainītu asmeni Ievietojiet atpakaļ visu tā kā parādīts 17 a...

Страница 86: ...piederumi ir no dažādiem materiāliem piemēram metāla un plastmasas Bojātās detaļas jānodod īpašo atkritumu pārstrādei Jautājiet spe cializētā veikalā vai pašvaldībā Labošanas darbs Pēc labošanas darba vai apkopes pārliecinieties vai ir piestiprinātas un ir nevainojamā stāvoklī daļas kas attiecas uz drošības tehniku Savainojumiem bīsta mās daļas uzglabājiet citām personām un bērniem nepieejamā viet...

Страница 87: ...bība stipra ierīces vibrācija Vaļīgas skrūves Vaļīgs naža stiprinājums Nelīdzsvarots nazis Pārbaudiet skrūves Pārbaudiet naža stiprinājumu Nomainiet nazi Motors nedarbojas Nav nospiesta motora bremzes svira Akseleratora sviras nepareizs stāvoklis Bojāta aizdedzes svece Tukša degvielas tvertne Piesārņota degviela Auksta apkārtne Bojāts motors Nospiediet motora bremzes sviru Pārbaudiet iestatījumu N...

Страница 88: ...gaus atstumo Nesusiję asmenys visada turi laikytis atstumo nuo įrenginio Prieš atlikdami techninės priežiūros darbus pašalinkite uždegimo žvakės kištuką Laikykite rankas ir kojas toliau nuo besisukančių peilių Laikykite rankas ir kojas toliau nuo besisukančių peilių Svarbu Išmetamosios dujos yra nuodingos Todėl neeksploatuokite variklio nevėdinamose srityse Dėmesio karštas paviršius pavojus nudegt...

Страница 89: ...Įžanga 90 2 Įrenginio aprašymas 90 3 Komplektacija 90 4 Naudojimas pagal paskirtį 91 5 Saugos nurodymai 91 6 Techniniai duomenys 93 7 Prieš pradedant eksploatuoti 94 8 Valdymas 94 9 Techninė priežiūra ir valymas 97 10 Laikymas 99 11 Utilizavimas ir pakartotinis atgavimas 99 12 Sutrikimų šalinimas 100 ...

Страница 90: ...lzbearbeitungsmaschinen GmbH Günzburger Straße 69 D 89335 Ichenhausen Gerbiamas kliente mes linkime Jums daug džiaugsmo ir didelės sėkmės dirbant su nauju įrenginiu Nurodymas Pagal galiojantį Atsakomybės už gaminį įstatymą šio įrenginio gamintojas neatsako už žalą kuri atsiranda šiame įrenginyje arba dėl jo netinkamai naudojant nesilaikant naudojimo instrukcijos remontuojant tretiesiems asmenims n...

Страница 91: ...konstruota valdyti vienam asmeniui Laikykitės visų saugos ir pavojų nuorodų ant ma šinos Ant mašinos turi būti visos saugos ir pavojų nuoro dos bei jos turi būti įskaitomos Naudokite tik techniškai nepriekaištingos būklės mašiną ir tik pagal paskirtį atsižvelgdami į saugą ir pavojus bei laikydamiesi naudojimo instrukcijos Ypač nedelsdami pašalinkite paveskite pašalinti sutrikimus galinčius paveikt...

Страница 92: ...enkitės neprisispausti pirštų tarp judančio pjovimo įrankio ir standžių įrenginio dalių Būkite ypač atsargūs pjaudami ant paslankaus grunto prie arti esančių šiukšlynų griovių ir tven kinių Nuorodos Atidžiai perskaitykite naudojimo nurodymus Susi pažinkite su nustatymais ir tinkamu mašinos nau dojimu Niekada neleiskite vaikams arba kitiems asme nims kurie nėra susipažinę su naudojimo nurody mais n...

Страница 93: ... ir reguliariai daryti darbo pertraukas Naudotojas turi būti pakankamai apmokytas kaip naudoti nustatyti ir valdyti įrenginį įskaitant drau džiamus valdymo veiksmus Reguliariai tikrinkite įrenginį ir prieš kiekvieną nau dojimą įsitikinkite kad visi paleidimo fiksatoriai ir liečiamieji jungikliai tinkamai veikia Netinkamai atliekant techninę priežiūrą naudojant netinkamas atsargines dalis arba paša...

Страница 94: ...ti kokius nors Jūsų ve japjovės nustatymo ir arba remonto darbus pa laukite kol peilis nebesisuks Prieš atlikdami variklio nustatymo techninės priežiūros ir remonto darbus išjunkite variklį ir ištraukite uždegimo žvakės kištuką 7 Prieš pradedant eksploatuoti Komponentų surinkimas Pristatant kai kurios dalys yra išmontuotos Surinkti lengva kai laikomasi tolesnių nuorodų Nurodymas Norint surinkti ar...

Страница 95: ...adžių išjunkite vari klį Pavaros naudojimas Variklio stabdys 3 Norėdami išjungti variklį nau dokite svirtį Kai atleidžiate svirtį variklis ir pjovimo peilis sustoja automatiškai Prieš pjaudami turėtumėte kelis kartus patikrinti pa leidimo stabdymo svirtį Įsitikinkite kad starterio trauklė lengvai juda Įspėjamoji nuoroda paleidus variklį pjovimo peilis sukasi Svarbu prieš paleisdami variklį kelis k...

Страница 96: ...rieš pastatydami vejapjovę į uždarą sritį iš pra džių leiskite varikliui atvėsti Prieš statydami į lai kymo vietą pašalinkite žolę lapus tepalą ir alyvą Visada laikykitės kreipiamosiomis rankenomis užti krinamo saugaus atstumo tarp peilio korpuso ir nau dotojo Pjaudami ir keisdami važiavimo kryptį prie griovių ir ant šlaitų būkite ypač atsargūs Stovėkite stabiliai avėkite batais su neslidžiais ir ...

Страница 97: ...tu peiliu kyla pavojus susižaloti Nedėkite ant vejapjovės daiktų Prieš naudodami iš naujo patikrinkite visus varžtus ir veržles Priveržkite atsilaisvinusius varžtus Prieš naudodami iš naujo ištuštinkite surinkimo krepšį 16 Norėdami išvengti neleistino naudojimo ištraukite uždegimo žvakės kištuką Atkreipkite dėmesį į tai kad vejapjovė nebūtų sta toma šalia pavojaus šaltinio Išėjusios dujos gali spr...

Страница 98: ...ž žalą patirtą netinkamai remontuojant ir nenaudojant originalių atsarginių dalių Įgaliokite klientų aptarnavimo tarnybą arba įgaliotą specialistą Atitinkami reikalavimai galioja ir priedų dalims Eksploatavimas laikas Laikykitės įstatymų nuostatų reguliuojančių vejapjo vių eksploatavimo laiką kuris skirtingose vietose gali skirtis Peilių galandimas Peilių ašmenis galima pagaląsti metalo dilde Nori...

Страница 99: ...as Užsakant atsargines dalis reikia nurodyti šiuos duo menis įrenginio tipą įrenginio gaminio numerį Atsarginės dalys priedai Vejapjovės peiliai gaminio Nr 7911200617 Techninės priežiūros informacija Atkreipkite dėmesį į tai kad šio gaminio toliau nuro dytos dalys naudojant arba natūraliai dėvisi arba to liau nurodytų dalių reikia kaip vartojamųjų medžiagų Greitai susidėvinčios dalys uždegimo žvak...

Страница 100: ...ija Atsilaisvino varžtai Atsilaisvino peilio tvirtinimo elemen tai Nesubalansuotas peilis Patikrinkite varžtus Patikrinkite peilio tvirtinimo elementus Pakeiskite peilį Variklis neveikia Nepaspausta variklio stabdymo svirtis Akceleratoriaus rankinio valdymo rankenėlė netinkamoje padėtyje Sugedo uždegimo žvakė Tuščias degalų bakas Nešvarūs degalai Šalta aplinka Sugedęs variklis Paspauskite variklio...

Страница 101: ... www scheppach com service scheppach com 49 08223 4002 99 49 08223 4002 58 101 ...

Страница 102: ... www scheppach com service scheppach com 49 08223 4002 99 49 08223 4002 58 102 A ...

Страница 103: ... www scheppach com service scheppach com 49 08223 4002 99 49 08223 4002 58 103 B ...

Страница 104: ... и норми за артикул 2014 29 EU 2014 35 EU X 2014 30 EU 2004 22 EC 2014 68 EU X 2011 65 EU 89 686 EC_96 58 EC 90 396 EC Ichenhausen den 20 11 2019 __________________________ Unterschrift Markus Bindhammer Technical Director First CE 2017 Subject to change without notice Documents registar Stefan Hartinger Günzburger Str 69 D 89335 Ichenhausen X 2006 42 EC Annex IV Notified Body Notified Body No Cer...

Страница 105: ... www scheppach com service scheppach com 49 08223 4002 99 49 08223 4002 58 105 ...

Страница 106: ...iezeitnochwirdeineneueGarantiezeitdurchdieseLeistungfürdasGerätoderfüretwaigeeingebauteErsatzteileinGanggesetzt DiesgiltauchbeiEinsatzeinesVor Ort Services Das betroffene Gerät ist in gesäubertem Zustand zusammen mit einer Kopie des Kaufbelegs hierin enthalten die Angaben zum Kaufdatum und der Produktbezeichnung der Kundendienststelle vorzulegenbzw einzusenden WirdeinGerätunvollständig ohnedenkomp...

Страница 107: ...dentro de este plazo se torne inútil a causa de fallas de material o de fabricación Las piezas que no son fabri cadas por nosotros mismos serán garantizadas hasta el punto que nos corresponda garantía del suministrador anterior Los costes por la colocación de piezas nuevas recaen sobre el comprador Están excluidos derechos por modificaciones aminoraciones y otros derechos de indemnización por daño...

Страница 108: ...na gallaðs efnis eða skemmda í framleiðslu innan ákveðins tímabils Af því er tekur til hluti sem ekki eru framleiddir af okkur ábyrgjumst við af því leiti aðeins að við eigum rétt á ábyrgðarkröfum gagnvart birgðasölum Kostnaður vegna uppsetningar á nýjum hlutum skal falla í skaut kaupanda Ógilding sölu eða afsláttur á kaupverði sem og aðrar kröfur vegna skemmda eru undanskildar Garanti TR Apaçık k...

Отзывы: