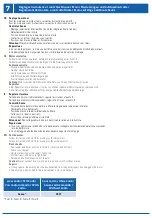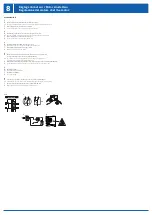
8
Réglage du moteur / Motor einstellen /
Regolazione del motore / Set the motor
Somfy Sunea io
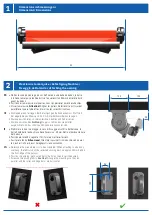
1
Faire raccorder le moteur au secteur par le monteur /
Motor durch Monteur an Stromnetz anschliessen /
Far collegare il motore alla rete elettrica dall’installatore /
Fitter to connect the motor to the mains
2
Activer le mode de programmation /
Programmierungsmodus aktivieren /
Attivare la modalità di programmazione /
Activate the programming mode
FR
Appuyer simultanément sur les touches MONTER/BAISSER jusqu’à ce qu’un mouvement
MONTER/BAISSER s’effectue.
DE
Die AUF- und AB-Taste gleichzeitig gedrückt halten, bis eine AUF/AB-Bewegung erfolgt.
IT
Tenere premuti contemporaneamente i tasti SU/GIÙ fino a quando si verifica un movimento
verso l’ALTO/verso il BASSO.
EN
Press the UP and DOWN buttons at the same time until there is an
UP/DOWN movement.
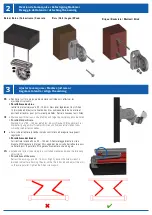
3
Vérifier le sens de la marche/
Laufrichtung überprüfen /
Verificare la direzione di movimento /
Check the direction of travel
FR
Si le sens est incorrect, appuyer sur la touche my jusqu’à ce qu’un mouvement
MONTER/BAISSER s’effectue.
DE
Stimmt die Laufrichtung nicht, die my-Taste gedrückt halten, bis eine AUF/AB-Bewegung
erfolgt.
IT
Se la direzione di movimento non è corretta, tenere premuto il tasto my fino a quando si
verifica un movimento verso l’ALTO/verso il BASSO.
EN
If the direction of travel is wrong, press the my button until there is an UP/DOWN
movement.
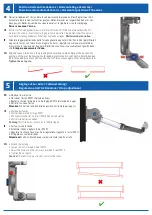
4
Programmer la position finale inférieure /
Untere Endlage programmieren /
Programmare la posizione finale inferiore /
Program the lower end position
FR a.
Descendre dans la position finale inférieure souhaitée. La barre à toile ne doit pas se lever!
b. Presser les touches MONTER et my jusqu’à ce l’entraînement démarre de lui-même.
c. Laisser monter jusqu’à la butée finale supérieure.
DE
a. In die gewünschte untere Endlage fahren. Stoffstab darf nicht aufstehen!
b. Die AUF- und my-Taste gedrückt halten, bis der Antrieb selbstständig losfährt.
c. Antrieb in den oberen Endanschlag fahren lassen.
IT
a. Portarsi nella posizione finale inferiore desiderata. La barra finale non deve sporgere!
b. Tenere premuti i tasti SU e my fino a quando il motore parte automaticamente.
c. Far spostare il motore nella posizione finale superiore.
EN
a. Move it to the lower end position you want, the fabric rod must not move up.
b. Press the UP and my button until the (motor) drive sets off by itself.
c. Let the (motor) drive move into the upper end stop.
5
Sauvegarder la programmation
/ Programmierung abspeichern / Salvare la programmazione /
Save the programming
FR
Maintenir enfoncée la touche my jusqu’à ce qu’un mouvement MONTER/BAISSER s’effectue.
DE
Die my-Taste gedrückt halten, bis eine AUF/AB-Bewegung erfolgt.
IT
Tenere premuto il tasto my fino a quando si verifica un movimento verso
l’ALTO/verso il BASSO.
EN
Press the my button until there is an UP/DOWN movement.
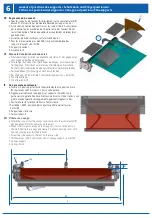
6
Désactiver le mode de programmation (au verso de l’émetteur) /
Programmierungsmodus deaktivieren
(Sender-Rückseite) /
Disattivare la modalità di programmazione (retro del trasmettitore) /
Disable the programming
mode (rear side of the transmitter)
FR
Maintenir enfoncée la touche Progr. jusqu’à ce qu’un mouvement MONTER/BAISSER
s’effectue.
DE
Prog.-Taste gedrückt halten, bis eine AUF/AB-Bewegung erfolgt.
IT
Tenere premuto il tasto di programmazione fino a quando si verifica un movimento verso
l’ALTO/verso il BASSO.
EN
Press the Prog. button until there is an UP/DOWN movement.
my
my
my
my


