BSK-EN fire damper
INSTALLATION, MOUNTING AND OPERATING INSTRUCTIONS
Maintenance or functional test
Construction subject to change
No return possible
Version: 2018-11-14 | Page 18
MAINTENANCE OR FUNCTIONAL TEST
Unclean and humid air can impair the continuous operational
safety. Therefore, after commissioning of the ventilation in-
stallation, the function of all fire dampers must be checked
semi-annually.
If two consecutive functional checks do not show any defects,
the fire dampers only have to be tested once a year. If mainte-
nance agreements are made, for example for ventilation in-
stallations, it is recommended to include the functional tests
of the fire dampers in these maintenance agreements.
1. Manual trigger device
1.1 External check
1.1.1 Visual inspection
•
Check the fire damper for damage and contamination.
•
Perform necessary cleaning work.
1.1.2 Manual triggering – Closing the fire damper
•
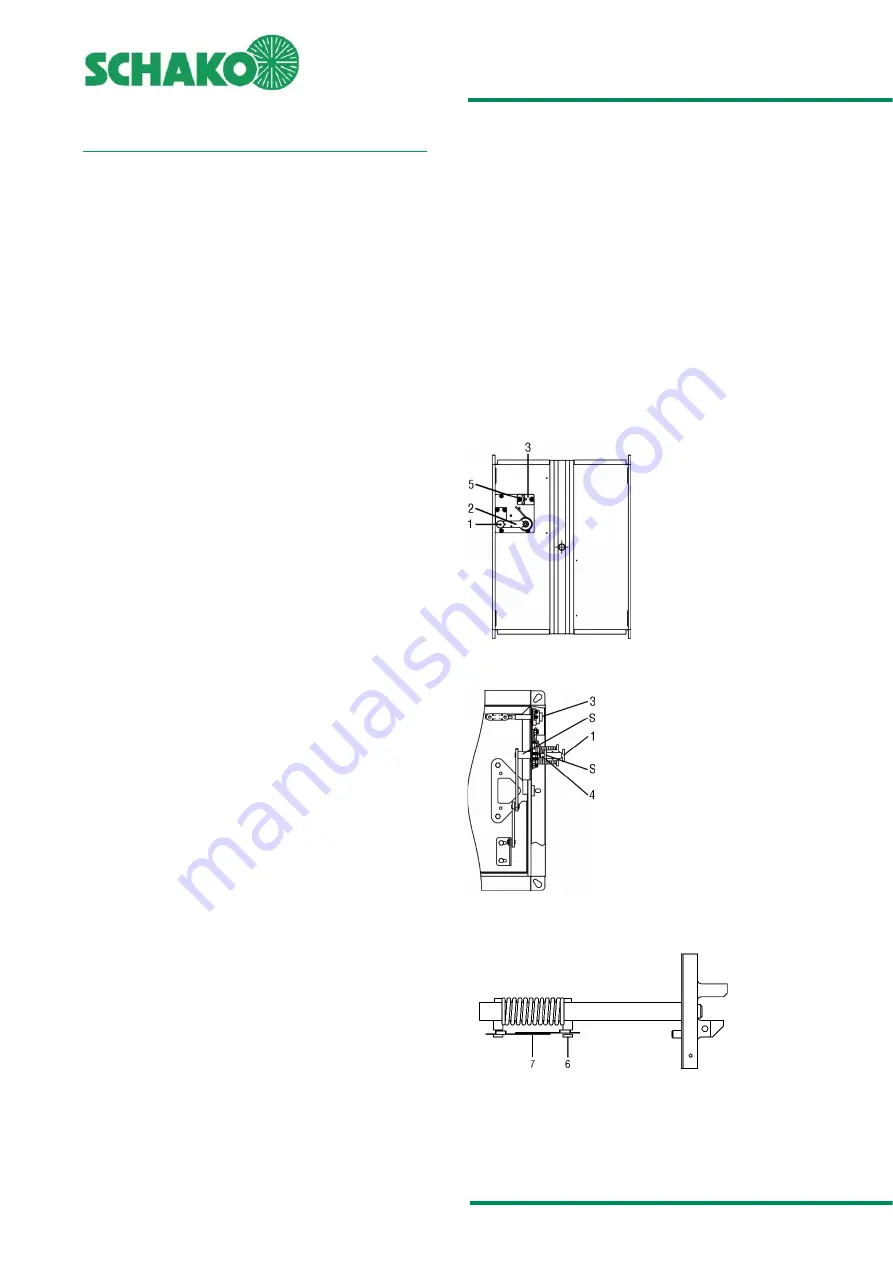
Pull the disc (pos. 1) at the hand lever (pos. 2), this releases
the locking (in the open position) of the locking bolt (pos.
4) in the trigger device (pos. 3).
•
The hand lever is released and is moved by spring force in
the direction of the closed position.
ATTENTION! Do not reach into the swivelling range of the
damper leaf and hand lever. There is a risk of injury.
•
The fire damper must close automatically.
1.1.3 Test of the snap-in locking device
•
Pull the disc (pos. 1) at the hand lever (pos. 2) in the closed
position and release it again.
•
The return must be performed automatically.
1.1.4 Fire damper open
•
Pull the disc (pos. 1) at the hand lever (pos. 2) and move it
in the direction of the trigger device (pos. 3).
•
The locking pin (pos. 4) must engage in the trigger device
(pos. 3).
•
The fire damper is ready for operation again.
•
After successful manual triggering, repeat the process se-
veral times as described in section 1.1.2.
1.2 Internal check
1.2.1 Visual inspection
•
Check the fire damper for damage and contamination.
•
Perform necessary cleaning work.
1.2.2 Check of the trigger device
•
Perform manual triggering as described in section 1.1.2.
•
Remove the fastening screws (2 pieces) (pos.5), pull the
trigger device out of the housing.
•
Contract the fusible link holder (pos. 6) by means of a sui-
table tool (pliers, vice etc.) and removed the fusible link
(pos. 7).
•
Check the fusible link; if no damage is visible, insert the
fusible link again.
•
Install the trigger device again and tighten it by means of
screws.
BSK-EN with manual trigger
Figure. 1.1: Side view
S
= moving parts (storage), lubricate only if not running
smoothly
Figure 1.2: Front view
Figure 1.3: Trigger device


