


ENG
4
1
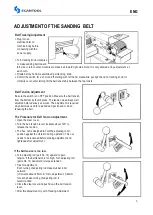
The Set Up of Sanding Stop Plate
●
Push down the belt tension lever to gain tension.
The belt tension was totally released be- fore
delivery ex works.
●Install the sanding stop plate and make sure it
does not touch the sanding belt.
2
The Set Up of Working Table
Put working table at correct position and keep
proper distance to the sanding belt.
3
The Set Up of Dust Collector
Fix dust collector unit by using two screws on each
side. Read page 8 for more information.
4
The Set Up of Eye Shield
Install the eyeshield to the machine and make
necessary adjustment to gain the maximum
protection. Read page 8 (exploded view) for more
information.
5
The Adjustment of Eye Shield
5
4
3
A 3mm distance between
working table and sand-
ing belt is required.
2
A safety distance between the
sanding stop plate and sanding
belt.
Sanding stop plate touches
sanding belt.
1
ASSEMBLY OF FITTINGS
Содержание 1220
Страница 2: ...READ THIS MANUAL BEFORE USE DIESE ANLEITUNG VOR DER VERWENDUNG LESEN LÆS DENNE MANUAL FØR ANVENDELSE ...
Страница 16: ...ENG 9 DIAGRAM ...
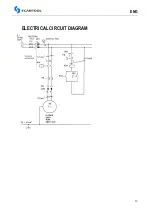
Страница 19: ...ENG 12 ELECTRICAL CIRCUIT DIAGRAM ...
Страница 31: ...DE 24 DIAGRAMM ...
Страница 34: ...DE 27 ELEKTRISCHER SCALTPLAN ...
Страница 45: ...DK 9 DIAGRAM ...
Страница 48: ...DK 12 ELEKTRISK KREDSKØBSDIAGRAM ...