Page 9
5. Installation
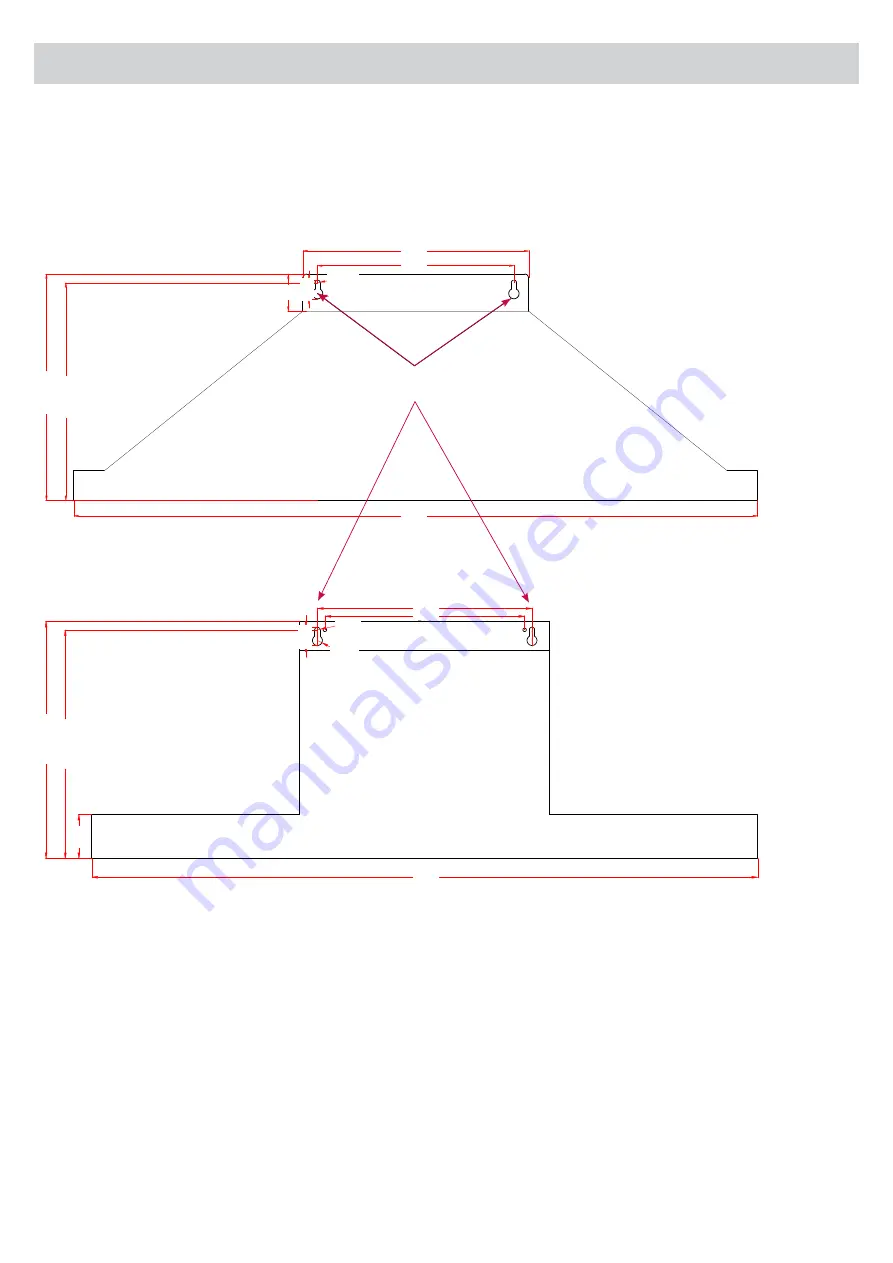
Mounting Points
The diagrams below are a guide for all mounting points.
For SC900WRS Model
For SC900WTS Model
Main Mounting Points
297
899
297.8
286.3
R3.5
49
258
24.8
270
290
R6.85
900
321
60
309.5
Страница 1: ...I N S T A L L A T I O N O P E R A T I O N M A I N T E N A N C E G U I D E RANGEHOOD SC900WRS SC900WTS...
Страница 2: ...7 Rangehood Contents 7 Operation 7 Cutout Size 7 5 Installation 8 Mounting Instructions 8 For Installers 8 Mounting Points 9 Installation Example 10 Overview 11 Flexi Ducting 11 6 Condensation Informa...
Страница 3: ...instruction manual in a safe place so you can refer to it at any time ATTENTION Installation regulation or maintenance of both gas and electric appliances should only be executed by qualified and auth...
Страница 4: ...ing or maintenance The power outlet must be within reach of the power cord from the rangehood Check all contents of the packaging including all electrical functions of the rangehood before installatio...
Страница 5: ...installations that fail to heed the applicable legislation on electrical safety with regard to both modes and materials The electrical technical data can be found inside the rangehood after removing t...
Страница 6: ...place the bulb by inserting it into the socket and hand turning in a clockwise direction Electrical Cord Ensure the electric cord is not exposed to heat chemicals or sharp objects If the supply cord i...
Страница 7: ...angehood Contents Male Plug Main Power 240V 10 amp connection Single Outlet 200mm Reducer For use with HiFlow VX120 motor Lamp Mounting Bracket 1 Extension Flue Piece 2 Main Flue For use with Isodrive...
Страница 8: ...regulations concerning the expelling of air and install your rangehood in accordance with local laws and regulations IMPORTANT If the user decides to install the rangehood at a distance of less than m...
Страница 9: ...tion Mounting Points The diagrams below are a guide for all mounting points For SC900WRS Model For SC900WTS Model Main Mounting Points 297 899 297 8 286 3 R3 5 R3 5 49 258 24 8 270 290 R3 5 24 8 R6 85...
Страница 10: ...to secure the rangehood via the secondary mounting points Step 2 Feed through aluminium flexi duct from the outlet block to the kitchen ceiling Step 3 Place flue covers on Step 4 Attach wall mounting...
Страница 11: ...he ducting Connect flexi ducting to the outlet on rangehood using duct tape or cable tie Please DO NOT rip the ducting 2 3 5 7 6 8 4 9 Flexi Ducting IMPORTANT For the motor to operate efficiently do n...
Страница 12: ...ngehood Speed of food liquid heating Angle of ducting Scandium S bend preferred Filter size larger canopy preferred Quality of pots or cookware you are using high quality recommended How to reduce the...
Страница 13: ...turned on Check rangehood s motor switch Ensure that there is power to the rangehood the motor is connected to the rangehood and the rangehood is switched on Check lamp switch Lamp switch should be at...
Страница 14: ...ons Model SC900WRS SC900WTS Feeding Voltage 220 240V 50Hz 10 amp GPO Lamp Power Incandescent 2 x 25W Dimensions For SC900WRS Model For SC900WTS Model 272 5 0 0 5 0 0 2 5 0 900 485 311 347 5 5 0 5 5 0...
Страница 15: ...product Service In the event that the failure is not due to the faults mentioned in Troubleshooting contact the customer service centre In Australia Customer Service 1300 829 066 In New Zealand Custo...
Страница 16: ...41 322 Australia 8 3 4 Anzed Court Mulgrave 3170 Victoria Phone 1300 881 693 Email info scandiumappliances com au Web www scandiumappliances com au New Zealand 5 Tolich Place Henderson Auckland 0610 P...