background image

User Manual & Datasheet V 2.1

1

Introduction

2

Operating Principle

CAPVEL is composed of specially developed capaci-

tance change gauging circuit. It uses fast RISC based
processor to perform all the complicated jobs of evaluat-
ing the level out of the capacitance. This capacitance is
formed by the sense rod and the metallic container wall,
where containers are non-metallic or non-uniformly wide
or having turbulent fluid, a metallic stilling well is pro-
vided. The amount of capacitance is proportional to the
level of material between the sense rod and metallic wall
of stilling tube or container.

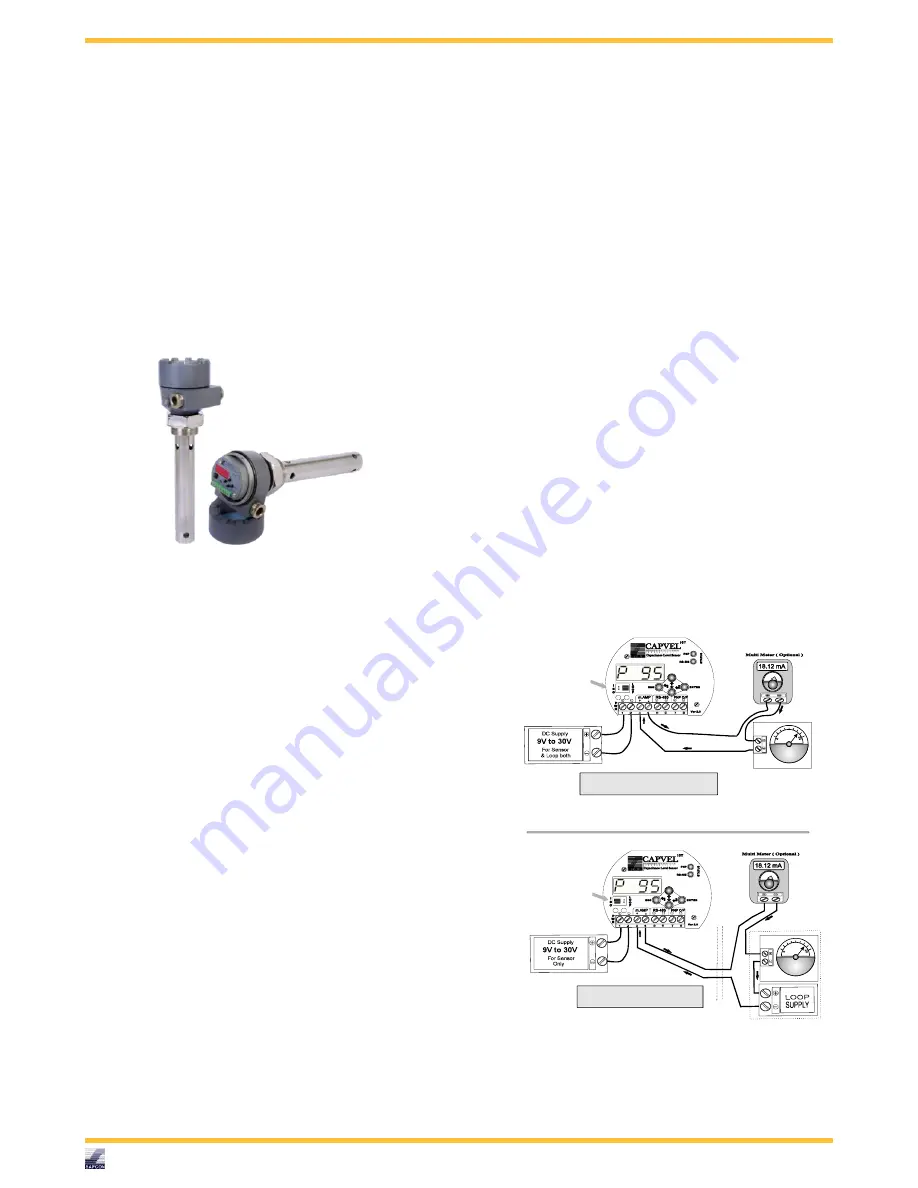
Figure 1: Capvel

3

System Description

CAPVEL is composed of cast aluminium housing,

supplied with suitable mounting arrangement viz.NPT,
BSP or Flanges and two metallic cable entries.

An

external Earthing / Grounding terminal is also provided.
The sensing rod which is mostly Teflon coated. This
sensing rod can be replaced by flexible probe for some
applications.

The stilling tube is also provided for

turbulent fluids, irregular width tanks, non-metallic
tanks or for fluids with low dielectric (e.g. diesel).
Opening the threaded aluminium cover, an electronic
insert could be found. This is the electronic unit which
converts the level into 4-20 mA signal depending on the
calibration. The status LED is a bi-color LED that blinks
alternately in Red and Green to indicate instrument is in
process of converting the level to 4-20 mA signal. Two
DIP switches are provided to calibrate the 4 mA and
20 mA points. The calibration is easy and a complete
procedure is given in "Calibration" page. The two wires
connected at the back are pre-connected sensor wires
and should not be disturbed. Also while calibration try
to keep hands away from the wires of terminal 6 and 7.
Now referring to the "Connection Diagram", Capvel can
be wired in two possible combinations. Preferred one
is galvanically isolated, 4-wire combination where only
one source of power is available, 3-wire, non-isolated
combination can also be used. The converted level signal
can be sensed using a 4-20 mA indicator or PLC 4-20

mA input or multimeter in 40 mA range or any-other
device that takes 4-20 mA signal as input.

4

Features

5

Applications

6

Capvel-BT Features

User Interface : 2 DIP sw 2 LED

Output-1 : 4-20 mA, Galvanically Isolated

Output-2 : Rs-485 Digital Data

7

Capvel-ICT Features

User Interface : 4 Digit Display with 4 Keys + 2
LED

Output-1 : 4-20 mA, Galvanically Isolated

Output-2 : Rs-485 Digital Data

Output-3 : Controlling Devices connected with Ex-
ternal Relay

3-wire Single Supply Operation

mAmp

Maximum Internal Resistance of Indicator/PLC/Scanner

[(Sensor Supply - 4V) x 50] Ohm

Indicator or

Scanner

or PLC

4-20mA

mAmp

Maximum Internal Resistance of Indicator/PLC/Scanner

[(Loop S upply - 4V) x 50] Ohm

Indicator or

Scanner

or PLC

4-20mA

4-wire Dual Supply Operation ( Galvanic Isolated )

J umpers

( Towards ISO )

J umpers

( Towards LOOP )

I

S
O
L
A
T

I

O
N

Figure 2: Connection Diagram

Sapcon Instruments Pvt.Ltd.

R

5

Содержание CAPVEL-ICT

Страница 1: ...CAPVEL ICT Capacitance Level Transmitter INSTRUCTION MANUAL Version 2 0 ...

Страница 2: ... 6 10 Measurement Specification 6 11 Installation Guidelines 7 11 1 Tank Mounting Installation 7 12 Electrical Connections 7 13 Calibration 7 14 Error Display and Remedy 10 15 Menu and Description 11 16 RS 485 Serial Commands for Communication with Capvel 12 17 Settings 13 18 Maintenance 13 19 Support Training 13 20 Customer Support 13 List of Figures 1 Capvel 5 2 Connection Diagram 5 3 Calibratio...

Страница 3: ...chanical Specifications 6 2 Electrical Specifcations 6 3 Measurement Specifications 6 4 Error Display and Remedy 10 5 Menu 11 6 Menu 12 7 Percentage Level Information 12 8 Configuring and Asking Sensor ID on Network 13 Sapcon Instruments Pvt Ltd R 3 ...

Страница 4: ...l instrument housing in terms of dimensions color and design Please refer to GA drawings for dimensional details Values of performance described in this manual were obtained under ideal testing conditions Hence they may differ under industrial environment and settings General Instructions Instrument shouldn t block the material filling inlet Secure the cover of housing tightly Tighten the cable gl...

Страница 5: ...in process of converting the level to 4 20 mA signal Two DIP switches are provided to calibrate the 4 mA and 20 mA points The calibration is easy and a complete procedure is given in Calibration page The two wires connected at the back are pre connected sensor wires and should not be disturbed Also while calibration try to keep hands away from the wires of terminal 6 and 7 Now referring to the Con...

Страница 6: ...SS Overall Dimensions Please refer enclosed probe drawing Table 1 Mechanical Specifications 9 Electrical Specification For Electrical Specification please refer Table 2 PARAMETER VALUE Mains Capvel BT 9V to 55V DC Capvel ICT 9V to 30V DC Power Consumption Capvel BT Max 0 5 watt 12 V Capvel ICT Max 1 watt 12 V Table 2 Electrical Specifcations 10 Measurement Specification For Measurement Specificati...

Страница 7: ...tion all electrical connections must be powered OFF and the fuel tank must be empty 11 1 Tank Mounting Installation Note It is recommanded that the tank must be empty while following steps in this section 12 Electrical Connections 13 Calibration Sapcon Instruments Pvt Ltd R 7 ...

Страница 8: ...is in RUN MODE again We can Calibrate 4mA and 20mA in any order according to our choice The order of empty fill or fill empty is immaterial Calibrating HIGH L evel Upper Calibration has done DOWN 2 Press and Hold This Key UP For 3 Seconds Wait for around 5 Seconds 3 Wait for around 5 Seconds Press and Hold This Key For 3 Seconds Fill the tank at High Level High SCAL Low SCAL Figure 3 Calibration S...

Страница 9: ...if measured mA is between 13 25mA 15 5mA 64L 8L 2 25mA x measured mA 4 if measured mA is between 15 5mA 17 75mA 72L 6L 2 25mA x measured mA 4 if measured mA is between 17 75mA 20 0mA 42L 12L 2 25mA x measured mA 4 if measured mA is between Volume at various strapping level can be found by taking notes of amount of fluid needed to raise the level or it can be calculated mathematically from tank dim...

Страница 10: ...ase recalibrate correctly 4 PrHI Over Capacitance Tank and probe dimen sions are not matched 5 PrLO Under Capacitance Tank and probe dimen sions are not matched 6 RFOP Internal reference got open circuited Internal fault in sensor 7 RFSC Internal reference got short circuited Internal fault in sensor 8 RFHI Internal reference satu rated Internal fault in sensor 9 RFLO Internal reference negligi bl...

Страница 11: ...Higher Set point Only in Pump Controlling SPH must be higher than SPL rLdr Relay Drive r SPL L 000 L 099 Lower Set point Only in Pump Controlling SPH must be higher than SPL rLdr Relay Drive r Cd C 000 C 100 Cover Delay in Seconds rLdr Relay Drive r Ud U 000 U 100 Uncover Delay in Sec onds SCAL Scal Factor SC H H 020 H 100 Higher SCALE LEVEL SCAL HIGH must be 20 or more Higher than SCAL LOW SCAL S...

Страница 12: ...ion othr o PRF PR 1 PRF 9 Profile Only for optimization InFo i SEr 12345678 Serial No Factory Sated and Read Only InFo i dAt 12345678 Mfd Date in DD MM YY format Factory Sated and Read Only Table 6 Menu 16 RS 485 Serial Commands for Communication with Capvel For RS 485 Serial Commands please refer Table 7 COMMAND DESCRIP TION COMMAND TO BE SEND TO SENSOR EXPECTED RESPONSE FROM INSTRUMENT EXPLAINAT...

Страница 13: ...ructions given in this manual To further ease the process of installation and use we have developed special demo videos which are hosted on YouTube Sapcon s YouTube channel SAPCON INSTRUMENTS lists all these videos https goo gl dnxfcz Should you require further information regarding installation use or working of the instrument please don t hesitate to contact us Kindly provide the following infor...

Отзывы: