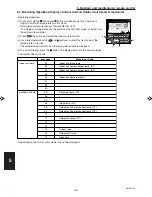
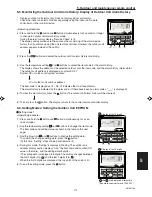

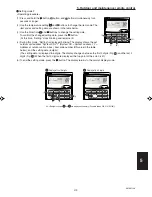
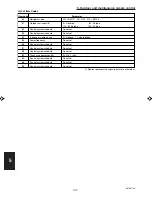
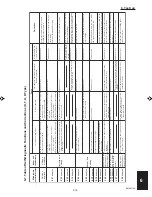


1
2
3
4
5
6
VI-2
SM831148
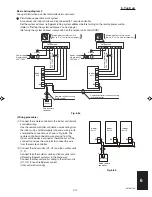
6. Test run
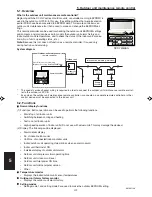
6. TEST RUN
6-1. Preparing for Test Run
Before attempting to start the air conditioner,
check the following:
(1) All loose matter is removed from the cabinet espe-
cially steel filings, bits of wire, and clips.
(2) The control wiring is correctly connected and all
electrical connections are tight.
(3) The protective spacers for the compressor used for
transportation have been removed. If not, remove
them now.
(4) The transportation pads for the indoor fan have been
removed. If not, remove them now.
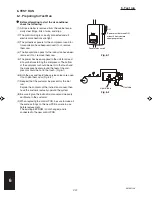
(5) The power has been supplied to the unit for at least
5 hours before starting the compressor. The bottom
of the compressor should be warm to the touch and
the crankcase heater around the feet of the com-
pressor should be hot to the touch. (Fig. 6-1)
(6) Both the gas and liquid tube service valves are open.
If not, open them now. (Fig. 6-2)
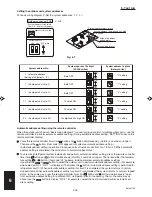
(7) Request that the customer be present for the trial
run.
Explain the contents of the instruction manual, then
have the customer actually operate the system.
(8) Be sure to give the instruction manual and warranty
certificate to the customer.
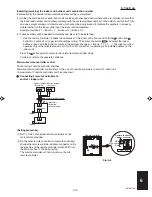
(9) When replacing the control PCB, be sure to make all
the same settings on the new PCB as were in use
before replacement.
The existing EEPROM is not changed, and is
connected to the new control PCB.
Fig. 6-1
Fig. 6-2
Power mains switch
(Power must be turned ON
at least 5 hours before
attempting test run)
ON
Liquid tube
Gas tube
Содержание 000 BTU Ductless Single Zone Mini-Split Wall-Mounted Heat Pump
Страница 2: ......
Страница 77: ...1 2 3 4 5 6 I 73 SM831148 1 Specifications 1 4 Dimensional Data B Outdoor Unit CH4272R C4272R ...
Страница 118: ......
Страница 119: ...III 1 SM831148 3 Electrical data 1 2 3 4 5 6 3 ELECTRICAL DATA 3 1 Indoor Units III 2 3 2 Outdoor Units III 16 ...
Страница 122: ...1 2 3 4 5 6 III 4 SM831148 3 Electrical data Ceiling Mounted Type TH2672R TH3672R TH4272R Electric Wiring Diagram ...
Страница 123: ...III 5 SM831148 3 Electrical data 1 2 3 4 5 6 Ceiling Mounted Type TH2672R TH3672R TH4272R Schematic Diagram ...
Страница 124: ...1 2 3 4 5 6 III 6 SM831148 3 Electrical data Ceiling Mounted Type THH2672R THH3672R Electric Wiring Diagram ...
Страница 125: ...III 7 SM831148 3 Electrical data 1 2 3 4 5 6 Ceiling Mounted Type THH2672R THH3672R Schematic Diagram ...
Страница 126: ...1 2 3 4 5 6 III 8 SM831148 3 Electrical data Concealed Duct Type UH2672R UH3672R Electric Wiring Diagram ...
Страница 127: ...III 9 SM831148 3 Electrical data 1 2 3 4 5 6 Concealed Duct Type UH2672R UH3672R Schematic Diagram ...
Страница 128: ...1 2 3 4 5 6 III 10 SM831148 3 Electrical data Wall Mounted Type KH2672R ...
Страница 129: ...III 11 SM831148 3 Electrical data 1 2 3 4 5 6 Wall Mounted Type KH2672R Schematic Diagram ...
Страница 130: ...1 2 3 4 5 6 III 12 SM831148 3 Electrical data Wall Mounted Type KH3072R KH3672R Electric Wiring Diagram ...
Страница 131: ...III 13 SM831148 3 Electrical data 1 2 3 4 5 6 Wall Mounted Type KH3072R KH3672R Schematic Diagram ...
Страница 132: ...1 2 3 4 5 6 III 14 SM831148 3 Electrical data Wall Mounted Type KHH2672R Electric Wiring Diagram ...
Страница 133: ...III 15 SM831148 3 Electrical data 1 2 3 4 5 6 Wall Mounted Type KHH2672R Schematic Diagram ...
Страница 134: ...1 2 3 4 5 6 III 16 SM831148 3 Electrical data 3 2 Outdoor Units CH2672R Electric Wiring Diagram ...
Страница 135: ...III 17 SM831148 3 Electrical data 1 2 3 4 5 6 3 2 Outdoor Units CH2672R Schematic Diagram ...
Страница 136: ...1 2 3 4 5 6 III 18 SM831148 3 Electrical data 3 2 Outdoor Units C2672R Electric Wiring Diagram ...
Страница 137: ...III 19 SM831148 3 Electrical data 1 2 3 4 5 6 3 2 Outdoor Units C2672R Schematic Diagram ...
Страница 138: ...1 2 3 4 5 6 III 20 SM831148 3 Electrical data 3 2 Outdoor Units CH3072R CH3672R Electric Wiring Diagram ...
Страница 139: ...III 21 SM831148 3 Electrical data 1 2 3 4 5 6 3 2 Outdoor Units CH3072R CH3672R Schematic Diagram ...
Страница 140: ...1 2 3 4 5 6 III 22 SM831148 3 Electrical data 3 2 Outdoor Units C3072R C3672R Electric Wiring Diagram ...
Страница 141: ...III 23 SM831148 3 Electrical data 1 2 3 4 5 6 3 2 Outdoor Units C3072R C3672R Schematic Diagram ...
Страница 142: ...1 2 3 4 5 6 III 24 SM831148 3 Electrical data 3 2 Outdoor Units CH4272R Electric Wiring Diagram ...
Страница 143: ...III 25 SM831148 3 Electrical data 1 2 3 4 5 6 3 2 Outdoor Units CH4272R Schematic Diagram ...
Страница 144: ...1 2 3 4 5 6 III 26 SM831148 3 Electrical data 3 2 Outdoor Units C4272R Electric Wiring Diagram ...
Страница 145: ...III 27 SM831148 3 Electrical data 1 2 3 4 5 6 3 2 Outdoor Units C4272R Schematic Diagram ...
Страница 146: ......