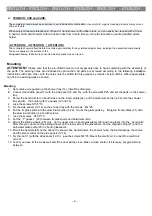
Sanotechnik TR20 Скачать руководство пользователя страница 2

Lista Componenti 

– Packing list - 

No


pcs 

Deutsch

English

Magyar

Czech 


Român

ă

 Slovensko Hrvatski  Slovensky 

Turkey 

1 1 

Tettuccio

  Top 

cover 

Tet

ő

st

ř

echa 

Capac  

Zgornji del 

Gornji dio 

Horná 

č

as

ť


Tavan 

2 1 

Ventilator

e

  Ventilator 

Ventilátor  ventilátor Ventilator Ventilator Ventilator  Ventilátor  Vantilatör 

3 1 

Artoparlante

  loudspeaker Hangszóró reproduktor difuzor  zvo

č

nik zvu

č

nik reproduktor Hoparlör 

4 2

Guida rotaie

Bend rails 

Vezet

ő

sín pojezdový 

profil 

Ş

ine

Vodila 

Vode

ć

profil 

Lišty 

Profil 

5 1 

Luce 

superiore


Top 

light 

Világítás 

osv

ě

tlení Iluminare 

Lu

č

Svjetlo

Svetlo Tepe I

ş

ı

ğ

ı


6 1 

Soffione doccia


Head 

shower 

Fejzuhany  

sprcha 

hlavy 

Cap 

dispersor 

dus  

 naglavni 

tuš 

tuš iznad 

glave  

Hlava sprchy 

Tepe 
Du

ş

7 1 

Parete posteriore


Back wall 

 Hátfal 

zadní 
st

ě

na 

 Partea 

din spate 

 hrbtni 

panel 

zadnja 

panel 

Zadná stena 

Arka 

Panel 

8 22 

Vite


M4*25 

Screw 

M4*25 

Csavarok 

(M4*25) 

šrouby 

M4*25 

Ş

uruburi 

M4*25 

Vijaki 

M4x25 

Vijci 

M4x25 

Skrutky M4*25 

Vida 

M4*25 

9 1 

Mensola


Shelf 

Polc 

poli

č

ka Poli

ţă

 Poli

č

ka Polica 

Odkladací 

priestor 

Ş

ampuan 

Raf

ı


10 1 

Pannello di controllo


Control 

panel 

Kezel

ő

 panel 

kontrolní 

panel 

Panou de 

comanda 

Kontrolni 

elem. 

Kontrolni 

elem. 

Kontrolný 

element 

Kontrol 

Paneli 

11 1 

Porta asciugamano

 Towel 

rail  Törölköz

ő

 tartó 

držák 

ru

č

níku 

Suport 

prosop 

Držalo 

brisa

č


Nosa

č


ru

č

nika 

Držiak na uterák 

Halu Bar

ı


12 1 

Parete laterale sx


Side wall 

left 

Oldalfal  

bo

č

ní 

st

ě

na 

Perete 
lateral  

stranski 

panel  

panel sa 

strane 

Bo

č

ná stena 

Sol Arka 

Panel 

13 4 

Getti


Jets 

Fúvókák 

trysky 

Duze 

Šob 

Mlaznica 

Trysky 

Jetler 

Packing1  

22,23,24,25,26,27

,31


Packing2 

7,10,13,18


Packing3 

12, 16


Packing4 

1,2,3,4,5,6,8,9,11,
12,14,15,16,17,19

,20,21,28,29,30 

Содержание TR20

Страница 1: ...nloads Montaggio in Tempi Record Guarda il video dimostrativo www sanotechnik it SANOTECHNIK IT ViaPistelli19 92024 Canicatt AG Italia P IVA 02649080849 Tel 09221807908 Email sanotechnikitalia gmail c...

Страница 2: ...posteriore Back wall H tfal zadn st na Partea din spate hrbtni panel zadnja panel Zadn stena Arka Panel 8 22 Vite M4 25 Screw M4 25 Csavarok M4 25 rouby M4 25 uruburi M4 25 Vijaki M4x25 Vijci M4x25 Sk...

Страница 3: ...rofili Profil Profil spojovacia li ta pre pevn as k ti Dikey Profil 23 2 Guarnizione T T gasket T t m t s T t sn n Cheder T T tesnilo T brtvilo T tesnenie T conta 24 2 Ante fisse Fix doors Fix vegfal...

Страница 4: ...sizioni di legge in vigore ATTENZIONE Non consentito l uso di tubazioni rigide tra la doccia e la fornitura di acqua Il collegamento deve essere flessibile in modo da essere possibile in qualsiasi mom...

Страница 5: ...tit Perdite d acqua al di fuori box doccia pu verificarsi anche quando le articolazioni docce vengono direttamente spruzzate con acqua Eventuali piccole macchie punti o graffi sui pannelli posteriori...

Страница 6: ...3 4 22 21 4 22 21...

Страница 7: ...4 9 17 19 11 8 12 14 4 24 4 22 4 31 30...

Страница 8: ...5 28 25 26 26 29...

Страница 9: ...6 12 12 22...

Страница 10: ...7 Silikon...

Страница 11: ...8 Connessioni Idrauliche TR250 Doccetta Soffione Acqua fredda r Acqua calda Massaggio piedi Getti...

Страница 12: ...9 Connessioni Idrauliche TR25 Doccetta Soffione Acqua fredda r Acqua calda Massaggio piedi Ingresso acqua Getti...

Страница 13: ...Connessioni Elettriche 10...

Страница 14: ...pannello del computer deve essere installato da persona qualificata La tensione di alimentazione AC 230 10 Si prega di spegnere il controllo dopo ogni utilizzo Scollegarlo quando non viene utilizzato...

Страница 15: ...nel 13 14 IMPORTANT IMPORTANT IMPORTANT IMPORTANT The client have to guarantee that the complete shower cabin is mount in such way that every time it is free amenably to make overhauls or repair work...

Страница 16: ...le extensible intermediate 50 cm between the siphon and sewer connection be installed so that a push back for maintenance or service is possible 3 Electrical installation On site The electronic connec...

Страница 17: ...eared up the shower tray 14 Install the drain pipe 2 Connect the middle panel 7 with the side panel 12 and 16 with the screws M4 25 and put the parts on the shower tray 3 Screw the bend rails 4 on bou...

Страница 18: ...ENGLISH ENGLISH ENGLISH ENGLISH ENGLISH ENGLISH 3 4 22 21 4 22 21...

Страница 19: ...ENGLISH ENGLISH ENGLISH ENGLISH ENGLISH ENGLISH 4 9 17 19 11 8 12 14 4 24 4 22 4 31 30...

Страница 20: ...ENGLISH ENGLISH ENGLISH ENGLISH ENGLISH ENGLISH 5 28 25 26 26 29...

Страница 21: ...ENGLISH ENGLISH ENGLISH ENGLISH ENGLISH ENGLISH 6 12 12 22...

Страница 22: ...ENGLISH ENGLISH ENGLISH ENGLISH ENGLISH ENGLISH 7 Silikon...

Страница 23: ...ENGLISH ENGLISH ENGLISH ENGLISH ENGLISH ENGLISH 8 Water connections TR20 D sen Topshower Handshower Cold water Hot water Footmassage Jets...

Страница 24: ...ENGLISH ENGLISH ENGLISH ENGLISH ENGLISH ENGLISH 9 Water connections TR25 Jets Cold water Footmassage Hot water Topshower Handshower Water inlet...

Страница 25: ...ENGLISH ENGLISH ENGLISH ENGLISH ENGLISH ENGLISH Electrical connections 10...

Страница 26: ...the low end 88MHz Then press the tune key the radio will begin to make automatic tuning from the low end to the high end again repress the radio key to turn off the radio 7 Press the Volume up or down...

Отзывы: