background image

DEUTSCH 

– DEUTSCH – DEUTSCH – DEUTSCH – DEUTSCH – DEUTSCH – DEUTSCH - DEUTSCH 

11/2014 

1


Art.Nr.: 
D50510 


Sanotechnik Handelsgesellschaft m.b.H. 

Industriestrasse 5 

A-2752 Wöllersdorf 

Tel.: 0043/2622/421 93-0 

Fax. 0043/2622/421 93-6 

Email: 

[email protected]     

www.sanotechnik.com 


Содержание D50510

Страница 1: ...SCH DEUTSCH DEUTSCH DEUTSCH DEUTSCH 11 2014 1 Art Nr D50510 Sanotechnik Handelsgesellschaft m b H Industriestrasse 5 A 2752 Wöllersdorf Tel 0043 2622 421 93 0 Fax 0043 2622 421 93 6 Email office sanotechnik at www sanotechnik com ...

Страница 2: ...nd ohne vorherige Dusche aus um festzustellen was Sie bevorzugen Wenn Sie vorher duschen trocknen Sie sich vollständig ab da das Wasser das Holz beschädigen kann 9 Essen Sie mindestens eine Stunde vor der Benutzung nichts Am besten ist eine Benutzung mit nüchternem Magen da ein voller Magen Unbehagen erzeugen kann 10 Sie können auch von der entspannenden Wirkung der Infrarotkabine profitieren inde...

Страница 3: ...gerung 1 Setzen Sie die Kabine während des Transports keinem Regen Schnee oder heftigen Kollisionen aus 2 Lagern Sie sie nicht in einer feuchten Umgebung Schimmelbildung ELEKTROINSTALLATION Bauseits Der Elektro Anschluss darf nur von einem behördlich konzessionierten Elektroinstallationsunternehmen durchgeführt werden Die Installationsvorschriften der örtlichen Energieversorgungsunternehmen sowie ...

Страница 4: ...ng durch unbefugtes Personal Transportschäden zurückzuführen sind wie z B Sicherungen dekorative Elemente usw Durch mangelhafte Einhaltung der Bedienungsanleitung lehnt der Hersteller jegliche direkte und indirekte Haftung auf Personen oder Sachschäden ab Durch indirekte Schäden w z B Folgeschäden durch mangelnden Gebrauch oder allfällige Entfernung haftet der Hersteller nicht Bei Reparaturen nach...

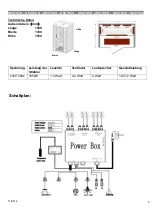
Страница 5: ...EUTSCH DEUTSCH 11 2014 5 Technische Daten Außenmaße in mm Länge 1000 Breite 1300 Höhe 1950 Spannung Leistung der Strahler Leuchte Ventilator Lautsprecher Gesamtleistung 230V 50Hz 1650W 1 5 Watt 4 2 Watt 2 Watt 1 657 2 Watt Schaltplan Höhe Länge Breite ...

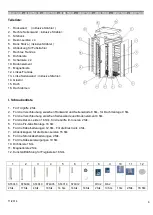
Страница 6: ...e Verschraubung zwischen Rückwand und Seitenwände 8 Stk für Dachmontage 9 Stk 3 Für die Verschraubung zwischen Seitenwände und Bodenelement 4 Stk 4 Für die Dekor Leisten 16 Stk für die Griffe im Inneren 2 Stk 5 Für die Fix Glas Montage 16 Stk 6 Für die Kabelhalterungen 12 Stk Für die Elektronik 4 Stk 7 Abdeckkappen für die Dekor Leisten 16 Stk 8 Für die Stromkabelhalterungen 2 Stk 9 Für die Kabelv...

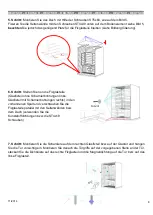
Страница 7: ...denelement 2 Schritt Stellen Sie die linke Seitenwand auf das Bodenelement und verschrauben Sie es mit der Rückwand Senkkopfschrauben ST5x60 Montieren Sie dann die Elektronikbox auf der Rückwand 3 Schritt Montieren Sie die Sitzbankstütze bzw Sitzbank wie auf dem Bild 3 4 Schritt Stellen Sie die rechte Seitenwand auf das Bodenelement und verschrauben Sie es mit der Rückwand Senkkopfschrauben ST5x60...

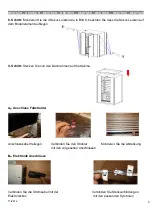
Страница 8: ...steile Glasfixteil ohne Scharnierbohrungen links Glasfixteil mit Scharnierbohrungen rechts in den vorhandenen Spalt und verschrauben Sie die Fixglasteile parallel mit den Seitenwänden bzw dem Dach verwenden Sie die Kunststoffdichtungen bzw die ST4x18 Schrauben 7 Schritt Montieren Sie die Scharniere auf dem rechten Glasfixteil bzw auf der Glastür und hangen Sie die Tür vorsichtig ein Montieren Sie ...

Страница 9: ...eisten auf dem Bodenelement aufliegen 9 Schritt Stecken Sie nun den Dachrahmen auf die Kabine A Anschluss Fußstrahler Anschlusskabel freilegen Verbinden Sie den Strahler Montieren Sie die Abdeckung mit den vorgesehen Anschlüssen B Elektronik Anschlüsse Verbinden Sie die Stromkabel mit der Verbinden Sie Steckverbindungen Elektronikbox mit den passenden Symbolen ...

Страница 10: ...hluss C FM Indikator Leuchte 06 Strahler Gruppe A D FM Radio Indikator Leuchte 07 Strahler Gruppe B E Lautstärke und Zeit 08 Farblicht F Lautstärke Indikator Leuchte 09 Ventilator G Zeit Indikator Leuchte 10 FM Radio H Strahler Gruppe A Indikator Leuchte 11 CD MP3 I Strahler Gruppe B Indikator Leuchte 12 FM Radio Frequenz J Ventilator automatisch Indikator Leuchte 13 FM Radio Frequenz K Power Ein ...

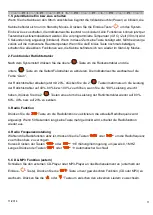
Страница 11: ...ahler zu aktivieren Die Indikatorleuchte wechselt auf die Farbe Grün der Rotlichtstrahler arbeiten jetzt mit 20 drücken Sie die 2 Tasten mehrmals um die Leistung der Rotlichtstrahler auf 40 80 bzw 100 zu erhöhen wenn Sie die 100 Leistung erreicht haben drücken Sie die 2 Tasten erneut um die Leistung der Rotlichtstrahler wieder auf 80 60 40 bzw auf 20 zu senken 3 Radio Funktion Drücken Sie die Tast...

Страница 12: ...e zu erhöhen bzw zu verringern System muss aktiv sein Langes Drücken Schnelles Erhöhen Verringern Der Einstellbereich geht von 5 99 Minuten Drücken Sie die Tasten um die Temperatur um jeweils 1 C zu erhöhen bzw zu verringern System muss aktiv sein Langes Drücken Schnelles Erhöhen Verringern Der Einstellbereich geht von 35 60 C Nach dem Einstellen der gewünschten Temperatur wechselt die Anzeige zur...

Страница 13: ...frequenz 50HZ Gesamtleistung Max 2600W Leistungsverlust 0 25mA Wiederstand 50MΩ Spannungsfestigkeit 2000V Detaillierte Technische Daten Typen Nennspannung Frequenz Nennleistung Sonstiges Strahler 230VAC 50 HZ 250 300W 7 Stk Licht 12VDC 1 5W 1 Stk Ventilator 12VDC 4W 1 Stk Radio CD MP3 12VDC 4W Bedienelement Außenmaße 170x140 mm ...

Страница 14: ...H ENGLISH ENGLISH ENGLISH ENGLISH 1 13 Item No D50510 Sanotechnik Handelsgesellschaft m b H Industriestrasse 5 A 2752 Wöllersdorf Tel 0043 2622 421 93 0 Fax 0043 2622 421 93 6 Email office sanotechnik at www sanotechnik com 11 2014 ...

Страница 15: ...ower in order to determine what you prefer If you take a shower before please dry off completely because the water can damage the wood 9 Eat at least one hour before using It is best to use with an empty stomach because a full stomach may cause discomfort 10 You can also benefit from the relaxing effect of the infrared cabin by going to bed after use The relaxed state after use will help calm and ...

Страница 16: ... collisions 2 Store them in a non humid environment Mold building ELECTRICAL Feeder The electrical connection may be performed by an officially licensed electrical company The installation requirements of local utility companies and the provisions of DIN 57100 and OVE VDE 0100 Part 701 must be strictly complied with The cable sheathed cable H05VV f3G2 5 YMM J 3x2 5 mm up to 3500 watts shall have a...

Страница 17: ...to use incorrect installation maintenance by unauthorized personnel due to transport damage such as fuses decorative elements etc Inadequate compliance with the instructions the manufacturer disclaims any direct or indirect liability to persons or property By indirect damage such as damage caused by lack of use or removal of any manufacturer is not liable For repairs after the warranty period the ...

Страница 18: ...NGLISH 5 13 Technical parameter External Dimensions mm Length 1000 Width 1300 Height 1950 Voltage Power of Heater Lampion Ventilation fan Speaker Total Power 230V 50Hz 1650W 1 5 Watt 4 2 Watt 2 Watt 1 657 2 Watt Prepare before installation Height Length Width ...

Страница 19: ...lation X2 2 For the side wall and back wall installation X8 For the roof fixing X9 3 For the fixing the side wall and the bottom board X4 4 For the decoration strip installation X16 for the handle inside X2 5 For the fixed glass installation X16 6 For the wire clip installation X12 For the electric box installation X4 7 For the decoration strip cap X16 8 For the total electric power source wire cl...

Страница 20: ...of the installer right the back wall and mare sure it is vertically Step 2 Put the left side wall on the left of the bottom board and use the sunk screw 5 60 to install it with the the back wall Then install the electricity box after finish the installation of the side board Step 3 Put the bench board and the bench frame as the pic 3 Step 4 Fix the right side wall with the ST5 60 screw ...

Страница 21: ...om board with ST4 40 screw Step 6 Install with left and right side fixed glass Keep the parallel and level between the glass and the side wall to fit the bottom board well then fix the elasticity of the screw good enough Finally do the same way with the glass door Step 7 Install the hinge of the glass door the handle the magnetic strip And also the single side strip ...

Страница 22: ...he wrapping decoration strip installation Step 9 Put on the roof outline board A Feet heater connection Uncover the heater Connect the electric line Put on the floor B Electric power source connection The connection between power source and the heater Check the mark and connect ...

Страница 23: ...05 MP3 USB input C FM tune indicator light 06 Infrared sauna group A D Volume time 07 Infrared sauna groub B E Volume adjust indicator light 08 Colour light F Time setting indicator light 09 Fan G Infrared sauna group A light 10 FM H Infrared sauna group B light 11 CD MP3 I Automatic fan indicator light 12 FM frequency J Fan by hand indicator light 13 FM frequency K Power on off indicator light 14...

Страница 24: ...e red glass heather now works 30 press the two key several times to increase the power of the red light emitter by 10 maximum 100 or if you have the 100 achieved power press the 2 key again in order to reduce the power of the red light emitters by 10 minimum 30 3 Radio function Press the Radio button to switch on the Radio when the system is booting The Radio light turns green The dynamic screen s...

Страница 25: ... 9 Time Temperature setting Press the button to raise the temperature for always 1 minute or to reduce The system has to be on working status keep on long press the button more than one second can adjust the item quickly The adjustment range is 5 99 minutes Adjust the temperature up and down at 1 minute by press button when the system is on working status Keep on long press the button more than on...

Страница 26: ...leakage 0 25mA Insulated resistance 50MΩ Dielectric strength 2000V Technical description of load configuration Load type Rated load Voltage Rated Load Frequency Rated Load Power Others heater 230VAC 50 HZ 250 300W 7 sets light 12VDC 1 5W 1 set Ventilator 12VDC 4W 1 pc Radio CD MP3 12VDC 4W The installment size of control panel 170 140 mm Outer size 170 140 mm ...

Отзывы: