background image

520-222-000

1/04   Rev C

Model S30 Metallic Design Level 1   Page 23

DIAPHRAGM SERVICING

To service the diaphragms first shut

off the suction, then shut off the
discharge lines to the pump. Shut off the
compressed air supply, bleed the
pressure from the pump, and disconnect
the air supply line from the pump. Drain
any remaining liquid from the pump.

Step #1:

 See the pump assembly

drawing, and the diaphragm servicing
illustration.

Using a 9/16"  wrench or socket,

remove the 16 capscrews (item 10), and
hex nuts that fasten the manifolds (items
22 & 23) to the outer chambers (item 14).

Step #2:

 Removing the outer

chambers.

Using a 11/16" and a 5/8" wrench or

socket, remove the 16 capscrews (items
9), and hex nuts that fasten the outer
chambers, diaphragms, and inner
chambers (items 15) together.

Step #3:

 Removing the diaphragm

assemblies.

Use a 1

1

/

16

" (27mm) wrench or six

pointed socket to remove the diaphragm
assemblies (outer plate, diaphragm, and
inner plate) from the diaphragm rod
(item 32) by turning counterclockwise.

NOTE:

 To uninstall the diaphragm

plates from the diaphragm, hold the inner
diaphragm plate using one of two
methods:

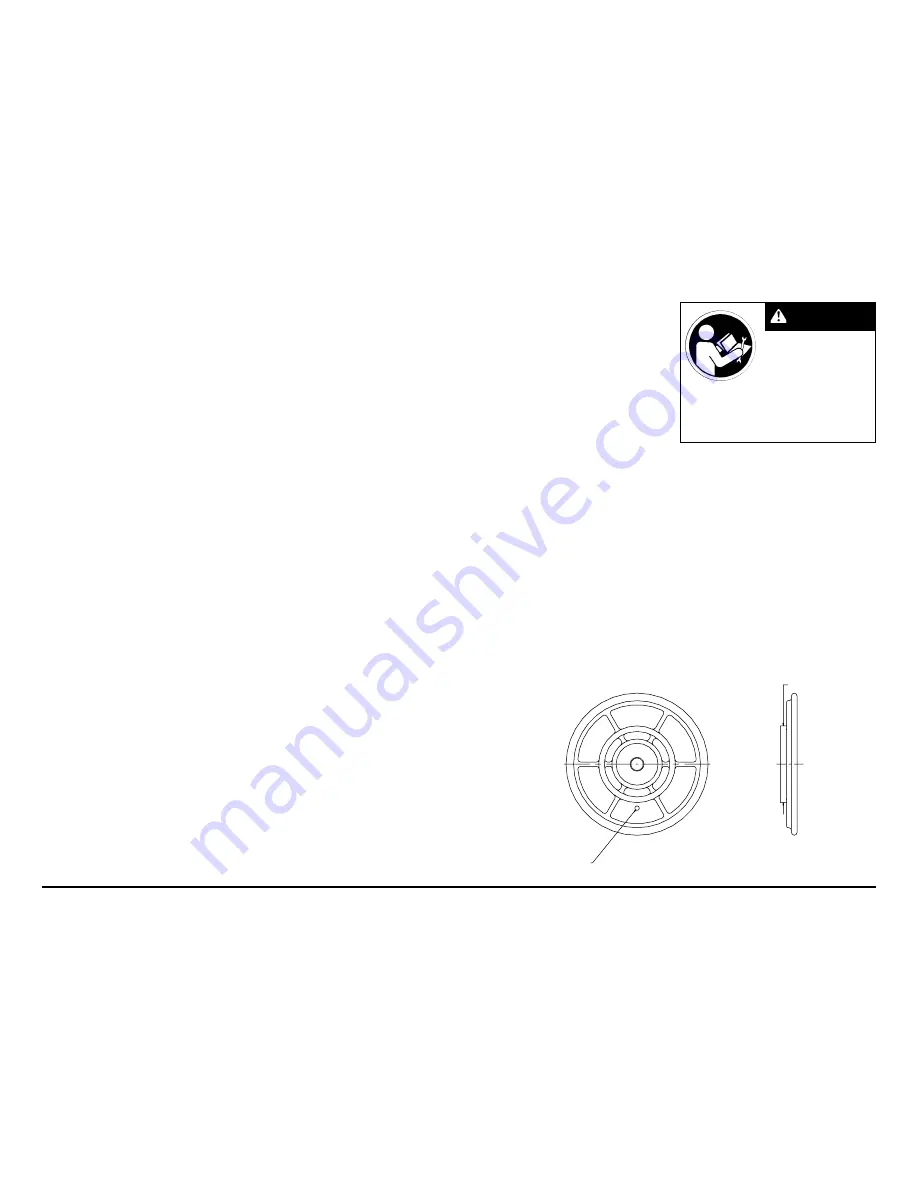
Preferred Method: Place the

assembled plates and diaphragm in a
large vise, gripping on the exterior cast
diameter of the inner diaphragm plate
(see the drawing at far right).

Alternate Method: When a larger vise

is not available, insert a 1/4 - 20UNC hex
capscrew or setscrew (standard
hardware) into the tapped hole in the inner
diaphragm plate. Insert the assembled
plates and diaphragm into a vise with the
stud from the outer plate and the
1/4 - 20 fastener loosely between the
jaws of the vise (see illustration at right).

Use a 1

1

/

16

" wrench or socket to

remove the outer diaphragm plate (item
29) by turning counterclockwise. Inspect
the diaphragm (item 17) for cuts,
punctures, abrasive wear or chemical
attack. Replace the diaphragms if
necessary.

Step #4:

 Installing the diaphragms.

Push the threaded stud of the outer

diaphragm plate through the center hole
of the diaphragm. Thread the inner plate
clockwise onto the stud. 

Use one of the

two methods for holding the inner
diaphragm plate that was described in
prior note in step #3.

 Use a torque wrench

to tighten the diaphragm assembly
together to 50 ft. lbs. (67.79 Newton
meters). Allow a minimum of 15 minutes
to elapse after torquing, then re-torque
the assembly to compensate for stress
relaxation in the clamped assembly.

Step #5:

 Installing the diaphragm

assemblies to the pump.

Make sure the bumper (item 6) is

installed over the diaphragm rod.

Thread the stud of the one diaphragm

assembly clockwise into the tapped hole
at the end of the diaphragm rod (item
32) until the inner diaphragm plate is flush
to the end of the rod. Insert rod into
pump.

Align the bolt holes in the diaphragm

with the bolt pattern in the inner chamber
(item 15).

Fasten the outer chamber (item 14)

to the pump, using the capscrews (items
9), and hex nuts.

On the opposite side of the pump,

pull the diaphragm rod out as far as
possible. Make sure the bumper (item
6) is installed over the diaphragm rod.

Thread the stud of the remaining

diaphragm assembly clockwise into the
tapped hole at the end of the diaphragm
rod (item 32) as far as possible and still
allow for alignment of the bolt holes in
the diaphragm with the bolt pattern in
the inner chamber (item 15).

Fasten the remaining outer chamber

(item 14) to the pump, using the
capscrews (items 9), and hex nuts.

Step #6:

 Re-install the manifolds to

the pump, using the capscrews (items
10), hex nuts and flat washers.

Read these instructions
completely, before in-
stallation and start-up. It
is the responsibility of
the purchaser to retain

this manual for reference. Failure to
comply with the recommendations stated
in this manual will damage the pump, and
void factory warranty.

IMPORTANT

The pump is now ready to be

re-installed, connected and returned to
operation.

OVERLAY DIAPHRAGM SERVICING

The overlay diaphragm (item 16)

is designed to fit over the exterior of the
standard TPE diaphragm  (item 17).

 The molded directional arrows on the

overlay diaphragm must point vertically.

Follow the same procedures

described for the standard diaphragm for
removal and installation.

Alternate Method:

Install 1/4 - 20UNC fastener

into tapped hole.

Preferred Method:
Grip this exterior
cast diameter.

Содержание S30

Страница 1: ...n Valve w Stroke Indicator Servicing 19 Solenoid Shifted Air Valve Drawing 20 Solenoid Shifted Air Valve Parts List 20 Solenoid Shifted Air Distribution Valve Option 21 Diaphragm Service Drawing with Overlay 22 Diaphragm Service Drawing Non Overlay 22 Diaphragm Servicing 23 Overlay Diaphragm Servicing 23 Actuator Plunger Servicing 24 Check Valve Servicing 25 Check Valve Drawing 25 Optional Muffler...

Страница 2: ......

Страница 3: ...ayer Long mechanical flex 275 F 40 F life Excellent abrasion resistance 135 C 40 C Virgin PTFE Chemically inert virtually impervious Very few chemicals are known to react chemically with PTFE molten alkali metals turbulent liquid or gaseous fluorine and a few fluoro chemicals such as 220 F 35 F chlorine trifluoride or oxygen difluoride which readily liberate free fluorine at elevated temperatures ...

Страница 4: ...0VAC Pulse Output Kit P3 Intrinsically Safe 110 120VAC Pulse Output Kit P4 Intrinsically Safe 220 240VAC Pulse Output Kit SP Stroke Indicator Pins Check Diaphragm Check Non Wetted Shipping MODEL Pump Pump Valve Design Wetted Check Valve Valve Material Porting Pump Pump Kit Weight Brand Size Type Level Material Materials Seat Options Options Style Options Options lbs kg S30B1ABBANS000 S 30 B 1 A B ...

Страница 5: ...1 2 3 4 5 6 7 0 20 40 60 80 100 120 140 160 180 200 900 800 700 600 500 400 300 200 100 0 220 240 U S Gallons per minute Displacement Per Stroke 94 gallons 3 56 liters Flow Capacity 0 to 235 gallons per minute 0 to 889 liters per minute 120 204 140 238 100 PSI 6 8 Bar 80 PSI 5 44 Bar 60 PSI 4 08 Bar 20 PSI 1 36 Bar Air Inlet Pressure 40 PSI 2 72 Bar 30 20 25 10 15 5 9 1 6 7 6 3 4 5 1 5 NPSHR METER...

Страница 6: ...Bolt Circle Suction Port 3 150 LB FF ANSI Flange Ø3 4 4 Holes Equally Spaced On A Ø6 Bolt Circle 1 NPT Exhaust Port For Optional Piping Exhaust Air In Submerged Applications Air Inlet 3 4 NPT Pulse Output Kit Aluminum Sound Dampening Muffler Encapsulated Muffler Stainless Steel Metal Muffler DIMENSION B C D E 15 3 4 16 1 32 31 3 4 4 1 8 18 29 32 35 11 16 30 27 32 4 7 32 19 35 25 32 Mesh Muffler 16...

Страница 7: ...s Equally Spaced On A Ø160mm Bolt Circle Discharge Port 80 DIN 10 Bar Flange Ø19mm 8 Holes Equally Spaced On A Ø160mm Bolt Circle Metric Dimensions S30 Metallic Flanged Dimensions in Millimeters Dimensional Tolerance 3mm Pulse Output Kit Aluminum Sound Dampening Muffler Encapsulated Muffler Stainless Steel Metal Muffler DIMENSION B C D E 400 407 806 105 481 906 808 107 483 908 Mesh Muffler 422 422...

Страница 8: ...r Of Gravity Suction Port 3 NPT 1 3 4 To Center Of Gravity Standard Encapsulated Muffler 1 NPT Exhaust Port For Optional Muffler Styles Or Piping Exhaust Air In Submerged Applications Air Inlet 3 4 NPT Pulse Output Kit Aluminum Sound Dampening Muffler Encapsulated Muffler Stainless Steel Metal Muffler DIMENSION B C D E 15 3 4 16 1 32 29 31 32 2 11 32 17 9 64 32 1 16 30 3 16 2 9 16 17 23 64 32 9 32...

Страница 9: ...ction And Discharge Ports Are Available With 3 BSP Tapered Connection Air Inlet 3 4 NPT Standard Encapsulated Muffler 1 NPT Exhaust Port For Optional Muffler Styles Or Piping Exhaust Air In Submerged Applications Pulse Output Kit Aluminum Sound Dampening Muffler Encapsulated Muffler Stainless Steel Metal Muffler DIMENSION B C D E 400 407 761 60 435 815 767 66 441 821 Mesh Muffler 437 437 425 A ...

Страница 10: ...educes vibration and strain to the pumping system A Warren Rupp Tranquilizer surge suppressor is recommended to further reduce pulsation in flow AIR SUPPLY Air supply pressure cannot exceed 125 psi 8 6 bar Connect the pump air inlet to an air supply of sufficient capacity and pressure required for desired performance When the air supply line is solid piping use a short length of flexible hose not ...

Страница 11: ...TA80 Surge Suppressor 020 051 000 Filter Regulator 020 051 001 Lubricator Available from Warren Rupp CAUTION The air exhaust should be piped to an area for safe disposition of the product being pumped in the event of a diaphragm failure INSTALLATION GUIDE Top Discharge Ball Valve Unit ...

Страница 12: ...r exhaust muffler Corrective Action Remove muffler screen clean or de ice and reinstall Refer to the Air Exhaust section of your pump SERVICE MANUAL What to Check Pumped fluid in air exhaust muffler Corrective Action Disassemble pump chambers Inspect for diaphragm rupture or loose diaphragm plate assembly Refer to the Diaphragm Replacement section of your pump SERVICE MANUAL What to Check Suction ...

Страница 13: ...e 28 WARNING IMPORTANT Read these safety warnings and instructions in this manual completely before installation and start up of the pump It is the responsibility of the purchaser to retain this manual for reference Failure to comply with the recommendations stated in this manual will damage the pump and void factory warranty WARNING Airborne particles and loud noise hazards Wear ear and eye prote...

Страница 14: ...r coded RED 361 Buna N 363 Viton Flurorel Color coded YELLOW 364 E P D M Rubber Color coded BLUE 365 Neoprene Rubber Color coded GREEN 366 Food Grade Nitrile 368 Food Grade EPDM 370 Butyl Rubber Color coded BROWN 371 Philthane Tuftane 374 Carboxylated Nitrile 375 Fluorinated Nitrile 378 High Density Polypropylene 379 Conductive Nitrile 405 Cellulose Fibre 408 Cork and Neoprene 425 Compressed Fibre...

Страница 15: ...520 222 000 1 04 Rev C Model S30 Metallic Design Level 1 Page 13 ...

Страница 16: ...75 217 000 MIDSECTION CONVERSION KIT Replaces Aluminum Midsection with Cast Iron Components Air Inlet Cap Intermediate Bracket Inner Chambers and Inner Diaphragm Plates HARDWARE KITS 475 197 330 Zinc Plated Capscrews Washers and Hex Nuts 475 197 115 Stainless Steel Capscrews Washers and Hex Nuts PULSE OUTPUT KITS For use with 530 010 000 mufflers or piped exhaust 475 198 001 DC Kit 475 198 002 DC ...

Страница 17: ...2 518 143 156 Manifold Suction 1 518 143 156E Manifold Suction 3 BSPT 1 518 143 010 Manifold Suction 1 518 143 010E Manifold Suction 3 BSPT 1 518 143 110 Manifold Suction 1 518 143 110E Manifold Suction 3 BSPT 1 518 143 112 Manifold Suction 1 518 143 112E Manifold Suction 3 BSPT 1 23 518 144 156 Manifold Discharge 1 518 144 156E Manifold Discharge 3 BSPT 1 518 144 010 Manifold Discharge 1 518 144 ...

Страница 18: ...wrench or socket remove the eight hex capscrews items 1 F that fasten the end caps to the valve body Next remove the two end caps items 1 E Inspect the two o rings items 1 D on each end cap for damage or wear Replace the o rings as needed Remove the bumpers items 1 C Inspect the bumpers for damage or wear Replace the bumpers as needed Remove the spool part of item 1 B from the sleeve Be careful no...

Страница 19: ...cks or damage Replace gasket if needed Step 2 Disassembly of the air valve Using a 7 16 wrench or socket remove the eight hex capscrews items 1 F that fasten the end caps to the valve body Next remove the two end caps items 1 E Inspect the two o rings items 1 D on each end cap for damage or wear Replace the bumpers as needed Remove the bumpers items 1 C Inspect the bumpers for damage or wear Repla...

Страница 20: ...alve 1 1 C 132 029 552 Bumper 2 1 D 165 096 551 Cap Muffler 1 1 E 165 098 147 Cap End 2 1 F 530 028 550 Muffler 1 1 G 560 020 360 O Ring 8 1 H 675 044 115 Ring Retaining 2 1 J 710 015 115 Screw SelfTapping 4 1 K 210 008 330 Clip Safety 1 1 M 560 001 360 O Ring 2 For Pumps with Alternate Mesh Sound Dampening Mufflers or Piped Exhaust 1 031 147 000 Air Valve Assembly 1 includes all items on 031 146 ...

Страница 21: ...nants Remove the sleeve if needed and replace with a new sleeve and spool set item 1 A Step 3 Re assembly of the air valve Install one bumper item 1 C and one end cap item 1 E with o rings item 1 G and 1 M into one end of the air valve body item 1 B Install one retaining ring item 1 H into the groove on the same end Insert the safety clip item 1 K through the smaller unthreaded hole in the endcap ...

Страница 22: ...1 39 241 001 000 Connector conduit 1 241 003 000 Conduit Connector with 1 Suppression Diode DC Only 40 170 029 330 Capscrew Hex HD 5 16 18 x 1 50 4 41 618 051 150 Plug 2 For Explosion Proof Solenoid Valve Connector not required for explosion proof coil coil is integral with valve 37 893 098 001 Solenoid Valve NEMA 7 9 24VDC 1 893 098 002 Solenoid Valve NEMA 7 9 24VAC 12VDC 1 893 098 003 Solenoid V...

Страница 23: ...utilized to cycle the pump s air distribution valve an electric solenoid is utilized As the solenoid is powered one of the pump s air chambers is pressurized while the other chamber is exhausted When electric power is turned off the solenoid shifts and the pressurized chamber is exhausted while the other chamber is pressurized By alternately applying and removing power to the solenoid the pump cyc...

Страница 24: ...22 000 1 04 Rev C Model S30 Metallic Design Level 1 Page 22 Diaphragm Service Drawing Non Overlay Diaphragm Service Drawing with Overlay 32 25 15 13 6 28 17 16 29 9 14 24 24 32 25 15 13 6 28 17 29 9 14 24 24 ...

Страница 25: ...se one of the two methods for holding the inner diaphragm plate that was described in prior note in step 3 Use a torque wrench to tighten the diaphragm assembly together to 50 ft lbs 67 79 Newton meters Allow a minimum of 15 minutes to elapse after torquing then re torque the assembly to compensate for stress relaxation in the clamped assembly Step 5 Installing the diaphragm assemblies to the pump...

Страница 26: ... rings if necessary Apply a light coating of grease to each o ring and re install the plungers in to the bushings Push the plungers in as far as they will go To remove the bushings item 7 first remove the retaining rings item 31 by using a flat screwdriver NOTE It is recommended that new retaining rings be installed Step 3 Re install the pilot valve assembly into the intermediate assembly Be caref...

Страница 27: ... is removed the check valve components can be seen Inspect the check balls items 2 for wear abrasion or cuts on the spherical surface The check valve seats item 34 should be inspected for cuts abrasive wear or embedded material on the surfaces of both the external and internal chambers The spherical surface of the check balls must seat flush to the surface of the check valve seats for the pump to ...

Страница 28: ...o hold it in place Configuration B 530 010 000 Mesh Muffler screws directly into the Air Valve Body This muffler is equipped with a metal element Configuration C 530 027 000 Sound Dampening Muffler screws directly into the Air Valve body This muffler is equipped with a porous plastic element Configuration A Configuration B and C Note the pump is built with a metal muffler for static electric dissi...

Страница 29: ...cm diameter Reducing the pipe size will restrict air flow and reduce pump performance When the pumped product source is at a higher level than the pump flooded suction condition pipe the exhaust higher than the product source to prevent siphoning spills See illustration 3 at right CONVERTINGTHE PUMP FOR PIPINGTHE EXHAUST AIR The following steps are necessary to convert the pump to pipe the exhaust...

Страница 30: ...014 330 self tapping screws Then insert the leak detectors into the bottom port in the inner chambers Configuration B To be used with either of the muffler options or if your exhaust is piped away You will need to mount the terminal box to the 612 185 552 mounting plate using the 2 710 014 330 self tapping screws Then mount the mounting plate directly to the air valve body using the 4 710 009 115 ...

Страница 31: ... a PLC The Pulse Output Kits mount directly onto the Muffler Cap on the Air Distribution Valve Assembly or onto the Air Distribution Valve Assembly when the threaded exhaust port or an auxiliary muffler is being used See the individual kits listed on the Pump Repair Parts List for further information RuppTech Pulse Output Kit Drawing Options Exhaust Port or Auxiliary Muffler Setup Integral Muffler...

Страница 32: ...he local electrical code for detailed grounding instruction and the type of equipment required Grounding The Pump Take action to prevent static sparking Fire or explosion can result especially when handling flammable liquids The pump piping valves containers or other miscellaneous equipment must be grounded WARNING One eyelet is installed to a true earth ground Requires a 5 16 or 8mm maximum diame...

Отзывы: