background image

WEA453e Installation Manual 

Version 1.0 

Samsung Electronics America 

Page 

113

 of 

117


Assembling Heat Shrink Tube 

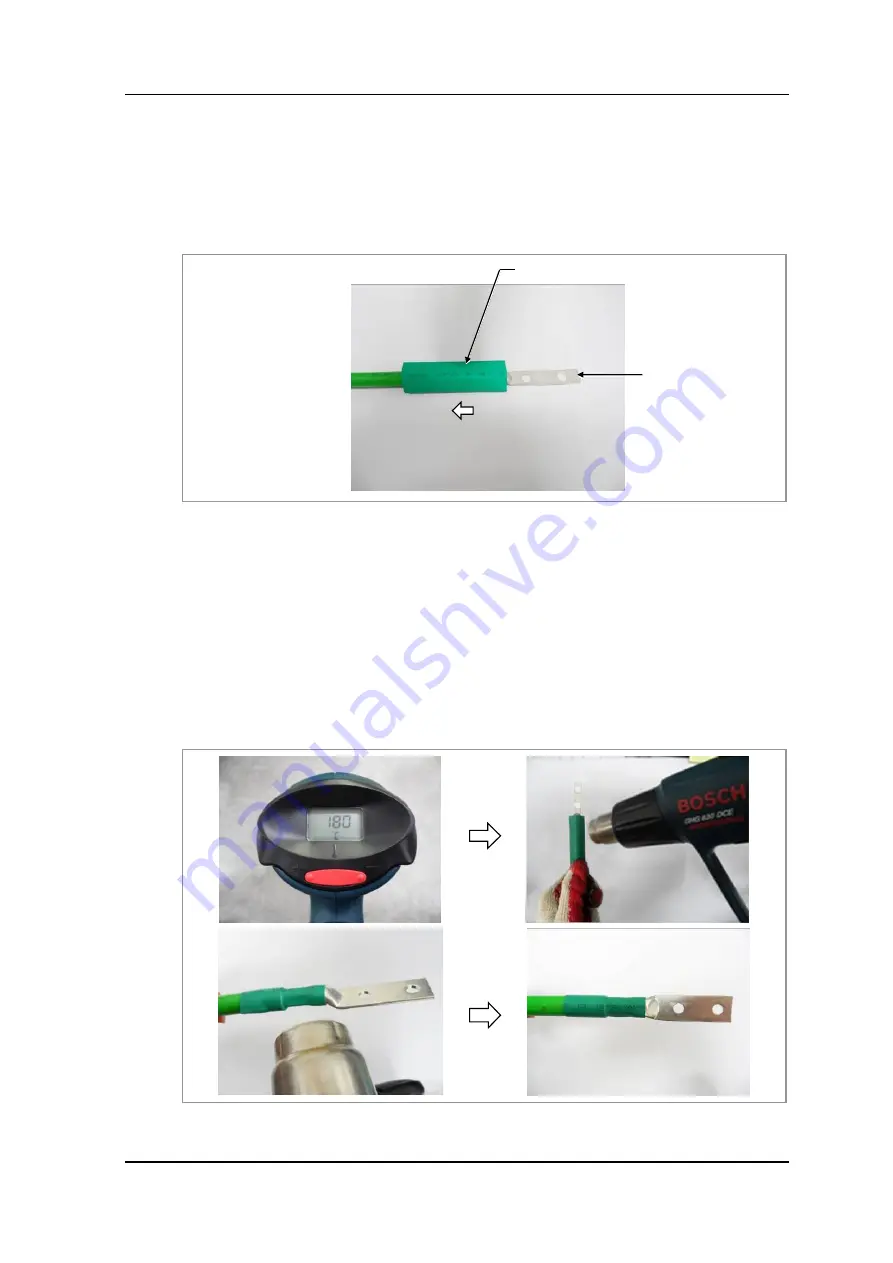
1)  After assembling a pressure terminal, move the heat shrink tube, inserted to the cable, to 

the end of pressure terminal copper tube. 


Figure 88. 

Assembling Heat Shrink Tube (1) 

 
2)  Set the temperature of the heat gun to 180-200°C. 
 
3)  Locate a heat shrink tube to cover the entire copper tube of the pressure terminal. 
 
4)  Rotate a heat gun 360° to apply heat evenly to shrink the tube. 

(Because the pressure terminal and the cable is hot due to the heat of a heating gun, be 
careful not to have a burn.) 


Figure 89. 

Assembling Heat Shrink Tube (2) 

Heat Shrink Tube 

Pressure Terminal 

Содержание WEA453e AP

Страница 1: ...WEA453e Installation Manual Version 1 0 Samsung Electronics America Page 1 of 117 WEA453e AP Installation Manual ...

Страница 2: ...rmation SAMSUNG ELECTRONICS AMERICA reserves the right without prior notice to revise information in this publication for any reason SAMSUNG ELECTRONICS AMERICA also reserves the right without prior notice to make changes in design or components of equipment as engineering and manufacturing may warrant Copyright 2015 Samsung Electronics America All rights reserved No part of this manual may be rep...

Страница 3: ...n procedure for the Outdoor AP CHAPTER 3 Cables Connect Describes the connection procedure of cables to the installed Outdoor AP CHAPTER 4 Inspecting the Installation Status Describes the procedure for checking the installation status of the system after installation when the cables have been connected ANNEX A Connector Assembly This annex describes the process for Connector Assembly ANNEX B Press...

Страница 4: ... or instructions that the reader should follow in order to avoid personal injury or fatality CAUTION Provides information or instructions that the reader should follow in order to avoid a service failure or damage to the system CHECKPOINT Provides the operator with checkpoints for stable system operation NOTE Indicates additional information as a reference Console Screen Output The lined box with ...

Страница 5: ...ons of the purchase contract This product and its electronic accessories should not be mixed with other commercial wastes for disposal BATTERY Symbol Information Correct disposal of batteries in this product Applicable in countries with separate collection systems The marking on the battery manual or packaging indicates that the battery in this product should not be disposed of with other househol...

Страница 6: ...e Safety Concerns section is to ensure the safety of users and prevent property damage Please read this document carefully for proper use Symbols Caution Indication of a general caution Restriction Indication for prohibiting an action for a product Instruction Indication for commanding a specifically required action ...

Страница 7: ...is being supplied When mounts demounts the SDP U Make sure to turn off the switch inside the stiffener when mounting demounting SDP U When measures voltage When measures the voltage be careful not to short a circuit since the power is being supplied When mounts demounts the SDP U Make sure to turn off the switch inside the stiffener when mounting demounting SDP U CAUTION WARNING ...

Страница 8: ... injury to the operator may occur Connect the Ground Cable When connecting the cables make sure to connect the ground cable first If the other cables are connected without the ground cable connected first it may cause an electric shock causing serious damage or severe injury Transportation and Storing Beware of Fire or Burns Since there is a risk of fire or burns make sure to avoid contact with an...

Страница 9: ...em Design and Interface 15 1 2 System Specifications 17 1 3 Installation Safety Procedures 18 1 4 Installation Tools 19 CHAPTER 2 System Installation 20 2 1 Installation Procedure 20 2 2 Foundation Procedure 21 2 2 1 System Arrangement 21 2 3 Carrying and Unpacking 23 2 3 1 Moving the Components 23 2 3 2 Unpacking the Components 23 2 4 Mounting the System 24 2 4 1 Wall Mounting 28 2 4 2 Mounting t...

Страница 10: ...3 5 3 Connecting the Arrestors 77 3 5 4 Connecting the Patch Antenna Cables 81 3 5 5 Connecting the Patch Antenna Cables Outdoor AP 85 CHAPTER 4 Inspecting the Installation Status 93 ANNEX A Connector Assembly 97 A 1 RJ 45 Shield Type 97 A 2 Finishing the Connector Connection Part by Tape 99 ANNEX B Pressure Terminal Assembly 100 B 1 Preparations 100 B 2 Pressure Reference Table 101 B 3 Assembling...

Страница 11: ...l 2 35 Figure 18 Mounting the Outdoor AP on the Wall 3 35 Figure 19 Mounting the Adapter 1 36 Figure 20 Mounting the Adapter 2 37 Figure 21 Mounting the Outdoor AP on a Pole 1 39 Figure 22 Mounting the Outdoor AP on a Pole 2 40 Figure 23 Mounting the Outdoor AP on a Pole 3 40 Figure 24 Mounting the Outdoor AP on a Pole 4 41 Figure 25 Mounting the Adapter on a Pole 1 42 Figure 26 Mounting the Adapt...

Страница 12: ...nnecting the Arrestors 3 80 Figure 56 Connecting the Patch Antenna Cables 1 81 Figure 57 Connecting the Patch Antenna Cables 2 82 Figure 58 Connecting the Patch Antenna Cables 3 83 Figure 59 Connecting the Patch Antenna Cables 4 84 Figure 60 Patch Antenna Package Components 85 Figure 61 Installing on a Wall 87 Figure 62 Installing on a Pipe 88 Figure 63 Installing on a Wall Using Brackets 90 Figur...

Страница 13: ...Table 3 Dimensions and Weight 17 Table 4 Environmental Conditions 17 Table 5 Basic Tools 19 Table 6 Recommended Clearance Distance When Installing the System 21 Table 7 Components and Tools for Assembling the Unit Bracket 24 Table 8 Components and Tools for Assembling the Dipole Antennas 25 Table 9 Drill Bit and Hole Depth for Anchor Bolts 30 Table 10 Components and Tools for Mounting the Mount Br...

Страница 14: ...e Pin Map 72 Table 26 Components and Tools for Connecting the Arrestors 77 Table 27 Materials and Tools for Connecting the Patch Antenna Cables 81 Table 28 Inspection Checklist 94 Table 29 Pressure Reference Table for Pressure Terminal 101 Table 30 Compressor Specifications per Cable Thickness 102 Table 31 Standard Torque Value for Tightening Bolts 114 Table 32 Brass Bolts Torque Value 114 ...

Страница 15: ...ctronics America Page 15 of 117 CHAPTER 1 Preparation 1 1 System Design and Interface Design The design of the Outdoor AP is as follows Figure 1 Outdoor AP Design Unit mm 267 Bottom View 207 7 Front View Top View Left View Right View Rear View 57 5 184 ...

Страница 16: ...nual Version 1 0 Samsung Electronics America Page 16 of 117 Interface The interface and connections for the Outdoor AP are as follows Figure 2 Outdoor AP Interface ANT_1 Ground Terminal CONSOLE LAN PoE DC 48 V ANT_2 ANT_3 LED ...

Страница 17: ...ecifications of the Smart AP are as follows Table 2 Power Specifications and Consumption Item Specifications PoE IEEE 802 3at Adapter optional 100 240 VAC 50 Hz 48 VDC 1 A Power Consumption 25 5 W Dimensions and Weight The dimensions and weight of the Smart AP are as follows Table 3 Dimensions and Weight Item Specifications Dimensions mm 267 184 57 5 Weight kg 3 kg or less Environmental Conditions...

Страница 18: ...em make sure that the power supply is turned off Installing the system with the power turned on may cause serious damages or fatal injury When drilling into a wall the operator must wear protective gloves and safety goggles to avoid any injuries caused by splinters Do not wear any metal accessories such as watches or rings in order to avoid an electric shock All unused ports must be covered with w...

Страница 19: ...cm 2 Torque Wrench Set M6 M14 10 30 kgf cm 490 5 4905 cN m 100 500 kgf cm Replaceable head 3 Drill Bit Set 6 17 mm 4 Heating Gun 50 300 C 5 Power Extension Cable 30 m 6 Tape Measure 5 m 50 m 7 Cable Cutter 6 32 mm 8 Silicon Gun Silicon Normal Gray Colorless 9 Hammers Still Rubber PVC 10 Wrenches 10 mm 13 mm 17 mm 19 mm 24 mm 36 mm 11 Wire Stripper 6 24 mm These basic tools are subject to change ba...

Страница 20: ... 2 1 Installation Procedure The installation procedure for the Outdoor AP is as follows Figure 3 Installation Procedure for the Outdoor AP Foundation Procedure Unpacking and Transporting Marking and Drilling System Arrangement Mounting the System Leveling the System Unpacking the Components Moving the Components ...

Страница 21: ...ining or repairing the system establish a clear distance from any obstructions Table 6 Recommended Clearance Distance When Installing the System Product Area Recommended Clearance Distance Front Rear 800 mm or further Side 300 mm or further Top Bottom 1 000 mm or further Figure 4 Wall Type Arrangement Unit mm 267 411 7 267 Top View Front View 87 5 163 2 61 5 36 3 Outdoor AP Adapter Top View Front ...

Страница 22: ...Pole Type Arrangement The top view of the above image is used when the diameter of the pole is 101 6 mm however the measurement may differ depending on the pole diameter Unit mm Top View Front View Pole Ф 101 6 267 411 7 87 5 267 121 6 Outdoor AP Adapter 168 2 68 0 121 6 Top View Front View 47 ...

Страница 23: ...tructions before moving the system Avoid any physical impact dust humidity or static electricity that may cause any system damage while moving it 2 3 2 Unpacking the Components When unpacking the components keep in mind the following Do not unpack the components until they arrive at the installation site Sort the supplies by job specifications and store the components in a safe place where they wi...

Страница 24: ... the Unit Bracket 1 Prepare the following components Table 7 Components and Tools for Assembling the Unit Bracket Item Description Components Unit Bracket 1 EA M4 L10 Torx Screw WSP 4 EA Regulated Torque Value M4 Torx Screw 9 52 14 28 kgf cm Required Tool Torque Driver T20H 2 Fix the unit bracket to the Outdoor AP by matching up each hole and screwing in the 4 torx screws WSP Figure 6 Assembling t...

Страница 25: ...he Dipole Antennas Item Description Components Dipole Antennas 3 EA Connectors Outdoor AP N Type Female Dipole Antenna N Type Male Regulated Torque Value N Type Male 9 11 3 kgf cm Required Tool Torque Wrench 2 Connect the 3 dipole antennas to the Outdoor AP connectors ANT1 ANT2 and ANT3 Figure 7 Assembling the Dipole Antennas 1 RF Antenna Port N Type Female Dipole Antenna N Type male connector ...

Страница 26: ...pe over the area in at least two layers of butyl tape starting 10 20 mm down from the upper end to 10 20 mm below the heat shrink tube 5 Wrap butyl tape over the area in at least two layers of insulating tape in the same manner 6 Tie both ends of the insulating tape using cable ties to make sure they do not become unwrapped Figure 8 Assembling the Dipole Antennas 2 Insulating Tape 2 3 Insulating T...

Страница 27: ...lation Manual Version 1 0 Samsung Electronics America Page 27 of 117 Figure 9 Assembling the Dipole Antennas 3 Butyl Tape Butyl Tape 4 5 Butyl Tape 6 1 2 8 9 7 Insulating Tape Insulating Tape Butyl Tape Cable Tie 10 ...

Страница 28: ... the marked points the level can only be adjusted by a small amount Then inspect the level of the marked points to check whether they are horizontal vertical by referring to System Leveling and adjust them accordingly To minimize the margin of marking errors by the operator it is recommended to determine the exact placement of the system first Place the system in the appropriate place and then mar...

Страница 29: ...ng the placement of the system and the correct distances between the holes mark the positions on the wall 2 Draw a horizontal line between the marked holes 3 Verify the horizontal line is correct by using a spirit level If it is not level then adjust the marked points accordingly Unit mm Plastic Anchor Hole Ф 5 163 2 148 61 5 34 ...

Страница 30: ... where the marked points are for fixing the plastic anchors Table 9 Drill Bit and Hole Depth for Anchor Bolts Item Anchor Bolt Drill Bit Hole Depth Outdoor AP M4 6 mm 30 mm 63 9 mm 90 90 93 75 mm 148 mm Outdoor AP Adapter 90 90 34 mm O Remove any foreign substances from inside the drilled hole Cross Section of a Hole 30 mm X 6 mm ...

Страница 31: ...all 1 Prepare the following components Table 10 Components and Tools for Mounting the Mount Bracket to the Wall Item Description Components Mount Bracket 1 EA M6 30L Plastic Anchors 4 EA M4 25L Tapping Screws 4 EA Regulated Torque Value M4 Tapping Screw 9 52 14 28 kgf cm Required Tools Drill Hammer Torque Driver and Spirit Level Unit mm Drill 6 ...

Страница 32: ...tallation Manual Version 1 0 Samsung Electronics America Page 32 of 117 2 Insert the plastic anchors into the drilled holes on the wall Figure 14 Mounting the Mount Bracket on the Wall 1 Wall 90 90 Plastic Anchor ...

Страница 33: ...ion 1 0 Samsung Electronics America Page 33 of 117 3 Align the mount bracket with the plastic anchors and firmly attach it using the screws Figure 15 Mounting the Mount Bracket on the Wall 2 Mount Bracket Tapping Screw Plastic Anchor ...

Страница 34: ...ion Components M4 Torx Screws WSP 3 EA Regulated Torque Value M4 Torx Screw 9 52 14 28 kgf cm Required Tool Torque Driver T20H The 2 M4 Torx Screws WSP should be tightened on the left and right sides of the bracket 2 Hang the unit bracket with the groove aligned with the screws temporarily fixed to the mount bracket Figure 16 Mounting the Outdoor AP on the Wall 1 Unit Bracket Groove M4 Torx Screw ...

Страница 35: ...amsung Electronics America Page 35 of 117 3 Tighten each screw on both sides Figure 17 Mounting the Outdoor AP on the Wall 2 4 Mount the top part using a screw Figure 18 Mounting the Outdoor AP on the Wall 3 M4 Torx Screw WSP M4 Torx Screw WSP ...

Страница 36: ...or Mounting the Adapter on the Wall Item Description Components M6 30L Plastic Anchors 4 EA M4 25L Tapping Screws 4 EA Regulated Torque Value M4 Tapping Screw 9 52 14 28 kgf cm Required Tools Drill Hammer Torque Driver and Spirit Level 2 Insert the plastic anchors into the drilled holes on the wall Figure 19 Mounting the Adapter 1 Plastic Anchor Wall 90 90 148 mm 34 mm ...

Страница 37: ...53e Installation Manual Version 1 0 Samsung Electronics America Page 37 of 117 3 Attach the adapter to the plastic anchors using screws Figure 20 Mounting the Adapter 2 Adapter Tapping Screw Plastic Anchor ...

Страница 38: ...WEA453e Installation Manual Version 1 0 Samsung Electronics America Page 38 of 117 When mounting the wall type adapter place the adapter directly on the wall without using the adapter mount bracket ...

Страница 39: ...gulated Torque Value M4 L14 Torx Screw 9 52 14 28 kgf cm Required Tool Torque Driver T20H The metal band used for attaching the mount bracket to the pole must be made from an approved material and the screws should be stainless steel STS 304 If these regulations are not followed the components can become corroded and rust The 2 M4 Torx Screws WSP should be tightened on the left and right sides of ...

Страница 40: ...the unit bracket with the groove aligned with the screws temporarily fixed to the mount bracket Figure 22 Mounting the Outdoor AP on a Pole 2 4 Tighten each screw on both sides Figure 23 Mounting the Outdoor AP on a Pole 3 Unit Bracket Groove M4 Torx Screw WSP Mount Bracket M4 Torx Screw WSP ...

Страница 41: ...mponents Table 14 Materials and Tools for Mounting the Adapter to a Pole Item Description Components Adapter Bracket 1 EA Metal Band 1 EA M4 Screw WSP 4 EA Regulated Torque Value M4 Screw WSP 9 52 14 28 kgf cm Required Tool Driver The tightening components that are used for mounting the adapter to a pole must be stainless steel STS 304 If this is not followed the components can become corroded and...

Страница 42: ...ersion 1 0 Samsung Electronics America Page 42 of 117 2 Align the adapter screw holes with the Adapter bracket holes and secure the adapter using the 4 screw WSP Figure 25 Mounting the Adapter on a Pole 1 Adapter Bracket Screw WSP ...

Страница 43: ... Manual Version 1 0 Samsung Electronics America Page 43 of 117 3 Secure the adapter mount bracket to the pole using the metal band Figure 26 Mounting the Adapter on a Pole 2 Adapter Bracket Metal band tightening part Pole ...

Страница 44: ...rit Level The procedure for using a spirit level are as follows Table 15 Using a Spirit Level Item Description Inspection Method Place the spirit level against the top and the sides of the system to check the location of the bubble Criterion Level Not Level If the system is level the bubble is located in the middle of the indicator lines Not Level Adjust the height by using Bakelite or other mater...

Страница 45: ...ion Manual Version 1 0 Samsung Electronics America Page 45 of 117 Figure 28 Using a Spirit Level on a Wall Mount 2 Figure 29 Using a Spirit Level on a Pole Mount 1 Vertical Leveling Vertical Leveling Horizontal Leveling ...

Страница 46: ...WEA453e Installation Manual Version 1 0 Samsung Electronics America Page 46 of 117 Figure 30 Using a Spirit Level on a Pole Mount 2 Vertical Leveling ...

Страница 47: ...procedure for connecting the cables to the system is as follows Figure 31 Connecting the System Cables Connecting a Ground Cable Connecting a Power Cable Connecting the System Ground Cable Connecting an Interface Cable Connecting the System Power Cable Connecting an Ethernet Cable Connecting the Patch Antenna Cable Connecting a PoE Cable ...

Страница 48: ...n such as cutting after installing or installing after cutting Checking the Cable Route When installing a cable between the Outdoor AP and other devices such as the AC distribution box MGB main ground bar or a switch or router you must check the cable route length and cable installation method Consider the following steps while checking the cable route Select a minimum cable length within a range ...

Страница 49: ...t connector of the system or to an auxiliary device after checking the previous cable route and cutting steps have been completed Consider the following when installing the cable Be careful not to damage the cable If the cable is damaged cut out the damaged section before installation When overlaying other cables with the installed ones make sure the cables are not flipped over Pay close attention...

Страница 50: ...binding thread cut 50 mm away from the knot to ensure that it does not become untied if cut too short When a bad connection may occur due to tension in the connector s interlinked area bind the cable at the shortest point from the connector Connecting the Connector Connecting to the connector involves assembling a connector to an installed cable and connecting the connector to a device Consider th...

Страница 51: ...Consider the following when attaching name tags Use engraved or coated labels for the outdoor cables to prevent fading The type and method of attaching the tag may vary by business to business so discuss the appropriate method with the business owner before labeling Keep all of the cables from getting crossed or tangled and consider a possible extension when installing Also keep the DC power or da...

Страница 52: ...nnected to the Outdoor AP are as follows Figure 33 Outdoor AP Connection Cables 2 Power Cable Assembly DC MGB 1 Ground Cable AC DC Adaptor Switch or Router PoE Switch Patch Antenna Outdoor AP AC Distribution Box 5 Antenna Cable 2 Power Cable Assembly AC 3 PoE Cable 4 Ethernet Cable Optional 5 Antenna Cable 5 Antenna Cable MGB ...

Страница 53: ...und Cable AWG10 F GV 4 mm 2 1C AC DC Adaptor AC Distribution Box 2 Power Cable Assembly DC AC Power Cable Assembly Outdoor AP AC DC Adaptor 2 Power Cable Assembly AC DC Power Cable Assembly PoE Switch 3 PoE Cable S FTP Cat 6 4 Pair ø8 1 ø8 5 Switch or Router 4 Ethernet Cable S FTP Cat 6 4 Pair ø8 1 ø8 5 Patch Antenna 5 Antenna Cable Antenna Cable Assembly ...

Страница 54: ... shock to the operator The purpose of grounding is as follows To protect human lives and electrical systems from lightning excessive electricity surges or high voltage To provide a discharge path for a surge caused by lightning or electricity To protect the system from static electricity To remove or reduce the potential for a high frequency electrical overload inside the system or the unit To pro...

Страница 55: ...ch and Nipper 2 Install a ground cable from the MGB to the ground terminal of the Outdoor AP Figure 34 Connecting a Ground Cable to the Outdoor AP 1 3 After assembling a pressure terminal with a heat shrink tube secure it firmly into the ground terminal of the system using the M6 SEMS Fastening components such as the pressure terminal or cables must meet the UL or equivalent standards requirements...

Страница 56: ...mm 2 1C Heat Shrink Tube Spec Color Length Φ 10 mm Green 50 mm Pressure Terminal MGB Check the MGB standards for the field and have the pressure terminal ready Arrestor 4 mm 2 1 hole ring type hole diameter 4 2 mm Fastening Components MGB Check the MGB standards for the field and have the fasteners ready Arrestor M4 Screw 1 EA Installed on the arrestor Regulated Torque Value M4 Screw 9 52 14 28 kg...

Страница 57: ...e 36 Connecting a Ground Cable to the Outdoor AP 3 2 After assembling Arrestor 1 and Arrestor 2 using a pressure terminal and a heat shrink tube secure only Arrestor 1 using the fastening components Fastening components such as the pressure terminal or cables must meet the UL or equivalent standards requirements Ex Manufacturer Panduit Arrestor 4 mm 2 Pressure Terminal S10 10R Q Ground Cable MGB ...

Страница 58: ...stallation Manual Version 1 0 Samsung Electronics America Page 58 of 117 Figure 37 Connecting a Ground Cable to the Arrestor 1 M4 Screw Pressure Terminal Ground Cable Arrestor 1 Arrestor 2 Heat Shrink Tube Green ...

Страница 59: ...embling Arrestor 2 and Arrestor 3 using a pressure terminal and a heat shrink tube secure only Arrestor 1 using the fastening components Figure 38 Connecting a Ground Cable to the Arrestor 2 Arrestor 1 Arrestor 2 Arrestor 3 Arrestor 2 M4 Screw Pressure Terminal Heat Shrink Tube Green Arrestor 2 ...

Страница 60: ...ge 60 of 117 4 Assemble Arrestor 3 with a pressure terminal and a heat shrink tube then connect it to the MGB Figure 39 Connecting a Ground Cable to the Arrestor 3 M4 Screw Pressure Terminal Arrestor 1 Arrestor 2 Heat Shrink Tube Green Arrestor 3 Arrestor 3 Arrestor 3 MGB ...

Страница 61: ...acket is secured to the metal bracket in a way that makes the ground terminal unreachable 1 in 4 screw holes for the bracket connection on the back of patch antenna must be connected with a ground cable Screw Standard M4 L8 washer included Regulated Torque Value 6 0 kgf cm Figure 40 Connecting a Ground Cable to the Patch Antenna Patch Antenna M4 8L Screw ...

Страница 62: ...nstall or cut the cable If you cut a cable without considering its curvature radius a contact failure can occur after the cable is connected Connecting a Power Cable 1 Prepare the following components Table 20 Components and Tools for Connecting a Power Cable Item Description Installation Section Rectifier Outdoor AP Power Input Terminal Cables AC Distribution Box AC DC Adaptor Power Cable Assembl...

Страница 63: ...ics America Page 63 of 117 Item Description Table 21 Power Cable Connector Pin Map Power Connector Pin No Description Color 1 GND White 2 NC No Connection Green 3 48 VDC Black Cable Side Connector DY5T1203SNF System Side Connector DY5F1203PNFL 04 3 1 3 1 2 2 ...

Страница 64: ...ection with a cable installed After installing the cable use a pressed sponge rubber packing or silicon to remove any gaps in the port or the connection When connecting power cables turn the coupling nut on the upside of the cable connector to make the connection Try not to grab the cable gland on the bottom of the cable connector when turning or tightening 2 Install the DC cable from the Outdoor ...

Страница 65: ... the connector linked to the system with the O mark on the connector linked to the cable 6 Keep the cable straight between the connector linked to the system and the connector linked to the cable to avoid any damage caused by twisting the connectors 7 Take the connector body in your left hand and turn the coupling nut with your right hand in a clockwise direction until the lock clicks If excessive...

Страница 66: ...ung Electronics America Page 66 of 117 Figure 44 Connecting a Power Cable 3 Do not apply excessive force to pull on the cable Do not bend the cable to exceed the allowed bend radius Do not twist the cable Connector body Maintains the fixed state ...

Страница 67: ...net Tx Rx0 2 Orange Gigabit Ethernet Tx Rx0 3 White Green Gigabit Ethernet Tx Rx1 4 Blue Gigabit Ethernet Tx Rx2 5 White Blue Gigabit Ethernet Tx Rx2 6 Green Gigabit Ethernet Tx Rx1 7 White Brown Gigabit Ethernet Tx Rx3 8 Brown Gigabit Ethernet Tx Rx3 Shell Shield Shield The connector pin map provided above is for one linked to the system Confirm the pin link point for the connector that is linked...

Страница 68: ...stallation Manual Version 1 0 Samsung Electronics America Page 68 of 117 2 Install the PoE cable from the PoE switch to the Outdoor AP PoE port Figure 45 Connecting the PoE Cable 1 PoE Switch Outdoor AP PoE Cable ...

Страница 69: ...the RJ 45 plug linked to the PoE cable to the Outdoor AP PoE port When connecting make sure the latch of the RJ 45 plug faces down and listen for a clicking sound Figure 46 Connecting the PoE Cable 2 Fixing Tube RJ 45 Latch Insert as the RJ 45 Latch face down Shell PoE Port RJ 45 Plug PoE Cable ...

Страница 70: ... Page 70 of 117 4 Insert the fixing tube into the Outdoor AP LAN and match each groove 5 Push the shell against the Outdoor AP PoE connector 6 Straighten the cable and fasten the shell by turning it clockwise Figure 47 Connecting the PoE Cable 3 Fixing Tube Shell Shell ...

Страница 71: ...e Installation Manual Version 1 0 Samsung Electronics America Page 71 of 117 7 Fasten it completely until the white belt on the connector can no longer be seen Figure 48 Connecting the PoE Cable 4 White Belt ...

Страница 72: ...specifications of the connector for the switch or router port and have the connector ready Outdoor AP RJ45 Required Tools LAN Tool LAN Tester Nipper Scissors Wire Stripper and Cable Cutter Table 25 LAN Cable Pin Map System Side Color Map Description 1 White Orange Gigabit Ethernet Tx Rx0 2 Orange Gigabit Ethernet Tx Rx0 3 White Green Gigabit Ethernet Tx Rx1 4 Blue Gigabit Ethernet Tx Rx2 5 White B...

Страница 73: ...em input output power or external interface and cable connection free of any foreign substances air or moisture Unused port or connection Use a waterproof cap rubber packing or other finishing materials Port or connection with a cable installed After installing the cable use a pressed sponge rubber packing or silicon to remove any gaps in the port or the connection 2 Install the LAN cable from the...

Страница 74: ...onnect the RJ 45 plug linked to the LAN cable to the Outdoor AP LAN port When connecting make sure the RJ 45 plug faces down and listen for a clicking sound Figure 50 Connecting a LAN Cable 2 Fixing Tube Shell LAN Port RJ 45 Plug LAN Cable RJ 45 Latch Insert as the RJ 45 Latch face down ...

Страница 75: ...a Page 75 of 117 4 Insert the fixing tube into the Outdoor AP LAN and match each groove 5 Push the shell against the Outdoor AP PoE connector 6 Straighten the cable and fasten the shell by turning it clockwise Figure 51 Connecting a LAN Cable 3 Fixing Tube Shell Shell ...

Страница 76: ...3e Installation Manual Version 1 0 Samsung Electronics America Page 76 of 117 7 Fasten it completely until the white belt on the connector can no longer be seen Figure 52 Connecting a LAN Cable 4 White Belt ...

Страница 77: ...the following components Table 26 Components and Tools for Connecting the Arrestors Item Description Component Arrestors 3 EA Connectors Linked to the Outdoor AP N Type Male Linked to the Patch Antenna N Type Female Regulated Torque Value N Type 16 5 18 1 kgf cm Required Tool Torque Wrench Outdoor AP Side Patch Antenna Side ...

Страница 78: ...e interlinked parts in two or more layers of insulating tape to cover the metal sections after connecting the connector 4 Wrap the insulating tape in two or more layers of butyl tape covering all of the insulating tape and up to 10 20 mm below the insulated area 5 Wrap over the butyl tape area with two or more layers of insulating tape in the same manner Antenna Port N Type Female Arrestor N Type ...

Страница 79: ... 0 Samsung Electronics America Page 79 of 117 6 Tie both ends of the insulating tape using cable ties to make sure they do not become unwrapped Figure 54 Connecting the Arrestors 2 Insulating Tape 2 Insulating Tape Insulating Tape 1 3 1 2 ...

Страница 80: ...tallation Manual Version 1 0 Samsung Electronics America Page 80 of 117 Figure 55 Connecting the Arrestors 3 Butyl Tape Butyl Tape 4 5 Butyl Tape 6 8 9 7 Insulating Tape Insulating Tape Butyl Tape Cable Tie 10 1 2 ...

Страница 81: ...n Patch Antenna Outdoor AP Antenna Port Cable Antenna Cable Assembly Connectors Arrestor N Type Female Patch Antenna Port N Type Male check the specifications of the RF antenna and have the connector ready Required Tools Cable Cutter Wire Stripper Nipper Torque Wrench Spanner Utility Knife Soldering Iron and Lead 2 Connect the cables from the Outdoor AP arrestor to the patch antenna Figure 56 Conn...

Страница 82: ...nterlinked parts in two or more layers of insulating tape to cover the metal sections after connecting the connector 4 Wrap the insulating tape in two or more layers of butyl tape covering all of the insulating tape and up to 10 20 mm below the insulated area 5 Wrap over the butyl tape area with two or more layers of insulating tape in the same manner Patch Antenna Cable RF Antenna Port N Type Mal...

Страница 83: ...msung Electronics America Page 83 of 117 7 Tie both ends of the insulating tape using cable ties to make sure they do not become unwrapped Figure 58 Connecting the Patch Antenna Cables 3 Insulating Tape 2 Insulating Tape Insulating Tape 1 3 1 2 ...

Страница 84: ...ion Manual Version 1 0 Samsung Electronics America Page 84 of 117 Figure 59 Connecting the Patch Antenna Cables 4 Butyl Tape Butyl Tape 4 5 Butyl Tape 6 8 9 7 Insulating Tape Insulating Tape Butyl Tape Cable Tie 10 1 2 ...

Страница 85: ...ch Antenna Cables Outdoor AP 3 5 5 1 Patch Antenna Package Components Unpack the patch antenna package and confirm all of the following components are included Figure 60 Patch Antenna Package Components Patch Antennas Pipe Clamp Wall Clamp Impact anchor 5 EA M4 L8 screw 5 EA M4 L20 tapping type 1 screw 5 EA ...

Страница 86: ... short you can extend it by using an additional cable When it should be extended use an N type cable connector One end is female the other is male For best performance use a cable with less signal loss 3 5 5 3 Installing the Patch Antenna Install the patch antenna on a wall pipe or ceiling Make sure that all of the necessary components are included and prepared before installing Always make sure t...

Страница 87: ...oles that look the same as those of the patch antenna on the wall you want to install it on then insert and secure the impact anchors into the holes 3 Screw the M4 L20 screws into the holes of the patch antenna to secure the patch antenna to the impact anchors 4 Return the screw caps to the mounted patch antenna Figure 61 Installing on a Wall 1 3 4 2 A wall where 221 3 mm 221 3 mm ...

Страница 88: ...enna using the M4 L8 screws Torque 6 0 Kgf cm 2 Attach the clamp to the pipe and secure it by tightening the nuts Keep the cables of patch antenna facing down Torque 80 0 kgf cm 3 Unscrew the M4 bolts adjust the angle of the patch antenna to up down left right and then tighten the M4 bolts again Figure 62 Installing on a Pipe 3 1 2 M4 bolts ...

Страница 89: ...tach the clamp to the patch antenna using the M4 L8 screws Assemble the clamp with the wide area of the key hole facing down 4 Drill the same 2 holes as those of the patch antenna on the wall you want to install it on then insert and secure the impact anchors into the holes 5 Leave 2 3 3 mm of the screws out from the wall when screwing the 2 M4 L20 screws into the impact anchors 6 Hook the keyhole...

Страница 90: ...WEA453e Installation Manual Version 1 0 Samsung Electronics America Page 90 of 117 Figure 63 Installing on a Wall Using Brackets 1 2 3 4 5 6 ...

Страница 91: ...our round head taping type 1 M4 screws and a steel plate on which the holes for the screws are punched out Prepare the length of screws for more than L20 when considering the ceiling s depth 2 Use a drill or other device to drill 4 holes into the ceiling to match the plate size 3 Take the caps off of the patch Keep the caps 4 Use the M4 L20 screws to screw the patch antenna and the plate onto the ...

Страница 92: ...17 Figure 64 Installing on a Ceiling Refer to the Outdoor AP installation manual for instructions on how to connect the patch antenna cable to the Outdoor AP 2 3 4 5 Steel plate Ceiling Steel plate Ceiling Round head taping type 1 M4 screw Ceiling 1 221 3 mm 221 3 mm 3 0 mm or more ...

Страница 93: ...of the installation status is as follows Figure 65 Procedure for Inspecting the Installation Status No YES Reporting the Results Complying with Corrective Action On site Inspection Performing the Inspection checklist Inspection Checklist Corrective Actions Reporting Final Results and Prevention Plans Planning the Inspection Inspecting Compliance Results ...

Страница 94: ...ecessary 4 1 1 4 Inspecting Compliance Results The inspector must check if all of the corrective actions have been carried out and then request any further corrective action to the installation manager when the results of the corrective action or compliance inspection are unsatisfactory 4 1 1 5 Reporting the Final Results and Prevention Plans After all of the corrective actions have been completed...

Страница 95: ...of the pressure terminal and if the tightening torque value has been met Cable tag installation status Check the location labeling and tag installation method used Power Supply Power supply equipment and circuit breaker installation status Check the power supplying the equipment s capacity input voltage using a tester and the circuit breaker s type and capacity Cable standards Check the thickness ...

Страница 96: ...installation position and mounting status Cable installation and binding status Check the damage installed route bending radius of cables and the materials used Cable connection status Check the cable connection status the connector assembly and the tightened state Check if the tightening torque value has been met Check the finishing status Cable tag installation status Check the location labeling...

Страница 97: ...gure 66 Assembling the RJ 45 Connector Shield Type 1 1 2 Prepare work tools and materials 4 Pass the cable through the RJ 45 cap 5 Remove the coating 17 mm from the end 6 Push the shield backward and cut the aluminum shield 7 Cut the shield leaving a 5 mm of it 8 Arrange the cable in reference to the pin map 9 Cut the cable to make it 12 mm long 3 Pass the cable through the marking tube 1 2 3 4 5 ...

Страница 98: ...r Shield Type 2 10 Insert the RJ 45 modular jack 11 Make sure that the shield does not get in the RJ 45 modular jack 12 Insert the cable completely into the RJ 45 modular jack 13 Compress the jack using the tool 14 Move the RJ 45 cap to the connector side and compress the marking tube to finish the assembly 10 11 12 13 14 ...

Страница 99: ...by tape Figure 68 Check Items for Finishing the Connector Connection Part Wrapping only the metal part of connector connection using insulation tape X O Wrapping the tape with overlapping Starting and Ending points of Insulation Tape Mid point between 1 and 2 Wrap the tape with the half of the tape width is overlapped For both insulation tape and butyl tape Tape Width Overlap area of tape 1 Starti...

Страница 100: ...ssure Terminal Assembly B 1 Preparations The following must be available to connect a pressure terminal to a cable Figure 69 Preparations Cable Cutter Wire Stripper Handheld Compressor Hydraulic Press Heat Gun Marking Pen Cutter Blade Steel Ruler Scissors Cable Pressure Terminal Heat Shrink Tube ...
Страница 101: ...ategory Copper tube length of a pressure terminal mm Number of pressure points Hand 11 mm or less 1 Hand 12 15 mm 2 Hand 16 23 mm 3 Hand 24 32 mm 4 Hand 33 mm or more 5 Hydraulic 30 mm or less 2 Hydraulic 31 47 mm 3 Hydraulic 48 63 mm 4 Hydraulic 64 mm or more 5 Figure 70 Pressure Reference Drawing Handheld Compressor 1 spot 2 spot 3 spot 4 spot Unit mm 11 4 5 12 15 16 23 24 32 16 4 5 Copper Tube ...

Страница 102: ...ble 30 Compressor Specifications per Cable Thickness Cable Size mm 2 Press Size Small Handheld Press Large Handheld Press AK 38 100 Hydraulic Press IZUMI Hexagonal Dies 2 5 2 X X 4 2 X X 6 5 5 X X 10 8 8 X Unit mm 2 spot 3 spot 4 spot 30 4 spot Copper Tube Starting Duplicate Pressure Arbitrary Fixing Reference Points 13 5 31 13 5 47 63 64 31 48 ...

Страница 103: ...1 0 Samsung Electronics America Page 103 of 117 Cable Size mm 2 Press Size Small Handheld Press Large Handheld Press AK 38 100 Hydraulic Press IZUMI Hexagonal Dies 16 14 14 16 25 22 22 25 35 38 38 35 50 X 60 50 70 X 80 70 95 X 100 95 300 ...

Страница 104: ... to a cable are as follows Strip the Cable Sheath 1 After checking the inside length of a pressure terminal mark the cable Figure 72 Stripping Cable Sheath 1 2 Adjust the length of a cutter blade according to the sheath thickness of the cable 3 Push the clamp with a thumb according to the cable size to secure a space for the cable Figure 73 Stripping Cable Sheath 2 ...

Страница 105: ...eath 5 Align the stripper to be perpendicular to the cable and rotate it more than two laps Figure 74 Stripping Cable Sheath 3 6 Push the lever of the stripper to the right to turn its blade at 90 Figure 75 Stripping Cable Sheath 4 7 Move the stripper up to the end of cable while maintaining the stripper to be perpendicular to the cable Figure 76 Stripping Cable Sheath 5 ...

Страница 106: ...specifications and cautions of a wire stripper described in this manual are as follows Vender Weidmuller Model Weidmuller AM25 Order No 9001080000 Specifications For outer diameter 6 24 mm PVC sheath Up to 4 5 mm sheath cutting depth To prevent the cutter blade of a wire stripper from touching the cable conductor adjust the length of cutter blade by checking the cable sheath thickness Make sure th...

Страница 107: ...il the conduct comes out 1 mm from the end of the terminal Figure 78 Fixing Pressure Terminal_Handheld Compressor 1 2 From the holes of handheld compressor select one that fits to the pressure terminal Figure 79 Fixing Pressure Terminal_Handheld Compressor 2 3 Insert the pressure terminal to the selected hole 4 Fix the pressure terminal and cable temporarily so the position can be changed later by...

Страница 108: ...xed align it to the hole and firmly compress the pressure terminal to secure fix it Figure 81 Fixing Pressure Terminal_Handheld Compressor 4 6 Separate the pressure terminal from the handheld compressor Press down the handle of compressor until a clicking sound is heard to be unlocked Figure 82 Fixing Pressure Terminal_Handheld Compressor 5 ...

Страница 109: ... enclosed with the product The specifications and cautions of a handheld compressor described in this manual are as follows Vender GALLEX Model GL 2045A 22 Specification 5 5 mm 2 8 mm 2 14 mm 2 22 mm 2 JIS 6 mm 2 10 mm 2 16 mm 2 25 mm 2 DIN Fixing Pressure Terminal Hydraulic Press 1 Among the dies of the hydraulic press select one that fits to the pressure terminal Figure 83 Fixing Pressure Termin...

Страница 110: ...re 84 Fixing Pressure Terminal_Hydraulic Press 2 3 Insert the pressure terminal into the pressing area and fix it slightly by aligning it to the end of cable sheath Figure 85 Fixing Pressure Terminal_Hydraulic Press 3 4 Move the compressor lever up and down to press the pressure terminal firmly Figure 86 Fixing Pressure Terminal_Hydraulic Press 4 ...

Страница 111: ... Samsung Electronics America Page 111 of 117 5 Turn the top compressing lever clockwise and then push it down When the pressing area of compressor is loosened remove the pressure terminal Figure 87 Fixing Pressure Terminal_Hydraulic Press 5 ...

Страница 112: ... Press A hydraulic press is used differently depending on its manufacturer or type Therefore refer to the user manual enclosed with the product The specifications and cautions of a hydraulic press described in this manual are as follows Vender IZUMI Model IZUMI EP 510B Specification Circular 32 160 SQ Hex 14 325 SQ ...

Страница 113: ...er tube Figure 88 Assembling Heat Shrink Tube 1 2 Set the temperature of the heat gun to 180 200 C 3 Locate a heat shrink tube to cover the entire copper tube of the pressure terminal 4 Rotate a heat gun 360 to apply heat evenly to shrink the tube Because the pressure terminal and the cable is hot due to the heat of a heating gun be careful not to have a burn Figure 89 Assembling Heat Shrink Tube ...

Страница 114: ... ft M3 4 08 6 12 0 40 0 60 0 29 0 44 M4 9 52 14 28 0 93 1 40 0 69 1 03 M5 20 0 30 0 1 96 2 94 1 45 2 17 M6 33 28 49 92 3 26 4 90 2 41 3 61 M8 82 4 123 6 8 08 12 12 5 96 8 94 M10 166 4 249 6 16 32 24 48 12 03 18 05 M12 292 0 438 0 28 64 42 65 21 11 31 67 Table 32 Brass Bolts Torque Value Bolt Spec Torque Value kgf cm Torque Value N m Torque Value lbf ft M6 29 98 10 2 94 10 2 17 10 M8 64 26 10 6 3 1...

Страница 115: ...Dualband Antenna WDS ANTD5U Order 3EA Dipole Patch Antenna WDS ANTP6U Patch Surge Arrestor WDS ASAP6U Order 3EA Install Position Pole or Wall Pole Brackets included In a Unit Box Unit Bracket x1 Mount Bracket x1 Screws Wall Metal Band Selection Thin or Thick 50 150mm WDS AMB100 150 250mm WDS AMB200 Thin Thick END Outdoor AP WDS A453E Pole Install Adaptor Bracket WDS AA48PB No Yes Metal Band Figure...

Страница 116: ...tronics America Page 116 of 117 ABBREVIATION A AP Access Point AWG American Wire Gauge E EMC Electromagnetic Compatibility L LAN Local Area Network M MGB Main Ground Bar P PoE Power over Ethernet R RF Radio Frequency S S FTP Screened Foiled Twisted Pair ...

Страница 117: ...nual Copyright 2015 Samsung Electronics America All rights reserved No part of this manual may be reproduced in any form or by any means graphic electronic or mechanical including recording taping photocopying or information retrieval systems without express written permission of the publisher of this material ...

Отзывы: