background image

13

Step-by-step installation guide

3

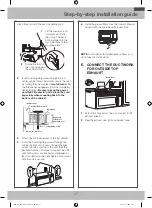
.  Remove the screw that holds the blower motor 

and carefully pull out the blower unit. The wires 

will extend far enough to allow you to adjust the 

blower unit.

blower mortor screw

CAUTION

: To avoid breaking or cracking the blower 

blade, do not touch the blade. Hold the outer case 

of the blower when you pull it out or put it back in 

place.

4

.  Roll the blower unit 90 ° so that the fan blade 

openings are facing toward the front of the 

microwave.

Back of 

Microwave

Before Roll

After Roll

Back of 

Microwave

5

.  Place the blower unit back into the opening.

CAUTION

: Do not pull or stretch the blower unit 

wiring. Make sure the wires are not pinched.

6

.  Secure the blower unit to the microwave with the 

screw.

B2.  INSTALLING THE CHARCOAL 

FILTER

1

. Remove the screws on the top of the grille using 

a #1 Phillips screwdriver.

2

.  Open the door.

3

.  Remove the grille.

•  Push the grille left, and then pull the grille straight 

off.

Charcoal filter

4

.  Install the charocal filter. When properly installed, 

the wire mesh of the filter should be visible from 

the front.

5

.  Reinstall the grille and the screws.

6

.  Close the door.

Insert mesh-side up

SMH1927_XAA_DE68-04108A-03_EN.indd   13

2017-11-02     2:27:44

Содержание SME21K6000ASAA

Страница 1: ...taller Be sure to leave these instructions with the Consumer Note to Consumer Keep these instructions for future reference Skill level Installation of this appliance requires basic mechanical and elec...

Страница 2: ...culation 12 B2 Installing the charcoal filter 13 C Outside back exhaust horizontal duct 14 C1 Adapting the microwave blower for outside back exhaust 14 3 Installation 15 A Prepare the rear wall for ou...

Страница 3: ...TAL SHOCK Insure proper ground exists before use Insure proper ground exists before use The power cord of this appliance is equipped with a three prong grounding plug which mates with a standard three...

Страница 4: ...ition adaptor is used the bottom corners of the damper will have to be cut to fit using the tin snips in order to allow free movement of the damper OUTSIDE BACK EXHAUST EXAMPLE ONLY The following char...

Страница 5: ...nd roof caps etc present additional resistance to airflow and are equivalent to a section of straight duct which is longer than their actual physical size When calculating the total duct length add th...

Страница 6: ...CTIONS Wood Screws x 2 1 Template INSTALLATION INSTRUCTIONS Toggle Bolts and wing nuts 3 16 x 3 2 Template INSTALLATION INSTRUCTIONS Self aligning Machine Screws 28 x 3 2 You will find the installatio...

Страница 7: ...sh NOTES The space between the cabinets must be 30 wide and free of obstructions This microwave oven is for installation over ranges up to 36 wide If you are going to vent your microwave oven to the o...

Страница 8: ...This plate will be used as the rear wall template and for mounting NOTE Retain the two screws You will need to re insert the screws in their original locations after you have removed the mounting plat...

Страница 9: ...sed cabinet bottom 30 to Cooktop Draw a vertical line on the wall at the center of the 30 wide space Tape the Rear Wall Template onto the wall so that the top of the template touches the bottom of the...

Страница 10: ...g fingers on sharp edges 1 Draw a horizontal line on the wall at the bottom of the Rear Wall Template 2 Drill holes for toggle bolts in 3 locations Hole A Hole B Hole C as shown in the illustration ab...

Страница 11: ...r is shipped assembled and attached to the filler upper Select the type of ventilation required for your installation and proceed to that section A OUTSIDE TOP EXHAUST VERTICAL DUCT B RECIRCULATING NO...

Страница 12: ...T ADAPTOR After you have installed the microwave you will need to open the top cabinet and adjust the exhaust adaptor so that you can connect it to the house duct For Front to Back Adjustment Slide th...

Страница 13: ...Roll After Roll Back of Microwave 5 Place the blower unit back into the opening CAUTION Do not pull or stretch the blower unit wiring Make sure the wires are not pinched 6 Secure the blower unit to t...

Страница 14: ...A 5 Rotate the blower unit counterclockwise 180 Before Rotation After Rotation Back of Microwave Back of Microwave 6 Place the blower unit back into the opening AFTER Fan Blade Openings Facing Back E...

Страница 15: ...al duct only B Attach the Mounting Plate to the Wall C Prepare the Cabinet above D Mount the Microwave Oven E Connect the Ductwork for outside top exhaust vertical duct only A PREPARE THE REAR WALL FO...

Страница 16: ...t through Read the instructions on the TOP CABINET TEMPLATE Tape it underneath the top cabinet Drill the holes following the instructions on the TOP CABINET TEMPLATE CAUTION Wear safety goggles when d...

Страница 17: ...abinet Bottom Shelf Equivalent to Depth of Cabinet Recess Cabinet Bottom Shelf Microwave Oven Top Cabinet Front Filler Block Self Aligning Screw 4 Attach the microwave oven to the top cabinet 5 Insert...

Страница 18: ...Replace the house fuse or turn the breaker back on Insure proper ground exists before use 5 Plug the power cord into a dedicated 15 amp electrical outlet Insure proper ground exists before use Insure...

Страница 19: ...19 Notes SMH1927_XAA_DE68 04108A 03_EN indd 19 2017 11 02 2 27 46...

Страница 20: ...DE68 04108A 03 SMH1927_XAA_DE68 04108A 03_EN indd 20 2017 11 02 2 27 46...

Отзывы: