background image

Playback/Editing

  108

Editing a photo

Learn how to edit photos.

• 

The camera will save edited photos as new files.

• 

When you edit photos, the camera will automatically convert them to a lower resolution. Photos that you rotate or resize manually are not automatically converted 
to a lower resolution.

• 

Files in a folder can be individually edited within the folder. Panoramic or 3D files cannot be edited.
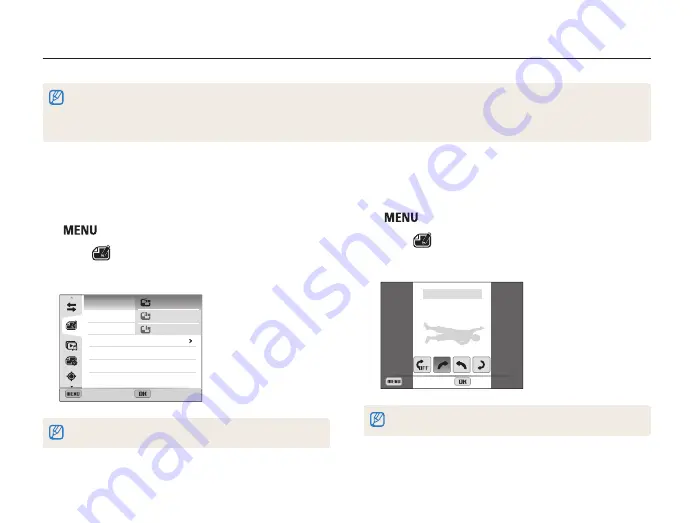
Rotating a photo

In Playback mode, select a photo, and then press  
[

].

Select 


Rotate

.

Select an option.

Back

Set

Rotate : Right 90˚

The camera will overwrite the original file.

Resizing photos

Change the size of a photo and save it as a new file.

In Playback mode, select a photo, and then press  
[

].

Select 


Resize

.

Select an option.

Back

Set

Resize
Rotate
Smart Filter
Image Adjust

2592X1944
1984X1488
1024X768

Available resize options differ depending on the original size of the photo.

Содержание SMART Camera WB850F

Страница 1: ...d usage instructions for your camera Please read this manual thoroughly WB850F WB855F Basic troubleshooting Quick reference Contents Basic functions Extended functions GPS Shooting options Playback Editing Wireless network Settings Appendixes Index ...

Страница 2: ...iod of time Prolonged exposure to sunlight or extreme temperatures can cause permanent damage to your camera s internal components Health and safety information Always comply with the following precautions and usage tips to avoid dangerous situations and ensure peak performance of your camera Warning situations that could cause injury to yourself or others Do not disassemble or attempt to repair y...

Страница 3: ...erence with aircraft equipment Follow all airline regulations and turn off your camera when directed by airline personnel Turn off the camera near medical equipment Your camera can interfere with medical equipment in hospitals or health care facilities Follow all regulations posted warnings and directions from medical personnel Avoid interference with pacemakers Maintain a minimum of 15 cm between...

Страница 4: ...ng is not responsible for damage or injuries caused by unapproved batteries chargers cables or accessories Use the battery only for its intended purpose Misusing the battery may cause a fire or electric shock Do not touch the flash while it fires The flash is very hot when fired and may burn your skin When you use the AC charger turn off the camera before you disconnect the power to the AC charger ...

Страница 5: ...ug the small end of the USB cable into your camera If the cable is reversed it may damage your files The manufacturer is not responsible for any loss of data Avoid interference with other electronic devices Your camera emits radio frequency RF signals that may interfere with unshielded or improperly shielded electronic equipment such as pacemakers hearing aids medical devices and other electronic d...

Страница 6: ...ations concerning its use You are not allowed to reuse or distribute any part of this manual without prior permission For Open Source License information refer to the OpenSourceInfo pdf in the provided CD ROM Outline of the User Manual Basic functions 14 Learn about your camera s layout icons and basic functions for shooting Extended functions 37 Learn how to capture a photo and record a video by ...

Страница 7: ...posure If you cannot decide on an appropriate exposure select the AE BKT Auto Exposure Bracket option p 79 and then capture bracketed photos The camera will capture 3 consecutive photos each with a different exposure normal underexposed and overexposed p 78 Adjusting the exposure manually EV Depending on the intensity of the ambient light your photos may be too bright or dark In these cases you ca...

Страница 8: ... still life Background the objects around the subject Composition the combination of a subject and background Composition Background Subject Exposure Brightness The amount of light that enters your camera determines the exposure You can alter the exposure by changing the shutter speed aperture value or ISO sensitivity By altering the exposure your photos will be darker or lighter Normal exposure O...

Страница 9: ...ctly Half press Shutter to ensure the subject is focused p 35 Set the image stabilizer option p 34 Photos are blurred when shooting at night As the camera tries to let in more light the shutter speed slows This can make it difficult to hold the camera steady long enough to take a clear picture and may result in camera shake Select Night in mode p 40 Turn on the flash p 74 Set ISO sensitivity optio...

Страница 10: ...ring 3D photos mode 3D Shot 50 3D Panorama 47 Applying effects to photos mode Magic Frame 50 mode Split Shot 51 mode Artistic Brush 53 Smart Filter effects 93 Image Adjust to adjust Contrast Sharpness or Saturation 95 Reducing camera shake Optical Image Stabilization OIS 34 Dual Image Stabilization DUAL IS 34 Shooting with GPS Taking pictures with geotagging 62 Using the compass 69 Creating movies...

Страница 11: ...e 53 Using the HDR mode 54 Using the Creative Movie Maker mode 55 Using the Movie mode 57 Recording high speed videos 59 Using the Smart Scene Detection mode 60 Basic functions 14 Unpacking 15 Camera layout 16 Inserting the battery and memory card 19 Charging the battery and turning on your camera 20 Charging the battery 20 Turning on your camera 20 Performing the initial setup 21 Learning icons 2...

Страница 12: ...78 Focusing on a selected area 80 Using tracking auto focus 80 Adjusting the focus area 81 Using Face Detection 82 Detecting faces 82 Capturing a self portrait shot 83 Capturing a smile shot 83 Detecting eye blinking 84 Using Smart Face Recognition 84 Registering faces as your favorites My Star 85 Adjusting brightness and color 86 Adjusting the exposure manually EV 86 Changing the metering option ...

Страница 13: ... a PictBridge photo printer 126 Wireless network 127 Connecting to a WLAN and configuring network settings 128 Connecting to a WLAN 128 Using the login browser 129 Network connection tips 130 Entering text 131 Sending photos or videos to a smart phone 132 Using a smart phone as a remote shutter release 133 Using photo or video sharing websites 135 Accessing a website 135 Uploading photos or videos...

Страница 14: ...1 Appendixes 154 Error messages 155 Camera maintenance 157 Cleaning your camera 157 Using or storing the camera 158 About memory cards 159 About the battery 162 Before contacting a service center 166 Camera specifications 169 Glossary 173 FCC notice 178 Declaration sentence in official languages 181 Index 183 ...

Страница 15: ...ng icons 23 Using the Mode screen 24 Accessing the Mode screen 24 Icons on the Mode screen 24 Selecting options or menus 27 Using MENU 27 Using Fn 29 Setting the display and sound 30 Setting the display type 30 Setting the sound 30 Capturing photos 31 Zooming 32 Reducing camera shake 34 Tips for getting a clearer photo 35 Basic functions Learn about your camera s layout icons and basic functions f...

Страница 16: ...mera case HDMI cable A V cable Battery charger Memory card Memory card Memory card adapter The illustrations may differ slightly from the items shipped with your product The items included in the box may differ depending on the model You can purchase optional accessories at a retailer or a Samsung service center Samsung is not responsible for any problems caused by using unauthorized accessories ...

Страница 17: ...tery Tripod mount HDMI port Accepts HDMI cable USB and A V port Accepts USB cable and A V cable Internal antenna Avoid contact with the internal antenna while using the wireless network Speaker Lens Microphone Flash Shutter button AF assist light Timer lamp POWER button Mode dial p 18 GPS antenna Please avoid touching the antenna area while receiving the GPS signal ...

Страница 18: ...em charging the battery or when the camera is connecting to WLAN or sending a photo Steady When the camera is connected to a computer charging the battery or when the image is in focus Display Zoom button In Shooting mode Zoom in or out In Playback mode Zoom in on part of a photo or view files as thumbnails or adjust the volume Attaching the strap Flash release Video Recording button Drive Lever ...

Страница 19: ... Wi Fi Connect to wireless local area networks and use functions GPS Views the location of a photo with place information and surrounding area on a map Movie Customize settings to record a video Buttons Button Description Press the Video Recording button to start recording a video Rotate the Drive Lever to access burst options Access options or menus Access options in Shooting mode Press the appro...

Страница 20: ...ut of the slot Slide the lock down to release the battery Using the memory card adapter To use micro memory cards with this product a PC or a memory card reader insert the card into an adapter You need a storage device for shooting Insert the memory card Memory card Rechargeable battery Battery lock Insert a memory card with the gold colored contacts facing up Insert the battery with the Samsung l...

Страница 21: ...era by pressing and holding for about 5 seconds the camera does not emit any sounds Charging the battery Before you use the camera for the first time you must charge the battery Plug the small end of the USB cable into your camera and then plug the other end of the USB cable into the AC adapter Status lamp Red light on Charging Red light off Fully charged Red light blinking Error Use only the AC a...

Страница 22: ...Home and then press When you travel to another country select Visit and then select a new time zone 5 Press to select a time zone and then press To set daylight savings time press Back DST Time Zone Home London The screen may differ depending on the language selected 1 Verify that Language is highlighted and then press or 2 Press to select a language and then press 3 Press to select Time Zone and ...

Страница 23: ... the date and time and then press 9 Press to select Date Type and then press or 10 Press to select a date type and then press Language Time Zone Date Time Set Date Type Time Type English London 01 01 2012 YYYY MM DD MM DD YYYY DD MM YYYY Back Set The default date type may differ depending on the language selected 11 Press to select Time Type and then press or 12 Press to select a time type and the...

Страница 24: ...u select or the options you set Icon Description Smart zoom on ISO sensitivity 2 Shooting options right Icon Description Continuous auto focus enabled for a video recording GPS options and status Photo resolution Video resolution Single shot mode High speed burst mode Precapture mode Bracket mode Frame rate Photo quality Metering Flash Flash intensity adjusted Auto focus option 1 Shooting options ...

Страница 25: ...ode screen Turn the mode dial to the left or right to go to another mode screen 2 Mode icons Press to scroll to a desired mode and then press to access the mode Icons on the Mode screen Aperture Priority Shutter Priority Manual Icon Description Aperture Priority The camera selects a shutter speed based on the aperture value you have set manually p 44 Shutter Priority The camera selects an aperture...

Страница 26: ...y sunlight reflected from sand or snow p 40 Magic Plus Icon Description Panorama Capture and combine a series of photos to create a panoramic image p 47 3D Shot Capture scenes with a 3D effect the 3D effect works only on a 3D TV or 3D monitor p 50 Magic Frame Capture a photo with various frame effects p 50 Split Shot Capture several photos and arrange them with preset layouts p 51 Picture in Pictu...

Страница 27: ...t phone of an image from your camera p 133 Social Sharing Upload photos or videos to file sharing websites p 135 Email Send photos or videos stored on the camera via email p 137 SkyDrive Upload photos or videos to a cloud server p 140 Auto Backup Send photos or videos that you captured with the camera to a PC wirelessly p 141 TV Link View photos or videos that you captured with the camera on a wid...

Страница 28: ...ss again to go back to the previous menu Half press Shutter to return to Shooting mode Using MENU To select options press and then rotate the navigation button or press or 1 In Shooting mode press 2 Rotate the navigation button or press to scroll to a menu or an option or 3 Press to confirm the highlighted option or menu ...

Страница 29: ...utton or press to select a White Balance option Back Adjust White Balance Daylight Press again to go back to the previous menu 6 Press to save your settings 7 Press to return to Shooting mode For example to select a White Balance option in Program mode 1 Rotate the mode dial to 2 Press Exit Move Photo Size Quality EV ISO White Balance Flash Smart Filter 3 Rotate the navigation button or press to s...

Страница 30: ... Balance option in Program mode 1 Rotate the mode dial to 2 Press Exit Adjust EV 0 3 Press to scroll to 4 Press Without pressing you can directly select the desired option by turning the zoom button to the left right 5 Rotate the navigation button or press to select a White Balance option Back Adjust White Balance Daylight 6 Press to save your settings 7 Press to return to Shooting mode ...

Страница 31: ...functions on or off 1 In Shooting or Playback mode press 2 Select Beep Sound 3 Select an option Option Description Off The camera does not emit any sounds On The camera emits sounds Setting the display type You can select a display type for the Shooting or Playback mode Each type displays different shooting or playback information See the table below Press repeatedly to change the display type Sho...

Страница 32: ...n focus A red frame means the subject is out of focus 5 Press Shutter to capture a photo 6 Press to view the captured photo To delete the photo press and then select Yes 7 Press to return to Shooting mode See page 35 for tips to get clearer photos 1 Rotate the mode dial to 2 Slide the flash release to pop the flash up when it is need 3 Align your subject in the frame ...

Страница 33: ...al zoom you can zoom in up to 84 times Optical range Digital range Zoom indicator The Digital zoom is not available with the Face detection option Smart Filter effect Tracking AF option Burst option or Manual Focus If you capture a photo with the Digital zoom the photo quality may be lower than normal Zooming You can capture close up photos by adjusting the zoom Zoom in Zoom out Zoom ratio When yo...

Страница 34: ...to 84 times Optical range Smart range Digital range Zoom indicator Smart zoom is not available with the Face detection option Smart Filter effect Tracking AF option Burst option or Manual Focus If you capture a photo with the Smart zoom the photo quality may be lower than normal Setting Smart zoom 1 In Shooting mode press 2 Select Smart Zoom 3 Select an option Icon Description Off The Smart zoom i...

Страница 35: ...er may not function properly when you move your camera to follow a moving subject you use the Digital zoom there is too much camera shake the shutter speed is slow for example when you capture night scenes the battery is low you capture a close up shot If you use the OIS function with a tripod your images may be blurred by the vibration of the OIS sensor Deactivate the OIS function when you use a ...

Страница 36: ...ress Shutter again if the focus frame appears in red Reducing camera shake Set the Optical Image Stabilization option or Dual Image Stabilization option to reduce camera shake optically p 34 Select the DUAL IS option to reduce camera shake both optically and digitally p 34 When is displayed Camera shake When you shoot in the dark avoid setting the flash option to Slow Sync or Off The aperture rema...

Страница 37: ...bject is too bright the subject is shiny or reflective the subject includes horizontal patterns such as blinds the subject is not positioned in the center of the frame When you capture photos in low light Turn on the flash p 74 When subjects are moving rapidly Use the High speed burst mode or Precapture function p 90 Using the focus lock Half press Shutter to focus When the subject is in focus you...

Страница 38: ...sing the Aperture Priority mode 44 Using the Shutter Priority mode 45 Using the Manual mode 46 Using the Magic Plus mode 47 Using the Panorama mode 47 Using the 3D Shot mode 50 Using the Magic Frame mode 50 Using the Split Shot mode 51 Using the Picture in Picture mode 52 Using the Artistic Brush mode 53 Using the HDR mode 54 Using the Creative Movie Maker mode 55 Using the Movie mode 57 Recording...

Страница 39: ...ted areas Close up photos of colorful subjects Camera is stabilized or on a tripod when shooting in the dark Actively moving subjects Fireworks when using a tripod Dark indoor setting Partially bright light in a dark place Short distance spotlight Portrait with a spotlight 1 Rotate the mode dial to 2 Align your subject in the frame The camera automatically selects a scene An appropriate scene icon...

Страница 40: ...cts a face the camera may not select a portrait mode depending on the subject s position or lighting The camera may not select the correct scene depending on the shooting conditions such as camera shake lighting or distance to the subject Even if you use a tripod the camera may not detect the mode if the subject is moving In mode the camera consumes more battery power because it changes settings o...

Страница 41: ...er to focus 4 Press Shutter to capture the photo 1 Rotate the mode dial to 2 Select a scene Beauty Shot Night Landscape Text Sunset Dawn Backlight Beach Snow Option Description Beauty Shot Capture a portrait with options to hide facial imperfections Night Capture scenes at night or in low lighting using a tripod is recommended Landscape Capture still life scenes and landscapes Text Clearly capture...

Страница 42: ...press Shutter to focus 11 Press Shutter to capture the photo When you use the Beauty Shot mode the focus distance will be set to Auto Macro Using the Beauty Shot mode In Beauty Shot mode you can capture a portrait with options to hide facial imperfections 1 Rotate the mode dial to 2 Select 3 Press 4 Select Face Tone 5 Select an option For example increase the face tone setting to make skin appear ...

Страница 43: ... shutter speed and aperture value which the camera sets automatically 1 Rotate the mode dial to 2 Set the desired options For a list of options refer to Shooting options starting on page 70 3 Align your subject in the frame and then half press Shutter to focus 4 Press Shutter to capture the photo ...

Страница 44: ...ws less time to let light in Photos are darker but objects in motion are captured more clearly Slow shutter speed Fast shutter speed Aperture value The aperture is a hole that lets light into the camera The aperture housing contains thin metal plates that open and close widening or narrowing the aperture and controlling the amount of light that enters the camera The size of the aperture is closely...

Страница 45: ...tter to capture the photo Using the Aperture Priority mode The Aperture Priority mode allows you to set the aperture value manually while the camera automatically selects an appropriate shutter speed 1 Rotate the mode dial to 2 Select To select another mode when the mode dial is set to press and then select a mode 3 Press and then rotate the navigation button to adjust the aperture value See page ...

Страница 46: ...hutter to capture the photo Using the Shutter Priority mode The Shutter Priority mode allows you to set the shutter speed manually while the camera automatically selects an appropriate aperture value 1 Rotate the mode dial to 2 Select To select another mode when the mode dial is set to press and then select a mode 3 Press and then rotate the navigation button to adjust the shutter speed See page 4...

Страница 47: ... Select To select another mode when the mode dial is set to press and then select a mode 3 Press and then press to select the aperture value or shutter speed 4 Rotate the navigation button to adjust the aperture value or shutter speed 5 Set options For a list of options refer to Shooting options starting on page 70 6 Align your subject in the frame and then half press Shutter to focus 7 Press Shut...

Страница 48: ...n capture a scene only in horizontal directions When the viewfinder is aligned with the next scene the camera captures the next photo automatically 9 When you are finished release Shutter When you have captured all the necessary shots the camera combines them into one panoramic photo Using the Panorama mode In Panorama mode you can capture a wide panoramic scene in a single photo Capture and combi...

Страница 49: ...e not available The camera may stop shooting due to the shooting composition or movement within the scene In Panorama mode your camera may not capture the last scene in its entirety if you stop moving the camera exactly where you want the scene to end To capture the entire scene move your camera slightly beyond the point where you want the scene to end In 3D Panorama mode your camera may not captu...

Страница 50: ...ect the camera may not recognize the correct subject If subjects are outside of the guide frame while capturing the camera does not capture the movement of the subjects The frame size may change depending on the position of the subject 9 When you are finished release Shutter The camera automatically combines the shots into one photo For best results when capturing panoramic photos avoid the follow...

Страница 51: ...ile that supports the 3D effect only on an MPO compatible display such as a 3D TV or 3D monitor On your camera s display you can view only JPEG files Use proper 3D glasses when you view an MPO file on a 3D TV or 3D monitor Using the Magic Frame mode In Magic Frame mode you can apply various frame effects to your photos The shape and the feel of the photos will change according to the frame you sel...

Страница 52: ...art Filter effect to part of the shot press and then select Smart Filter a desired option You can apply different Smart Filter effects to each part of the shot OK Panel off Home 4 Align your subject in the frame and then half press Shutter to focus 5 Press Shutter to capture a photo Repeat steps 4 and 5 to capture the rest of the photos To recapture a photo press 6 Press to save your settings In S...

Страница 53: ...r saved photos press and then select Open Image a desired photo You cannot select a video file or a photo captured in Panorama mode 4 Press to set the photo as the background image To recapture a background photo press Retake Move Frame 5 Press and then press to change the insertion point 6 Press and then press to change the insertion size 7 Press to save the setting 8 Half press Shutter to focus ...

Страница 54: ...tate The maximum size of the insertion window is 1 4 of the screen and the aspect ratio stays the same when changing the size The maximum length of video that can be inserted is 20 minutes In Picture in Picture mode the available zoom range may be less than in other shooting modes When you select a background photo from your saved photos black bars may appear at the edges of the image depending on...

Страница 55: ... take longer to save files You cannot upload a video captured in Artistic Brush mode via the wireless networking feature on your camera Using the HDR mode In High Dynamic Range HDR mode your camera will automatically take several shots with various exposures and merge them into one photo in which the mid tone is maximized by correcting both bright and dark areas You can capture photos with soft ri...

Страница 56: ...a may be shaken while continuously taking shots using a tripod is recommended Using the Creative Movie Maker mode In the Creative Movie Maker mode you can easily make movies from the photos and videos stored on your memory card Making a movie with the Creative Movie Maker 1 Rotate the mode dial to 2 Select 3 Select Movie Creation 4 Select Select and then select files You must select at least 2 fil...

Страница 57: ...tion and then select Creation Start If your camera does not have enough available memory to store the movie you cannot select Creation Start Delete files from the memory card to make more memory available p 103 If the pop up message appears when you select Creation Start select a smaller movie size in the Movie Size option The video rendering may take longer depending on the number and size of the...

Страница 58: ...when recording a video the camera may record the noise of the zoom operating To decrease zoom noise use the Sound Alive function p 96 You can start recording a video in some modes by pressing Video recording without having to rotate the mode dial to The video frame size may appear smaller while you are recording a video depending on the video resolution and frame rate If you perform no operations ...

Страница 59: ...odes up to 6 photos Images captured while recording a video Press Shutter to capture images while recording a video Captured images will be saved automatically Captured images will be automatically resized depending on the size of the recorded video You cannot capture still images while recording high speed videos You cannot capture still images when you pause the video recording The quality of im...

Страница 60: ...ot record audio when recording high speed videos The image quality of high speed video may be lower than normal speed video 1 Rotate the mode dial to mode only allows you to record a high speed video 2 Rotate the drive lever to the up or down to select a frame rate Icon Descripion 480fps Record 480 frames per second for up to 10 seconds 240fps Record 240 frames per second for up to 10 seconds 30fp...

Страница 61: ...y selects a scene An appropriate scene icon will appear at the bottom left of the screen Icon Description Landscapes Sunsets Blue skies Forested areas 6 Press Video recording to start recording 7 Press Video recording again to stop recording If the camera does not recognize an appropriate scene mode it uses the default settings for the Smart Scene Detection mode The camera may not select the corre...

Страница 62: ... of a photo with place information and surrounding area on the map Using GPS 62 Taking pictures with geotagging 62 Checking the Shooting location on the map 63 Searching Surroundings 66 Checking the location with POI 66 Using Live Landmark 67 Using the compass 69 ...

Страница 63: ...re use the most recently recorded geotag Show Location Set the scope of the location information to be displayed either during Shooting mode or on a photo taken GPS Power Enable the GPS Option Description GPS Reset Select to search again for a GPS satellite near your location Export Routes Transfer your route to a memory card by utilizing the received GPS information in order to view it on the map...

Страница 64: ...ayed on the photo taken Information of a location Landmark Paris Eiffel Tower Checking the Shooting location on the map 1 Turn the mode dial to A shooting location of the most recent photo is marked on the map The location and direction of the marked photo are displayed on the left of the map When there is no photo a map of the current location is provided Paris Single View POI View 2 Press to sel...

Страница 65: ...ible Searching for the GPS signal GPS signal reception is normal For GPS to operate properly the Map data should be stored in the memory card A maximum of 5 thumbnail images can be displayed on the screen The location name is not displayed on the map for a photo with no location information You can download both location Map data containing the reception area and POI data from the Map Download Man...

Страница 66: ...nload The camera uses WGS 84 World Geodetic System 1984 for GPS The camera may not display location information even if it receives the GPS signal depending on the area for use Battery consumption may occur faster when you use the GPS function The GPS function is only supported in 63 countries including Germany the USA Spain the UK Italy India China Canada France and Korea For the 55 countries for...

Страница 67: ...interest within a maximum radius of 5 Km 2 Press to select the desired POI classification then POI POI information is displayed 3 Press to set the destination The direction and distance from the current location to the selected POI are displayed You can navigate with arrow keys If you go to a POI off the screen when selecting detailed POI information the display moves to the edge of the map 50M Ex...

Страница 68: ...destination The provided distance is measured from your current location If the destination is far from the current location the scale is automatically changed so the map is displayed on one screen 5 Press to exit search Using Live Landmark By pressing the Live Landmark button in Shooting mode you can view the location of and information about the nearest POI on an augmented reality display 1 Pres...

Страница 69: ...I out of the screen when selecting detailed POI information it goes to the map on the bottom 3 Press to set the destination The direction and distance from the current location to the selected POI are displayed 4 Press to end search Live landmark information is not provided when No GPS signal is received The GPS is turned off No map data are found You can directly set the destination by pressing o...

Страница 70: ...ass Calibration You may need to calibrate the compass if you wish to use Map View Mode or the Live Landmark function Performing the calibration of the compass will provide a more accurate direction Paris Single View POI View Calibrate Compass 1 Calibration alert message will display when the compass need to be calibrated 2 Slowly wave the camera in a figure eight about 2 3 times to calibrate the c...

Страница 71: ... portrait shot 83 Capturing a smile shot 83 Detecting eye blinking 84 Using Smart Face Recognition 84 Registering faces as your favorites My Star 85 Adjusting brightness and color 86 Adjusting the exposure manually EV 86 Changing the metering option 87 Selecting a White Balance setting 87 Using burst modes 90 Capturing photos in the High speed burst mode 90 Capturing photos in the Precapture mode ...

Страница 72: ...ase the resolution your photo or video will include more pixels so it can be printed on larger paper or displayed on a larger screen When you use a high resolution the file size will also increase Setting the photo resolution 1 In Shooting mode press 2 Select Photo Size 3 Select an option Icon Description 4608X3456 Print on A1 paper 4608X3072 Print on A1 paper in wide ratio 3 2 4608X2592 Print on ...

Страница 73: ...quality settings will result in larger file sizes The camera compresses and saves the photos you capture in the JPEG format 1 In Shooting mode press 2 Select Quality 3 Select an option Icon Description Super Fine Capture photos in super high quality Fine Capture photos in high quality Normal Capture photos in normal quality ...

Страница 74: ...cel the timer Depending on the Face Detection options you selected the timer function may not be available 1 In Shooting mode press Back Set Timer Off 2 Select an option Icon Description Off The timer is not active 10 Sec Capture a photo after a 10 second delay 2 Sec Capture a photo after a 2 second delay Double Capture one photo after a 10 second delay and another photo after a 2 second delay Ava...

Страница 75: ...sh Back Adjust Flash Auto 4 Select an option Icon Description Off The flash will not fire The camera will display the shake warning when you are shooting in low light Auto In Smart Auto mode the camera will select a proper flash setting for the scene it detects Preventing red eye If the flash fires when you capture a photo of a person in the dark a red glow may appear in the person s eyes To preve...

Страница 76: ... between the 2 bursts of the flash Do not move until the flash fires a second time Fill in The flash always fires The camera automatically adjusts light intensity Slow Sync The flash fires and the shutter stays open longer This option is recommended when you want to capture more ambient light to reveal more details in the background Use a tripod to prevent your photos from blurring The camera will...

Страница 77: ... your settings Adjusting the flash intensity may not be effective if the subject is too close to the camera you set a high ISO sensitivity the exposure value is too big or too small How to use the flash Slide the flash release to pop the flash up when it is need When the flash unit is closed the flash does not fire regardless of the selected option When the flash unit pops up the flash fires accor...

Страница 78: ...n ISO The higher ISO sensitivity you select the more sensitive to light your camera becomes Use a higher ISO sensitivity to capture better photos and reduce camera shake when not using the flash 1 In Shooting mode press 2 Select ISO 3 Select an option Select to use an appropriate ISO sensitivity based on the brightness of the subject and lighting Higher ISO sensitivities may result in more image n...

Страница 79: ...tos select the appropriate focus option according to your distance from the subject 1 In Shooting mode press 2 Select Focus Back Set Focus Auto Focus Normal Using macro Use macro to capture close up photos of subjects such as flowers or insects Try to hold the camera firmly to prevent blurry photos Turn off the flash if the distance to the subject is less than 16 in 40 cm ...

Страница 80: ...focus area options and Face Detection options 3 Select an option Icon Description Auto Focus Normal Focus on a subject farther than 31 in 80 cm away Farther than 11 5 ft 3 5 m away when you use the zoom Manual Focus Focus on a subject by adjusting the focus distance manually Macro Focus on a subject that is 4 31 in 10 80 cm from the camera 5 11 5 ft 1 5 3 5 m when you use the zoom Auto Macro Autom...

Страница 81: ...our camera is tracking the subject When you half press Shutter the green frame means that your subject is in focus 5 Press Shutter to capture the photo Focusing on a selected area You can focus on an area that you have selected 1 In Shooting mode press 2 Select Focus Area Selection AF 3 Press to return to Shooting mode 4 Press and then rotate the navigation button or press to move the frame to a d...

Страница 82: ...ust reselect the subject to track If the camera fails to focus the focus frame will change to a red single line frame If you use this function you cannot set Face Detection options Burst options Smart zoom and Smart Filter effects Adjusting the focus area You can get clearer photos by selecting an appropriate focus area according to your subject s location in the scene 1 In Shooting mode press 2 S...

Страница 83: ...a The focus frame will appear orange for Smile Shot and Blink Detection it is too bright or too dark the subject is not facing the camera the subject is wearing sunglasses or a mask the subject s facial expression changes drastically the subject is backlit or the lighting conditions are unstable Face Detection is not available when you set Smart Filter effects Image adjustment Selection AF Trackin...

Страница 84: ... quick beep press Shutter When faces are located in the center the camera beeps rapidly If you turn Volume off in the sound settings the camera will not emit a beep p 150 Capturing a smile shot The camera automatically releases the shutter when it detects a smiling face 1 In Shooting mode press 2 Select Face Detection Smile Shot 3 Press to return to Shooting mode 4 Compose your shot The camera aut...

Страница 85: ... page 85 Faces that the camera has automatically registered The camera may recognize and register faces incorrectly depending on lighting conditions drastic changes in the subject s pose or face and whether or not the subject is wearing glasses The camera can automatically register up to 12 faces If the camera recognizes a new face when 12 faces have already been registered it will replace the low...

Страница 86: ...lete a favorite face press and then select Delete p 100 Registering faces as your favorites My Star You can register your favorite faces to prioritize the focus and exposure on those faces 1 In Shooting mode press 2 Select Smart FR Edit My Star 3 Align your subject s face with the oval guideline and then press Shutter to register the face Back Set Capture photos of one person at a time when regist...

Страница 87: ...rexposure If you cannot decide on an appropriate exposure select the AE BKT Auto Exposure Bracket option and then capture bracketed photos The camera will capture 3 consecutive photos each with a different exposure normal underexposed and overexposed p 91 You cannot set the exposure when you record a video with pressing Video recording in normal shooting mode Adjusting the exposure manually EV Dep...

Страница 88: ...e brightness and lighting of your photos will vary depending on the metering mode you select 1 In Shooting mode press 2 Select or Metering 3 Select an option Icon Description Multi Your camera divides the frame into several areas and then measures the light intensity of each area Suitable for general photos Spot Your camera measures only the light intensity at the very center of the frame If a sub...

Страница 89: ...cent or 3 way fluorescent light Fluorescent_L For shooting under white fluorescent light Tungsten For shooting indoor photos under incandescent bulbs or halogen lamps Custom Set To use White Balance settings that you define p 89 Color Temp To adjust the color temperature of the light source p 89 Customizing preset White Balance options 1 In Shooting mode press 2 Select or White Balance 3 Scroll to...

Страница 90: ...ooting mode press 2 Select or White Balance 3 Scroll to Custom Set 4 Aim the lens at a piece of white paper and then press Shutter Adjusting color temperature 1 In Shooting mode press 2 Select or White Balance 3 Scroll to Color Temp 4 Press 5 Rotate the navigation button or press to adjust the color temperature to match your light source You can capture a warmer photo with a higher color temperatu...

Страница 91: ...ions only when you select Single It may take longer to save the photos depending on the memory card capacity and performance The camera always displays captured photos before returning to Shooting mode When shooting at 10 FPS with a shutter speed of 1 30 the camera shoots at 8 FPS Capturing photos in the High speed burst mode 1 In Shooting mode rotate the Drive Lever up or down 2 Select an option ...

Страница 92: ...s all of the captured photos while you are half pressing Shutter If you do not press Shutter all the way down the photos captured while you are half pressing Shutter will not be saved Capturing bracketed photos You can use the automatic bracketing feature to capture multiple photos of the same subject with different setting values slightly modified such as exposure or white balance 1 In Shooting m...

Страница 93: ...keting option 1 In Shooting mode press 2 Select Bracket 3 Select a bracketing option 4 Rotate the navigation button to adjust the detail Adjust the color for the selected light source white balance or select an exposure value 5 Press to save your settings ...

Страница 94: ...inting effect Cross Filter Add lines that radiate outward from bright objects to imitate the visual effect of a cross filter Sketch Apply a pen sketch effect Soft Focus Hide facial imperfections or apply dreamy effects Fish eye Distort close objects to imitate the visual effect of a fisheye lens Classic Apply a black and white effect Retro Apply a sepia tone effect Zooming Shot Blur the edges of a...

Страница 95: ... Classic Apply a black and white effect Retro Apply a sepia tone effect If you select Miniature when recording a video the miniature recording time is displayed with the Miniature icon and is shorter than the real recording time If you select Miniature when recording a video you cannot record the video sound or capture still images while recording If you select Miniature Vignetting Sketch or Fish ...

Страница 96: ...n Decrease the color and brightness Increase the color and brightness Sharpness Description Soften the edges on your photos suitable for editing the photos on your computer Sharpen the edges to improve the clarity of your photos This may also increase the noise in your photos Saturation Description Decrease the saturation Increase the saturation 5 Press to save your settings Select 0 if you do not...

Страница 97: ...hen you record a video 1 In Shooting mode press 2 Select Voice 3 Select a Sound Alive option Icon Description Audio Zoom Turn on the Audio zoom function Sound Alive Turn on the Sound Alive function to reduce the zoom noise Normal Turn off the Sound Alive and Audio Zoom functions Mute Do not record sounds Do not block the microphone when you use the Sound Alive function Sounds recorded with Sound A...

Страница 98: ...or 3D TV 113 Transferring files to your computer 116 Transferring files to your Windows computer 116 Transferring files to your Mac computer 117 Using the provided programs on your PC 119 Installing software 119 Using Intelli studio 120 Using CMM Creative Movie Maker 124 Printing photos with a PictBridge photo printer 126 Playback Editing Learn how to play back photos or videos and edit photos or ...

Страница 99: ...s a folder p 100 Protected file Print order has been set DPOF To display file information on the screen press Starting Playback mode View photos or play videos stored in your camera 1 Press The most recent file will be displayed If the camera is off it will turn on and display the most recent file 2 Rotate the navigation button or press to scroll through files Press and hold to scroll through file...

Страница 100: ...om the list and then press Set Back Edit Ranking 4 Rotate the navigation button or press to change the ranking of the face and then press Video file information Play Capture Album Icon Description Folder name File name Current playback time Video length Video file Video includes images captured while recording Video made in Creative Movie Maker mode Protected file Image captured while recording a ...

Страница 101: ...hotos in the folder Single View Album Zoom In 2 Press to open the folder 3 Press to scroll through the files 4 Press to return to Playback mode You cannot edit a photo while viewing a folder To edit a photo in a folder press to open the folder and then scroll to the photo Deleting favorite faces You can delete your favorite faces 1 In Playback mode press 2 Select Face List Edit Delete 3 Select a f...

Страница 102: ...files by category such as file type date week face location or landmark 1 In Playback mode rotate Zoom to the left 2 Press 3 Select Filter a category Back Set Filter Share Wi Fi Type Date Week Face Location Landmark Option Description Type View files by the file type Date View files by the date they were saved Week View files by the day of the week they were saved Face View files by recognized fac...

Страница 103: ...l through files Rotate the navigation button or press Delete files Press and then select Yes When you scroll to a video file or folder in the thumbnails view the camera will automatically play back the video or the photos in the folder Protecting files Protect your files from accidental deletion 1 In Playback mode press 2 Select Protect Select To protect all files select All Lock 3 Scroll to the f...

Страница 104: ...1 In Playback mode press 2 Select Delete All 3 When the pop up message appears select Yes All unprotected files are deleted Deleting files Select files to delete in Playback mode Deleting a single file You can select one file and then delete it 1 In Playback mode select a file and then press 2 When the pop up message appears select Yes When viewing files in Smart Album or thumbnails view press to ...

Страница 105: ...photo is retained in its original form When you view photos that were captured by another camera the zoom ratio may differ Viewing photos Enlarge part of a photo or view photos as a slide show Enlarging a photo In Playback mode rotate Zoom to the right to enlarge a portion of the photo Rotate Zoom to the left to zoom out Enlarged area Zoom ratio The maximum zoom ratio differs depending on the phot...

Страница 106: ... photos captured in Panorama mode 1 In Playback mode rotate the navigation button or press to scroll to a desired panoramic photo The entire panoramic photo appears on the screen 2 Press The camera automatically scrolls through the photo horizontally or vertically depending on the direction you moved when capturing the photo The camera then switches to Playback mode While playing back a panoramic ...

Страница 107: ... the slide show Press and then press to stop the slide show and return to Playback mode Playing a video In Playback mode you can view a video and then capture or trim parts of the playing video You can save the captured or trimmed segments as new files 1 In Playback mode select a video and then press 2 View the video Current playback time Video length Pause Stop To Description Scan backward Press ...

Страница 108: ...eo The captured image is saved as a new file Trimming a video 1 While viewing a video press at the point where you want the trimming to begin 2 Rotate Zoom to the right and then press 3 Press at the point where you want the trimming to end 4 Rotate Zoom to the right 5 When the pop up message appears select Yes The original video should be at least 10 seconds long The camera will save the edited vi...

Страница 109: ...ed within the folder Panoramic or 3D files cannot be edited Rotating a photo 1 In Playback mode select a photo and then press 2 Select Rotate 3 Select an option Back Set Rotate Right 90 The camera will overwrite the original file Resizing photos Change the size of a photo and save it as a new file 1 In Playback mode select a photo and then press 2 Select Resize 3 Select an option Back Set Resize R...

Страница 110: ...omo cameras Ink Painting Apply a watercolor painting effect Icon Description Oil Painting Apply an oil painting effect Cartoon Apply a cartoon painting effect Cross Filter Add lines that radiate outward from bright objects to imitate the visual effect of a cross filter Sketch Apply a pen sketch effect Soft Focus Hide facial imperfections or apply dreamy effects Fish eye Distort close objects to im...

Страница 111: ...increases the skin tone becomes brighter and smoother 5 Press to save your settings Adjusting your photos Learn how to correct red eye adjust the skin tone and adjust the brightness contrast or saturation The camera will save an edited photo as a new file but may convert it to a lower resolution Removing red eye 1 In Playback mode select a photo and then press 2 Select Image Adjust Red eye Fix 3 P...

Страница 112: ...just the option 6 Press to save your settings Adding noise to the photo 1 In Playback mode select a photo and then press 2 Select Image Adjust Add Noise 3 Press to save Creating a print order DPOF Select photos to print and save print options in the Digital Print Order Format DPOF This information is saved in the MISC folder on your memory card for convenient printing on DPOF compatible printers 1...

Страница 113: ...to select the print size and then press Printing photos as thumbnails Print photos as thumbnails to check all the photos at once 1 In Playback mode press 2 Select DPOF Index 3 When the pop up message appears select Yes You can take the memory card to a print shop that supports DPOF Digital Print Order Format or you can print photos directly through a DPOF compatible printer at home Photos with dim...

Страница 114: ... Playback mode when you connect it to a TV 8 View photos or play videos using the camera buttons Depending on the TV model you may see some digital noise or part of an image may not appear Images may not be centered on the TV screen depending on your TV settings 1 In Shooting or Playback mode press 2 Select Video Out 3 Select the video signal output for your country or region p 153 4 Turn off your...

Страница 115: ... p 153 to control the camera and TV with the TV s remote control Anynet lets you control all connected Samsung A V devices with the TV remote control The time it takes for the camera to connect to your HDTV may vary with the type of SD SDHC or SDXC card you use A faster SD SDHC or SDXC card will not necessarily result in a faster HDMI transfer because the main function of the card is to improve th...

Страница 116: ...era automatically enters Playback mode If Anynet is off in your camera or your TV does not have Anynet the TV does not turn on automatically Turn the TV on manually 7 Press to switch to 3D TV Mode Press again to switch to 2D TV Mode 8 Turn on your TV s 3D function Refer to your TV s user manual for more details 9 View 3D photos using the buttons on your camera or if the TV has Anynet the remote co...

Страница 117: ...n your computer select My Computer Removable Disk DCIM 100PHOTO 5 Drag or save files to your computer Transferring files to your Windows computer Connecting the camera as a removable disk Connect the camera to your computer as a removable disk 1 Turn off the camera 2 Connect the camera to your computer with the USB cable You must plug the small end of the USB cable into your camera If the cable is...

Страница 118: ...the camera can be removed safely 5 Remove the USB cable Transferring files to your Mac computer When you connect the camera to a Macintosh computer the computer will automatically recognize the device You can transfer files directly from the camera to the computer without installing any programs Mac OS 10 4 or later is supported 1 Turn off the camera 2 Connect your camera to a Macintosh computer w...

Страница 119: ... 3 Turn on the camera The computer recognizes the camera automatically and displays a removable disk icon If the camera fails to connect a pop up window will appear Select Computer 4 Double click the removable disk icon 5 Drag or save files to your computer ...

Страница 120: ... restart your computer Programs contained on the CD Program Requirements Intelli studio Edit photos and videos Map Download Manager Download map data for each country PC Auto Backup Send the recorded files to a connected PC via Wi Fi Creative Movie Maker Easily make movies from captured still images and videos You can download Map Download Manager PC Auto Backup and Creative Movie Maker by connect...

Страница 121: ...indows XP SP2 Windows Vista or Windows 7 Hard disk capacity 250 MB or more 1 GB and above recommended Others CD ROM drive 1024 X 768 pixels 16 bit color display compatible monitor 1280 X 1024 pixels 32 bit color display recommended USB 2 0 port nVIDIA Geforce 7600GT or higher ATI X1600 series or higher Microsoft DirectX 9 0c or higher A 32 bit version of Intelli studio will be installed even on 64...

Страница 122: ...rmware for the connected device from the program toolbar Intelli studio is compatible only with Windows You cannot edit files directly on the camera Transfer files to a folder on your computer before editing Intelli studio supports the following formats Videos MP4 Video H 264 Audio AAC WMV WMV 7 8 9 AVI MJPEG Photos JPG GIF BMP PNG TIFF 13 14 15 12 6 7 9 8 10 1 3 4 5 2 11 ...

Страница 123: ...e camera 11 View files as thumbnails or on a map 12 Browse folders stored on the camera 13 Browse folders stored on your computer 14 Move to the previous or next folder 15 Print files view files on a map store files in My Folder or register faces Transferring files with Intelli studio You can easily transfer files on your camera to your computer by using Intelli studio The battery will charge whil...

Страница 124: ...izes the camera automatically If the camera fails to connect a pop up window will appear Select Computer 5 Select a destination folder on your computer and then select Yes New files stored on the camera will automatically transfer to the selected folder If your camera has no new files the pop up window for saving new files will not appear ...

Страница 125: ...ers 1024 x 768 32bit color or higher USB 2 0 port Microsoft DirectX 9 0c or higher OpenGL 2 0 or higher For a laptop the software may operate slowly due to the low power design even if it meets the recommended specifications Depending on the 3D performance of the graphics card the processing speed and resolution of the movie may vary Files not recorded with a Samsung camera camcorder may not play ...

Страница 126: ...ion 1 Open menus 2 Open Save project 3 Steps to create a Creative Movie 4 Creation Box 5 Add images and videos No Description 6 PC Browser 7 Project name 8 Delete 9 Next step Using Creative Movie Maker For details select Help Help from the program toolbar 7 8 9 1 2 3 4 5 6 ...

Страница 127: ...photos to be printed on a single sheet of paper Type Set the type of paper Quality Set the print quality Date Set to print the date File Name Set to print the file name Reset Reset settings to their default values Some options may not be supported by some printers 1 In Shooting or Playback mode press 2 Select USB Printer 3 Turn on the printer and then connect your camera to the printer with the US...

Страница 128: ...ding photos or videos 135 Sending photos or videos via email 137 Changing email settings 137 Sending photos or videos via email 138 Uploading photos to a cloud server 140 Using Auto Backup to send photos or videos 141 Installing the program for Auto Backup on your PC 141 Sending photos or videos to a PC 141 Viewing photos or videos on a TV Link enabled TV 143 Sending photos using Wi Fi Direct 145 ...

Страница 129: ...onnect to the WLAN If you selected a WPS profile supported AP select WPS PIN connection and then enter a PIN on the AP device You can also connect to a WPS profile supported AP by selecting WPS button connection on the camera and then pressing the WPS button on the AP device Connecting to a WLAN 1 Rotate the mode dial to 2 Select or 3 Press and then select Wi Fi Setting In some modes press or foll...

Страница 130: ...nd then proceed with the desired operation It may take longer to load the login page due to the page size or network speed If this occurs wait until the login information input window appears The payment and login functions may not be available depending on the page you connected to Setting network options 1 In the Wi Fi Setting screen move to an AP and then press 2 Select each option and enter th...

Страница 131: ...HCP server is not available you must make an autoip txt file and copy it to the inserted memory card to connect to the network using Auto IP Network connection tips The quality of the network connection will be determined by the AP The further the distance between your camera and the AP the longer it will take to connect to the network If a nearby device is using the same radio frequency signal as...

Страница 132: ... then press to enter Press to delete the last letter Cancel Backspace Done Icon Description Move the cursor In ABC mode change the case Enter com Switch between Symbol mode and ABC mode Icon Description Enter a space Done Save the displayed text View the entering text guide The keyboard supports the English alphabet only regardless of the display language To move to Done directly press You can ent...

Страница 133: ...e application from Samsung Apps or the Android market When there are no files in the camera memory you cannot use this feature You can view up to 1 000 files and send up to 100 files at a time 5 On the smart phone select files to send from the camera to the smart phone 6 On the smart phone select Copy The camera will send the files 1 On the camera rotate the mode dial to 2 On the camera select If ...

Страница 134: ...nality You should install the application on the device before using this feature You can download the application from Samsung Apps or Android market 4 On the smart phone set the following shooting options Icon Description Flash option Timer option Photo size While using this feature some buttons are not available on your camera The zoom button and the shutter button on your smart phone will not ...

Страница 135: ...60 size When you use this feature the ideal distance between the camera and the smart phone may vary depending on your surroundings The smart phone must be within 23 ft 7 m of the camera to use this feature It will take some time to capture the photo after you release on the smart phone The Remote Viewfinder function will deactivate when there is an incoming call on the smart phone either the came...

Страница 136: ...nts by selecting the Comment box For information about entering text refer to Entering text p 131 Accessing a website 1 Rotate the mode dial to 2 Select 3 Select a website The camera will automatically attempt to connect to a WLAN via the most recently connected AP device If the camera has not previously been connected to a WLAN it will search for available AP devices p 128 4 Enter your ID and pas...

Страница 137: ... differ depending on the selected website If you cannot access a website because of firewall or user authentication settings contact your network administrator or network service provider Uploaded photos or videos may be automatically titled with the date they were captured The speed of your Internet connection may affect how quickly photos upload or web pages open If there are no files in the cam...

Страница 138: ...password 7 Enter the password again 8 When the pop up appears press If you lose your password you can reset it by selecting Reset on the password setting screen When you select Reset previously saved user s setting information email addresses and the recently sent email list will be deleted Changing email settings In the email menu you can store or change your personal information You can also set...

Страница 139: ...ormation about entering text refer to Entering text p 131 1 Rotate the mode dial to 2 Select 3 Select the Sender box enter your email address and then select Done If you have previously saved your information it will be inserted automatically p 137 To use an address from the list of previous senders select an address 4 Select the Recipient box enter an email address and then select Done To use an ...

Страница 140: ...cally resized to a lower resolution If you cannot send an email because of firewall or user authentication settings contact your network administrator or network service provider When there are no files in the camera memory you cannot use this feature You can also send an email in Playback mode by pressing and then selecting Email 6 Scroll to files to send and then press You can select up to 20 fi...

Страница 141: ...ting a cloud server When there are no photos in the camera memory you cannot use this feature 1 Rotate the mode dial to 2 Select If a pop up message that prompts to you to create an account appears select The camera will attempt to connect to a WLAN via the most recently connected AP If the camera has not previously been connected to a WLAN it will search for available AP devices p 128 3 Login wit...

Страница 142: ... the transfer is complete select Shut down PC after backup On 4 Press to start the backup To cancel sending press You cannot select individual files to backup This function backs up only new files on the camera The backup s progress will be shown on the PC monitor When the transfer is completed the camera will turn off automatically in approximately 30 seconds Select Cancel to return to the previo...

Страница 143: ...ile transfer will be interrupted While you are using this feature only POWER is available on your camera You can connect only one camera to the PC at a time for sending files The backup may be canceled due to network conditions Photos or videos can be sent to a PC one time only Files cannot be sent again even if you reconnect your camera to another PC When there are no files in the camera memory y...

Страница 144: ...ay not play smoothly depending on the type of TV or network conditions If this happens re record the video in or quality and play it again If videos do not play smoothly on your TV over the wireless connection try connecting the camera to the TV with an A V cable AP 1 Rotate the mode dial to 2 Select If the guide message appears press The camera will automatically attempt to connect to a WLAN via ...

Страница 145: ...g on the network connection the number of files to be shared or sizes of the files If you power off the camera abnormally while viewing photos or videos on a TV for example by removing the battery the TV considers the camera to still be connected The order of photos or videos on the camera may be different than on the TV Depending on the number of photos or videos you want to share it may take som...

Страница 146: ...t multiple photos by scrolling to individual thumbnails and then pressing Select Next when you are finished selecting photos 4 Select the device from the camera s list of Wi Fi Direct devices Ensure that the device s Wi Fi Direct option is turned on You can also select your camera from the device s list of Wi Fi Direct devices 5 On the device allow the camera to connect to the device The photo wil...

Страница 147: ...damage caused by your changing your PC s BIOS settings Setting the PC to wake up from sleep mode 1 Click Start and then open the Control Panel 2 Configure the network connection Windows 7 Click Network and Internet Network and Sharing Center Change adapter settings Windows Vista Click Network and Internet Network and Sharing Center Manage network connections Windows XP Click Network and Internet C...

Страница 148: ...Manage network connections Windows XP Click Network and Internet Connection Network Connection 7 Select drivers related to network adapter 8 Click the Advanced tab and then set the WOL menus You cannot use this feature across a firewall or if a security program has been installed To turn on the PC with the WOL feature the PC must have an active connection to the LAN Ensure that the indicator light...

Страница 149: ...Settings menu 149 Accessing the settings menu 149 Sound 150 Display 150 Settings 151 Settings Refer to options to configure your camera s settings ...

Страница 150: ...und Beep Sound AF Sound Off Low Medium High On 5 Press to return to the previous screen Accessing the settings menu 1 In Shooting or Playback mode press 2 Select a menu Volume Start Sound Shutter Sound Beep Sound AF Sound Medium Off On On On Exit Move Option Description Sound Set various camera sounds and the volume p 150 Display Customize the display settings p 150 Settings Customize the settings...

Страница 151: ...ption Help Guide Display Display a brief description of an option a menu Off On Grid Line Select a guide to help you compose a scene Off 3 X 3 2 X 2 Cross Diagonal Date Time Display Set whether or not to display the date and time on the camera s display Off On Display Brightness Adjust the brightness of the screen Auto Dark Normal Bright Normal is fixed in Playback mode even if you have selected A...

Страница 152: ... camera Language Set a language for the display text Time Zone Set the time zone for your location When you travel to another country select Visit and then select the appropriate time zone Home Visit Date Time Set Set the date and time Auto Correct Time Automatically updates the time by receiving time data from GPS satellites However this function is only available when the GPS device is turned on...

Страница 153: ...ing to the Design rule for Camera File system DCF standard If you intentionally change file names the camera may not play back the files Default Item Description Imprint Set whether or not to display the date and time on captured photos Off Date Date Time The date and time will be displayed on the bottom right corner of the photo Some printer models may not print the date and time properly The cam...

Страница 154: ...amera plays back files on an HDTV via the HDMI cable NTSC 1080i 720p 480p PAL 1080i 720p 576p If the HDTV does not support the selected resolution the HDTV automatically selects the next lower resolution If you select 480p or 576p the playback menus and Smart Album will not be available when you connect the camera to a TV Default Item Description Video Out Set the video signal output for your regi...

Страница 155: ...he camera 158 About memory cards 159 About the battery 162 Before contacting a service center 166 Camera specifications 169 Glossary 173 FCC notice 178 Declaration sentence in official languages 181 Index 183 Appendixes Get information about error messages specifications and maintenance ...

Страница 156: ...Turn on TV Link enabled devices on the network The camera has failed to locate a TV Link enabled device Invalid password The password for transferring files to another camera is wrong Enter the correct password again Low Battery Insert a charged battery or recharge the battery Memory Full Delete unnecessary files or insert a new memory card Error message Suggested remedies Card Error Turn off your...

Страница 157: ...ransferring photos Try turning on the TV Link feature again Photo reception failed The camera has failed to receive a photo from the sending camera Ask the other person to send the file again Transfer failed The camera has failed to send a photo to the other camera Try sending again The camera has failed to send an email or transfer a photo to a TV Link device Check the network connection and try ...

Страница 158: ...olutions can damage the camera or cause it to malfunction Do not press on the lens cover or use a blower brush on the lens cover Cleaning your camera Camera lens and display Use a blower brush to remove dust and wipe the lens gently with a soft cloth If any dust remains apply lens cleaning liquid to a piece of lens cleaning paper and wipe gently ...

Страница 159: ...age to your camera Do not paint your camera as paint can clog moving parts and prevent proper operation Turn off the camera when not using it Using or storing the camera Inappropriate places to use or store the camera Avoid exposing the camera to very cold or very hot temperatures Avoid using your camera in areas with extremely high humidity or where the humidity changes drastically Avoid exposing...

Страница 160: ...amera Protect the display from external force by keeping it in the case when not in use Protect the camera from scratches by keeping it away from sand sharp implements or loose change Do not use the camera if the screen is cracked or broken Broken glass or acrylic could cause injury to your hands and face Take the camera to a Samsung service center to have it repaired Never place cameras batteries...

Страница 161: ...Photo Size Super Fine Fine Normal 244 302 396 280 346 452 322 396 516 380 468 608 468 572 738 708 856 1 086 1 106 1 318 1 626 1 452 1 702 2 058 2 674 2 980 3 364 Video Size 480fps 240fps 30fps 1920X1080 Approx 17 30 1280X720 Approx 26 06 640X480 Approx 51 30 For Sharing Approx 300 384X288 Approx 43 28 176X128 Approx 29 10 The figures above are measured without using the zoom function Available rec...

Страница 162: ...emory cards Avoid exposing memory cards to very cold or very hot temperatures below 0 ºC 32 ºF or above 40 ºC 104 ºF Extreme temperatures can cause memory cards to malfunction Insert a memory card in the correct direction Inserting a memory card in the wrong direction may damage your camera and memory card Do not use memory cards that have been formatted by other cameras or by a computer Reformat ...

Страница 163: ... and then turn off the camera for 1 minute 4 Repeat steps 1 to 3 Videos Approximately 85 min Record videos at resolution and 30 FPS The figures above are measured by Samsung s standards Your results may differ depending on your actual usage Several videos were recorded in succession to determine the total recording time When using network functions the battery will be depleted more quickly The abo...

Страница 164: ... minutes before turning on the camera If you connect the camera to an external power source when the battery is depleted using high energy consuming functions will cause the camera to turn off To use the camera normally recharge the battery fully Low battery message When the battery has fully discharged the battery icon will turn red and the Low Battery message will appear Notes about using the ba...

Страница 165: ... After charging is finished disconnect the cable from your camera Do not bend or place heavy objects on the AC cable Doing so may damage the cable Notes about charging with a computer connected Use only the provided USB cable The battery may not charge when you use a USB hub other USB devices are connected to your computer you connect the cable to the port on the front side of your computer the US...

Страница 166: ... a prolonged period When the camera is switched on do not leave it in any confined space for a prolonged period Do not allow battery terminals to come in contact with metallic objects such as necklaces coins keys or watches Use only authentic manufacturer recommended Lithium ion replacement batteries Do not disassemble or puncture the battery with any sharp object Avoid exposing the battery to hig...

Страница 167: ... camera heats up While you use the camera it may heat up This is normal and should not affect your camera s lifespan or performance The flash does not work Slide the flash release to pop the flash up The flash option may be set to Off p 74 You cannot use the flash in some modes Situation Suggested remedies Cannot turn on the camera Ensure that the battery is inserted Ensure that the battery is ins...

Страница 168: ...ing memory cards for more detail p 161 Cannot play back files If you change the name of a file your camera may not play the file the name of the file should meet the DCF standard If you encounter this situation play back the files on your computer Situation Suggested remedies The photo is blurry Make sure that the focus option you set is suitable for close up shots p 78 Make sure that the lens is ...

Страница 169: ...ransferring files The file transmission may be interrupted by static electricity Disconnect the USB cable and connect it again Your computer cannot play videos Videos may not play on some video player programs To play video files captured with your camera install and use the Intelli studio program on your computer p 120 Situation Suggested remedies Intelli studio is not functioning properly End In...

Страница 170: ...ghted Face Detection Compensation 2EV 1 3 EV Step ISO equivalent Auto ISO 100 ISO 200 ISO 400 ISO 800 ISO 1600 ISO 3200 Image sensor Type 1 2 3 Approximately 7 77 mm BSI CMOS Effective pixels Approximately 16 2 mega pixels Total pixels Approximately 16 8 mega pixels Lens Focal length Schneider KREUZNACH 21x Zoom Lens f 4 1 86 1 mm 35 mm film equivalent 23 483 mm F stop range F2 8 W F5 9 T Digital ...

Страница 171: ...te Time Date Off Shooting Photos Modes Smart Auto Portrait Night Portrait Backlight Portrait Night Backlight Landscape White Natural Green Blue Sky Sunset Macro Macro text Macro Color Tripod Action Fireworks Low Light Spot Light Spot Light Macro Spot Light Portrait Program Aperture Priority Shutter Priority Manual Scene Beauty Shot Night Landscape Text Sunset Dawn Backlight Beach Snow Magic Plus P...

Страница 172: ...nal SD card up to 2 guaranteed SDHC card up to 32 GB guaranteed SDXC card up to 64 GB guaranteed File format Still Image JPEG DCF EXIF 2 21 DPOF 1 1 PictBridge 1 0 Movie Clip MP4 Video MPEG 4 AVC H 264 Audio AAC Image size For 2 GB SD Number of photos Super Fine Fine Normal 4608X3456 244 302 396 4608X3072 280 346 452 4608X2592 322 396 516 3648X2736 380 468 608 2832X2832 468 572 738 2592X1944 708 8...

Страница 173: ...rgeable battery Lithium ion battery SLB 10A 1030 mAh Connector type Micro USB 5 pin The power source may differ depending on your region Dimensions W X H X D 109 6 X 61 9 X 24 9 mm without protrusions Weight 226 5 g without battery and memory card Operating Temperature 0 40 C 32 104 F Operating Humidity 5 85 Software Intelli studio Map Download Manager PC Auto Backup Creative Movie Maker Specifica...

Страница 174: ...nformation such as selected images and number of prints on a memory card DPOF compatible printers sometimes available at photo shops can read the information from the card for convenient printing AEB Auto Exposure Bracket This feature automatically captures several images at different exposures to help you capture a properly exposed image AF Auto Focus A system that automatically focuses the camer...

Страница 175: ...hotosite for each pixel in the image Each photosite records the brightness of the light that strikes it during an exposure Common sensor types are CCD Charge coupled Device and CMOS Complementary Metal Oxide Semiconductor EV Exposure Value All the combinations of the camera s shutter speed and lens aperture that result in the same exposure EV Compensation This feature allows you to quickly adjust ...

Страница 176: ...eteriorate quality of images ISO sensitivity The sensitivity of the camera to light based on the equivalent film speed used in a film camera At higher ISO sensitivity settings the camera uses a higher shutter speed which can reduce blur caused by camera shake and low light However images with high sensitivity are more susceptible to noise JPEG Joint Photographic Experts Group A lossy method of com...

Страница 177: ...ty images have a lower rate of compression which usually results in a larger file size Resolution The number of pixels present in a digital image High resolution images contain more pixels and typically show more detail than low resolution images Shutter speed Shutter speed refers to the amount of time it takes to open and close the shutter and it is an important factor in the brightness of a phot...

Страница 178: ...t be mixed with other commercial wastes for disposal PlanetFirst represents Samsung Electronics commitment to sustainable development and social responsibility through eco driven business and management activities Correct disposal of batteries in this product Applicable in the European Union and other European countries with separate battery return systems This marking on the battery manual or pac...

Страница 179: ...ween the equipment and receiver Connect the equipment into an outlet on a circuit different from that to which the receiver is connected Consult the dealer or an experienced radio TV technician for help Declaration of Conformity Trade Name Samsung Electronics America Inc Model No Samsung WB850F WB855F Responsible Party Samsung Electronics America Inc Address 85 Challenger Road Ridgefield Park NJ 0...

Страница 180: ...ived including interference that may cause undesired operation Caution Any changes or modifications to the equipment not expressly approved by the party responsible for compliance could void user s authority to operate the equipment IC 649E WB850F This equipment may be operated in all EU countries In France this equipment may only be used indoors Complies with IDA Standards DA100790 Approved by PT...

Страница 181: ...e phone number of Samsung Service Centre see the warranty card or contact the retailer where you purchased your product Product details For the following Product DIGITAL CAMERA Model s WB850F WB855F Declaration Applicable standards We hereby declare that the product s above is are in compliance with the essential requirements and other provisions of the R TTE Directive 1999 5 EC the Low Voltage Di...

Страница 182: ... declara que la cámara digital cumple con los requisitos esenciales y cualesquiera otras disposiciones aplicables o exigibles de la Directiva 1999 5 CE Ελληνική ΜΕ ΤΗΝ ΠΑΡΟΥΣΑ η Samsung Electronics ΔΗΛΩΝΕΙ ΟΤΙ η ψηφιακή φωτογραφική μηχανή ΣΥΜΜΟΡΦΩΝΕΤΑΙ ΠΡΟΣ ΤΙΣ ΟΥΣΙΩΔΕΙΣ ΑΠΑΙΤΗΣΕΙΣ ΚΑΙ ΤΙΣ ΛΟΙΠΕΣ ΣΧΕΤΙΚΕΣ ΔΙΑΤΑΞΕΙΣ ΤΗΣ ΟΔΗΓΙΑΣ 1999 5 ΕΚ Français Par la présente Samsung Electronic déclare que l app...

Страница 183: ...né ustanovenia Smernice 1999 5 ES Suomi Samsung Electronics vakuuttaa täten että tämä digitaalikamera on direktiivin 1999 5 EY oleellisten vaatimusten ja sitä koskevien direktiivin muiden ehtojen mukainen Svenska Härmed intygar Samsung Electronicsatt dessa digitalkameror står i överensstämmelse med de väsentliga egenskapskrav och övriga relevanta bestämmelser som framgår av direktiv 1999 5 EG Бълг...

Страница 184: ...cifications 169 Capturing an image from video 107 Charging 20 Cleaning Camera body 157 Display 157 Lens 157 Connecting to a computer Mac 117 Contrast Playback mode 111 Shooting mode 95 Creative Movie Maker 124 D Date Time Set 151 Deleting files 103 Digital Print Order Format DOF 111 Digital zoom 32 Disconnecting the camera 117 Display brightness 150 Display type 30 Dual Image Stabilization DUAL IS...

Страница 185: ...ation Playback mode 111 Shooting mode 95 Sharpness 95 Image quality 72 Imprint 152 Intelli studio 120 ISO sensitivity 77 L Language settings 151 M Macro Auto Macro 79 Macro 79 Manual Focus 79 Magic Frame mode 50 Manual mode 46 Memory card Caution 161 Insert 19 Menu button 18 Metering Center weighted 87 Multi 87 Spot 87 Mode dial 16 Mode screen 24 Movie mode 57 My star Cancelling 100 Ranking 99 Reg...

Страница 186: ...mode 45 Slide show 105 Smart Album 101 Smart Auto mode 38 Smart Face Recognition 84 Smart Filter Playback mode 109 Shooting mode 93 Smart Scene Detection mode 60 Retouching faces Playback mode 110 Shooting mode 41 Rotating 108 S Saturation Playback mode 111 Shooting mode 95 Scene mode 40 Searching Surroundings POI 66 Using Live Landmark 67 Using the compass 69 Self portrait 83 Service center 166 S...

Страница 187: ...o out 153 Viewing files Folder 100 Slide show 105 Smart Album 101 Thumbnails 102 TV 113 W Website Accessing 135 Uploading photos or videos 135 White Balance 87 Wireless network 128 Z Zoom Audio Zoom 96 Using the zoom 32 Zoom button 17 Zoom sound settings 96 3 3D Shot mode 50 3D TV 115 Index ...

Страница 188: ...Please refer to the warranty that came with your product or visit our website www samsung com for after sales service or inquiries ...

Отзывы: