background image

13

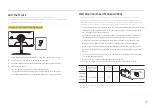
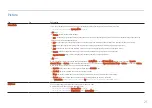
To lock an anti-theft locking device:

Fix the cable of your anti-theft locking device to a heavy object such as a desk.

Put one end of the cable through the loop on the other end.

Insert the locking device into the anti-theft lock slot at the back of the product.

Lock the locking device.


‒ An anti-theft locking device can be purchased separately.


‒ Refer to the manuals provided with your anti-theft locking device for details.


‒ Anti-theft locking devices can be purchased at electronics retailers or online.

Using a screw longer than the standard length can damage the internal components of the product. 

The length of screws required for a wall mount that does not comply with the VESA standards 
may vary depending on the specifications.

Do not use screws that do not comply with the VESA standards. Do not attach the wall-mount 
kit or desktop stand using excessive force. The product may get damaged or fall and cause 
personal injury. Samsung shall not be held liable for any damage or injury caused by using 
improper screws or attaching the wall-mount kit or desktop stand using excessive force. 

Samsung shall not be held liable for any product damage or personal injury caused by using a 
wall mount kit other than the one specified or from an attempt to install the wall-mount kit on 
your own.

To mount the product on a wall, ensure you purchase a wall-mount kit that can be installed 10 
cm or farther away from the wall.

Be sure to use a wall-mount kit that complies with the standards.

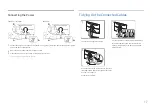
To install the monitor using a wall mount, disconnect the stand base from the monitor.

― Do not install your Wall Mount Kit while your product is turned on. It may result in personal injury due to 

electric shock.

Wall Mount Kit Specifications(VESA)

Anti-theft Lock

― An anti-theft lock allows you to use the product securely even in public places.

― The locking device shape and locking method depend on the manufacturer. Refer to the manuals

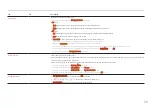
 Model 

  Name

  VESA screw hole 

specs (A * B) in 

millimeters

C

Standard 

  Screw

Quantity

 Wall mount bracket

C

Product

100.0 x 100.0

8.5 ~ 10 mm

M4

4

S24AG32*

S27AG32*

S32AG32*

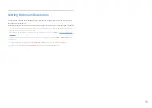
Install your wall mount on a solid wall perpendicular to the floor. Before attaching the wall mount to 
surfaces other than plaster board, please contact your nearest dealer for additional information. If you 
install the product on a slanted wall, it may fall and result in severe personal injury. Samsung wall mount 
kits contain a detailed installation manual and all parts necessary for assembly are provided.

provided with your anti-theft locking device for details.

Содержание S27AG32 Series

Страница 1: ...his manual in parts or entirety without the authorization of Samsung is prohibited Trademarks other than that of Samsung are owned by their respective owners An administration fee may be charged in th...

Страница 2: ...talling the Software Easy Setting Box 26 Restrictions and Problems with the Installation 26 System Requirements 26 26 Connecting and Using a Source Device 15 Ports 15 16 16 16 16 16 17 17 18 Informati...

Страница 3: ...ustomers Not a product defect 35 A Product damage caused by customer s fault 35 Others 35 36 Troubleshooting Guide 27 27 27 27 30 Specifications General 31 33 37 WEEE Correct Disposal of This Product...

Страница 4: ...o protective earth ground Caution Consult instructions for use This symbol instructs the user to consult the user manual for further safety related information Electricity and Safety Warning Do not us...

Страница 5: ...nd injure children Edible oil such as soybean oil can damage or deform the product Do not install the product in a kitchen or near a kitchen counter Caution Do not drop the product while moving Do not...

Страница 6: ...m power off the product and remove the power cable Do not drop objects on the product or apply impact Do not move the product by pulling the power cord or any cable If a gas leakage is found do not to...

Страница 7: ...DC adapter in a well ventilated area If you place the AC DC power adapter hanging with the cord input facing upwards water or other foreign substances could enter the Adapter and cause the Adapter to...

Страница 8: ...e the cloth to wipe the exterior of the product clean Do not apply a cleaning agent that contains alcohol solvent or surfactant to the product Do not spray water or detergent directly on the product 4...

Страница 9: ...g the Stand connected fasten the connecting screw at the bottom of the stand base stand into the main body in the direction of the arrow as shown in the gure Caution f not obser the warranty ce may be...

Страница 10: ...s or edges of the product when moving it Do not directly apply pressure on the screen Do not hold the screen when moving the product Do not hold the product upside down only by the stand Do not press...

Страница 11: ...10 cm 3 93 Inches 10 cm 3 93 Inches 10 cm 3 93 Inches 10 cm 3 93 Inches 10 cm 3 93 Inches 5 0 2 0 20 0 2 0 0 120 0 mm 5 0 mm The product tilt and height can be adjusted Hold the top centre of the pro...

Страница 12: ...xtending the stand the corner of the product may hit the floor and get damaged Do not rotate the product counterclockwise The product may get damaged When rotating the product be careful not to damage...

Страница 13: ...ry caused by using a wall mount kit other than the one specified or from an attempt to install the wall mount kit on your own To mount the product on a wall ensure you purchase a wall mount kit that c...

Страница 14: ...Button Power LED System Power LED On Function Key Guide or Down Brightness Contrast Sharpness Volume Source Menu Eye Saver Mode Eye Saver Mode Power Off Return Control Panel The colour and shape of pa...

Страница 15: ...rself with the product functions precautions and other information required to use the product properly 5 To use Max specifications of our products check the support specifications of the cable versio...

Страница 16: ...ction is not supported if the source device is connected using the HDMI DVI cable The optimum resolution may not be available with an HDMI DVI cable Connection Using an DP Cable It is recommended to u...

Страница 17: ...n it on The input voltage is switched automatically Connecting the Power Tidying Up the Connected Cables Connect the corresponding cables Pull the right side of the HOLDER STAND CABLE to remove from t...

Страница 18: ...message will appear up to three times for a specified time even when the product is turned off and on again If you want to set the optimum resolution foryour computer please refer to Q A How can I cha...

Страница 19: ...applied the screen may have malfunction If the Refresh Rate function is in use and the text displayed on the PC screen looks blurry or corrupted resolve the issue by changing the resolution of the PC...

Страница 20: ...ignals This can only be set when the external input is connected through HDMI DP and PC AV Mode is set to AV This option is available when FreeSync Premium is set to Off Virtual Aim Point Off Virtual...

Страница 21: ...rough automatic contrast adjustment In AV mode When the external input is connected through HDMI DP and PC AV Mode is set to AV Picture Mode has four picture settings Dynamic Standard Movie and Custom...

Страница 22: ...nabled The Color feature is only activated at a certain AV resolution such as 720P 60 Hz and 1080P 60 Hz Black Level If a DVD player or set top box is connected to the product via HDMI image quality d...

Страница 23: ...lume control screen then use the JOG button to move the focus down To deactivate the Mute function access the Volume control screen then increase or decrease the Volume Eco Saving Plus 23 The Eco Savi...

Страница 24: ...9 or16 10 are only supported If the product is in HDMI DisplayPort mode and the screen says Check the cable connection and the settings of the source device press the JOG button to display the Functi...

Страница 25: ...bsite to the root directory If the No update files found on your USB device Please check your USB device and try again message is displayed this is probably due to the following reasons A USB memory i...

Страница 26: ...tcut icon does not appear press the F5 key Restrictions and Problems with the Installation The Easy Setting Box installation may be affected by the Graphics Card Motherboard and the Networking Environ...

Страница 27: ...g Caution When the product makes popping cracking sound The sound may be caused by contraction or expansion from temperature change of external components or internal circuit of the product This is NO...

Страница 28: ...t on the screen Check that the resolution and frequency for the PC are within the range of resolution and frequency compatible with the product Next if required change the settings referring to Standa...

Страница 29: ...lume If the volume is still low after turning it up to the maximum level adjust the volume on your PC sound card or software programme Video is available but there is no sound Sound cannot be heard if...

Страница 30: ...s Monitor and adjust Screen refresh rate under Monitor settings How can I change the resolution Windows 7 Go to Control Panel Appearance and Personalization Display Screen Resolution Adjust Resolution...

Страница 31: ...xel Pitch 0 2739 mm H x 0 2739 mm V 0 3108 mm H x 0 3108 mm V 0 36375 mm H x 0 36375 mm V Maximum Pixel Clock 384 144 MHz Power Supply AC100 240V 50 60Hz Based on the AC voltage of the adapter For the...

Страница 32: ...notice to improve quality For detailed device specifications visit the Samsung website Flicker Free Flicker Free technology reduces screen flickering for a more comfortable viewing experience Europe...

Страница 33: ...he following table by referring to the graphics card user manual Resolution Horizontal Frequency kHz Vertical Frequency Hz Pixel Clock MHz Sync Polarity H V Port HDMI IN DP IN IBM 720 x 400 31 469 70...

Страница 34: ...x1080 VESA 1920 x1080 O 166 587 143 981 346 500 O VESA 1920 x1080 Horizontal Frequency The time required to scan a single line from the left to the right side of the screen is called a horizontal cyc...

Страница 35: ...mme If customer requests software installation and setup for the product If a service technician removes cleans dusts or foreign materials inside of the product If customer requests an installation ad...

Страница 36: ...le you are using the FreeSync function the screen may flicker due to variation of the output frequency from the graphics card The response rate during the game may fluctuate depending on the resolutio...

Страница 37: ...human health from uncontrolled waste disposal please separate these items from other types of waste and recycle them responsibly to promote the sustainable reuse of material resources Household users...

Отзывы: