background image

English - 23

SETTING

 UP

COMPLETING THE SET UP

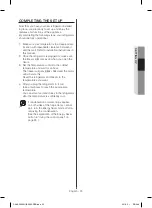
Now that you have your new refrigerator installed 
in place, you are ready to set up and enjoy the 
features and functions of the appliance. 
By completing the following steps, your refrigerator 
should be fully operational.

1.  Make sure your refrigerator is in an appropriate 

location with reasonable clearance between it 
and the wall. Refer to installation instructions in 
this manual.

2.  Once the refrigerator is plugged in, make sure 

the interior light comes on when you open the 
doors.

3.  Set the Temperature control to the coldest 

temperature and wait for an hour. 
The freezer will get slightly chilled and the motor 
will run smoothly. 
Reset the refrigerator and freezer to the 
temperatures you want.

4.  After you plug the refrigerator in, it will 

take a few hours to reach the appropriate 
temperature. 
You can store food and drinks in the refrigerator 
after the temperature is sufficiently cool.

If condensation or water drops appear 
on both sides of the fridge door’s central 
part, turn the Energy Saver mode off after 
removing the condensation. 
(See the explanation of the Energy Saver 
button in “Using the control panel” on 
page 25.)

DA68-02954H (EN)-03-���.indd   23

2018. 2. 1.   �� 3:48

Содержание RF23HCEDBSA

Страница 1: ...Refrigerator user manual imagine the possibilities Thank you for purchasing this Samsung product Free Standing Appliance DA68 02954H EN 03 indd 1 2018 2 1 3 48 ...

Страница 2: ...onsible for their safety This appliance can be used by children aged from 8 years and above and persons with reduced physical sensory or mental capabilities or lack of experience and knowledge if they have been given supervision or instruction concerning use of the appliance in a safe way and understand the hazards involved Children shall not play with the appliance Cleaning and user maintenance s...

Страница 3: ...anyone other than an Authorized Service Person to service this appliance In Queensland the authorized Service Person MUST hold a Gas Work Authorisation or Licence for hydrocarbon refrigerants to carry out Servicing or repairs which involve the removal of covers For Australia only Important safety symbols and precautions WARNING Hazards or unsafe practices that may result in severe personal injury ...

Страница 4: ...s Refrigerant R 600a contact your local authority in regard to safe disposal of this product WARNING When transporting and installing the appliance care should be taken to ensure that no parts of the refrigerating circuit are damaged SEVERE WARNING SIGNS FOR INSTALLATION Do not install this appliance in a humid oily or dusty location in a location exposed to direct sunlight and water rain drops De...

Страница 5: ...eak This may result in an electric shock or fire The installation or any service of this appliance is recommended by a qualified technician or service company Failing to do so may result in an electric shock fire explosion problems with the product or injury This refrigerator must be properly installed and located in accordance with the manual before it is used Do not install the refrigerator in a...

Страница 6: ...ks caused by current leakage from the refrigerator This may result in an electric shock fire explosion or problems with the product Never plug the power cord into a socket that is not grounded correctly and make sure that it is in accordance with local and national codes If the supply cord is damaged it must be replaced by the manufacturer its service agent or similarly qualified persons in order ...

Страница 7: ...or children go inside the drawer It can cause death from suffocation by entrapment or personal injury WARNING Do not sit on the Freezer door The door may be broken and cause a personal injury To prevent children entrapment you must reinstall the divider using provided screws after cleaning or other actions if you removed the divider from the drawer Never put fingers or other objects into the dispe...

Страница 8: ... only for the storage of food in a domestic environment Bottles should be stored tightly together so that they do not fall out In the event of a gas leak such as propane gas LP gas etc ventilate immediately without touching the power plug Do not touch the appliance or power cord Do not use a ventilating fan A spark may result in an explosion or fire Use only the LED Lamps provided by manufacturer ...

Страница 9: ...uipped with the LED Lamp do not disassemble the Lamp Cover and LED Lamp by yourself Please contact your service agent If any dust or water is in the refrigerator pull out power plug and contact your Samsung Electronics service center There is a risk of fire Plug the power plug into the wall socket firmly Do not use a damaged power plug damaged power cord or loose wall socket This may result in an ...

Страница 10: ...esult in a personal injury and or property damage Any changes or modifications CAUTION performed by a 3rd party on this completed appliance are neither covered under Samsung warranty service nor is Samsung responsible for safety issues and damages that result from 3rd party modifications Do not block air holes If the air holes are blocked especially with a plastic bag the refrigerator can be over ...

Страница 11: ...ing and difficult to use In addition the open container can leak and the leaked oil can cause the door bin to crack After opening an oil container it is best to keep the container in a cool and shaded place such as a cupboard or pantry Examples of vegetable oil olive oil corn oil grape seed oil etc CAUTION SIGNS FOR CLEANING AND MAINTENANCE Do not clean the appliance by spraying water directly ont...

Страница 12: ... chute It may cause a personal injury or material damage Before cleaning or performing maintenance unplug the appliance from the wall socket Failing to do so may result in an electric shock or fire Use a clean sponge or soft cloth and a mild detergent in warm water to clean the refrigerator Do not use abrasive or harsh cleansers such as window sprays scouring cleansers flammable fluids muriatic ac...

Страница 13: ...ecial disposal procedure Please contact your local authorities in regard to the environmentally safe disposal of this product Ensure that none of the pipes on the back of the appliances are damaged prior to disposal The pipes shall be broken in WARNING the open space When disposing of this or other refrigerator s remove the door door seals door latch so that children or animals cannot become trapp...

Страница 14: ...a bad effect on preservation due to its properties Your appliance is frost free which means there is no need to manually defrost your appliance as this will be carried out automatically Temperature rise during defrosting can comply with ISO requirements But if you want to prevent an undue rise in the temperature of the frozen food while defrosting the appliance please wrap the frozen food up in se...

Страница 15: ...s It is recommended to install the refrigerator with clearance to the back and sides This will help reduce power consumption and keep your energy bills lower For the most efficient use of energy please keep the all inner fittings such as baskets drawers shelves on the position supplied by manufacturer This appliance is intended to be used in household and similar applications such as staff kitchen...

Страница 16: ...he right left back and top for air circulation If the refrigerator does not have enough space it can cause the bad influence to refrigeration effi ciency and power consumption A location that allows you to move the refrigerator easily if it needs maintenance or service Do not install the refrigerator in locations where the temperature is over 110 F 43 C or below 50 F 10 C A A B B C C D D E E Depth...

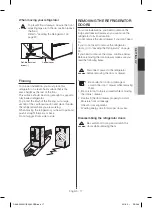
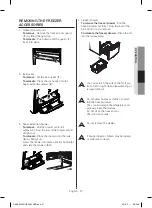
Страница 17: ...G THE REFRIGERATOR DOORS For some installations you need to remove the fridge and freezer drawers so you can move the refrigerator to its final location Do not remove the doors drawer if you don t need to If you do not need to remove the refrigerator doors go to Leveling the Refrigerator on page 20 If you need to remove the doors continue below Before removing the door drawer make sure you read th...

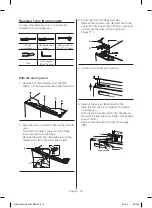
Страница 18: ...it from the hinge Remove the water line 3 while pressing the marked part 4 of the water line coupler 2 3 4 3 Pull and remove the hinge lever 5 Remove the ground screw 6 attached to the upper left door hinges with a philips screwdriver Remove the upper left and right door hinges 7 5 7 6 4 Lift the door straight up to remove 5 Remove the screw 8 attached to the lower left and right door hinges with ...

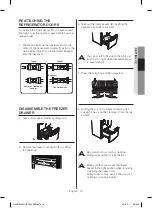
Страница 19: ...eeze room guard 1 by lifting the guard up 1 3 Take out the lower basket 2 by lifting the basket up from the rail system 2 You can scratch the side of the bin if you twist it left or right when disassembling or re assembling it 4 Press the fixing hook of the rail system 5 Holding the top of the Freezer Drawer pull it out all the way and then remove it from the rail system Be careful not to scratch ...

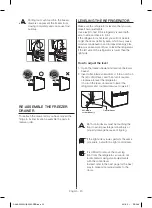
Страница 20: ... the left side of the refrigerator is lower than the right side How to adjust the level 1 Open the freezer drawer and remove the lower basket 2 Insert a flat blade screwdriver into a notch on the left control lever and then turn it counter clockwise to level the refrigerator You turn the lever clockwise to lower the refrigerator and counterclockwise to raise it flat blade screwdriver Control Lever...

Страница 21: ... filter removes unwanted particles from your water However it does not sterilize or destroy microorganisms You may need to purchase a water purifying system to do that In order for the ice maker to operate properly a water pressure of 138 862 kPa is required Under normal conditions a 170 cc 5 75 oz cup can be filled in about 10 seconds If the refrigerator is installed in an area with low water pre...

Страница 22: ... the water line on the unit 2 Connect the water line on the unit with the water line in the kit 3 Tighten the compression nut onto the compression fitting There should be no gaps between A B C 4 Turn water on and check for any leakage Only connect the water line to a drinkable water source If you have to repair or disassemble the water line cut off 6 5 mm of the plastic tubing to make sure you get...

Страница 23: ...hen you open the doors 3 Set the Temperature control to the coldest temperature and wait for an hour The freezer will get slightly chilled and the motor will run smoothly Reset the refrigerator and freezer to the temperatures you want 4 After you plug the refrigerator in it will take a few hours to reach the appropriate temperature You can store food and drinks in the refrigerator after the temper...

Страница 24: ...e button again for 3 seconds to cancel the Power Freeze function 2 Alarm Filter Reset 3 sec The Alarm button serves two purposes To turn the door open alarm on and off To reset the water filter life indicator 1 Door Alarm Function If the door alarm is set to On an alarm beeps if any refrigerator door is left open for more than three minutes The beeping stops when you close the door The door alarm ...

Страница 25: ... off To switch the temperature units between ºC and ºF 1 Light Function Touching the Lighting button turns on the Dispenser LED lamp in continuous mode so that it stays on continuously The button also lights up If you want the Dispenser lamp to come on only when some one uses the dispenser press the Lighting button to turn the continuous mode off 2 To switch the temperature units between ºC and ºF...

Страница 26: ...in their water which causes the water filter to clog more quickly 9 Ice Type Touch this button to select your desired ice type Cubed and crushed ice modes alternate when you press the button This mode can not be used with the Water mode simultaneously 10 Ice Maker Off Control Lock 3 sec The Ice Maker Off button serves two purposes To turn the Ice maker on and off To turn the Control Lock Function ...

Страница 27: ...emble the water filter because impurities in the water cause it to stick If you are having difficulties grip the water filter firmly and pull it hard When you pull the water filter a little water can leak from the opening This is normal To minimize the water leaks keep the filter cartridge horizontal when you pull it To prevent overflow empty the water filter tray 3 and dry around the filter case ...

Страница 28: ...er supply coming out of a reverse osmosis system going to the water inlet valve of the refrigerator needs to be between 35 and 120 psi 241 and 827 kPa If a reverse osmosis water filtration system is connected to your cold water supply the water pressure to the reverse osmosis system needs to be a minimum of 40 to 60 psi 276 to 414 kPa If the water pressure to the reverse osmosis system is less tha...

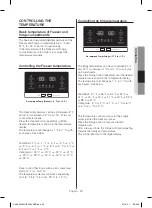
Страница 29: ...8 C 19 C 20 C 21 C 22 C 23 C 15 C 16 C 17 C 18 C Keep in mind that foods such as ice cream may melt at 4 F or 15 5 C The temperature display will move sequentially from 8 F to 5 F or from 23 C to 15 C Controlling the fridge temperature Recommend Temp Fridge 37 F or 3 C The fridge temperature can be set between 34 F and 44 F or between 1 C and 7 C to suit your particular needs Press the Fridge butt...

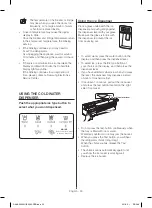
Страница 30: ... ice Dispenser Place a glass underneath the ice dispenser and push gently against the dispenser lever with your glass Make sure the glass is in line with the dispenser to prevent the ice from bouncing out To select water press the water button on the display and then press the dispenser lever To select Ice press the ICE type button of your choice on the display and then press the dispenser lever I...

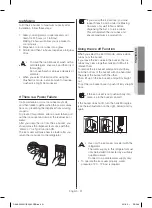
Страница 31: ... faster after you return the ice bucket to the refrigerator CAUTION If you use all the ice at once you must repeat Steps 2 and 3 under Ice Making However only wait 8 hours before dispensing the first 4 to 6 ice cubes This will replenish the ice cubes and ensure maximum ice production Using the ice off Function When you select the Ice Off mode remove all ice cubes from the bucket If you leave the i...

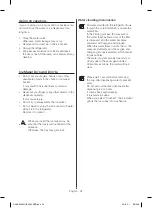
Страница 32: ... the Ice maker tray be sure that the tray is well centered at the entrance Otherwise the tray may get stuck CAUTION Water clouding phenomenon All water provided to the refrigerator flows through the core filter which is an alkaline water filter In the filtering process the pressure of the water that has flowed out of the filter is increased and the water becomes saturated with oxygen and nitrogen ...

Страница 33: ...he Vertical Hinged Section is in the correct position to avoid scratching the other door If the Vertical Hinged Section is reversed put it back to the right position and close the door Moisture may appear at times on the Vertical Hinged Section The door handle may become loose over time If this happens tighten the bolts found on the inside of the door If you close one door with too much force the ...

Страница 34: ...ction Button 1 When you select Deli the temperature of the pantry will be kept around 41 F or 5 C This feature helps keep food fresh for a long time 2 When you select Fresh the temperature of the pantry will be kept around 38 F or 3 C This feature helps keep food fresh for a longer time 3 When you select Chilled the temperature of the pantry will be kept around 34 F or 1 C This feature also helps ...

Страница 35: ...ood first To remove dust from the bins Remove the guard and wash the bin in water CAUTION 2 Tempered Glass shelves To remove Tilt up the front of the shelf in the direction shown 1 and lift it up vertically 2 Pull the shelf out To relocate Tilt the front of the shelf up and guide the shelf hooks into the slots at a desired height Then lower the front of the shelf so that the hooks can drop into th...

Страница 36: ... straight out To relocate the pantry Push the rails to the back of the refrigerator Place the drawer onto the rails and slide the pantry back until it is in place To remove the divider Pull the pantry completely out to full extension and raise the front side of the divider to unhook it from the rear wall of the pantry then lift the divider out To relocate the divider Hook the back of the divider o...

Страница 37: ...wer into place until it is horizontal and slide the drawer 3 in 3 4 4 Freezer Drawer To remove the freezer drawer Pull the freezer drawer out fully Tilt up the rear of the bin and lift it out to remove To relocate the freezer drawer Place the bin into the rail assembly You can scratch the side of the bin if you twist it left or right when disassembling or re assembling it Do not allow babies or ch...

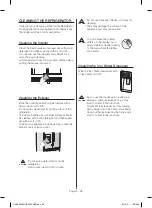
Страница 38: ...t and then wiped dry with a soft cloth To keep your appliance looking its best polish the exterior once or twice a year Do not spray water directly on the refrigerator Use a clean damp cloth to clean CAUTION Do not use benzene thinner or Clorox for cleaning They may damage the surface of the appliance and may cause a fire You can erase the printed letters on the display if you apply stainless clea...

Страница 39: ...ergent and damp cloth Wipe dry with a clean soft cloth Do not clean the refrigerator with benzene thinner or car detergent These substances could cause a fire Cleaning the rear side of the refrigerator To keep cords and exposed parts free of dust and dirt accumulation vacuum the rear side of the appliance once or twice a year 1 Do not remove the back cover 1 You could suffer an electric shock CAUT...

Страница 40: ...se to the wall preventing proper ventilation Was anything dropped behind or under the refrigerator If you hear a ticking sound from inside the refrigerator this is normal It occurs because various parts contract or expand in response to temperature changes in the refrigerator interior If it sounds as if something is hitting something else inside the refrigerator this is normal The sound is caused ...

Страница 41: ... Digital display Is the Child Lock on Check if the filter is properly installed If it is not properly installed the water dispenser may not work The auto close system does not work with the freezer door Is there an imbalance between the right and left parts of the door Open and close the door smoothly 1 2 times After you do this the auto close system usually works properly again Try opening the do...

Страница 42: ...Memo DA68 02954H EN 03 indd 42 2018 2 1 3 49 ...

Страница 43: ...Memo DA68 02954H EN 03 indd 43 2018 2 1 3 49 ...

Страница 44: ...for details of where and how they can take these items for environmentally safe recycling Business users should contact their supplier and check the terms and conditions of the purchase contract This product and its electronic accessories should not be mixed with other commercial wastes for disposal DA68 02954H 03 Contact SAMSUNG WORLD WIDE If you have any questions or comments relating to Samsung...

Отзывы: