background image

Free-Standing Gas 

Range

quick start guide

imagine

 the possibilities

Thank you for purchasing this Samsung product. 

To receive more complete service, please register 

your product at

www.samsung.com/register

1-800-SAMSUNG (726-7864)

This manual is made with 100 % recycled paper.

ENGLISH

NX58H5650WS 

NX58H5600SS

Quick guide_NX58H56_DG68-00MES+CFR.indb   1

08/02/2014   12:16:06

Содержание NX58H5650WS

Страница 1: ...chasing this Samsung product To receive more complete service please register your product at www samsung com register 1 800 SAMSUNG 726 7864 This manual is made with 100 recycled paper ENGLISH NX58H5650WS NX58H5600SS Quick guide_NX58H56_DG68 00525A_EN MES CFR indb 1 08 02 2014 12 16 06 ...

Страница 2: ...nition system is working properly 2 After the surface burner lights turn the control knob to adjust the power setting of the surface burner and turn off the electronic ignition system All surfuce burner ignitors spark at the same time when any of the surface burner controls are turned to the LITE position Never cook with a control set on LITE All surface burners can be manually lit during a power ...

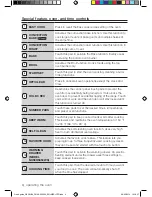
Страница 3: ...rolled with electronic touch pads Use the following pads to program and operate all oven cooking cleaning and timing functions All programmed settings and cooking status will show on the digital display 2 3 4 5 1 6 7 10 9 11 12 13 14 15 16 17 18 8 2 1 3 4 5 6 7 8 9 10 11 12 14 15 16 17 18 Quick guide_NX58H56_DG68 00525A_EN MES CFR indb 3 08 02 2014 12 16 07 ...

Страница 4: ...event accidental tipping of the range Touch pads will not work and the oven door will stay locked until this function is turned off 9 NUMBER PADS Touch these pads to set the desired times temperatures and preset oven functions 10 KEEP WARM Touch this pad to keep cooked foods warm after cooking This lowers and maintains the oven temperature to 150 F to 200 F 66 C to 93 C 11 SELF CLEAN Activates the...

Страница 5: ...on or off MINIMUM AND MAXIMUM SETTINGS All the features listed in the following chart have minimum and maximum temperature or time settings FEATURE MINIMUM SETTING MAXIMUM SETTING BAKE 150 F 66 C 550 F 288 C BROIL Lo Hi SELF CLEAN 2 hours 4 hours CONVECTION BAKE 150 F 66 C 550 F 288 C CONVECTION ROAST 150 F 66 C 550 F 288 C KEEP WARM 3 hours WARMING DRAWER 3 hours BREAD PROOF 12 hours In case of C...

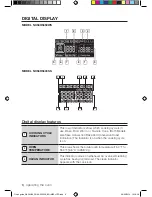
Страница 6: ...onvection Bake and Convection Roast indicators The indicator is on when the cooking cycle is on 2 OVEN TEMPERATURE This area shows the actual oven temperature 150 F to 550 F 66 C to 288 C 3 CLEAN INDICATOR This indicator comes on whenever an oven self cleaning cycle has been programmed The clean indicator appears with the Lock icon 1 2 3 4 6 7 8 1 5 9 1 3 4 8 7 1 10 9 2 Quick guide_NX58H56_DG68 00...

Страница 7: ...ng used 7 PREHEATING OVEN SIGNAL LIGHT This light blinks until the oven reaches the set temperature 150 F to 175 F 66 C to 79 C 8 LOCK ICON This appears when the controls have been deactivated and when the oven door lock has been activated Pressing and holding the Start Set pad for 3 seconds will activate and deactivate the controls and the door lock mechanism The Lock icon also comes on during a ...

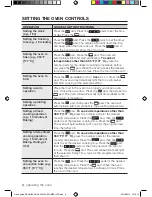
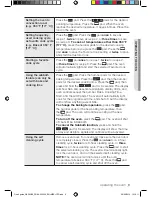
Страница 8: ...en will automatically light and preheat to the keep warm temperature Setting a proofing operation Press the pad then press the pad The oven will automatically light and preheat to the proofing temperature Setting a timed cooking operation e g 15 minutes of Baking Press the pad To cook at temperatures other than 350 F 177 C press the number pads for the desired cooking temperature Press the pad the...

Страница 9: ...n press and hold the pad for 3 seconds The display will show SAb and deactivate all signals display LEDs and oven controls except the number Bake Cooking Time Start and Clear Off pads The oven will automatically light cook for the programmed time and shut off but the display will not show anything except SAb To change the baking temperature press the pad the number pads for the new baking temperat...

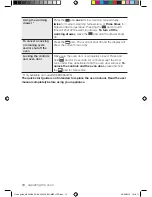
Страница 10: ... pad The oven will shut off and the display will show the current time of day Locking the controls and oven door Make sure the oven door is completely closed Press and hold pad for 3 seconds All controls except the Door Lock pad will be deactivated and the oven door will lock To unlock the controls and the oven door press and hold the pad for 3 seconds Only available on model NX58H5650WS The quick...

Страница 11: ...memo Quick guide_NX58H56_DG68 00525A_EN MES CFR indb 11 08 02 2014 12 16 11 ...

Страница 12: ...onics 1 800 SAMSUNG 726 7864 U S A Mobile Phones 1 800 SAMSUNG 726 7864 www samsung com ca support English www samsung com ca_fr support French www samsung com us support www samsung com us support Quick guide_NX58H56_DG68 00525A_EN MES CFR indb 12 08 02 2014 12 16 13 ...

Страница 13: ...ducto Samsung Para que le podamos brindar un servicio más completo sírvase registrar su producto en www samsung com register 1 800 SAMSUNG 726 7864 Este manual está fabricado con papel 100 reciclado ESPAÑOL NX58H5650WS NX58H5600SS Quick guide_NX58H56_DG68 00525A_EN MES CFR indb 1 08 02 2014 12 16 13 ...

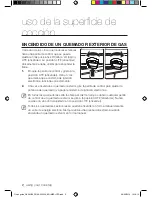
Страница 14: ...ciona correctamente 2 Una vez encendido el quemador exterior gire la perilla de control para ajustar la potencia del quemador y apagar el sistema de ignición electrónico En todos los quemadores salta la chispa al mismo tiempo cuando cualquier perilla de control de un quemador exterior se gira a la posición LITE encender Nunca cocine con un control ajustado en la posición LITE encender Todos los qu...

Страница 15: ...áctiles electrónicas Utilice las siguientes teclas para programar y operar todas las funciones de cocción limpieza y temporización del horno Todos los ajustes programados y los estados de cocción se mostrarán en la pantalla digital 2 3 4 5 1 6 7 10 9 11 12 13 14 15 16 17 18 8 2 1 3 4 5 6 7 8 9 10 11 12 14 15 16 17 18 Quick guide_NX58H56_DG68 00525A_EN MES CFR indb 3 08 02 2014 12 16 14 ...

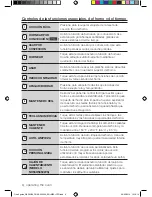
Страница 16: ...e encienda accidentalmente También bloquea la puerta del horno para impedir un vuelco accidental de la estufa Las teclas táctiles no funcionarán y la puerta del horno permanecerá bloqueada hasta que se desactive esta opción 9 TECLAS NUMÉRICAS Toque estas teclas para establecer los tiempos las temperaturas y las funciones programadas del horno 10 MANTENER CALIENTE Toque esta tecla para mantener los...

Страница 17: ... Auto limpieza 17 RELOJ Permite ajustar el reloj 18 LUZ DEL HORNO Toque esta tecla para encender o apagar la luz del horno VALORES AJUSTABLES MÍNIMOS Y MÁXIMOS Todas las funciones enumeradas en la siguiente tabla tienen valores ajustables mínimos y máximos de temperatura o de tiempo FUNCIÓN VALOR MÍNIMO VALOR MÁXIMO HORNEAR 150 F 66 C 550 F 288 C ASAR Lo bajo Hi alto AUTO LIMPIEZA 2 horas 4 horas ...

Страница 18: ...os modelos tienen también indicadores de asar hornear por convección Este indicador se enciende cuando el ciclo de cocción está activo 2 TEMPERATURA DEL HORNO En esta zona se muestra la temperatura del horno 150 F a 550 F 66 C a 288 C 3 INDICADOR LIMPIEZA Este indicador se ilumina cuando se ha programado un ciclo de auto limpieza del horno El indicador de limpieza aparece con el icono de bloqueo 1...

Страница 19: ...L HORNO Este indicador se ilumina cuando se alcanza la temperatura establecida 150 F a 175 F 66 C a 79 C 8 ICONO DE BLQUEO Se muestra cuando se han desactivado los controles y se ha activado el bloqueo de la puerta del horno Si mantiene presionada durante 3 segundos la tecla Start Set Iniciar Configurar se activarán y se desactivarán los controles y el mecanismo de bloqueo de la puerta El icono de...

Страница 20: ...ón adecuada sobre la plancha Cierre la puerta del horno Presione la tecla y a continuación la tecla El horno se enciende automáticamente y se precalienta para mantener la temperatura de calentamiento Ajuste de la función de entibiar para leudado Presione la tecla y a continuación la tecla El horno se enciende automáticamente y se calienta para mantener la temperatura entibiar para leudado Ajuste d...

Страница 21: ...da Presione la tecla una vez para la receta 1 dos veces para la receta 2 o tres veces para la receta 3 Presione la tecla El horno se enciende automáticamente y se inicia el ciclo de cocción personalizado deseado Uso de la función Shabat sólo se puede establecer con la función de asar y tiempo de cocción Presione la tecla Presione las teclas numéricas para establecer la temperatura de horneado dese...

Страница 22: ...a temperaturas medias o tres veces para temperaturas altas Si se presiona la tecla una cuarta vez se desactiva la función del cajón de calentamiento Para desactivar el cajón de calentamiento presione la tecla hasta que éste se desactive Para cancelar un ciclo de cocción o de limpieza o apagar el horno Presione la tecla El horno se apaga y la pantalla muestra la hora del día Bloqueo de los controle...

Страница 23: ...notas Quick guide_NX58H56_DG68 00525A_EN MES CFR indb 11 08 02 2014 12 16 18 ...

Страница 24: ...onics 1 800 SAMSUNG 726 7864 U S A Mobile Phones 1 800 SAMSUNG 726 7864 www samsung com ca support English www samsung com ca_fr support French www samsung com us support www samsung com us support Quick guide_NX58H56_DG68 00525A_EN MES CFR indb 12 08 02 2014 12 16 18 ...

Страница 25: ...roduit Samsung Afin de bénéficier du meilleur du service après vente enregistrez votre appareil sur le site suivant www samsung com register 1 800 SAMSUNG 726 7864 Ce manuel est composé de papier 100 recyclé Français canadien NX58H5650WS NX58H5600SS Quick guide_NX58H56_DG68 00525A_EN MES CFR indb 1 08 02 2014 12 16 19 ...

Страница 26: ... d allumage électronique a fonctionné si vous entendez un clic 2 Une fois le brûleur allumé réglez la puissance à l aide du bouton ce qui coupera le système d allumage électronique Lorsque vous placez l un des boutons en position LITE ALLUMAGE tous les dispositifs d allumage se déclenchent en même temps N utilisez jamais la commande LITE ALLUMAGE pour faire cuire des aliments Tous les brûleurs peu...

Страница 27: ...e touches tactiles Utilisez les touches suivantes pour programmer et utiliser les fonctions de cuisson de nettoyage et de minuterie Les réglages programmés et l état des modes de cuisson s affichent sur l écran numérique 2 3 4 5 1 6 7 10 9 11 12 13 14 15 16 17 18 8 2 1 3 4 5 6 7 8 9 10 11 12 14 15 16 17 18 Quick guide_NX58H56_DG68 00525A_EN MES CFR indb 3 08 02 2014 12 16 20 ...

Страница 28: ...ILLAGE 3 S Permet de désactiver les touches du panneau de commande pour éviter la mise en marche accidentelle du four et de verrouiller la porte pour éviter de faire basculer la cuisinière Les touches ne fonctionnent pas et la porte du four est verrouillée tant que cette fonction reste activée 9 TOUCHES NUMÉRIQUES Permettent de régler les durées les températures et les programmes de cuisson automa...

Страница 29: ...e régler l heure 18 ÉCLAIRAGE DU FOUR Permet d activer ou de désactiver l éclairage du four RÉGLAGES MINIMUM ET MAXIMUM Toutes les fonctions répertoriées dans le tableau suivant sont associées à des réglages de température et de durée mini et maxi FONCTION RÉGLAGE MINIMUM RÉGLAGE MAXIMUM CUISSON TRADITIONNELLE 150 F 66 C 550 F 288 C GRIL Lo Faible Hi Élevé AUTO NETTOYAGE 2 heures 4 heures CUISSON ...

Страница 30: ... comportent aussi des voyants pour les modes de cuisson traditionnelle par convection et de rôtissage par convection Le voyant s allume lorsque le mode de cuisson correspondant est activé 2 TEMPÉRATURE DU FOUR Affiche la température réelle du four 150 F à 550 F 66 C à 288 C 3 VOYANT DE NETTOYAGE Ce voyant s affiche lorsqu un cycle d auto nettoyage du four a été lancé Un petit cadenas s affiche alo...

Страница 31: ...uffe plat est utilisé 7 SIGNAL LUMINEUX DE PRÉCHAUFFAGE DU FOUR Clignote pendant toute la durée de préchauffage du four 150 F à 175 C 66 C à 79 C 8 SYMBOLE DE VERROUILLAGE Apparaît lorsque les commandes ont été désactivées et que la porte du four a été verrouillée Pour activer ou désactiver la fonction de verrouillage des commandes et de la porte appuyez pendant 3 secondes sur la touche Control Do...

Страница 32: ...Comment lancer un cycle de maintien au chaud Enfournez les aliments en les plaçant sur la grille correctement positionnée Fermez la porte du four Appuyez sur la touche puis sur la touche Le four s allume automatiquement et commence à préchauffer Comment lancer un cycle de levée Appuyez sur la touche puis sur la touche Le four s allume automatiquement et commence à préchauffer Comment programmer un...

Страница 33: ...glage et démarrer le mode Comment démarrer un cycle de cuisson personnalisé Appuyez sur la touche une fois pour sélectionner le Programme 1 deux fois pour sélectionner le Programme 2 ou trois fois pour sélectionner le Programme 3 Appuyez sur la touche Le four s allume automatiquement et lance le cycle de cuisson personnalisé sélectionné Comment utiliser la fonction Shabbat disponible uniquement en...

Страница 34: ...at Appuyez sur la touche une fois pour régler une température peu élevée deux fois pour régler une température moyenne et trois fois pour régler une température élevée Pour arrêter le tiroir chauffe plat appuyez une quatrième fois sur la touche Pour éteindre le tiroir chauffe plat appuyez sur la touche jusqu à ce qu il s éteigne Comment annuler un cycle de cuisson ou de nettoyage et ou éteindre le...

Страница 35: ...notes Quick guide_NX58H56_DG68 00525A_EN MES CFR indb 11 08 02 2014 12 16 23 ...

Страница 36: ...onics 1 800 SAMSUNG 726 7864 U S A Mobile Phones 1 800 SAMSUNG 726 7864 www samsung com ca support English www samsung com ca_fr support French www samsung com us support www samsung com us support Quick guide_NX58H56_DG68 00525A_EN MES CFR indb 12 08 02 2014 12 16 24 ...

Отзывы: