background image

Code No.: DE68-02038B 

Microwave Oven

Owner’s Instructions

M1975N / M1915N

Quick Look-up Guide..............................................................................2
Oven .......................................................................................................3
Accessories ............................................................................................3
Control Panel..........................................................................................4
Using this Instruction Booklet .................................................................5
Safety Precautions .................................................................................5
Installing Your Microwave Oven.............................................................6
Setting the Time .....................................................................................7
How a Microwave Oven Work................................................................7
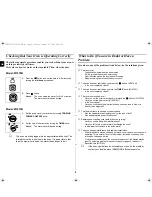
Checking that Your Oven is Operating Correctly ...................................8
What to Do if You are in Doubt or Have a Problem ...............................8
Cooking / Reheating...............................................................................9
Power Levels..........................................................................................9
Stopping the Cooking .............................................................................9
Adjusting the Cooking Time .................................................................10
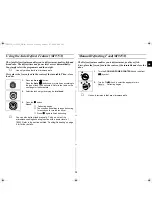
Using the Auto Reheat/Cook Feature (M1975N) .................................10
Auto Reheat/Cook Settings(M1975N)..................................................11
Using the Instant Reheat Feature ........................................................12
Instant Reheat Settings ........................................................................12
Using the Auto Defrost Feature (M1975N)...........................................13
Manual Defrosting Food(M1915N).......................................................13
Auto Defrost Settings(M1975N) ...........................................................14
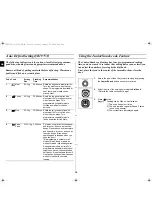
Using the Junior/Snack cook Feature ..................................................14
Junior Setting .......................................................................................15
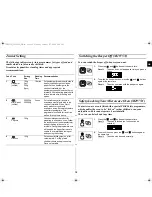
Switching the Beeper Off (M1975N) ....................................................15
Safety-Locking Your Microwave Oven (M1975N)................................15
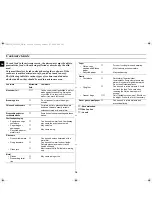
Cookware Guide...................................................................................16
Cooking Guide......................................................................................17
Cleaning Your Microwave Oven...........................................................22
Storing and Repairing Your Microwave Oven ......................................23
Technical Specification.........................................................................23

tX`^\u†tX`X\u†niU”GGwˆŽŒGXGGt–•‹ˆ SGvŠ›–‰Œ™GY^SGYWWZGGYaZ]Gwt

Содержание M1915N

Страница 1: ...ooking 9 Adjusting the Cooking Time 10 Using the Auto Reheat Cook Feature M1975N 10 Auto Reheat Cook Settings M1975N 11 Using the Instant Reheat Feature 12 Instant Reheat Settings 12 Using the Auto Defrost Feature M1975N 13 Manual Defrosting Food M1915N 13 Auto Defrost Settings M1975N 14 Using the Junior Snack cook Feature 14 Junior Setting 15 Switching the Beeper Off M1975N 15 Safety Locking Your...

Страница 2: ... four times when cooking is over 1 Place the frozen food in the oven Select the type of food by pressing the Auto button 2 Select the weight by turning the dial knob as required 3 Press the button Leave the food in the oven Press 30s once or more times for each extra 30 seconds that you wish to add 1 Place the food in the oven Select the power level by rotating the COOKING POWER CONTROL knob 2 Sel...

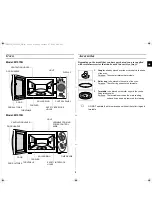
Страница 3: ... 300 450 600 700 850 1000W VENTILATION HOLES DOOR LATCHES DOOR TURNTABLE COUPLER ROLLER RING SAFETY INTERLOCK HOLES LIGHT DOOR HANDLE VARIABLE COOKING POWER CONTROL KNOB TIMER KNOB 1 Coupler already placed over the motor shaft in the base of the oven Purpose The coupler rotates the turntable 2 Roller ring to be placed in the centre of the oven Purpose The roller ring supports the turntable 3 Turnt...

Страница 4: ... SNACK SELECTION 3 AUTO DEFROST FEATURE SELECTION 4 AUTO COOK REHEAT SELECTION 5 POWER LEVEL SETTING 6 CLOCK SETTING 7 START DIAL KNOB Cook time Weight and Serving size 8 STOP CANCEL BUTTON 1 DEFROST 2 INSTANT REHEAT COOK tX u tX X u niU GGw G GGt SGv GY SGYWWZGGYaZ Gwt ...

Страница 5: ...rks etc Reason Electric arcing or sparking may occur and may damage the oven 2 DO NOT heat Airtight or vacuum sealed bottles jars containers Ex Baby food jars Airtight food Ex Eggs nuts in shells tomatoes Reason The increase in pressure may cause them to explode Tip Remove lids and pierce skins bags etc 3 DO NOT operate the microwave oven when it is empty Reason The oven walls may be damaged Tip L...

Страница 6: ...d or hidden just above the oven WARNING If the door or door seals are damaged the oven must not be operated until it has been repaired by a competent person WARNING It is hazardous for anyone other than a comperent person to carry out any service or repair operation which involves the removal of a cover which gives protection against exposure to microwave energy WARNING Liquids and other foods mus...

Страница 7: ...en the food out of the oven Standing times specified in recipes and in this booklet must therefore be respected to ensure Even cooking of the food right to the centre The same temperature throughout the food 1 To display the time in the Then press the button 24 hour notation Once 12 hour notation Twice 2 Turn the dial knob to set hour 3 Press the button 4 Turn the dial knob to set minute 5 Press t...

Страница 8: ...d a fuse to blow or a breaker to be triggered The food is either overcooked or undercooked Was the appropriate cooking length set for the type of food Was an appropriate power level chosen Sparking and cracking occur inside the oven arcing Have you used a dish with metal trimmings Have you left a fork or other metal utensil inside the oven Is aluminium foil too close to the inside walls The oven c...

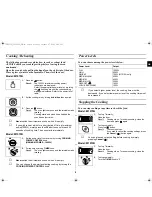
Страница 9: ...tton Result The 1000W maximum cooking power indications are displayed Select the appropriate power level by pressing the button again until the corresponding wattage is displayed Refer to the power level table 2 Set the cooking time by turning the dial knob as required 3 Press the button Result The oven light comes on and the turntable starts rotating Cooking starts and when it has finished the ov...

Страница 10: ...hat are microwave safe Press the 30s button once for each 30 seconds to be added During the cooking to increase or decrease the cooking time of your food turn the dial knob right or left Adjust the remaining cooking time by rotating the TIMER knob 1 Select the type of food that you are cooking by pressing the Auto Reheat Cook button once or more times 2 Select the size of the serving by turning th...

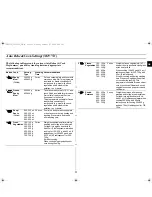
Страница 11: ... 400 450 g 500 550 g 600 650 g 700 750 g 3 mins Weigh the vegetables after washing cleaning and cutting into similar size Put them into a glass bowl with lid Add 30 ml 2 tablespoons water when cooking for 100 250 g add 45 ml 3 tablespoons for 300 450 g and add 60 75 ml 4 5 tablespoons for 500 750 g Stir after cooking When cooking bigger quantities stir once during cooking 5 Frozen Vegetables 100 1...

Страница 12: ...15N 1 Press the Drinks button which you want the required number of times Result Cooking starts after about two seconds When it has finished 1 The oven beeps four times 2 The end reminder signal will beep 3 times per 1 min 3 The current time is displayed again 1 Turn the COOKING POWER CONTROL knob to Max Power 2 Turn the TIMER knob to select Instant Reheat drinks soup sauce or fresh vegetable Butt...

Страница 13: ...ting Food M1915N The Defrost feature enables you to defrost meat poultry or fish First place the frozen food in the centre of the turntable and close the door Use only recipients that are microwave safe 1 Press the Auto button Press the Auto button one or more times according to the type of food to be defrosted Refer to the table on the next page for further details 2 Select the food weight by tur...

Страница 14: ...50mins Shield the tail of a whole fish with aluminium foil Turn the fish over when the oven beeps This programme is suitable for whole fishes as well as for fish fillets 4 Bread Cake 0 125 1kg 5 30mins Put bread on a piece of kitchen paper and turn over as soon as the oven beeps Place cake on a ceramic plate and if possible turn over as soon as the oven beeps Oven keeps operating and is stopped wh...

Страница 15: ...eady mini ravoli in a microwave proof plastic dish in the centre of turntable Pierce film of ready product or cover with microwave wrap Stir carefully before and after standing time This programme is suitable for ravioli as well as for noodles in sauce 3 Popcorn 100g Use special popdorn product for preparing in microwave oven Follow the instructions of food manufacturer and put the bag in the cent...

Страница 16: ...olystyrene cups containers Paper bags or newspaper Recycled paper or metal trims Can be used to warm food Overheating may cause the polystyrene to melt May catch fire May cause arcing Glassware Oven to table ware Fine glassware Glass jars Can be used unless decorated with a metal trim Can be used to warm foods or liquids Delicate glass may break or crack if heated suddenly Must remove the lid Suit...

Страница 17: ...ate for example see the chapter with tips techniques and hints Covering during cooking To cover the food during cooking is very important as the evaporated water rises as steam and contributes to cooking process Food can be covered in different ways e g with a ceramic plate plastic cover or microwave suitable cling film Standing times After cooking is over food the standing time is important to al...

Страница 18: ...4 4 3 Cut courgettes into slices Add 30 ml 2 tbsp water or a knob of butter Cook until just tender Egg Plants 250g 3 3 3 Cut egg plants into small slices and sprinkle with 1 tablespoon lemon juice Leeks 250g 4 4 3 Cut leeks into thick slices Mushrooms 125g 250g 1 2 2 3 3 Prepare small whole or sliced mushrooms Do not add any water Sprinkle with lemon juice Spice with salt and pepper Drain before s...

Страница 19: ...s REHEATING LIQUIDS Always allow a standing time of at least 20 seconds after the oven has been switched off to allow the temperature to even out Stir during heating if necessary and ALWAYS stir after heating To prevent eruptive boiling and possible scalding you should put a spoon or glass stick into the beverages and stir before during and after heating REHEATING BABY FOOD BABY FOOD Empty into a ...

Страница 20: ...es on a flat ceramic plate Cover with microwave cling film Stir before serving Filled pasta with sauce chilled 350g 600W 4 5 3 Put filled pasta e g ravioli tortellini in a deep ceramic plate Cover with plastic lid Stir occasionally during reheating and again before standing and serving Plated Meal chilled 350g 450g 550g 600W 4 5 5 6 6 7 3 Plate a meal of 2 3 chilled components on a ceramic dish Co...

Страница 21: ...mber this hint while freezing and defrosting food For defrosting of frozen food with a temperature of about 18 to 20 C use the following table as a guide All frozen food should be defrosted using defrosting power level 180W Food Portion Time min Standing Time min Instructions Meat Minced beef Pork steaks 200g 400g 250g 7 8 14 16 8 9 5 20 Place the meat on a flat ceramic plate Shield thinner edges ...

Страница 22: ...structions and stir well Use a suitable sized glass pyrex bowl with lid Cook covered for 6 to 7 minutes using 1000 W Stir several times well during cooking BROWNING ALMOND SLICES Spread 30 g sliced almonds evenly on a medium sized ceramic plate Stir several times during browning for 3 to 4 minutes using 600 W Let it stand for 2 3 minutes in the oven Use oven gloves while taking out Cleaning Your M...

Страница 23: ... you wish to store your oven away temporarily choose a dry dust free place Reason Dust and damp may adversely affect the working parts in the oven This microwave oven is not intended for commercial use Technical Specification SAMSUNG strives to improve its products at all times Both the design specifications and these user instructions are thus subject to change without notice Model M1975N M1915N ...

Страница 24: ...tX u tX X u niU GGw GY GGt SGv GY SGYWWZGGYaZ Gwt ...

Отзывы: