background image

ENG - 19

Using the Samsung Audio Remote App

Installing the Samsung Audio Remote App

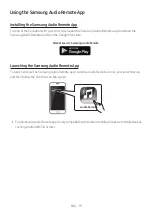
To control the Soundbar with your smart device and the Samsung Audio Remote app, download the 
Samsung Audio Remote app from the Google Play store.

Market search : Samsung Audio Remote

Launching the Samsung Audio Remote App

To launch and use the Samsung Audio Remote app, touch the Audio Remote icon on your smart device, 
and then follow the directions on the screen.

Audio Remote


The Samsung Audio Remote app is only compatible with Android mobile phones and mobile devices 
running Android OS 3.0 or later.

Содержание HWR450XY

Страница 1: ...FULL MANUAL Imagine the possibilities Thank you for purchasing this Samsung product To receive more complete service please register your product at www samsung com register HW R450 ...

Страница 2: ...e This symbol indicates that the rated voltage marked with the symbol is AC voltage DC voltage This symbol indicates that the rated voltage marked with the symbol is DC voltage Caution Consult instructions for use This symbol instructs the user to consult the user manual for further safety related information WARNING To reduce the risk of fire or electric shock do not expose this appliance to rain...

Страница 3: ...f the unit malfunctions Your product is not intended for industrial use It is for personal use only Condensation may occur if your product has been stored in cold temperatures If transporting the unit during the winter wait approximately 2 hours until the unit has reached room temperature before using 5 The battery used with this product contains chemicals that are harmful to the environment Do no...

Страница 4: ...to the Subwoofer 6 Automatic connection between the Subwoofer and the Soundbar 6 Manually connecting the Subwoofer if automatic connection fails 7 Connecting an SWA 8500S Sold Separately to your Soundbar 8 04 ConnectingtoyourTV 10 Method 1 Connecting with a Cable 10 Connecting using an Optical Cable 10 Method 2 Connecting Wirelessly 11 Connecting a TV via Bluetooth 11 05 ConnectinganExternalDevice...

Страница 5: ...TV remote control 23 Using the Hidden Buttons Buttons with more than one function 24 Output specifications for the different sound effect modes 24 09 InstallingtheWallMount 25 Installation Precautions 25 Wallmount Components 25 Detaching the Soundbar from the Wall 27 10 SoftwareUpdate 28 Updating Procedure 28 If UPDATE is not displayed 29 11 Troubleshooting 30 12 Licence 31 13 OpenSourceLicenceNot...

Страница 6: ...onsumption refer to the label attached to the product Label Bottom of the Soundbar Main Unit The power components are labelled 1 2 3 For more information about power connections see page 5 To purchase additional components or optional cables contact a Samsung Service Centre or Samsung Customer Care Depending on the region the appearance of the AC plug may differ from the plug displayed above or it...

Страница 7: ...s the source input mode Inputmode Display Optical Digital input D IN AUX input AUX BLUETOOTH mode BT USB mode USB To turn on BTPAIRING mode change the source to BT mode and then press and hold the Source button for more than 5 seconds When you plug in the AC cord the power button will begin working in 4 to 6 seconds When you turn on this unit there will be a 4 to 5 second delay before it produces ...

Страница 8: ...ice USB 5V0 5A Connect a USB device here to play music files on the USB device through the Soundbar AUXIN Connect to the Analogue output of an external device DC19V PowerSupplyIn Connect the AC DC power adapter When disconnecting the power cord from a wall outlet pull the plug Do not pull the cable Do not connect this unit or other components to an AC outlet until all connections between component...

Страница 9: ...r more information about the required electrical power and power consumption refer to the label attached to the product Label Bottom of the Soundbar Main Unit POWER RearofSubwoofer 1 PowerCord Connecting ElectricalPower DC 19V DC 19V Bottomofthe SoundbarMainUnit DC19V PowerJack 3 AC DCAdapter 2 ACPlug Make sure to rest the AC DC Adapter flat on a table or the floor If you place the AC DC Adapter s...

Страница 10: ...oofer LED Status Description Resolution Blue On Successfully connected normal operation Blinking Recovering the connection Check if the power cable attached to the main Soundbar unit is connected properly or wait about 5 minutes If blinking persists try manually connecting the subwoofer See page 7 Red On Standby with the Soundbar main unit turned off Check if the power cable attached to the main S...

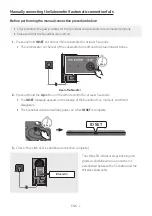
Страница 11: ...f the subwoofer turns off and the blue indicator blinks 5 Sec RearofSubwoofer 2 Press and hold the Upbutton on the remote control for at least 5 seconds The IDSET message appears on the display of the Soundbar for a moment and then it disappears The Soundbar will automatically power on when IDSET is complete SOUND MODE PAIR 5 Sec IDSET 3 Check if the LINK LED is solid blue connection complete Blue...

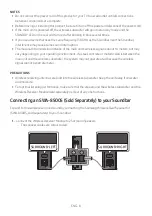
Страница 12: ...concrete or metallic wall is between the main unit and the wireless subwoofer the system may not operate at all because the wireless signal cannot penetrate metal PRECAUTIONS Wireless receiving antennas are built into the wireless subwoofer Keep the unit away from water and moisture For optimal listening performance make sure that the area around the wireless subwoofer and the Wireless Receiver Mo...

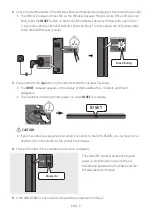
Страница 13: ...LINK Blueblinking 5 Sec 3 Press and hold the Upbutton on the remote control for at least 5 seconds The IDSET message appears on the display of the Soundbar for a moment and then it disappears The Soundbar will automatically power on when IDSET is complete SOUND MODE PAIR 5 Sec IDSET CAUTION If your Soundbar was playing music when it connects to the SWA 8500S you may hear some stuttering from the w...

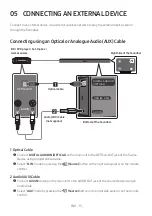
Страница 14: ...le When the audio in a broadcast is encoded in Dolby Digital and the Digital Output Audio Format on your TV is set to PCM we recommend that you change the setting to Dolby Digital When the setting on the TV is changed you will experience better sound quality The TV menu may use different words for Dolby Digital and PCM depending on the TV manufacturer ConnectingusinganOpticalCable DIGITAL AUDIO IN...

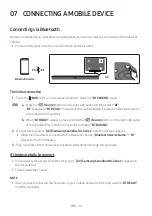
Страница 15: ...ND MODE PAIR OR Theinitialconnection 1 Press the PAIR button on the remote control to enter the BTPAIRING mode OR a Press the Source button on the right side panel and then select BT BT changes to BTREADY in a few seconds automatically if there is no Bluetooth device connected to the Soundbar b When BTREADY appears press and hold the Source button on the right side panel of the Soundbar for more t...

Страница 16: ...viously connected mobile device to the Soundbar BTPAIRING In this mode you can connect a new device to the Soundbar Press the PAIR button on the remote control or press and hold the Source button on the right side of the Soundbar for more than 5 seconds while the Soundbar is in BT mode NOTES If asked for a PIN code when connecting a Bluetooth device enter 0000 In Bluetooth connection mode the Blue...

Страница 17: ...ndbar BD DVDplayer Set topbox Gameconsole RightSideoftheSoundbar 1 OpticalCable X X Connect DIGITALAUDIOIN OPTICAL on the main unit to the OPTICAL OUT jack of the Source Device using a digital optical cable Y Y Select D IN mode by pressing the Source button on the right side panel or on the remote control 2 Audio AUX Cable X X Connect AUXIN Audio on the main unit to the AUDIO OUT jack of the Sourc...

Страница 18: ...k Type A on the other end to the micro USB jack on your Soundbar The Micro USB to USB adapter cable is sold separately To purchase contact a Samsung Service Centre or Samsung Customer Care 2 Connect your USB device to the female end of the adapter cable 3 Press the Source button on the right side panel or on the remote control and then select USB 4 USB appears in the display screen 5 Play music fi...

Страница 19: ...s 320kbps wma Wave_Format_MSAudio1 16kHz 48kHz 56kbps 128kbps Wave_Format_MSAudio2 16kHz 48kHz 56kbps 128kbps aac AAC 16kHz 96kHz 48kbps 320kbps AAC LC 16kHz 96kHz 128kbps 192kbps 5 1ch 320kbps HE AAC 24kHz 96kHz 48kbps 64kbps 5 1ch 160kbps wav 16kHz 48kHz up to 3000kbps ogg OGG 1 1 0 16kHz 48kHz 50kbps 500kbps If there are too many folders and files stored on the USB device it may take the Soundb...

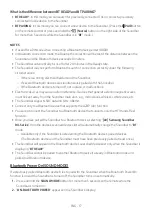
Страница 20: ...ice connected to the Soundbar b When BTREADY appears press and hold the Source button on the right side panel of the Soundbar for more than 5 seconds to display BTPAIRING 2 On your device select AV SamsungSoundbarR4 Series from the list that appears When the Soundbar is connected to the Bluetooth device BluetoothDeviceName BT appears in the front display 3 Play music files from the device connecte...

Страница 21: ...te electromagnetic waves must be kept away from the Soundbar main unit e g microwaves wireless LAN devices etc The Soundbar supports SBC data 44 1kHz 48kHz Connect only to a Bluetooth device that supports the A2DP AV function You cannot connect the Soundbar to a Bluetooth device that supports only the HF Hands Free function Once you have paired the Soundbar to a Bluetooth device selecting AV Samsu...

Страница 22: ...luetooth Bluetooth is a technology that enables Bluetooth compliant devices to interconnect easily with each other using a short wireless connection A Bluetooth device may cause noise or malfunction depending on usage if A part of your body is in contact with the receiving transmitting system of the Bluetooth device or the Soundbar It is subject to electrical variation from obstructions caused by ...

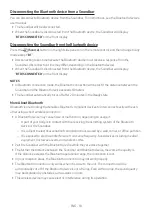
Страница 23: ...emote app from the Google Play store Marketsearch SamsungAudioRemote LaunchingtheSamsungAudioRemoteApp To launch and use the Samsung Audio Remote app touch the Audio Remote icon on your smart device and then follow the directions on the screen AudioRemote The Samsung Audio Remote app is only compatible with Android mobile phones and mobile devices running Android OS 3 0 or later ...

Страница 24: ...DE PAIR You can select the desired sound effect by choosing STANDARD SURROUNDSOUND GAME orSMART Select the STANDARD mode if you want to enjoy the original sound DRC DynamicRangeControl Lets you apply dynamic range control to Dolby Digital tracks Press and hold the SOUNDMODE button while the Soundbar is powered off to turn DRC Dynamic Range Control on or off With the DRC turned on loud sound is red...

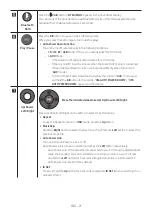
Страница 25: ...unction while the unit is in AUX mode press and hold the p button for 5 seconds ON AUTOPOWERDOWN OFF AUTOPOWERDOWN appears on the display VOL WOOFER SOUND MODE PAIR Up Down Left Right PresstheindicatedareastoselectUp Down Left Right Press Up Down Left Right on the button to select or set functions Repeat To use the Repeat function in USB mode press the Up button MusicSkip Press the Right button to...

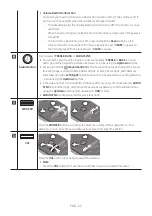
Страница 26: ... 600Hz 1 2kHz 2 5kHz 5kHz and 10kHz are selectable using the Left Right buttons and each can be adjusted to a setting between 6 to 6 using the Up Down buttons If the video on the TV and audio from the Soundbar are not synchronised select AUDIO SYNC in Sound Settings and then set the audio delay between 0 300milliseconds by using the Up Down buttons Not available in USB mode AUDIOSYNC is only suppo...

Страница 27: ...O F E R S O U N D B A R 5 Sec 3 If you want to control the Soundbar with your TV s remote push up and hold the WOOFER button for 5seconds repeatedly until ALL TVREMOTE appears in the display Then use your TV s menu to select external speakers ALL TVREMOTE S O U N D M O D E V O L W O O F E R S O U N D B A R 5 Sec 4 If you want to return the Soundbar to the default mode control by a Samsung TV remot...

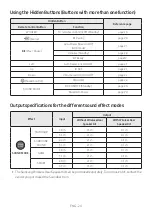
Страница 28: ...d EQ page 22 SOUND MODE DRC ON OFF Standby page 20 Bluetooth Power page 20 Outputspecificationsforthedifferentsoundeffectmodes Effect Input Output WithoutWirelessRear SpeakerKit WithWirelessRear SpeakerKit SOUNDMODE Surround VOL WOOFER SOUND MODE Bluetooth POWER STANDARD 2 0 ch 2 1 ch 4 1 ch 5 1 ch 2 1 ch 4 1 ch SURROUND SOUND 2 0 ch 2 1 ch 4 1 ch 5 1 ch 2 1 ch 4 1 ch GAME 2 0 ch 2 1 ch 4 1 ch 5 1...

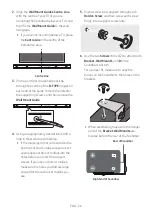
Страница 29: ...wall studs Purchase wall mounting screws according to the type and thickness of the wall you want to mount the Soundbar on Diameter M5 Length 35 mm or longer recommended Connect cables from the unit to external devices before you install the Soundbar on the wall Make sure the unit is turned off and unplugged before you install it Otherwise it may cause an electric shock WallmountComponents WallMou...

Страница 30: ...t each marking If the markings do not correspond to the positions of studs make sure you insert appropriate anchors or mollies into the holes before you insert the support screws If you use anchors or mollies make sure the holes you drill are large enough for the anchors or mollies you use 5 Push a screw not supplied through each Holder Screw and then screw each screw firmly into a support screw h...

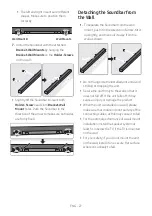
Страница 31: ... it in the direction of arrow tilt it up slightly and then pull it away from the wall as shown Do not hang onto the installed unit and avoid striking or dropping the unit Secure the unit firmly to the wall so that it does not fall off If the unit falls off it may cause an injury or damage the product When the unit is installed on a wall please make sure that children do not pull any of the connect...

Страница 32: ...set them after the update Note that updating the firmware resets the subwoofer connection too 1 Connect a Micro USB to USB adapter cable with a male USB 2 0 Micro USB plug Type B on one end and a standard female 2 0 USB jack Type A on the other end to the micro USB jack on your Soundbar The Micro USB to USB adapter cable is sold separately To purchase contact a Samsung Service Centre or Samsung Cu...

Страница 33: ... audio files supported by the Soundbar are stored in the USB storage device Do not disconnect the power or remove the USB device while updates are being applied The main unit will turn off automatically after completing the firmware update After the update is completed the user setup in the Soundbar is initialised so you can reset your settings We recommend you write down your settings so that you...

Страница 34: ... to cancel the mute function Isthevolumesettominimum Adjust the Volume Theremotecontroldoesnotwork Arethebatteriesdrained Replace with new batteries IsthedistancebetweentheremotecontrolandSoundbarmainunittoofar Move the remote control closer to the Soundbar main unit TheredLEDonthesubwooferblinksandthesubwooferisnotproducingsound ThisissuecanoccurifthesubwooferisnotconnectedtotheSoundbarmainunit T...

Страница 35: ...l DTS in combination with the Symbol and DTS 2 0 Channel are registered trademarks or trademarks of DTS Inc in the United States and or other countries DTS Inc All Rights Reserved 13 OPENSOURCE LICENCENOTICE To send inquiries and requests regarding open sources contact Samsung via Email oss request samsung com 14 IMPORTANT NOTESABOUT SERVICE Figures and illustrations in this User Manual are provid...

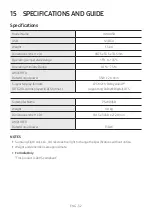
Страница 36: ...ut power 35W x 2 6 ohm Supported play formats DTS 2 0 sound is played in DTS format LPCM 2ch Dolby Audio supporting Dolby Digital DTS Subwoofer Name PS WR45B Weight 4 0 kg Dimensions W x H x D 181 5 x 343 0 x 272 0 mm AMPLIFIER Rated Output power 130W NOTES Samsung Electronics Co Ltd reserves the right to change the specifications without notice Weight and dimensions are approximate ForIndiaOnly T...

Страница 37: ...support VIETNAM 1800588889 www samsung com vn support THAILAND 0 2689 3232 OTHproducts 1800 29 3232 Tollfree www samsung com th support MYANMAR 95 1 2399 888 www samsung com mm support CAMBODIA 855 23 993232 1800 20 3232 Tollfree www samsung com th support LAOS 856 214 17333 MALAYSIA 1800 88 9999 603 77137420 Overseascontact www samsung com my support INDONESIA 021 5699 7777 0800 112 8888 TollFree...

Отзывы: