background image

ENG - 8

02  PRODUCT OVERVIEW

Top Panel of the Soundbar

Top Panel

Position the product so that 
the SAMSUNG logo is 
located on the top.

LED 

indicator

The LED Indicator flashes, glows, or changes color depending on the Soundbar's current 
mode or status. The color of the LED indicator and the number of lights indicate the active 
mode as described below.

W


White LED

W


White LED

M


Multicolor LED

W


White LED

W


White LED


• The Multicolor LED changes to 

White

Cyan

Green

Red

, and 

Blue

 depending on the 

mode or status.

Multi 

Function 

Button


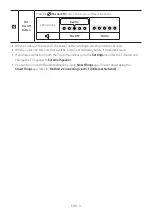
• In standby mode, press the   

(Multi Function)

 button to turn on the Soundbar.


• Press the   

(Multi Function)

 button to change the mode. Each time you change the 

mode, the LED lights in white and then turns off.

LED 

Indicator

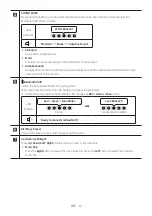
White On -> Off

White On -> Off

White On -> Off

Digital Audio In

” or 

TV ARC

Wi-Fi

Bluetooth


• Press the   

(Multi Function)

 button for 3 seconds to call Alexa. Say with the button 

pressed to enable voice recognition.

Volume 

Button

Press the 

 (Volume)

 button to adjust the volume.

Содержание HW-S61T

Страница 1: ...HW S60T S61T FULL MANUAL Imagine the possibilities Thank you for purchasing this Samsung product To receive more complete service please register your product at www samsung com register ...
Страница 2: ...educe the risk of fire or electric shock do not expose this appliance to rain or moisture To prevent injury this apparatus must be securely attached to the floor wall in accordance with the installation instructions CAUTION Do not expose this apparatus to dripping or splashing Do not put objects filled with liquids such as vases on the apparatus To turn this apparatus off completely you must pull ...

Страница 3: ...g has two blades with one wider than the other A grounding type plug has two blades and a third grounding prong The wide blade or the third prong are provided for your safety If the provided plug does not fit into your outlet consult an electrician for replacement of the obsolete outlet 10 Protect the power cord from being walked on or pinched particularly at plugs convenience receptacles and the ...

Страница 4: ...ld temperatures If transporting the unit during the winter wait approximately 2 hours until the unit has reached room temperature before using 5 The battery used with this product contains chemicals that are harmful to the environment Do not dispose of the battery in the general household trash Do not expose the battery to excess heat direct sunlight or fire Do not short circuit disassemble or ove...

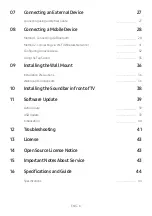
Страница 5: ...ifferent sound effect modes 14 Adjusting the Soundbar volume with a TV remote control 15 04 ConnectingtheSoundbar 16 Connecting Electrical Power 16 Connecting an SWA 8500S Sold Separately to your Soundbar 17 Connecting an SWA W500 Sold Separately to your Soundbar 19 05 UsingawiredconnectiontotheTV 21 Method 1 Connecting with HDMI 21 Method 2 Connecting using an Optical Cable 23 06 Usingawirelessco...

Страница 6: ...k 31 Configuring Amazon Alexa 32 Using the Tap Sound 35 09 InstallingtheWallMount 36 Installation Precautions 36 Wallmount Components 36 10 InstallingtheSoundbarinfrontofTV 38 11 SoftwareUpdate 39 Auto Update 39 USB Update 39 Initialization 40 12 Troubleshooting 41 13 License 43 14 OpenSourceLicenseNotice 43 15 ImportantNotesAboutService 43 16 SpecificationsandGuide 44 Specifications 44 ...

Страница 7: ... Unit To purchase additional components or optional cables contact a Samsung Service Center or Samsung Customer Care For more information about the wallmount see page 36 Design specifications and App screen are subject to change without prior notice The appearance of the accessories may differ slightly from the illustrations above InsertingBatteriesbeforeusingtheRemoteControl AAbatteriesX2 Slide t...

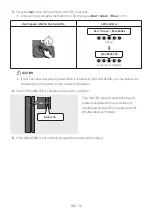
Страница 8: ... LED W White LED The Multicolor LED changes to White Cyan Green Red and Blue depending on the mode or status Multi Function Button In standby mode press the MultiFunction button to turn on the Soundbar Press the MultiFunction button to change the mode Each time you change the mode the LED lights in white and then turns off LED Indicator WhiteOn Off WhiteOn Off WhiteOn Off DigitalAudioIn or TVARC W...

Страница 9: ...o 6 seconds When you turn on this unit there will be a 4 to 5 second delay before it produces sound If you hear sounds from both the TV and Soundbar go to the Settings menu for the TV audio and change the TV speaker to ExternalSpeaker You can turn on and off audio feedback by using SmartThingsapp To learn about using the SmartThingsapp refer to Method2 ConnectingviaWi Fi WirelessNetwork ...

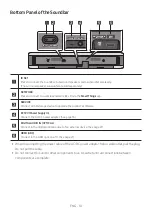
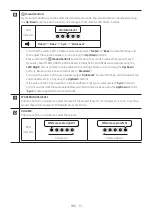
Страница 10: ...IN OPTICAL ID SET NETWORK SERVICE DC 19V HDMI ARC DIGITAL AUDIO IN OPTICAL SERVICE DC 19V HDMI OUT TV ARC DIGITAL AUDIO IN OPTICAL DIGITAL AUDIO IN OPTICAL ID SET NETWORK IDSET Press to connect the Soundbar to Surround speakers and a subwoofer wirelessly The surround speaker subwoofer are sold separately NETWORK Press to connect to a wireless network Wi Fi via the SmartThings app SERVICE Connect a...

Страница 11: ...n Off RedBlinksX3 AutoPowerDownFunction The unit turns off automatically in the following situations In DigitalAudioIn or TVARC Wi Fi Bluetooth mode if there is no audio signal for 18 minutes Source Press to select a source connected to the Soundbar Mute Press the Mute button to mute the sound Press it again to unmute the sound LED Indicator BlinksXRepeatly ...

Страница 12: ...e characteristics of the content BluetoothPAIR Switch the Soundbar to Bluetooth pairing mode When you press the button the LED display changes as shown below Until pairing is complete the Multicolor LED changes as Red Green Blue in turn LED Indicator Red Green BlueBlinks Pairing Connectioniscomplete Cyan BlinksX3 ReadytoconnectviaBluetooth p Play Pause You can also play or pause music by pressing ...

Страница 13: ...ttons and each can be adjusted to a setting between 6 to 6 using the Up Down buttons Make sure the Sound mode is set to Standard To control the volume of the each speaker select SideLevel in Sound Settings and then adjust the volume between 6 6 by using the Up Down buttons If the video on the TV and audio from the Soundbar are not synchronized select Sync in Sound Control and then set the audio de...

Страница 14: ...akerKit Standard 2 0 ch 2 1 ch 2 1 ch 5 1 ch 2 1 ch 4 1 ch Music 2 0 ch 4 1 ch 6 1 ch 5 1 ch 4 1 ch 6 1 ch Adaptive Sound 2 0 ch 4 1 ch 6 1 ch 5 1 ch 4 1 ch 6 1 ch The Samsung Wireless Rear Speaker Kit and Subwoofer can be purchased separately To purchase a Kit or the Subwoofer contact the vendor you purchased the Soundbar from ...

Страница 15: ...econds Each time you push the WOOFER button up and hold it for 5 seconds the mode switches in the following order Samsung TVRemote Default mode Off TVRemote All TVRemote The LED indicator status changes each time the mode is changed as shown below RemoteControlButton LEDIndicator Status S O U N D M O D E V O L W O O F E R S O U N D B A R 5 Sec Samsung TV Remote Default mode CyanBlinksX1 Enable a S...

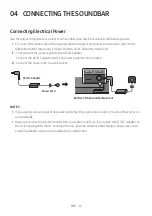
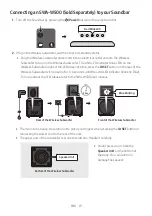
Страница 16: ...IN OPTICAL ID SET NETWORK SERVICE DC 19V HDM ARC DIGITAL AUDIO IN OPTICAL SERVICE DC 19V HDMI OUT TV ARC DIGITAL AUDIO IN OPTICAL ID SET NETWORK SERVICE DC 19V HDMI ARC DIGITAL AUDIO IN OPTICAL ID SET NETWORK SERVICE DC 19V HDMI ARC DIGITAL AUDIO IN OPTICAL SERVICE DC 19V HDMI OUT TV ARC DIGITAL AUDIO IN OPTICAL DI ID SET NETWORK D C 1 9 V BottomoftheSoundbarMainUnit NOTES If you unplug and reconn...

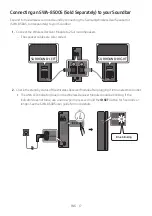
Страница 17: ...SURROUNDSPEAKERSOUT SPEAKERIMPEDANCE 3Ω SURROUND RIGHT SURROUND LEFT SURROUND RIGHT 2 Check the standby status of the Wireless Receiver Module after plugging it into an electrical outlet The LINK LED indicator blue on the Wireless Receiver Module should be blinking If the indicator does not blink use a narrow pin to press and hold the IDSET button for 5 seconds or longer See the SWA 8500S user gui...

Страница 18: ...BlinksX3 CAUTION If your Soundbar was playing music when it connects to the SWA 8500S you may hear some stuttering from the woofer as the connection finalizes 4 Check if the LINK LED is solid blue connection complete STANDBY LINK STANDBY LINK BlueisOn The LINK LED indicator stops blinking and glows a solid blue when a connection is established between the Soundbar and the Wireless Receiver Module ...

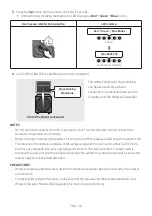
Страница 19: ...tton on the rear of the Wireless Subwoofer with a pen tip for 5 6 seconds until the LINK LED indicator blinks in Blue For more about the LED please refer to the SWA W500 user manual RearoftheWirelessSubwoofer POWER ID SET POWER ID SET FrontoftheWirelessSubwoofer POWER ID SET POWER ID SET Blueblinking POWER ID SET ID SET 5 Sec The main unit is heavy Be careful not to pinch your fingers when pressin...

Страница 20: ...our TV to a wall outlet until all connections between components are complete Before moving or installing this product be sure to turn off the power and disconnect the power cord The maximum transmission distance of the wireless signal of the main unit is about 32 8 ft 10 m but may vary depending on your operating environment If a steel concrete or metallic wall is between the main unit and the wi...

Страница 21: ...go In addition make sure that the cable is a certified Type A high speed HDMI Ethernet cable HIGH SPEED HDMI CABLE WITH ETHERNET ConnectingtheTVthatsupportsHDMIARC AudioReturnChannel HDMI IN ARC SERVICE DC 19V HDMI ARC DIGITAL AUDIO IN OPTICAL ConnecttotheHDMIIN ARC portofyourTV HDMICable Bottomofthe Soundbar ConnecttotheHDMI ARC portofthe Soundbarmainunit TopoftheSoundbar LED Indicator WhiteOn Of...

Страница 22: ...an transmit the digital video and audio data without connecting a separate optical cable We recommend you use a coreless HDMI cable if possible If you use a cored HDMI cable use one whose diameter is less than 0 55 inches 14 mm This function is not available if the HDMI cable does not support ARC When the audio in a broadcast is encoded in Dolby Digital and the Digital Output Audio Format on your ...

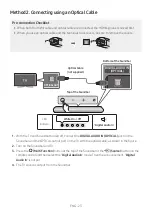
Страница 23: ...RC DIGITAL AUDIO IN OPTICAL BottomoftheSoundbar OpticalCable notsupplied TopoftheSoundbar 1 With the TV and Soundbar turned off connect the DIGITALAUDIOIN OPTICAL port on the Soundbar and the OPTICAL output port on the TV with the optical cable as shown in the figure 2 Turn on the Soundbar and TV 3 Press the MultiFunction button at the top of the Soundbar or the Source button on the remote control...

Страница 24: ... the Multicolor LED changes as Red Green Blue in turn ReadytoconnectviaBluetooth 2 Select Bluetooth mode on the Samsung TV e g Home Settings Sound Sound Output Bluetooth Speaker List AV Samsung Soundbar S60T AV Samsung Soundbar S61T Bluetooth 3 Select AV SamsungSoundbarS60T AV SamsungSoundbarS61T from the list on TV s screen An available Soundbar is indicated with NeedPairing or Paired on the TV s...

Страница 25: ...del NotesonBluetoothconnection Locate a new device within 3 28 ft 1 m to connect via Bluetooth communication If asked for a PIN code when connecting a Bluetooth device enter 0000 The Soundbar automatically turns off after 18 minutes in the Ready state The Soundbar may not perform Bluetooth search or connection correctly under the following circumstances If there is a strong electrical field around...

Страница 26: ...t your Internet service provider for details Because the menus may differ depending on the year of manufacture refer to your TV manual To connect the TV to the Soundbar via Wi Fi connect the Soundbar to the wireless router first See page 31 for details on how to establish a Wi Fi connection 1 For more information about Wi Fi connection to the Soundbar see page 31 Method2 ConnectingviaWi Fi Wireles...

Страница 27: ...ith the external device and Soundbar turned off connect the DIGITALAUDIOIN OPTICAL port on the Soundbar and the OPTICAL output port on the external device with the optical cable as shown in the figure 2 Turn on the Soundbar and external device 3 Press the MultiFunction button at the top of the Soundbar or the Source button on the remote control and then select the DigitalAudioIn mode Then the anno...

Страница 28: ... LEDIndicator SOUND MODE PAIR OR Red Green BlueBlinks Pairing Connectioniscomplete Cyan BlinksX3 When in Bluetooth mode 5 Sec Until pairing is complete the Multicolor LED changes as Red Green Blue in turn ReadytoconnectviaBluetooth 2 On your device select AV SamsungSoundbarS60T AV SamsungSoundbarS61T from the list that appears 3 Play music files from the device connected via Bluetooth through the ...

Страница 29: ... Free function When connecting the Soundbar to a Bluetooth device place them as close to each other as possible The farther the Soundbar and Bluetooth device are from each other the lower the sound quality will become The Bluetooth connection may break when the devices are out of the effective range The Bluetooth connection may not function as intended in areas with poor reception A Bluetooth devi...

Страница 30: ...ar blinks Red three times DisconnectingtheSoundbarfromtheBluetoothdevice Press the MultiFunction button at the top of the Soundbar or the Source button on the remote control to select the mode other than Bluetooth Disconnecting takes time because the Bluetooth device must receive a response from the Soundbar Disconnection time may differ depending on the Bluetooth device If the Soundbar is disconn...

Страница 31: ... 1 Install and launch the SmartThings app from your mobile device smartphone or tablet 2 On the app follow the screen instructions to add the Soundbar The automatic pop up the second screenshot below may not show on some devices If the pop up window does not appear press on the Home screen The Soundbar is added to the app Launch App Add device Auto pop up SmartThings App ...

Страница 32: ...over the network 1 Install the SmartThings app on your mobile device and then launch it 2 Enter the Alexa account by following the instructions on the app and then log in the service TopoftheSoundbar 3 Sec Alexa OR 3 Call Alexa or press the MultiFunction button on the Soundbar for 3 seconds to use the Alexa service Press the MultiFunction button for 3 seconds to call Alexa Say with the button pres...

Страница 33: ...lume control Alexa turnupthevolume Alexa turndownthevolume Listening to streaming content from Amazon Music Alexa playsomejazzmusic Playback control Alexa playnextsong Alexa stopthemusic Alexa whatisthissong Weather information Alexa what stheweather Timer scheduling Alexa setatimerfor10minutes ...

Страница 34: ... the Alexa status as shown below Alexastatus LEDindicatoronSoundbar Idle Off Listening Cyan On Thinking Cyan BlinksX1 Speaking TimerAlarmsand Reminders Cyan BlinksX2 Blue BlinksX2 Notification YellowBlinksX2 Alexaservice unavailable RedBlinksX3 Network disconnected RedBlinksX3 MicOff RedOn ...

Страница 35: ...e device does not tap a sharp corner of the Soundbar The Soundbar or mobile device may become scratched or damaged It is recommended that the mobile device be covered with a case Lightly tap the wide area in the upper portion of the Soundbar without using excessive force To use this function update the SmartThings app to the latest version The function may not be supported depending on the app ver...

Страница 36: ...urchase wall mounting screws according to the type and thickness of the wall you want to mount the Soundbar on Diameter M5 Length 1 3 8 inches 35 mm or longer recommended Connect cables from the unit to external devices before you install the Soundbar on the wall Make sure the unit is turned off and unplugged before you install it Otherwise it may cause an electric shock WallmountComponents WallMo...

Страница 37: ... If the markings do not correspond to the positions of studs make sure you insert appropriate anchors or mollies into the holes before you insert the support screws If you use anchors or mollies make sure the holes you drill are large enough for the anchors or mollies you use 5 Push a screw not supplied through each Holder Screw and then screw each screw firmly into a support screw hole 6 Install ...

Страница 38: ...de the Bracket Wall Mounts down so that the Bracket Wall Mounts rest securely on the Holder Screws 10 INSTALLINGTHE SOUNDBARIN FRONTOFTV 1 2inches 3cm ormore Microphone Istalling the center of the Soundbar to the center of the TV as illustrated in the image At this time place the Soundbar at least 1 2 inches 3cm away from the TV so that there is no interference with voice recognition NOTES Make su...

Страница 39: ...s the update firmware to the SERVICE port of the Soundbar 1 Go to the Samsung Electronics website www samsung com search for the model name from the customer support menu option For more information about update refer to Upgrade Guide 2 Download the upgrade file USB type 3 Unzip the file to create a folder with the file name 4 Store the created folder in a USB and then connect it to the Soundbar 5...

Страница 40: ...me for at least 5 seconds The LED display changes as shown below and then the Soundbar is initialized LED Indicator CyanBlinksX3 RedBlinks Off Whitemovesfromlefttoright andrighttoleft CAUTION All the settings of the Soundbar are initialized Be sure to perform this only when initialization is required ...

Страница 41: ... adjust the volume of the external device For sound output of the TV select Soundbar Samsung TV Home Settings Sound Sound Output Select Soundbar The cable connection to the Soundbar may not be loose Remove the cable and connect again Remove the power cord completely reconnect and turn the power on Initialize the product and try again See page 40 IncasetheTVisnotconnectedviaHDMI ARC Check whether t...

Страница 42: ...nd breaking may occur Check the installation environment and conditions for use IncaseWi Ficonnectionisnotpossible Check whether your wireless router is on Turn off the router turn it back on and then try again When the signal of the wireless router is too weak connection may not be possible Move the router near the Soundbar or adjust the installed position with no obstacles If your wireless route...

Страница 43: ... and HDMI High Definition Multimedia Interface and the HDMI Logo are trademarks or registered trademarks of HDMI Licensing LLC in the United States and other countries The Spotify Software is subject to third party licenses found here www spotify com connect third party licenses For more information about Spotify Connect please visit www spotify com connect 14 OPENSOURCE LICENSENOTICE To send inqu...

Страница 44: ...ats LPCM 2ch Dolby Audio supporting Dolby Digital DTS NOTES Samsung Electronics Co Ltd reserves the right to change the specifications without notice Weight and dimensions are approximate Precaution TheSoundbarwillrestartautomaticallyifyouturnon turnoffWi Fi Wi Fi Port deactivation method Press the IDSET button on the bottom panel of the Soundbar for 30 seconds to turn Wi Fi On Off Bluetooth Port ...

Страница 45: ...ipt must be retained by the customer and is the only acceptable proof of purchase It must be presented to the authorized service center at the time service is requested EXCLUSIONS WHATISNOTCOVERED This warranty does not cover damage due to accident fire flood and or other acts of God misuse incorrect line voltage improper installation improper or unauthorized repairs commercial use or damage that ...

Страница 46: ...tomer care Center HEADQUARTERS Samsung Electronics Canada Inc 2050 Derry Road West Mississauga Ontario L5N 0B9 Canada TEL 1 800 SAMSUNG 1 800 726 7864 www samsung com ca support Area Contact Center Web Site North America CANADA 1 800 SAMSUNG 726 7864 www samsung com ca support English www samsung com ca_fr support French U S A 1 800 SAMSUNG 726 7864 www samsung com us support ...

Страница 47: ...HW S60T S61T MANUEL COMPLET Imaginez les possibilités Merci d avoir choisi un appareil Samsung Pour recevoir une assistance plus complète veuillez enregistrer votre produit sur www samsung com register ...

Страница 48: ...e diminuer les risques d incendie ou de choc électrique n exposez pas cet appareil à la pluie ou à l humidité Pour éviter des blessures cet appareil doit être solidement fixé au plancher au mur conformément aux directives d installation MISEENGARDE Veillez à éviter toute projection sur l appareil Ne placez jamais de récipients contenant un liquide ex vase dessus La prise d alimentation fait office...

Страница 49: ...risée Une fiche polarisée comporte deux lames dont l une est plus large que l autre Une fiche de mise à la terre comporte deux lames et une troisième broche de mise à la terre La lame la plus large et la troisième broche sont destinées à assurer votre sécurité Si la fiche fournie ne s insère pas dans la prise utilisée faites appel à un électricien pour faire remplacer celle ci 10 Placez le cordon ...

Страница 50: ...ron 2 heures que l appareil ait atteint la température de la pièce avant de l utiliser 5 Les piles utilisées dans ce produit peuvent contenir des produits chimiques dangereux pour l environnement Ne jetez pas les piles dans votre poubelle habituelle Ne vous débarrassez pas des piles en les faisant brûler Les piles ne doivent pas être court circuitées démontées ou subir de surchauffe Le remplacemen...

Страница 51: ... 14 Réglage du volume du Soundbar avec une télécommande du téléviseur 15 04 ConnexionduSoundbar 16 Connexion de l alimentation électrique 16 Raccordement du module SWA 8500S vendu séparément au Soundbar 17 Raccordement du module SWA W500 vendu séparément au Soundbar 19 05 Utilisationd uneconnexionfilaireavecle téléviseur 21 Méthode 1 Connexion avec un câble HDMI 21 Méthode 2 Connexion à l aide d u...

Страница 52: ...lexa 32 Utilisation de la fonction Tap Sound 35 09 Installationdusupportmural 36 Précautions d installation 36 Composants de montage mural 36 10 InstallationduSoundbardevantletéléviseur 38 11 Miseàjourlogicielle 39 Mise à jour automatique 39 Mise à jour USB 39 Initialisation 40 12 Dépannage 41 13 Licence 43 14 AvisdeLicencesLibres 43 15 RemarqueImportanteConcernantleService 43 16 Caractéristiquese...

Страница 53: ...ter des composants supplémentaires ou des câbles en option contactez un centre de service Samsung ou le service clientèle Samsung Pour plus d informations sur le support mural consultez la page 36 La conception les spécifications et l écran de l application peuvent faire l objet d une modification sans préavis L apparence des accessoires peut différer légèrement des illustrations ci dessus Inserti...

Страница 54: ... voyant DEL multicolore devient Blanc Cyan Vert Rouge et Bleu selon le mode ou le statut Bouton multifonction En mode veille appuyez sur le bouton Multifonction pour allumer le Soundbar Appuyez sur le bouton Multifonction pour changer le mode Chaque fois que vous changez de mode le voyant DEL s allume en blanc puis s éteint Voyant DEL Voyantblancallumé éteint Voyantblancallumé éteint Voyantblancal...

Страница 55: ...e vous allumez cet appareil vous devrez patienter 4 à 5 secondes avant qu il ne produise du son Si le son provient à la fois du téléviseur et du Soundbar accédez au menu Paramètres correspondant au son du téléviseur et définissez le haut parleur du téléviseur sur Haut p externe Vous pouvez activer et désactiver la réaction acoustique en utilisant l application SmartThings Pour plus de détails sur ...

Страница 56: ...O IN OPTICAL DIGITAL AUDIO IN OPTICAL ID SET NETWORK IDSET Appuyez sur ce bouton pour connecter le Soundbar à des haut parleurs ambiophoniques et à un caisson de basses sans fil Le haut parleurs ambiophoniques et le caisson de basses sont vendus séparément NETWORK Appuyez sur ce bouton pour connecter le produit à un réseau sans fil Wi Fi par le biais de l application SmartThings SERVICE Connectez ...

Страница 57: ...ge clignote3fois FonctionAutoPowerDown L appareil s éteint automatiquement dans les situations suivantes En mode DigitalAudioIn ou TVARC Wi Fi Bluetooth en l absence de signal audio pendant 18 minutes Source Appuyez sur ce bouton pour sélectionner une source connectée au Soundbar Silence Appuyez sur le bouton Silence pour désactiver le son Appuyez de nouveau sur ce bouton pour activer le son Voyan...

Страница 58: ...mode association Bluetooth Lorsque vous appuyez sur le bouton l affichage des voyants DEL change comme indiqué ci dessous Jusqu à ce que l appairage soit terminé les voyants DEL multicolores s allument successivement Rouge Vert Bleu Voyant DEL Appairage LesvoyantsRouge Vert Bleuclignotent Connexionétablie Levoyantcyanclignote3fois ReadytoconnectviaBluetooth p Lecture Pause Vous pouvez également li...

Страница 59: ...valeur allant de 6 à 6 à l aide des boutons Haut Bas Veillez à ce que le mode son soit défini sur Standard Pour contrôler le volume de chaque haut parleur sélectionnez SideLevel dans les réglages sonores puis réglez le volume entre 6 et 6 à l aide des boutons Haut Bas Si la vidéo de la télévision et l audio du Soundbar ne sont pas synchronisés sélectionnez Sync dans les réglages sonores puis régle...

Страница 60: ...aux 5 1 canaux 2 1 canaux 4 1 canaux Music 2 0 canaux 4 1 canaux 6 1 canaux 5 1 canaux 4 1 canaux 6 1 canaux Adaptive Sound 2 0 canaux 4 1 canaux 6 1 canaux 5 1 canaux 4 1 canaux 6 1 canaux Le haut parleur arrière sans fil Samsung et le caisson des basses peuvent être achetés séparément Pour acheter le haut parleur ou le caisson des basses communiquez avec le vendeur auprès duquel vous avez acheté...

Страница 61: ...es À chaque fois que vous faites basculer le bouton WOOFER vers le haut et le maintenez enfoncé pendant 5 secondes le mode change dans l ordre suivant Samsung TVRemote Mode par défaut Off TVRemote All TVRemote L état duvoyant DELchange à chaque changement de mode comme illustré ci dessous Boutondelatélécommande VoyantDEL État S O U N D M O D E V O L W O O F E R S O U N D B A R 5 Sec Samsung TV Rem...

Страница 62: ...C SERVICE DC 19V HDMI ARC DIGITAL AUDIO IN OPTICAL ID SET NETWORK SERVICE DC 19V HDM ARC DIGITAL AUDIO IN OPTICAL SERVICE DC 19V HDMI OUT TV ARC DIGITAL AUDIO IN OPTICAL ID SET NETWORK SERVICE DC 19V HDMI ARC DIGITAL AUDIO IN OPTICAL ID SET NETWORK SERVICE DC 19V HDMI ARC DIGITAL AUDIO IN OPTICAL SERVICE DC 19V HDMI OUT TV ARC DIGITAL AUDIO IN OPTICAL DI ID SET NETWORK D C 1 9 V Dessousdel unitépr...

Страница 63: ...ET L R SURROUNDSPEAKERSOUT SPEAKERIMPEDANCE 3Ω SURROUND RIGHT SURROUND LEFT SURROUND RIGHT 2 Vérifiez le statut de veille du module récepteur sans fil après l avoir branché dans une prise électrique Le voyant LINK bleu du module récepteur sans fil clignote Si le voyant ne clignote pas utilisez une épingle pour appuyer sur le bouton IDSET et maintenez le enfoncé pendant au moins 5 secondes Consulte...

Страница 64: ...yan clignote3fois ATTENTION Si votre Soundbar est en train de lire de la musique lorsqu il est connecté au module SWA 8500S vous entendrez probablement des grésillements provenant du haut parleur lors de la finalisation de la connexion 4 Vérifiez que levoyant LINKest bleu fixe connexion établie STANDBY LINK STANDBY LINK Levoyantbleuest allumé Le voyant LINK cesse de clignoter et s allume en bleu f...

Страница 65: ...à l aide d un outil pointu pendant 5 à 6 secondes jusqu à ce que le voyant DEL LINK clignote en bleu Pour en savoir plus à propos de la DEL veuillez consulter le manuel d utilisation SWA W500 Partiearrièreducaissondebassessansfil POWER ID SET POWER ID SET Partieavantducaissondebassessansfil POWER ID SET POWER ID SET Levoyant clignoteenbleu POWER ID SET ID SET 5 Sec L unité principale est lourde Ve...

Страница 66: ... téléviseur à une prise murale tant que toutes les connexions entre les composants ne sont pas établies Avant de déplacer ou d installer ce produit veillez à couper le courant et à débrancher le cordon d alimentation La distance maximale de transmission du signal sans fil entre de l unité principale est d environ 10 m 32 8 pieds mais peut varier en fonction de votre environnement d utilisation Si ...

Страница 67: ...urez vous que le câble est un câble Ethernet HDMI haute vitesse certifié de type A CÂBLE HDMI HAUTE VITESSE AVEC ETHERNET ConnexiondutéléviseurprenantenchargeHDMIARC AudioReturnChannel HDMI IN ARC SERVICE DC 19V HDMI ARC DIGITAL AUDIO IN OPTICAL Connectezlecâbleauport HDMIIN ARC devotretéléviseur CâbleHDMI Panneaudessous duSoundbar ConnectezlecâbleauportHDMI ARC del unitéprincipaleduSoundbar Dessu...

Страница 68: ...sans connecter de câble optique séparé Nous vous recommandons d utiliser si possible un câble HDMI sans noyau Si vous utilisez un câble HDMI à noyau utilisez en un dont le diamètre est inférieur à 0 55 po 14 mm Cette fonction n est pas disponible si le câble HDMI ne prend pas en charge ARC Lorsque le son d une diffusion est encodé en Dolby Digital et que le paramètre Format de sortie audio numériq...

Страница 69: ...OUT TV ARC DIGITAL AUDIO IN OPTICAL PanneaudessousduSoundbar Câbleoptique nonfourni DessusduSoundbar 1 Le téléviseur et le Soundbar étant éteints connectez le port DIGITALAUDIOIN OPTICAL du Soundbar et le port de sortie OPTICAL du téléviseur à l aide du câble optique non fourni comme indiqué sur la figure 2 Allumez le Soundbar et le téléviseur 3 Appuyez sur le bouton Multifonction en haut du Sound...

Страница 70: ...s allument successivement Rouge Vert Bleu ReadytoconnectviaBluetooth 2 Sélectionnez le mode Bluetooth sur le téléviseur Samsung Par exemple Accueil Paramètres Son Sortie audio Liste des haut parleurs Bluetooth AV Samsung Soundbar S60T AV Samsung Soundbar S61T Bluetooth 3 Sélectionnez AV SamsungSoundbar S60T AV SamsungSoundbarS61T dans la liste sur l écran du téléviseur Un Soundbar disponible est i...

Страница 71: ... Localisez un nouvel appareil à moins d 3 28 pi 1 m pour vous connecter via la communication Bluetooth Si un code PIN vous est demandé lors de la connexion d un appareil Bluetooth entrez 0000 Le Soundbar s éteint automatiquement au bout de 18 minutes à l état Prêt Le Soundbar peut ne pas effectuer correctement la recherche ou la connexion Bluetooth dans les circonstances suivantes S il y a un fort...

Страница 72: ...nisseur de service Internet pour plus de détails Étant donné que les menus peuvent varier selon l année de fabrication consultez le manuel de votre téléviseur Pour brancher le téléviseur à la Soundbar par Wi Fi branchez d abord la Soundbar au routeur sans fil Reportez vous à la page 31 pour voir comment établir une connexion Wi Fi 1 Pour plus d informations sur la connexion Wi Fi à la Soundbar voi...

Страница 73: ...1 Éteignez l appareil externe et le Soundbar puis connectez le port DIGITALAUDIOIN OPTICAL du Soundbar et le port de sortie OPTICAL de l appareil externe à l aide du câble optique non fourni comme indiqué sur la figure 2 Allumez le Soundbar et l appareil externe 3 Appuyez sur le bouton Multifonction en haut du Soundbar ou sur le bouton Source de la télécommande puis sélectionnez le mode DigitalAud...

Страница 74: ...ND MODE PAIR OU Appairage LesvoyantsRouge Vert Bleuclignotent Levoyantcyan clignote3fois Connexionétablie En mode Bluetooth 5 Sec Jusqu à ce que l appairage soit terminé les voyants DEL multicolores s allument successivement Rouge Vert Bleu ReadytoconnectviaBluetooth 2 Sur votre appareil sélectionnez AV SamsungSoundbarS60T AV SamsungSoundbarS61T dans la liste qui apparaît 3 Lisez les fichiers musi...

Страница 75: ...e Lorsque vous connectez le Soundbar à un périphérique Bluetooth placez les aussi près que possible l un de l autre Plus le Soundbar et le périphérique Bluetooth sont éloignés l un de l autre plus la qualité sonore diminue La connexion Bluetooth peut se rompre lorsque les appareils sont hors de portée effective La connexion Bluetooth peut ne pas fonctionner comme prévu dans les zones où la récepti...

Страница 76: ...re du Soundbar clignote Rouge trois fois DéconnexionduSoundbardupériphériqueBluetooth Appuyez sur le bouton Multifonction en haut du Soundbar ou sur le bouton Source de la télécommande pour sélectionner un mode autre que Bluetooth La déconnexion prend du temps car le périphérique Bluetooth doit recevoir une réponse du Soundbar Le temps de déconnexion requis peut différer en fonction du périphériqu...

Страница 77: ...mobile téléphone intelligent ou tablette 2 Dans l application suivez les instructions à l écran pour ajouter le Soundbar La fenêtre contextuelle automatique deuxième illustration ci dessous peut ne pas s afficher sur certains appareils Si la fenêtre contextuelle ne s affiche pas appuyez sur le bouton sur l écran Home Le Soundbar a été ajouté à l application Lancez l application Ajouter un appareil...

Страница 78: ...oundbar au réseau 1 Installez l application SmartThings sur votre appareil mobile puis lancez la 2 Accédez au compte Alexa en suivant les instructions de l application puis connectez vous au service DessusduSoundbar 3 Sec Alexa OU 3 Appelez Alexa ou appuyez sur le bouton Multifonction du Soundbar pendant 3 secondes pour utiliser le service Alexa Appuyez sur le bouton Multifonction pendant 3 second...

Страница 79: ...ôle du volume Alexa montelevolume Alexa baisselevolume Écoute de contenu en streaming à partir d Amazon Music Alexa jouedelamusiquejazz Contrôle de lecture Alexa jouelachansonsuivante Alexa arrêtelamusique Alexa quelleestcettechanson Information météo Alexa queltempsfait il Planification de la minuterie Alexa règleuneminuteriesur10minutes ...

Страница 80: ...leSoundbar Inactive Éteint Écoute Cyanallumé Réfléchit Levoyantcyan clignote1fois Parle Alarmesetrappels deminuterie Levoyantclignote encyan2fois Levoyantclignote enbleu2fois Notification Levoyantclignote enjaune2fois ServiceAlexa indisponible Levoyantrouge clignote3fois Réseau déconnecté Levoyantrouge clignote3fois Arrêtmicrophone Voyantrouge allumé ...

Страница 81: ...oin pointu du Soundbar Cela pourrait rayer ou endommager le Soundbar ou l appareil mobile Il est recommandé de placer l appareil mobile dans un étui Appuyez légèrement sur la zone large de la partie supérieure du Soundbar sans exercer de force excessive Pour utiliser cette fonction mettez à jour l application SmartThings vers la dernière version Cette fonction peut ne pas être prise en charge en f...

Страница 82: ...s poteaux muraux Achetez des vis de montage mural en fonction du type et de l épaisseur du mur sur lequel vous souhaitez monter le Soundbar Diamètre M5 Longueur 1 3 8 pouces 35 mm ou plus recommandé Connectez les câbles de l unité aux appareils externes avant d installer le Soundbar sur le mur Assurez vous que l unité est éteinte et débranchée avant de l installer Sinon cela pourrait provoquer un ...

Страница 83: ...s marques ne correspondent pas aux positions des montants de la cloison veillez à insérer les chevilles ou les chevilles Molly appropriées dans les trous avant d insérer les vis de support Si vous utilisez des chevilles ou des chevilles Molly assurez vous que les trous que vous percez sont assez grands pour recevoir celles ci 5 Poussez une vis non fournie dans chaque Visdefixation puis vissez ferm...

Страница 84: ...emural vers le bas afin que les Supportdemontagemural reposent fermement sur les Visde fixation 10 INSTALLATION DUSOUNDBAR DEVANTLE TÉLÉVISEUR 3cm 1 2pouce ouplus Microphone Installez le centre du Soundbar au centre du téléviseur comme illustré sur l image À ce stade placez le Soundbar à au moins 3 cm 1 2 pouce du téléviseur afin qu il n y ait aucune interférence avec la reconnaissance vocale REMA...

Страница 85: ...dez au site Web de Samsung Electronics www samsung com recherchez le nom du modèle à partir de l option de menu de l assistance à la clientèle Pour plus d informations sur la mise à jour reportez vous au Guide de mise à niveau 2 Téléchargez le fichier de mise à niveau type USB 3 Décompressez le fichier pour créer un dossier avec le nom du fichier 4 Stockez le dossier créé sur une clé USB puis conn...

Страница 86: ...hage des voyants DEL change comme indiqué ci dessous puis le Soundbar est initialisé Voyant DEL Leblancsedéplacedegaucheà droiteetdedroiteàgauche Levoyantcyanclignote3fois Clignoteenrouge Éteint MISEENGARDE Tous les paramètres du Soundbar sont initialisés Veillez à effectuer cette opération uniquement lorsque l initialisation est requise ...

Страница 87: ...r Samsung Accueil Paramètres Son Sortie audio Sélectionnez le Soundbar La connexion du câble au Soundbar ne doit pas être lâche Débranchez le câble et rebranchez le Retirez complètement le cordon d alimentation rebranchez le et mettez l appareil sous tension Initialisez le produit et réessayez Voir page 40 Siletéléviseurn estpasconnectéviaHDMI ARC Vérifiez que le câble HDMI est correctement connec...

Страница 88: ...ire Vérifiez l environnement d installation et les conditions d utilisation SilaconnexionWi Fis avèreimpossible Vérifiez si votre routeur sans fil est allumé Éteignez le routeur rallumez le puis réessayez Lorsque le signal du routeur sans fil est trop faible la connexion peut ne pas être possible Déplacez le routeur près du Soundbar ou ajustez la position d installation pour qu il n y ait pas d ob...

Страница 89: ... Interface and the HDMI Logo are trademarks or registered trademarks of HDMI Licensing LLC in the United States and other countries Le logiciel Spotify est assujetti à des licences de tiers que vous trouverez ici www spotify com connect third party licenses Pour en savoir plus sur Spotify Connect veuillez visiter www spotify com connect 14 AVISDE LICENCESLIBRES Pour envoyer des questions concernan...

Страница 90: ...o prise en charge de Dolby Digital DTS REMARQUES Samsung Electronics Co Ltd se réserve le droit de modifierles caractéristiques sans préavis Le poids et les dimensions sont approximatifs Précaution LeSoundbarredémarreautomatiquementsivousactivez désactivezleWi Fi Wi Fi Méthode de désactivation du port Pour activer désactiver le Wi Fi appuyez sur le bouton IDSET sur le panneau inférieur du Soundbar...

Страница 91: ...nt doit le présenter au Centre de service agréé au moment où il fait la demande d une réparation sous garantie EXCLUSIONS CEQUIN ESTPASCOUVERT Cette garantie ne couvre pas les dommages causés par un accident un incendie une inondation un cas de force majeure un mauvais usage ou une tension incorrecte La garantie ne couvre pas une mauvaise installation une mauvaise réparation une réparation non aut...

Страница 92: ... Service Consommateurs Samsung SIÈGE SOCIAL Samsung Electronics Canada Inc 2050 Derry Road West Mississauga Ontario L5N 0B9 Canada TEL 1 800 SAMSUNG 1 800 726 7864 www samsung com ca_fr support Area Contact Center Web Site North America CANADA 1 800 SAMSUNG 726 7864 www samsung com ca support English www samsung com ca_fr support French U S A 1 800 SAMSUNG 726 7864 www samsung com us support ...

Отзывы: