background image

ENG - 13

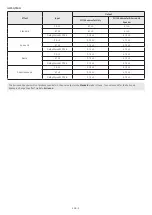
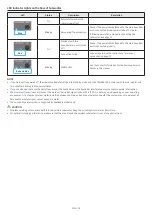
LED Indicator Lights on the Rear of Subwoofer

LED

Status

Description

Resolution

Blue

On

Successfully connected  
(normal operation)

-

Blinking

Recovering the connection

Check if the power cable attached to the main Soundbar 
unit is connected properly or wait about 5 minutes. 
If blinking persists, try manually connecting the 
subwoofer. See page 12.

Red

On

Standby (with the 
Soundbar main unit turned 
off)

Check if the power cable attached to the main Soundbar 
unit is connected properly.

Connection failed

Connect again. See the instructions for manual 
connection on page 12.

Red and blue

Blinking

Malfunction

See the contact information for the Samsung Service 
Center in this manual.

NOTE

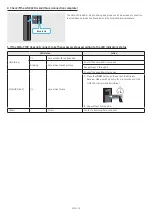
•  If the main unit is powered off, the wireless subwoofer will go into stand-by mode and the STANDBY LED on the rear of the sub-woofer will 

turn red after blinking in blue several times.

•  If you use a device that uses the same frequency as the Soundbar near the Soundbar, interference may cause some sound interruption.
•  The maximum transmission distance of the main unit’s wireless signal is about 32.8 ft (10 m), but may vary depending on your operating 

environment. If a steel-concrete or metallic wall is between the main unit and the wireless subwoofer, the system may not operate at all 
because the wireless signal cannot penetrate metal.

•  The surround speaker system is supported by applicable models only.

CAUTION

•  Wireless receiving antennas are built into the wireless subwoofer. Keep the unit away from water and moisture. 
•  For optimal listening performance, make sure that the area around the wireless subwoofer is clear of any obstructions.

Содержание HW-Q910C

Страница 1: ...hank you for purchasing this Samsung product To receive more complete service please registeryour product at www samsung com register Figures and illustrations in this User Manual are provided for ref...

Страница 2: ...to your Soundbar 14 05 Connecting to a TV 16 Connecting the TV that supports HDMI ARC Audio Return Channel 16 Connecting using an Optical Cable 17 Connecting via Bluetooth 18 Connecting via Wi Fi 20...

Страница 3: ...2 Surround Speaker PowerCord 3903 001117 x 2 Wireless ReceiverModule SpeakerCable AH81 02137A For more information about the power supply and power consumption refer to the label attached to the prod...

Страница 4: ...ton to turn the microphone on or off When the microphone is off the LED indicatorwill light red Red On Mic Off Red Off Mic On 3 Source Button Q750C model Press the Source button to change the input so...

Страница 5: ...ARC HDMI SERVICE DIGITAL AUDIO IN OPTICAL HDMI TO TV eARC ARC HDMI 3 5 4 1 POWER Connect the Soundbar s AC power cable See page 11 2 SERVICE Connect a USB storage device to upgrade the product s soft...

Страница 6: ...n to mute the sound Press it again to unmute the sound 5 SOUND MODE By pressing the button you can select the desired audio mode such as Surround Game Standard Adaptive sound Standard Outputs the orig...

Страница 7: ...usic by pressing the button 9 Up Down Left Right Press the indicated areas to select Up Down Left Right Press Up Down Left Right on the button to select or set functions Music Skip Press the Right but...

Страница 8: ...Up TV remote control On Off Standby page 10 Up ID SET page 12 Sound Control 7 Band EQ page 7 Output specifications forthe different sound effect modes HW Q910C Effect Input Output With Subwoofer Surro...

Страница 9: ...2 ch 5 1 2 ch Dolby Atmos DTS X 3 1 2 ch 5 1 2 ch Game 2 0 ch 3 1 2 ch 5 1 2 ch 5 1 ch 3 1 2 ch 5 1 2 ch Dolby Atmos DTS X 3 1 2 ch 5 1 2 ch Adaptive sound 2 0 ch 3 1 2 ch 5 1 2 ch 5 1 ch 3 1 2 ch 5...

Страница 10: ...ing this function Samsung VIZIO LG Sony Sharp PHILIPS PANASONIC TOSHIBA Hisense RCA 1 Turn Off the Soundbar 2 Push up and hold the WOOFER button for 5 seconds Each time you push the WOOFER button up a...

Страница 11: ...HDMI IN 1 HDMI IN 2 ID SET WOOFER REAR POWER NETWORK SERVICE DIGITAL AUDIO IN OPTICAL HDMI TO TV eARC ARC HDMI 1 HDMI 2 ID SET HDMI IN 1 HDMI IN 2 SERVICE DIGITAL AUDIO IN OPTICAL HDMI TO TV eARC ARC...

Страница 12: ...oofer turns off and the blue indicator blinks 5 Sec Blinking blue fast Rearof Subwoofer Rearof Subwoofer 3 Press the Up button on the remote control for 5 seconds The ID SET message appears on the dis...

Страница 13: ...ed off the wireless subwooferwill go into stand by mode and the STANDBY LED on the rear of the sub wooferwill turn red after blinking in blue several times If you use a device that uses the same frequ...

Страница 14: ...o the blue jack to the speakerwith the blue label 3 Insert the red and black colored ends of each speaker cable into the red and black jacks of the appropriate speaker The labels are on the backs of t...

Страница 15: ...D status Action LINK Blue On Connected with the Soundbar Blinking Connection standby status Check if the Soundbar is turned on Repeat steps 3 through 4 STANDBY Red On Connection failure Check if the S...

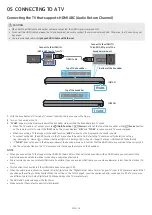
Страница 16: ...ppears on the display and the sound is heard To connect with eARC the eARC function in the TV menu should be set to On Refer to the TV user manual for details on setting e g Samsung TV Home Menu Setti...

Страница 17: ...ot supplied Bottom of the Soundbar D IN Top of the Soundbar Q910C Top of the Soundbar D IN Q750C 1 With the TV and Soundbar turned off connect the DIGITALAUDIO IN OPTICAL port on the Soundbar and the...

Страница 18: ...gs All Settings Sound Sound Output Bluetooth Speaker List Soundbar Q C Bluetooth 3 Select SoundbarQ C from the list on TV s screen An available Soundbar is indicated with Need Pairing or Paired on the...

Страница 19: ...28 ft 1 m to connect via Bluetooth communication If asked for a PIN code when connecting a Bluetooth device enter 0000 The Soundbar automatically turns off after18 minutes in the Ready state The Soun...

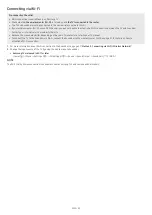
Страница 20: ...s Because the menus may differ depending on the year of manufacture refer to your TV manual To connect the TV to the Soundbarvia Wi Fi connect the Soundbar to the wireless router first See page 27 for...

Страница 21: ...l Cable not supplied D IN TV menu example TV AV Soundbarseries name HDMI Wi Fi TV menu Wi Fi TV menu example TV AV Soundbarseries name Wi Fi NOTE It can operate according to the Codec supported by TV...

Страница 22: ...is is available in all Sound modes Method 2 Connecting via TV To enable this function turn on the Adaptive Sound mode on your Samsung TV menu Home Menu Settings All Settings General Intelligent Mode S...

Страница 23: ...oundbar or the Source button on the remote control to select HDMI mode 5 The Soundbar display indicates that HDMI mode is currently selected and the Soundbarwill start playing sounds NOTE When you use...

Страница 24: ...Top of the Soundbar D IN Q750C 1 Use an optical cable not supplied to connect the DIGITALAUDIO IN OPTICAL on the Soundbar main and the OPTICAL OUT port on the external device 2 Turn on the Soundbar a...

Страница 25: ...c On Off Source button on the top panel of the Soundbar for more than 5 seconds to display BT PAIRING 2 On your device select SoundbarQ C from the list that appears When the Soundbar is connected to t...

Страница 26: ...h device may experience noise or malfunction under in the following conditions When the body is in contact with the signal transceiver on the Bluetooth device or Soundbar In corners orwhen there is an...

Страница 27: ...rtThings app from your mobile device smartphone or tablet 2 On the app follow the screen instructions to add the Soundbar The automatic pop up the second screenshot below may not show on some devices...

Страница 28: ...device does not tap a sharp corner of the Soundbar The Soundbar or mobile device may become scratched or damaged It is recommended that the mobile device be covered with a case Lightly tap the wide a...

Страница 29: ...h AirPlay 2 you can stream music podcasts and other audio from yourApple devices to the Samsung Soundbar Make sure the Soundbar is powered on and connected to the same Wi Fi network as yourApple devic...

Страница 30: ...ted on the wall install the Soundbar at least 2 inches 5 cm below the TV 2 inches 5 cm ormore 2 Align the Wall Mount Guide s CenterLine with the center of your TV if you are mounting the Soundbar belo...

Страница 31: ...all Mounts and then slide the Bracket Wall Mounts down so that the Bracket Wall Mounts rest securely on the Holder Screws 10 INSTALLING THE SOUNDBAR IN FRONT OF TV Component x 4 Rubber Foot BN67 00398...

Страница 32: ...Soundbar and then reconnect it to the Internet USB Update Bottom of the Soundbar HDMI IN 1 HDMI IN 2 ID SET WOOFER REAR POWER NETWORK SERVICE DIGITAL AUDIO IN OPTICAL HDMI TO TV eARC ARC HDMI 1 HDMI 2...

Страница 33: ...ace the batteries with new ones The Soundbarindicatorturns solid red The microphone is turned off Turn on the microphone See page 4 Sound is not output from the soundbar The volume of the Soundbar is...

Страница 34: ...speaker list on the device to connect Samsung TV Home Menu Settings All Settings Sound Sound Output Bluetooth Speaker List The automatic TV connection may be disabled While the Soundbar is in BT READY...

Отзывы: