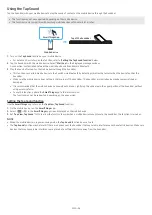
background image

ENG - 28

10  INSTALLING THE WALL 

MOUNT

Installation Precautions

•  Install on a vertical wall only.
•  Do not install in a place with high temperature or humidity.
•  Verify whether the wall is strong enough to support the product’s 

weight. If not, reinforce the wall or choose another installation 
point.

•  Purchase and use the fixing screws or anchors appropriate for 

the kind of wall you have (plaster board, iron board, wood, etc.). If 
possible, fix the support screws into wall studs.

•  Purchase wall mounting screws according to the type and 

thickness of the wall you want to mount the Soundbar on.
‒  Diameter: M5
‒  Length: 35 mm or longer recommended.

•  Connect cables from the unit to external devices before you install 

the Soundbar on the wall.

•  Make sure the unit is turned off and unplugged before you install 

it. Otherwise, it may cause an electric shock.

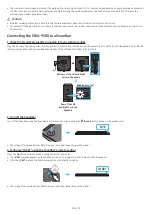
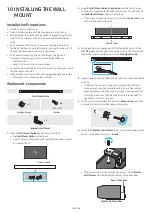
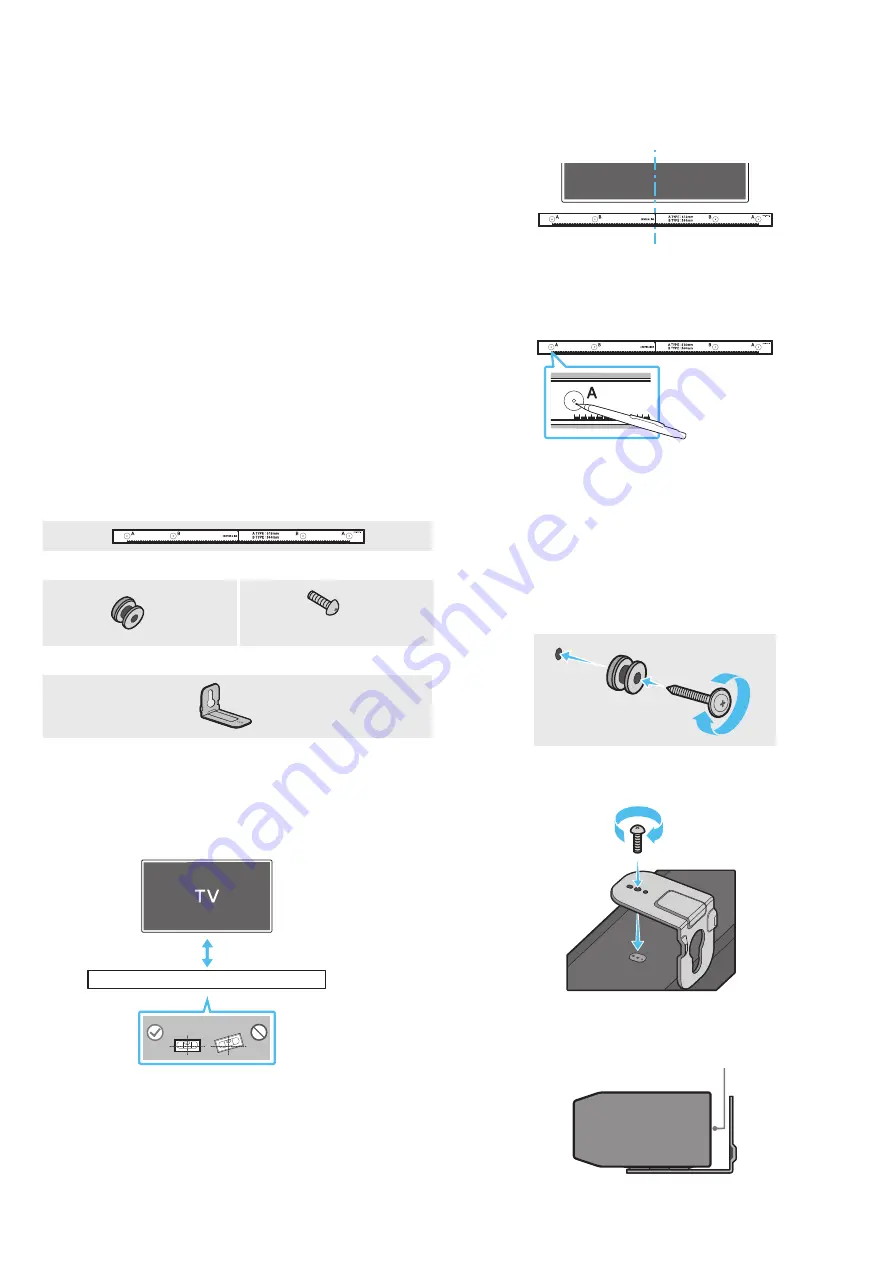
Wallmount Components

Wall Mount Guide

x 2

x 2

(M4 x L10)

Holder-Screw

Screw

x 2

Bracket-Wall Mount

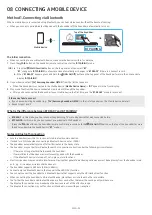
1. 

Place the 

Wall Mount Guide

 against the wall surface.

•  The 

Wall Mount Guide

 must be level.

•  If your TV is mounted on the wall, install the Soundbar at least 

5 cm below the TV.

5 cm or more

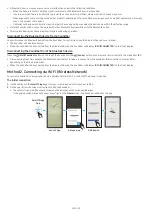
2. 

Align the 

Wall Mount Guide’s Centre Line

 with the centre of your 

TV (if you are mounting the Soundbar below your TV), and then fix 
the 

Wall Mount Guide

 to the wall using tape.

•  If you are not mounting below a TV, place the 

Centre Line

 in the 

centre of the installation area.

Centre Line

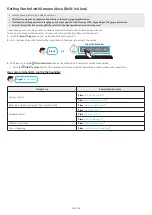
3. 

Push a pen tip or sharpened pencil tip through the centre of the 

A-TYPE

 images on each end of the Guide to mark the holes for the 

supporting screws, and then remove the 

Wall Mount Guide

.

4. 

Using an appropriately sized drill bit, drill a hole in the wall at each 
marking.
•  If the markings do not correspond to the positions of studs, 

make sure you insert appropriate anchors or mollies into the 
holes before you insert the support screws. If you use anchors 
or mollies, make sure the holes you drill are large enough for 
the anchors or mollies you use.

5. 

Push a screw (not supplied) through each 

Holder-Screw

, and then 

screw each screw firmly into a support screw hole.

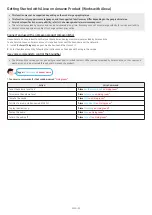
6. 

Install the 

2 Bracket-Wall Mounts

 in the correct orientation on the 

bottom of the Soundbar using 2 

Screws

.

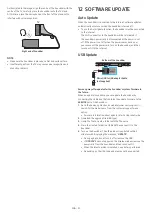
•  When assembling, make sure the hanger part of the 

Bracket-

Wall Mounts

 are located behind the rear of the Soundbar.

Rear of Soundbar

Right end of Soundbar

Содержание HW-Q870A

Страница 1: ...FULL MANUAL HW Q870A Imagine the possibilities Thank you for purchasing this Samsung product To receive more complete service please registeryour product at www samsung com register ...

Страница 2: ...otective earth ground AC voltage Rated voltage marked with this symbol is AC voltage DC voltage Rated voltage marked with this symbol is DC voltage Caution Consult Instructions for use This symbol instructs the user to consult the user manual for further safety related information WARNING To reduce the risk of fire or electric shock do not expose this appliance to rain or moisture CAUTION TO PREVE...

Страница 3: ...ight or other heat sources This could lead to overheating and cause the unit to malfunction 4 Protect the product from moisture i e vases and excess heat e g a fireplace or equipment creating strong magnetic or electric fields Unplug the power cable from the AC wall socket if the unit malfunctions Your product is not intended for industrial use It is for personal use only Condensation may occur if...

Страница 4: ...nnecting the SWA 9500 to a Soundbar 14 05 Using a wired connection to the TV 16 Method 1 Connecting with HDMI 16 Connecting the TV that supports HDMI ARC Audio Return Channel 16 Method 2 Connecting using an Optical Cable 17 06 Using a wireless connection to the TV 18 Method 1 Connecting via Bluetooth 18 Method 2 Connecting via Wi Fi 19 07 Connecting an External Device 20 Method 1 Connecting using ...

Страница 5: ...d Speakers on a Wall Optional 29 11 Installing the Soundbarabove a TV Stand 29 Component 29 12 Software Update 30 Auto Update 30 USB Update 30 Initialisation 31 13 Troubleshooting 31 14 Licence 33 15 Open Source Licence Notice 33 16 Important Notes About Service 33 17 Specifications and Guide 34 Specifications 34 ...

Страница 6: ... Surround Speaker Left Right PowerCord For more information about the power supply and power consumption refer to the label attached to the product Label Bottom of the Soundbar Main Unit To purchase additional components or optional cables contact a Samsung Service Centre or Samsung Customer Care For more information about the wallmount or rubber foot see pages 28 30 Design specifications and App ...

Страница 7: ...ICE DC 19V HDMI NETWORK ID SET DIGITAL AUDIO IN OPTICAL SERVICE NETWORK ID SET HDMI TO TV eARC ARC HDMI IN HDMI OUT TV ARC DIGITAL AUDIO IN OPTICAL SERVICE DC 19V DIGITAL AUDIO IN OPTICAL SERVICE DC 19V HDMI HDMI TO TV eARC ARC DIGITAL AUDIO IN OPTICAL SERVICE DC 19V HDMI NETWORK ID SET DIGITAL AUDIO IN OPTICAL SERVICE NETWORK ID SET HDMI TO TV eARC ARC HDMI IN HDMI OUT TV ARC DIGITAL AUDIO IN OPT...

Страница 8: ...k on a TV See page 16 When disconnecting the power cable of the AC DC power adaptor from a wall outlet pull the plug Do not pull the cable Do not connect this unit or other components to an AC outlet until all connections between components are complete ...

Страница 9: ...to select a source connected to the Soundbar 3 Mute Press the Mute button to mute the sound Press it again to unmute the sound 4 SOUND MODE You can select the desired sound mode by choosing STANDARD SURROUND GAME PRO or ADAPTIVE SOUND STANDARD Outputs the original sound SURROUND Provides a wider sound field than standard GAME PRO Provides stereoscopic sound to immerse you in the action while gamin...

Страница 10: ...mode is set to STANDARD To control the volume of the each speaker select Centre LEVEL or FRONT TOP LEVEL in Sound Settings and then adjust the volume between 6 6 by using the Up Down buttons If the video on the TV and audio from the Soundbar are not synchronized select SYNC in Sound Control and then set the audio delay between 0 300 milliseconds by using the Up Down buttons SYNC is only supported ...

Страница 11: ...e TV s remote control This function can be used with IR remote controls only Bluetooth remote controls remote controls that require pairing are not supported Set the TV speaker to External Speaker to use this function Manufacturers supporting this function VIZIO LG Sony Sharp PHILIPS PANASONIC TOSHIBA Hisense RCA 1 Turn Off the Soundbar Push up and hold the WOOFER button for 5 seconds Each time yo...

Страница 12: ...T HDMI TO TV eARC ARC HDMI IN HDMI OUT TV ARC DIGITAL AUDIO IN OPTICAL SERVICE DC 19V DIGITAL AUDIO IN OPTICAL SERVICE DC 19V HDMI HDMI TO TV eARC ARC DC 19V Bottom of the Soundbar Main Unit AC DC Adapter PowerCord 3 Connect power to the Soundbar and Subwoofer The Subwoofer is automatically connected when the Soundbar is turned on Blue is On NOTE Connect the Subwoofer power before connecting to th...

Страница 13: ...Status Description Resolution Blue On Successfully connected normal operation Blinking Recovering the connection Check if the power cable attached to the main Soundbar unit is connected properly orwait about 5 minutes If blinking persists try manually connecting the subwoofer See page 12 Red On Standby with the Soundbar main unit turned off Check if the power cable attached to the main Soundbar un...

Страница 14: ...into an electrical outlet and into the Surround Speakers to turn on the Surround Speakers The LINK LED indicator blue LED on the Surround Speakers blinks If the LED does not blink refer to step 5 Bottoms of the Left and Right Surround Speakers Blinking blue fast Rearof the Left and Right Surround Speakers 2 Turn off the Soundbar Turn off the Soundbar using the Soundbar s remote control or by press...

Страница 15: ...cted normal operation Blinking Recovering the connection Check if the power cable attached to the main Soundbar unit is connected properly orwait about 5 minutes Repeat steps 2 through 4 STANDBY Red On Standby with the Soundbar main unit turned off Check if the power cable attached to the main Soundbar unit is connected properly Connection failed 1 Press the ID SET button on the back of the Surrou...

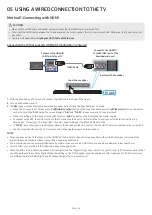
Страница 16: ...played When connecting a TV that supports the eARC function eARC appears on the display and the sound is heard To connect with eARC the eARC function in the TV menu should be set to On Refer to the TV user manual for details on setting e g Samsung TV Home Settings Sound Expert Settings HDMI eARC Mode Auto If TVARC does not appear in the display window of the Soundbar main unit confirm that the HDM...

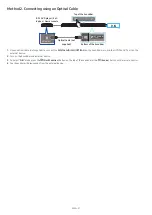
Страница 17: ...or Q Symphony the Soundbar syncs with a Samsung TV to output sound through two devices for optimum surround effect When the Soundbar is connected the menu TV Soundbar appears under the Sound Output menu of the TV Select the corresponding menu Optical Cable not supplied HDMI Cable OR D IN TV menu TV menu example TV AV Soundbarseries name HDMI NOTE It can operate according to the Codec supported by ...

Страница 18: ...nect If the device fails to connect If you have an existing Soundbar e g AV Samsung SoundbarQ870A on the list of speakers on the Samsung TV delete it Then repeat steps 1 through 3 Disconnecting the Soundbarfrom the Samsung TV Press the Multi Function button at the top of the Soundbar or the Source button on the remote control to select the mode other than BT Disconnecting takes time because the Sa...

Страница 19: ...undbar Contact your Internet service provider for details Because the menus may differ depending on the year of manufacture refer to your TV manual To connect the TV to the Soundbarvia Wi Fi connect the Soundbar to the wireless router first See page 23 for details on how to establish a Wi Fi connection 1 For more information about Wi Fi connection to the Soundbar see page 23 Method 2 Connecting vi...

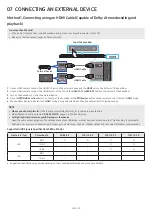
Страница 20: ...ion button on the top of the Soundbar or the Source button on the remote control to select HDMI mode 5 The Soundbar display indicates that HDMI mode is currently selected and the Soundbarwill start playing sounds NOTE When you use DolbyAtmos If the input source is Dolby Atmos 5 1 4 channels are outputted When Dolby Atmos is activated DOLBY ATMOS appears in the front display Configuring DolbyAtmos ...

Страница 21: ...al Cable not supplied 1 Use an optical cable not supplied to connect the DIGITALAUDIO IN OPTICAL on the Soundbar main and the OPTICAL OUT port on the external device 2 Turn on the Soundbar and external device 3 To select D IN mode press the Multi Function button on the top of the Soundbar or the Source button on the remote control 4 Your Soundbarwill play sounds from the external device ...

Страница 22: ...NG BT READY In this mode you can reconnect any Samsung TV or mobile device that was connected before BT PAIRING In this mode you can connect a new device to the Soundbar Press the PAIR button on the Soundbar remote control or press and hold the Mic On Off button on the top of the Soundbar for more than 5 seconds while the Soundbar is in BT mode Notes on Bluetooth connection Locate a new device wit...

Страница 23: ... disconnected When the Soundbar is disconnected from the Bluetooth device the Soundbarwill display BT DISCONNECTED on the front display Disconnecting the Soundbarfrom the Bluetooth device Press the Multi Function button on the top of the Soundbar or the Source button on the remote control to switch the mode from BT Disconnecting takes time because the Bluetooth device must receive a response from ...

Страница 24: ...your mobile device and then launch it 2 Enter the Alexa account by following the instructions on the app and then log in the service 3 Sec Alexa OR Top of the Soundbar 3 Call Alexa or press the Multi Function button on the Soundbar for 3 seconds to use the Alexa service Press the Multi Function button for 3 seconds to call Alexa Say with the button pressed to enable voice recognition Use voice com...

Страница 25: ...ed to connect the Soundbar over the network 1 Install the SmartThings app on your mobile device and then launch it 2 Enter the Alexa account by following the instructions on the app and then log in the service Use voice commands to control the Soundbar The Amazon Echo service you can use with your Soundbar is limited to music Other services provided by Amazon Echo such as news and weather can only...

Страница 26: ...e device does not tap a sharp corner of the Soundbar The Soundbar or mobile device may become scratched or damaged It is recommended that the mobile device be covered with a case Lightly tap the wide area in the upper portion of the Soundbar without using excessive force To use this function update the SmartThings app to the latest version The function may not be supported depending on the app ver...

Страница 27: ... use with an Apple product With AirPlay 2 you can control your home s audio system from your iPhone iPad HomePod orApple TV This Samsung Soundbar supports AirPlay 2 and requires iOS 11 4 or later NOTE Confirm that the Soundbar is connected to Wi Fi Refer to Method 2 Connecting via Wi Fi Wireless Network ...

Страница 28: ...l the Soundbar at least 5 cm below the TV 5 cm ormore 2 Align the Wall Mount Guide s Centre Line with the centre of your TV if you are mounting the Soundbar below your TV and then fix the Wall Mount Guide to the wall using tape If you are not mounting below a TV place the Centre Line in the centre of the installation area Centre Line 3 Push a pen tip or sharpened pencil tip through the centre of t...

Страница 29: ...han 8 0 kg Hole size 1 4 20 UNC threaded insert Standard Screw 6 3 mm ø 1 3 mm Pitch Length 18 0 mm long Quantity Left 1 EA Right 1 EA Rearof the Left and Right Surround Speakers Check the strength of the wall before you install the Wall Mount Brackets If the strength is insufficient make sure to reinforce the wall before installing the Wall Mount Brackets and the speakers on the wall Samsung Elec...

Страница 30: ... OPTICAL SERVICE DC 19V HDMI NETWORK ID SET HDMI TO TV eARC ARC HDMI IN HDMI OUT TV ARC DIGITAL AUDIO IN OPTICAL SERVICE DC 19V Bottom of the Soundbar Micro USB to USB adapterCable not supplied Samsung may offerupdates forthe Soundbar s system firmware in the future When an update is available you can update the Soundbar by connecting the USB drive that contains the update firmware to the SERVICE ...

Страница 31: ...low or muted Adjust the volume When any external device STB Bluetooth device mobile device etc is connected adjust the volume of the external device For sound output of the TV select Soundbar Samsung TV Home Settings Sound Sound Output Select Soundbar The cable connection to the Soundbar may not be loose Remove the cable and connect again Remove the power cord completely reconnect and turn the pow...

Страница 32: ...e Left button on the Soundbar remote control for 5 seconds to select ON TV CONNECT If you see OFF TV CONNECT press and hold Left button again for 5 seconds to switch the selection Remove and reconnect the power plug then try again Initialise the product and try again See page 31 The sound drops out when connected via Bluetooth Some devices can cause radio interference if they are located too close...

Страница 33: ...marks of HDMI Licensing Administrator Inc in the United States and other countries Use your phone tablet or computer as a remote control for Spotify Go to spotify com connect to learn how The Spotify Software is subject to third party licenses found here https www spotify com connect third party licenses Apple AirPlay iPhone iPad HomePod and Apple TV are trademarks of Apple Inc registered in the U...

Страница 34: ...urround speaker Name SWA 9500 Weight 1 7 kg Dimensions W x H x D 125 0 X 203 0 X 141 0 mm Operating Temperature Range 5 C to 35 C Operating Humidity Range 10 75 AMPLIFIER Rated Output power 35 W x 4 NOTE Samsung Electronics Co Ltd reserves the right to change the specifications without notice Weight and dimensions are approximate ForIndia Only This product is RoHS compliant Precaution The Soundbar...

Страница 35: ...00 588 855 HHP www samsung com vn support THAILAND Hotline no 1282 1800 29 3232 Toll free for all product www samsung com th support MYANMAR 95 1 2399 888 VIP HHP 95 1 2399 990 www samsung com mm support CAMBODIA 1800 20 3232 Toll free www samsung com th support LAOS 856 214 17333 MALAYSIA 1800 22 8899 HHP 1800 88 9999 OTH 603 7713 7420 Overseas contact www samsung com th support INDONESIA 021 569...

Отзывы: