background image

ENG - 9

04  CONNECTING TO YOUR TV

Hear TV sound from your Soundbar through wired or wireless connections.


When the Soundbar is connected to selected Samsung TVs, the Soundbar can be controlled using 
the TV’s remote control.


– This feature is supported by 2017 and later Samsung Smart TVs that support Bluetooth when 

you connect the Soundbar to the TV using an optical cable.


This function also allows you to use the TV menu to adjust the sound field and various settings 

as well as the volume and mute.

Method 1. Connecting with a Cable

When the audio in a broadcast is encoded in Dolby Digital and the “Digital Output Audio Format” on 
your TV is set to PCM, we recommend that you change the setting to Dolby Digital. When the setting on 
the TV is changed, you will experience better sound quality. (The TV menu may differ depending on the 
TV manufacturer.) 

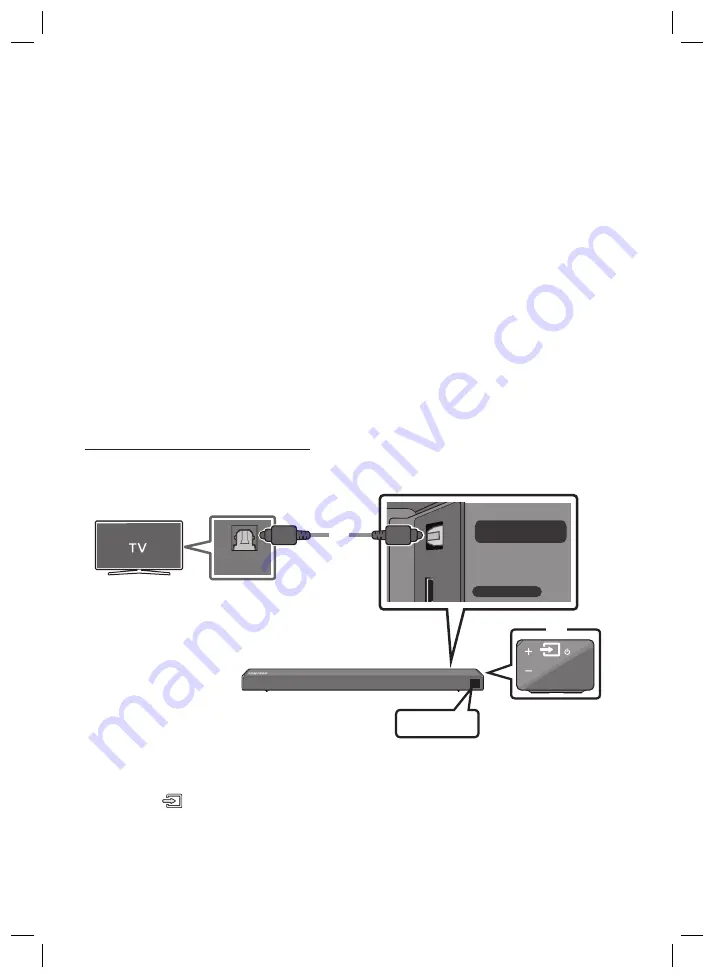
Connecting using an Optical Cable

USB (5V 0.5A)

AUX IN

DIGITAL AUDIO IN

(OPTICAL)

OPTICAL OUT

Optical Cable

Bottom of the Soundbar

Right Side of the Soundbar

D.IN

1. 

Connect the 

DIGITAL AUDIO IN (OPTICAL)

 jack on the Soundbar to the OPTICAL OUT jack of the TV 

with a digital optical cable.

2. 

Press the 


(Source)

 button on the right side panel or remote control, and then select the “

D.IN

” 

mode.

Содержание HW-N450

Страница 1: ...HW N450 USER MANUAL...

Страница 2: ...tes that the rated voltage marked with the symbol is DC voltage Caution Consult instructions for use This symbol instructs the user to consult the user manual for further safety related information WA...

Страница 3: ...the unit malfunctions Your product is not intended for industrial use It is for personal use only Condensation may occur if your product has been stored in cold temperatures If transporting the unit...

Страница 4: ...en the Subwoofer and the Soundbar 5 Manually connecting the Subwoofer if automatic connection fails 6 Connecting the SWA 8500S to a Soundbar Sold Separately 7 04 ConnectingtoyourTV 9 Method 1 Connecti...

Страница 5: ...e Remote Control 17 Adjusting the Soundbar volume with a TV remote control 20 09 InstallingtheWallMount 21 Installation Precautions 21 Wallmount Components 21 10 Troubleshooting 24 11 Licence 25 12 Op...

Страница 6: ...oundbar Main Unit The power components are labelled 1 2 3 For more information about power connections see page 4 For Soundbar wall mounting components see page 21 To purchase additional components or...

Страница 7: ...rce input mode D IN AUX HDMI BT USB To turn on BTPAIRING mode change the source to BT mode and then press and hold the Source button for more than 5 seconds D IN Connect to the digital optical output...

Страница 8: ...power and power consumption refer to the label attached to the product Label Bottom of the Soundbar Main Unit POWER RearofSubwoofer 1 PowerCord Connecting ElectricalPower HDMI IN USB 5V 0 5A AUX IN DI...

Страница 9: ...ofer LED Status Description Resolution Blue On Successfully connected normal operation Blinking Recovering the connection Check if the power cable attached to the main Soundbar unit is connected prope...

Страница 10: ...the subwoofer turns off and the blue indicator blinks 5 Sec RearofSubwoofer 2 Press and hold the Upbutton on the remote control for at least 5 seconds The IDSET message appears on the display of the...

Страница 11: ...status of the Wireless Receiver Module after plugging it into an electrical outlet The LINK LED indicator blue LED on the Wireless Receiver Module blinks If the LED does not blink press the IDSET butt...

Страница 12: ...Sec CAUTION If your Soundbar was playing music when it connects to the SWA 8500S you may hear some stuttering from the woofer as the connection finalises 4 Check if the LINK LED is solid blue connect...

Страница 13: ...ConnectingwithaCable When the audio in a broadcast is encoded in Dolby Digital and the Digital Output Audio Format on your TV is set to PCM we recommend that you change the setting to Dolby Digital Wh...

Страница 14: ...the connected device Auto Power Link may not function This function is only available in the D IN mode ConnectingaTVusinganHDMICable ConnecttotheHDMIIN ARC portofyourTV HDMI OUT TV ARC HDMI IN HDMI I...

Страница 15: ...el and then select BT Change BT to BTREADY b When BTREADY appears press and hold the Source button on the right side panel of the Soundbar for more than 5 seconds to display BTPAIRING 2 Select Bluetoo...

Страница 16: ...utton on the remote control or press and hold the Source button on the right side of the Soundbar for more than 5 seconds while the Soundbar is in BT mode NOTES If asked for a PIN code when connecting...

Страница 17: ...lied BD DVDplayer Set topbox Gameconsole RightSideoftheSoundbar 1 OpticalCable X X Connect DIGITALAUDIOIN OPTICAL on the main unit to the OPTICAL OUT jack of the Source Device using a digital optical...

Страница 18: ...I cable not supplied from the HDMIIN jack on the back of the product to the HDMI OUT jack on your digital device 2 Connect an HDMI cable not supplied from the HDMIOUT TV ARC jack on the back of the pr...

Страница 19: ...of the adapter cable 3 Press the Source button on the right side panel or on the remote control and then select USB 4 USB appears in the display screen 5 Play music files from the USB storage device t...

Страница 20: ...of the Soundbar for more than 5 seconds to display BTPAIRING 2 On your device select AV SamsungSoundbarNxxxN Series from the list that appears When the Soundbar is connected to the Bluetooth device B...

Страница 21: ...sired sound effect by choosing STANDARD or SURROUND DRC DynamicRangeControl Lets you apply dynamic range control to Dolby Digital tracks Press and hold the SOUNDMODE button while the Soundbar is power...

Страница 22: ...to select the next music file Press the Left button to select the previous music file Anynet AutoPowerLink You can turn Anynet and Auto Power Link on or off Anynet and Auto Power Link are turned on an...

Страница 23: ...WOOFER SOUND MODE PAIR WOOFER S O U N D M O D E V O L W O O F E R S O U N D B A R S O U N D M O D E V O L W O O F E R S O U N D B A R V O L W O O F E R S O U N D B A R S O U N D M O D E V O L W O O F...

Страница 24: ...remote push up and hold the WOOFER button for 5seconds repeatedly until ALL TVREMOTE appears in the display Then use your TV s menu to select external speakers S O U N D M O D E V O L W O O F E R S O...

Страница 25: ...s into wall studs Purchase wall mounting screws according to the type and thickness of the wall you want to mount the Soundbar on Diameter M5 Length 35 mm or longer recommended Connect cables from the...

Страница 26: ...d drill bit drill a hole in the wall at each marking If the markings do not correspond to the positions of studs make sure you insert appropriate anchors or mollies into the holes before you insert th...

Страница 27: ...r Screws on the wall 8 Slide the Soundbar down as shown below so that the Bracket WallMounts rest securely on the Holder Screws Insert the Holder Screws into the wide bottom part of the Bracket Wall M...

Страница 28: ...n to cancel the function Isthevolumesettominimum Adjust the Volume Theremotecontroldoesnotwork Arethebatteriesdrained Replace with new batteries IsthedistancebetweentheremotecontrolandSoundbarmainunit...

Страница 29: ...tered trademarks of HDMI Licensing LLC in the United States and other countries 12 OPENSOURCE LICENCENOTICE To send inquiries and requests regarding open sources contact Samsung via Email oss request...

Страница 30: ...WIRELESS DEVICE OUTPUT POWER BT max transmitter power SRD max transmitter power 100mW at 2 4GHz 2 4835GHz 25mW at 5 725GHz 5 825GHz Subwoofer Name PS WN20 Weight 5 7 kg Dimensions W x H x D 220 0 x 36...

Страница 31: ...return system CorrectDisposalofThisProduct WasteElectrical ElectronicEquipment Applicableincountrieswithseparatecollectionsystems This marking on the product accessories or literature indicates that t...

Страница 32: ...dass es sich bei der mit diesem Symbol gekennzeichneten Nennspannung um eine Gleichspannung handelt Achtung Gebrauchsanweisung beachten Dieses Symbol weist den Benutzer an weitere sicherheitsrelevante...

Страница 33: ...gewerblichen Einsatz vorgesehen Verwenden Sie dieses Produkt nur f r den privaten Bereich Wenn Ihr Produkt oder die CD bei kalten Temperaturen aufbewahrt wurden kann Kondensation auftreten Wenn Sie d...

Страница 34: ...en des Subwoofers bei Fehlschlagen der automatischen Verbindung 6 Verbinden des SWA 8500S mit einer Soundbar separat erh ltlich 7 04 AnschlussanihrFernsehger t 9 Methode 1 Verbindung mit einem Kabel 9...

Страница 35: ...n der Soundbar Lautst rke mit einer TV Fernbedienung 20 09 InstallierenderWandhalterung 21 Vorsichtsma nahmen f r die Installation 21 Komponenten f r die Anbringung an der Wand 21 10 Fehlerbehebung 24...

Страница 36: ...hlusskomponenten sind gekennzeichnet 1 2 3 Weitere Informationen zu den Stromanschl ssen finden Sie auf Seite 4 Siehe Seite 21 zu den Wandhalterungskomponenten Wenden Sie sich f r den Kauf zus tzliche...

Страница 37: ...BT USB Zum Einschalten des Modus BTPAIRING schalten Sie die Quelle auf den Modus BT um und halten Sie dann die taste Quelle l nger als 5 Sekunden lang gedr ckt D IN An den digitalen optischen Ausgang...

Страница 38: ...igten Stromversorgung und zum Stromverbrauch finden Sie auf dem Etikett am Ger t Etikett Unterseite des Soundbar Hauptger ts POWER R ckseitedes Subwoofers 1 Stromkabel Stromanschluss HDMI IN USB 5V 0...

Страница 39: ...desSubwoofers LED Status Beschreibung Abhilfe Blau Ein Erfolgreich verbunden normaler Betrieb Blinkend Verbindung wird wieder hergestellt Pr fen Sie ob das am Soundbar Hauptger t angeschlossene Stromk...

Страница 40: ...R ckseite des Subwoofers erlischt und die blaue Anzeigeleuchte blinkt 5 Sec R ckseitedesSubwoofers 2 Halten Sie die Taste Oben auf der Fernbedienung l nger als 5 Sekunden gedr ckt F r kurze Zeit ersc...

Страница 41: ...osen Empfangsmoduls nachdem es an eine Steckdose angeschlossen worden ist Die LINK LED Anzeige blaue LED Lampe auf dem drahtlosen Empf ngermodul blinkt Wenn die LED nicht blinkt halten Sie die Taste I...

Страница 42: ...Musik abspielt w hrend sie mit der SWA 8500S eine Verbindung herstellt h ren Sie m glicherweise ein Stottern aus dem Woofer w hrend die Verbindung hergestellt wird 4 Pr fen Sie ob die LINK LED blau l...

Страница 43: ...e Stummschaltung anzupassen Methode1 VerbindungmiteinemKabel Wenn Rundfunksignale Dolby Digital sind und die Einstellung f r Digitales Ausgangsaudioformat auf Ihrem Fernseher auf PCM gestellt ist wird...

Страница 44: ...angeschlossen Ger t k nnte Auto Power Link nicht funktionieren Diese Funktion ist nur im Modus D IN verf gbar EinenFernseher bereinHDMI Kabelverbinden HDMI OUT TV ARC HDMI IN HDMI IN ARC berpr fenSie...

Страница 45: ...enn BTREADY angezeigt wird dr cken und halten Sie die Taste Quelle am rechten Feld der Soundbar f r mehr als 5 Sekunden gedr ckt um BTPAIRING anzuzeigen 2 W hlen Sie den Bluetooth Modus an dem Fernseh...

Страница 46: ...der Fernbedienung oder dr cken und halten Sie die Taste Quelle an der rechten Seite der Soundbar f r l nger als 5 Sekunden gedr ckt w hrend sich die Soundbar im Modus BT befindet HINWEISE Falls sie be...

Страница 47: ...geliefert BD DVD Player Set Top Box Spielkonsole RechteSeitederSoundbar 1 OptischesKabel X X Verbinden Sie den Anschluss DIGITALAUDIOIN OPTICAL am Hauptger t ber ein optisches Digitalkabel mit dem Ans...

Страница 48: ...seite des Ger ts ber ein HDMI Kabel nicht enthalten mit dem Anschluss HDMI OUT Ihres Digitalger ts 2 Verbinden Sie den Anschluss HDMIOUT TV ARC auf der R ckseite des Ger ts ber ein HDMI Kabel nicht en...

Страница 49: ...le auf der rechten Seite oder der Fernbedienung und w hlen Sie dann USB 4 Auf dem Anzeigebildschirm wird USB angezeigt 5 Musikdateien vom Speicherger t ber die Soundbar wiedergeben Die Soundbar wird a...

Страница 50: ...BTPAIRING anzuzeigen 2 W hlen Sie AV SamsungSoundbarNxxxN Series aus der Liste aus Wenn eine Soundbar mit dem Bluetooth Ger t verbunden ist wird Bluetooth Ger tename BT in der vorderen Anzeige angeze...

Страница 51: ...durch Wahl von STANDARD oder SURROUND ausw hlen DRC DynamicRangeControl DRC Funktion Dynamic Range Control auf Dolby Digital Tracks anwenden Dr cken Sie die Taste SOUNDMODE und halten Sie sie gedr ck...

Страница 52: ...die n chste Musikdatei auszuw hlen Dr cken Sie die Taste Links um die vorherige Musikdatei auszuw hlen Anynet AutoPowerLink Sie k nnen Anynet und Auto Power Link ein oder ausschalten Anynet und Auto...

Страница 53: ...ND MODE PAIR WOOFER S O U N D M O D E V O L W O O F E R S O U N D B A R S O U N D M O D E V O L W O O F E R S O U N D B A R V O L W O O F E R S O U N D B A R S O U N D M O D E V O L W O O F E R S O U...

Страница 54: ...hres Fernsehers steuern wollen dr cken Sie wiederholt die Taste WOOFER nach oben und halten Sie sie f r 5 Sekunden gedr ckt bis ALL TVREMOTE in der Anzeige erscheint Verwenden Sie dann das Men Ihres F...

Страница 55: ...andmontage entsprechend der Art und der Dicke der Wand an der Sie die Soundbar montieren wollen Durchmesser M5 L nge 35 mm oder l nger empfohlen Schlie en Sie die Kabel vom Ger t an externe Ger te an...

Страница 56: ...ie mit einem geeigneten Bohrer an jeder Markierung ein Loch in die Wand Wenn die Markierungen nicht den Positionen der Halterungsbolzen entsprechen achten Sie darauf geeignete D bel oder Molly D bel i...

Страница 57: ...nd h ngen 8 Schieben Sie die Soundbar wie nachfolgend dargestellt nach unten sodass die Wandhalterung sicher auf den Aufh ngungsschraube ruhen Setzen Sie die Aufh ngungsschraube in den breiten unteren...

Страница 58: ...te VOL um die Funktion zu deaktivieren IstdieLautst rkeaufdasMinimumeingestellt Passen Sie die Lautst rke an DieFernbedienungfunktioniertnicht SinddieBatterienleer Tauschen Sie sie gegen neue aus Istd...

Страница 59: ...s and other countries 12 BEKANNTMACHUNG ZUOPENSOURCE LIZENZEN Wenn Sie Fragen bez glich des Themas Open Source haben wenden Sie sich bitte per E Mail unter der Adresse an Samsung oss request samsung c...

Страница 60: ...DRAHTLOSGER TS BT max Transmitterleistung SRD max Transmitterleistung 100mW bei 2 4GHz 2 4835GHz 25mW bei 5 725GHz 5 825GHz Subwoofername PS WN20 Gewicht 5 7 kg Abmessungen B H T 220 0 x 369 0 x 279 0...

Страница 61: ...ahmesystem entsorgen KorrekteEntsorgungvonAltger ten Elektroschrott Giltf rL ndermitAbfalltrennsystemen Die Kennzeichnung auf dem Produkt Zubeh rteilen bzw auf der dazugeh rigen Dokumentation gibt an...

Страница 62: ...e spanning gelijkspanning is Voorzichtig raadpleeg de instructies voor gebruik Dit symbool geeft aan dat de gebruiker de handleiding moet raadplegen voor meer informatie over de veiligheid WAARSCHUWIN...

Страница 63: ...et bedoeld voor industrieel gebruik Dit product is uitsluitend bestemd voor particulier gebruik Wanneer het product of een schijf bij een lage temperatuur wordt bewaard kan condensatie optreden Als u...

Страница 64: ...e subwoofer en de Soundbar 5 De subwoofer handmatig verbinden als de automatische verbinding mislukt 6 De SWA 8500S met een Soundbar verbinden afzonderlijk verkrijgbaar 7 04 VerbindenmetuwTV 9 Methode...

Страница 65: ...volume van de Soundbar aanpassen met de afstandsbediening van de tv 20 09 DeWandmontageInstalleren 21 Voorzorgsmaatregelen bij de installatie 21 Componenten voor muurmontage 21 10 ProblemenOplossen 2...

Страница 66: ...e stroomverbindingstappen zijn gelabeld 1 2 3 Meer informatie over stroomverbindingen vindt u op pagina 4 De wandbevestigingsonderdelen van de Soundbar vindt u op pagina 21 Om extra componenten of opt...

Страница 67: ...DMI BT USB Om de BTPAIRING modus in te schakelen wijzigt u de bron naar BT modus en houdt u de Bron knop gedurende meer dan 5 seconden ingedrukt D IN Sluit aan op de digitale optische uitgang van een...

Страница 68: ...rbruik vindt u op het etiket op het product Etiket onderkant van de hoofdeenheid van de Soundbar POWER Achterkantvan Subwoofer 1 Netsnoer Deelektriciteit aansluiten HDMI IN USB 5V 0 5A AUX IN DIGITAL...

Страница 69: ...rijving Oplossing Blauw Aan Met succes aangesloten normale werking Knipperend De verbinding herstellen Controleer of het netsnoer bevestigd aan de hoofdeenheid van de Soundbar goed is aangesloten of w...

Страница 70: ...de subwoofer gaat uit en het blauwe indicatorlampje knippert 5 Sec AchterkantvanSubwoofer 2 Houd de knop Omhoog op de afstandsbediening ten minste 5 seconden ingedrukt Het bericht IDSET verschijnt ev...

Страница 71: ...van de Draadloze ontvangermodule nadat u de stekker in het stopcontact hebt gestoken Het indicatielampje LINK LED blauwe LED op de Draadloze ontvangermodule knippert Als de LED niet knippert houd de...

Страница 72: ...Soundbar muziek afspeelde toen hij met de SWA 8500S werd verbonden kunt u bij het voltooien van de verbinding wat gestotter uit de woofer horen 4 Controleerof de LINKLEDvast blauwis verbindingvoltooid...

Страница 73: ...thode1 Verbindenmeteenkabel Wanneer de uitgezonden signalen Dolby Digital zijn en de instelling voor Audio indeling van digitale uitgang op uw tv PCM is is het aangeraden om de instelling in Dolby Dig...

Страница 74: ...paraat werkt Auto Power Link mogelijk niet Deze functie is alleen beschikbaar in de D IN modus EentvverbindenmeteenHDMI kabel Controleerde ARC bijde HDMIIN poortvanuwtv HDMI OUT TV ARC HDMI IN HDMI IN...

Страница 75: ...T naar BTREADY b Als BTREADY verschijnt houd dan de knop Bron op het rechterpaneel van de Soundbar gedurende meer dan 5 seconden ingedrukt zodat BTPAIRING wordt weergegeven 2 Selecteer Bluetooth modus...

Страница 76: ...ing of houd de Bron knop aan de rechterkant van de Soundbar gedurende meer dan 5 seconden ingedrukt wanneer in BT modus OPMERKINGEN Als u bij het verbinden met een Bluetooth apparaat een pincode wordt...

Страница 77: ...DVD speler Settopbox Gameconsole Rechterkantvande Soundbar 1 Optischekabel X X Verbind DIGITALAUDIOIN OPTICAL op de hoofdeenheid met de OPTICAL OUT aansluiting van het bronapparaat met behulp van een...

Страница 78: ...naf een HDMIIN aansluiting op de achterkant van het product op de HDMI OUT aansluiting van uw digitale apparaat 2 Verbind een HDMI kabel niet meegeleverd vanaf een HDMIOUT TV ARC aansluiting aan de ac...

Страница 79: ...het vrouwelijke uiteinde van de adapterkabel 3 Druk op de Bron knop op het rechterpaneel of de afstandsbediening en selecteer vervolgens USB 4 USB verschijnt op het scherm 5 Speel muziekbestanden van...

Страница 80: ...PAIRING wordt weergegeven 2 Selecteer AV SamsungSoundbarNxxxN Series in de lijst Wanneer een Soundbar is verbonden met het Bluetooth apparaat verschijnt Bluetooth apparaatnaam BT op het voorste scherm...

Страница 81: ...nste geluidseffect selecteren STANDARD of SURROUND te kiezen DRC DynamicRangeControl Hiermee kunt u het dynamische bereik voor het geluid instellen op Dolby Digital nummers Houd de knop SOUNDMODE inge...

Страница 82: ...s u het volgende muziekbestand wilt selecteren Druk op de Links knop als u het vorige muziekbestand wilt selecteren Anynet AutoPowerLink U kunt Anynet en Auto Power Link in of uitschakelen Anynet en A...

Страница 83: ...teund VOL BASS SOUND MODE PAIR WOOFER S O U N D M O D E V O L W O O F E R S O U N D B A R S O U N D M O D E V O L W O O F E R S O U N D B A R V O L W O O F E R S O U N D B A R S O U N D M O D E V O L...

Страница 84: ...met de afstandsbediening van de tv duw de knop WOOFER gedurende 5seconden herhaaldelijk omhoog tot ALL TVREMOTE op het scherm verschijnt Gebruik vervolgens het menu van de tv om externe luidsprekers t...

Страница 85: ...de ondersteuningsschroeven in muurtapeinden Koop wandmontageschroeven volgens het type en de dikte van de wand waarop u de Soundbar wilt monteren Diameter M5 Lengte 35 mm of langer aanbevolen Sluit ka...

Страница 86: ...jzer een gat in de muur bij elke markering Als de markeringen niet overeenkomen met de posities van de tapeinden zorg er dan voor dat u de geschikte verankeringen of pluggen in de gaten plaatst voorda...

Страница 87: ...e wand te hangen 8 Schuif de Soundbar omlaag zoals hieronder weergegeven zodat de Steunmuurmontage stevig op de Schroefhouder rusten Plaats de Schroefhouder in het brede onderste gedeelte van de Steun...

Страница 88: ...knop om de functie te annuleren Staathetvolumeopminimum Pas het volume aan Deafstandsbedieningwerktniet Zijndebatterijenleeg Plaats nieuwe batterijen Isdeafstandtussendeafstandsbedieningendehoofdeenh...

Страница 89: ...untries 12 KENNISGEVING OPENSOURCE LICENTIE Neem voor vragen en verzoeken met betrekking tot open source contact op met Samsung via e mail oss request samsung com 13 BELANGRIJKE OPMERKING OVERSERVICE...

Страница 90: ...APPARAAT BT max zendvermogen SRD max zendvermogen 100 mW op 2 4 GHz 2 4835 GHz 25 mW op 5 725 GHz 5 825 GHz Naam van subwoofer PS WN20 Gewicht 5 7 kg Afmetingen B X H X D 220 0 x 369 0 x 279 0 mm VER...

Страница 91: ...ijen in uw omgeving Correcteverwijderingvanditproduct elektrische elektronischeafvalapparatuur Vantoepassinginlandenwaarafvalgescheidenwordtingezameld Dit merkteken op het product de accessoires of he...

Страница 92: ...indiqu e par le symbole est une tension CC Mise en garde Consulter le mode d emploi ce symbole avertit l utilisateur qu il doit consulter le manuel d utilisation pour en savoir plus sur les informatio...

Страница 93: ...onctionnement Votre produit n est pas pr vu pour un usage industriel Ce produit ne peut tre utilis qu des fins personnelles Une condensation peut se former si le produit ou un disque a t stock basse t...

Страница 94: ...asse et la Soundbar 5 Connexion manuelle du Caisson de basse si la connexion automatique choue 6 Connexion du SWA 8500S une Soundbar Vendue s par ment 7 04 Connexion votreT l viseur 9 M thode 1 Connex...

Страница 95: ...commande 17 R glage du volume de la Soundbar avec une t l commande de t l viseur 20 09 InstallationduSupportMural 21 Pr cautions d installation 21 Composants de fixation au mur 21 10 D pannage 24 11...

Страница 96: ...e l alimentation sont tiquet es 1 2 3 Pour plus d informations sur les connexions de l alimentation consultez la page 4 Pour les composants de fixation murale de la Soundbar consultez la page 21 Pour...

Страница 97: ...BTPAIRING changez la source sur le mode BT puis appuyez et maintenez enfonc e la touche Source pendant plus de 5 secondes D IN Permet de connecter la sortie num rique optique d un appareil externe US...

Страница 98: ...ues requises reportez vous l tiquette coll e sur le produit tiquette Partie inf rieure de l unit principale Soundbar POWER Arri redu Caissondebasse 1 Cordon d alimentation Connexionde l alimentation l...

Страница 99: ...basse LED tat Description R solution Bleu Activ Connexion r ussie fonctionnement normal Clignotement R cup ration de la connexion V rifiez si le c ble d alimentation fix l unit principale Soundbar est...

Страница 100: ...u Caisson de basse s teint et l indicateur bleu clignote 5 Sec Arri reduCaissondebasse 2 Appuyez sur la touche Haut de la t l commande et maintenez la enfonc e pendant au moins 5secondes Le message ID...

Страница 101: ...e r ception sans fil apr s l avoir branch une prise lectrique Le voyant LED LINK LED bleue situ sur le module de r ception sans fil clignote Si la LED ne clignote pas appuyez sur la touche IDSET au do...

Страница 102: ...votre Soundbar diffuse de la musique au moment o elle est connect e au SWA 8500S vous pourriez entendre du bruit provenant du woofer une fois la connexion termin e 4 V rifiez que le voyant LED LINK s...

Страница 103: ...x r glages ainsi que le volume et la coupure du son M thode1 Connexionavecunc ble Lorsque les signaux de diffusion sont Dolby Digital et le r glage Format audio de sortie num rique est PCM sur votre t...

Страница 104: ...se peut que le Auto Power Link ne fonctionne pas Cette fonction est disponible uniquement en mode D IN Connexiond unt l viseur l aided unc bleHDMI HDMI OUT TV ARC HDMI IN HDMI IN ARC Contr lede ARC a...

Страница 105: ...ADY appara t appuyez et maintenez enfonc e la touche Source sur le panneau c t droit de la Soundbar pendant plus de 5 secondes pour afficher BTPAIRING 2 S lectionnez le mode Bluetooth sur le t l viseu...

Страница 106: ...ez sur la touche PAIR sur la t l commande ou appuyez et maintenez enfonc e la touche Source sur le c t droit de la Soundbar pendant plus de 5 secondes pendant que la Soundbar est en mode BT REMARQUES...

Страница 107: ...DVD Bo tierd codeur Consoledejeu C t droitdelaSoundbar 1 C bleoptique X X Raccordez DIGITALAUDIOIN OPTICAL de l unit principale la prise OPTICAL OUT de l appareil source l aide d un c ble optique num...

Страница 108: ...le HDMI non fourni de la prise HDMIIN au dos du produit la prise HDMI OUT de votre appareil num rique 2 Raccordez un c ble HDMI non fourni de la prise HDMIOUT TV ARC au dos du produit la prise HDMI IN...

Страница 109: ...puyez sur la touche Source sur le panneau c t droit ou la t l commande puis s lectionnez USB 4 USB appara t sur l cran d affichage 5 Lisez des fichiers musicaux depuis le p riph rique de stockage USB...

Страница 110: ...bar pendant plus de 5 secondes pour afficher BTPAIRING 2 S lectionnez AV SamsungSoundbarNxxxN Series dans la liste Lorsqu une Soundbar est connect e l appareil Bluetooth Nomdel appareilBluetooth BT ap...

Страница 111: ...uhait en choisissant parmi STANDARD ou SURROUND DRC DynamicRangeControl Vous permet d effectuer une commande de plage dynamique des pistes Dolby Digital Appuyez et maintenez enfonc e la touche SOUNDMO...

Страница 112: ...ichier musical suivant Appuyez sur la touche Gauche pour s lectionner le fichier musical pr c dent Anynet AutoPowerLink Vous pouvez activer ou d sactiver Anynet et le Auto Power Link Les fonctions Any...

Страница 113: ...MODE PAIR WOOFER S O U N D M O D E V O L W O O F E R S O U N D B A R S O U N D M O D E V O L W O O F E R S O U N D B A R V O L W O O F E R S O U N D B A R S O U N D M O D E V O L W O O F E R S O U N D...

Страница 114: ...e votre t l viseur poussez la touche WOOFER vers le haut et maintenez la enfonc e pendant 5secondes jusqu ce que ALL TVREMOTE apparaisse l cran Utilisez ensuite le menu de votre t l viseur pour s lect...

Страница 115: ...les poteaux Achetez les vis de support mural selon le type et l paisseur du mur sur lequel vous souhaitez monter la Soundbar Diam tre M5 Longueur 35 mm ou plus recommand s Connectez les c bles depuis...

Страница 116: ...trou dans le mur au niveau de chaque marque Si les marques ne correspondent pas aux positions des poteaux muraux veillez ins rer les ancrages ou les chevilles Molly appropri es dans les trous avant d...

Страница 117: ...isser la Soundbar vers le bas comme indiqu ci dessous afin que les Supportde fixationmurale reposent de mani re s re sur les Visdefixation Ins rez les Visdefixation dans la partie large inf rieure des...

Страница 118: ...annuler cette fonction Levolumeest ilr gl sonminimum R glez le volume Lat l commandenefonctionnepas Lespilessont elleus es Remplacez avec des piles neuves Est cequeladistanceentrelat l commandeetl un...

Страница 119: ...LIBRE Pour toute requ te et demande concernant les sources ouvertes contactez Samsung via e mail l adresse oss request samsung com 13 REMARQUE IMPORTANTE PROPOSDU SERVICE Les figures et les illustrat...

Страница 120: ...PAREIL SANS FIL Puissance de transmission BT max Puissance de transmission SRD max 100 mW 2 4 GHz 2 4835 GHz 25 mW 5 725 GHz 5 825 GHz Nom du caisson de basse PS WN20 Poids 5 7 kg Dimensions L x H x P...

Страница 121: ...ecte gratuite des batteries Lesbonsgestesdemiseaurebutdeceproduit D chetsd quipements lectriques lectroniques Applicableauxpaysdisposantdesyst mesdecollectes par s Ce symbole sur le produit ses access...

Страница 122: ...niawed ugtaryfy operatora http www samsung com pl support HUNGARY 0680SAMSUNG 0680 726 7864 www samsung com hu support AUSTRIA 0800 SAMSUNG 0800 7267864 OnlyforDealers 0810 112233 www samsung com at s...

Отзывы: