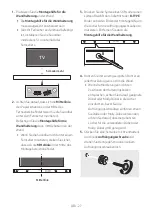
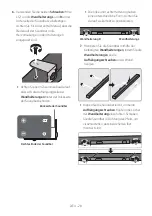
background image

DEU - 32

12  LIZENZ


Manufactured under license from Dolby 
Laboratories. Dolby, Dolby Audio, Pro Logic, 
and the double-D symbol are trademarks of 
Dolby Laboratories.

For DTS patents, see http://patents.dts.com. 
Manufactured under license from DTS 
Licensing Limited. DTS, the Symbol, DTS in 
combination with the Symbol, and DTS 2.0 
Channel are registered trademarks or 
trademarks of DTS, Inc. in the United States 
and/or other countries. © DTS, Inc. All Rights 
Reserved.

The terms HDMI and HDMI High-Definition 

Multimedia Interface, and the HDMI Logo are 
trademarks or registered trademarks of HDMI 
Licensing LLC in the United States and other 
countries.

13  BEKANNTMACHUNG 

ZU OPEN SOURCE 

LIZENZEN

Wenn Sie Fragen bezüglich des Themas Open 
Source haben, wenden Sie sich bitte per E-Mail 
unter der Adresse an Samsung 
([email protected]).

14  WICHTIGE 

HINWEISE ZUM 

KUNDENDIENST


Die Abbildungen in dieser Anleitung dienen 
nur als Referenz und können sich vom 
aktuellen Produkt unterscheiden.


Es kann eine Gebühr erhoben werden, wenn: 
(a)  Ein Techniker auf Ihre Anfrage bestellt 

wird und am Gerät kein Defekt vorliegt  
(z. B. weil Sie diese Bedienungsanleitung 
nicht gelesen haben).

(b) Sie das Gerät in einer Reparaturwerkstatt 

abgegeben haben und am Gerät kein 
Defekt vorliegt  
(z. B. weil Sie diese Bedienungsanleitung 
nicht gelesen haben).


Die Höhe dieser Gebühr wird Ihnen mitgeteilt, 
bevor irgendwelche Arbeiten durchgeführt 
werden oder der Hausbesuch erfolgt.

Содержание HW-M450

Страница 1: ...FULL MANUAL Imagine the possibilities Thank you for purchasing this Samsung product To receive more complete service please register your product at www samsung com register HW M450 ...

Страница 2: ...indicates that the rated voltage marked with the symbol is DC voltage Caution Consult instructions for use This symbol instructs the user to consult the user manual for further safety related information WARNING To reduce the risk of fire or electric shock do not expose this appliance to rain or moisture CAUTION TO PREVENT ELECTRIC SHOCK MATCH WIDE BLADE OF PLUG TO WIDE SLOT FULLY INSERT This appa...

Страница 3: ...he AC wall socket if the unit malfunctions Your product is not intended for industrial use It is for personal use only Condensation may occur if your product has been stored in cold temperatures If transporting the unit during the winter wait approximately 2 hours until the unit has reached room temperature before using 5 The battery used with this product contains chemicals that are harmful to th...

Страница 4: ... to the Subwoofer 6 Automatic connection between the subwoofer and the Soundbar 6 Manually connecting the subwoofer if automatic connection fails 7 04 ConnectingtoyourTV 9 Method 1 Connecting with a Cable 9 Connecting using an Optical Cable 9 Connecting a TV using an HDMI Cable 10 Method 2 Connecting Wirelessly 11 Connecting a TV via Bluetooth 11 05 ConnectinganExternalDevice 13 Connecting using a...

Страница 5: ...bar volume with a TV remote control 24 Using the Hidden Buttons 25 Output specifications for the different sound effect modes 25 09 InstallingtheWallMount 26 Installation Precautions 26 Wallmount Components 26 Detaching the Soundbar from the Wall 29 10 SoftwareUpdate 29 Updating Procedure 30 If UPDATE is not displayed 30 11 Troubleshooting 31 12 Licence 32 13 OpenSourceLicenceNotice 32 14 Importan...

Страница 6: ...5 For Soundbar wall mounting components see page 26 Micro USB to USB adapter and HDMI cables are sold separately To purchase contact a Samsung Service Centre or Samsung Customer Care The appearance of the accessories may differ slightly from the illustrations above InsertingBatteriesbeforeusingtheRemoteControl AAbatteriesX2 Slide the battery cover in the direction of the arrow until it is complete...

Страница 7: ...e Display Optical Digital input D IN ARC HDMI OUT input D IN TV ARC Auto conversion AUX input AUX HDMI input HDMI BLUETOOTH mode BT USB mode USB To turn on BTPAIRING mode change the source to BT mode and then press and hold the Source button for more than 5 seconds When you plug in the AC cord the power button will begin working in 4 to 6 seconds When you turn on this unit there will be a 4 to 5 s...

Страница 8: ... through the Soundbar AUXIN Connect to the Analogue output of an external device HDMIIN Inputs digital video and audio signals simultaneously using an HDMI cable Connect to the HDMI output of an external device HDMIOUT TV ARC Connect to the HDMI ARC jack on a TV DC24V PowerSupplyIn Connect the AC DC power adapter When disconnecting the power cable of the AC DC power adaptor from a wall outlet pull...

Страница 9: ...abel attached to the product Label Bottom of the Soundbar Main Unit POWER RearofSubwoofer 1 PowerCord Connecting ElectricalPower HDMI OUT TV ARC DC 24V DC 24V HDMI IN DC 24V Bottomofthe SoundbarMainUnit 2 AC DCAdapter 3 PowerCord Connecting ElectricalPower Make sure to rest the AC DC Adapter flat on a table or the floor If you place the AC DC Adapter so that it is hanging with the AC cord input fa...

Страница 10: ...eRearofSubwoofer LED Status Description Resolution Blue On Successfully connected normal operation Blinking Recovering the connection Check if the power cable to the main Soundbar unit is connected properly or wait for a while If blinking persists try manually connecting the subwoofer See page 7 Red On Standby with the Soundbar main unit turned off Check if the power cable to the main Soundbar uni...

Страница 11: ...the Soundbar for 1 3 seconds and then disappear S u r r o u n d S O U N D M O D E B l u e t o o t h P O W E R V O L W O O F E R S O U N D B A R 5 Sec IDSET 5 When the blue indicator on the subwoofer blinks turn on the Soundbar s power by pressing Power button on the right side of the main unit or on the remote control 6 When the connection is successfully established the blue indicator on the rear...

Страница 12: ...t If a steel concrete or metallic wall is between the main unit and the wireless subwoofer the system may not operate at all because the wireless signal cannot penetrate metal PRECAUTIONS Wireless receiving antennas are built into the wireless subwoofer Keep the units away from water and moisture For optimal listening performance make sure that the area around the wireless subwoofer and Wireless R...

Страница 13: ...and mute Method1 ConnectingwithaCable ConnectingusinganOpticalCable DIGITAL AUDIO IN OPTICAL USB 5V 0 5A AUX IN OPTICAL OUT OpticalCable BottomoftheSoundbar D IN RightSideoftheSoundbar 1 Connect the DIGITALAUDIOIN OPTICAL jack on the Soundbar to the OPTICAL OUT jack of the TV with a digital optical cable 2 Press the Source button on the right side panel or remote control and then select mode D IN ...

Страница 14: ...o Power Link may not function This function is only available in the D IN mode ConnectingaTVusinganHDMICable Checkthe ARC at HDMIINportofyourTV HDMI OUT TV ARC HDMI IN HDMI IN ARC HDMICable notsupplied BottomoftheSoundbar TVARC ChecktheHDMIOUT TV ARC portoftheSoundbarmainunit RightSideoftheSoundbar 1 With the Soundbar and TV turned on connect the HDMI cable not supplied as shown in the figure 2 TV...

Страница 15: ...TVviaBluetooth When a TV is connected using Bluetooth you can hear stereo sound without the hassle of cabling Only one TV can be connected at a time Theinitialconnection 1 Press the Source button on the right side panel or on the remote control and then select BT 2 Change BT to BTPAIRING If BTREADY appears press and hold the Source button on the right side panel of the Soundbar or on the remote co...

Страница 16: ...st if the distance between the Soundbar and the Bluetooth device exceeds 10 meters The Soundbar automatically turns off after 5 minutes in the Ready state The Soundbar may not perform Bluetooth search or connection correctly under the following circumstances If there is a strong electrical field around the Soundbar If several Bluetooth devices are simultaneously paired with the Soundbar If the Blu...

Страница 17: ...oundbar BD DVDplayer Set topbox Gameconsole RightSideoftheSoundbar 1 OpticalCable X X Connect DIGITALAUDIOIN OPTICAL on the main unit to the OPTICAL OUT jack of the Source Device using a digital optical cable Y Y Select D IN mode by pressing the Source button on the right side panel or on the remote control 2 Audio AUX Cable X X Connect AUXIN Audio on the main unit to the AUDIO OUT jack of the Sou...

Страница 18: ...MI cable not supplied from the HDMIIN jack on the back of the product to the HDMI OUT jack on your digital device 2 Connect an HDMI cable not supplied from the HDMIOUT TV ARC jack on the back of the product to the HDMI IN jack on your TV 3 Press the Source button on the right side panel or on the remote control and then select HDMI 4 HDMI mode is displayed on the Soundbardisplaypanel and sound pla...

Страница 19: ...e 2 0 USB jack Type A on the other end to the micro USB jack on your Soundbar Micro USB to USB adapter Cable is sold separately To purchase contact a Samsung Service Centre or Samsung Customer Care 2 Connect your USB device to the female end of the adapter cable 3 Press the Source button on the right side panel or on the remote control and then select USB 4 USB appears in the display screen 5 Play...

Страница 20: ...SAudio1 16KHz 48KHz 56kbps 128kbps Wave_Format_MSAudio2 16KHz 48KHz 56kbps 128kbps aac AAC 16KHz 96KHz 48kbps 320kbps AAC LC 16KHz 96KHz 128kbps 192kbps 5 1ch 320kbps HE AAC 24KHz 96KHz 48kbps 64kbps 5 1ch 160kbps wav 16KHz 48KHz up to 3000kbps ogg OGG 1 1 0 16KHz 48KHz 50kbps 500kbps flac FLAC 1 1 0 FLAC 1 2 1 16KHz 96KHz up to 3000kbps If there are too many folders and files stored on the USB de...

Страница 21: ...he remote control for more than 5 seconds to display BTPAIRING 3 Select AV SamsungSoundbarMxxxM Series from the list When a Soundbar is connected to the Bluetooth device BluetoothDeviceName BT appears in the front display 4 Play music files from the device connected via Bluetooth through the Soundbar Ifthedevicefailstoconnect If the previously connected Soundbar listing e g AV SamsungSoundbarMxxxM...

Страница 22: ... electromagnetic waves must be kept away from the Soundbar main unit e g microwaves wireless LAN devices etc The Soundbar supports SBC data 44 1kHz 48kHz Connect only to a Bluetooth device that supports the A2DP AV function You cannot connect the Soundbar to a Bluetooth device that supports only the HF Hands Free function Once you have paired the Soundbar to a Bluetooth device selecting AV Samsung...

Страница 23: ...luetooth Bluetooth is a technology that enables Bluetooth compliant devices to interconnect easily with each other using a short wireless connection A Bluetooth device may cause noise or malfunction depending on usage if A part of your body is in contact with the receiving transmitting system of the Bluetooth device or the Soundbar It is subject to electrical variation from obstructions caused by ...

Страница 24: ...emote app from the Google Play store Marketsearch SamsungAudioRemote LaunchingtheSamsungAudioRemoteApp To launch and use the Samsung Audio Remote app touch the Audio Remote icon on your smart device and then follow the directions on the screen AudioRemote The Samsung Audio Remote app is only compatible with Android mobile phones and mobile devices running Android OS 3 0 or later ...

Страница 25: ... adjust the sound for each frequency band 150Hz 300Hz 600Hz 1 2KHz 2 5KHz 5KHz and 10KHz are selectable Left Right and each can be adjusted to a setting between 6 6 Up Down If the video and audio between the TV and your Soundbar are not synchronised select AUDIOSYNC in Sound Settings and then set audio delay between 0 300 milliseconds by using the Up Down buttons Except USB mode Audio Sync is only...

Страница 26: ...BTPAIRINGmode To turn on BTPAIRING mode in BT mode press and hold the Source button for more than 5 seconds See page 17 for details AutoPowerDownFunction The unit turns off automatically in the following situations D IN HDMI BT USBMode If there is no audio signal for 5 minutes AUX Mode If the Audio AUX Cable is disconnected for 5 minutes If there is no KEY input for 8 hours when the Audio AUX Cabl...

Страница 27: ...D MODE Bluetooth POWER Bluetooth POWER Press to turn the Bluetooth POWER or volume restriction function on and off BluetoothPOWERfunction If the Soundbar is in standby mode and the Bluetooth POWER function is On when you turn on a previously connected Bluetooth device the Soundbar automatically turns on and connects via Bluetooth to the device When the Bluetooth POWER function is on ON BLUETOOTHPO...

Страница 28: ...VmenutosettheTVspeakeronaSamsungTVexternalspeakers Formoreinformation seetheTV susermanual After installing the Soundbar you can adjust the Soundbar s volume using the IR remote control that came with a Samsung TV If you do not want to use this function when the Soundbar is on press and hold the Surround button for 5 seconds OFF TVREMOTE appears in the Soundbar s display and the function turns off...

Страница 29: ...ationsforthedifferentsoundeffectmodes Effect Input Output ExceptWirelessRear SpeakerKit IncludeWirelessRear SpeakerKit Surround Surround VOL WOOFER SOUND MODE Bluetooth POWER ON 2 0 ch 2 1 ch 4 1 ch 5 1 ch 2 1 ch 4 1 ch SOUNDMODE Surround VOL WOOFER SOUND MODE Bluetooth POWER STANDARD 2 0 ch 2 1 ch 4 1 ch 5 1 ch 2 1 ch 4 1 ch MUSIC 2 0 ch 2 1 ch 4 1 ch 5 1 ch 2 1 ch 4 1 ch CLEAR VOICE 2 0 ch 2 1 c...

Страница 30: ...oard iron board wood etc If possible fix the support screws into wall studs Purchase wall mounting screws according to the type and thickness of the wall you want to mount the Soundbar on Diameter M5 Length 35 mm or longer recommended Connect cables from the unit to external devices before you install the Soundbar on the wall Make sure the unit is turned off and unplugged before you install it Oth...

Страница 31: ...sh a pen tip or sharpened pencil tip through the centre of the B TYPE images on each end of the Guide to mark the holes for the supporting screws and then remove the WallMountGuide CENTER LINE A B B A A TYPE 616mm B TYPE 360mm B CENTER LINE 4 Using an appropriately sized drill bit drill a hole in the wall at each marking If the markings do not correspond to the positions of studs make sure you ins...

Страница 32: ...hind the rear of the Soundbar RearofSoundbar RightendofSoundbar The left and right mounts are different shapes Make sure to position them correctly WallMountR WallMountL 7 Install the Soundbar with the attached Bracket WallMounts by hanging the Bracket WallMounts on the Holder Screws on the wall Slightly tilt the Soundbar to insert both Holder Screw heads into Bracket Wall Mount holes Push the Sou...

Страница 33: ...eaker system at least 5 cm below the TV if the TV is mounted on the wall For your safety if you do not mount the unit on the wall install it on a secure flat surface where it is unlikely to fall 10 SOFTWARE UPDATE SamsungmayofferupdatesfortheSoundbar s systemfirmwareinthefuture USBport HDMI OUT TV ARC DC 24V DC 24V USB 5V 0 5A AUX IN HDMI IN DIGITAL AUDIO IN OPTICAL USB 5V 0 5A MicroUSBto USBadapt...

Страница 34: ...play and then the Soundbar turns off The update is complete This product has a DUAL BOOT function If the firmware fails to update you can update the firmware again IfUPDATEisnotdisplayed 1 Turn off the Soundbar disconnect and then reconnect the USB storage device that contains the update files to the Soundbar s USB port 2 Disconnect the Soundbar s power cord reconnect it and then turn on the Sound...

Страница 35: ...utton to cancel the function Isthevolumesettominimum Adjust the Volume Theremotecontroldoesnotwork Arethebatteriesdrained Replace with new batteries IsthedistancebetweentheremotecontrolandSoundbarmainunittoofar Move the remote control closer to the Soundbar main unit TheredLEDonthesubwooferblinksandthesubwooferisnotproducingsound ThisissuecanoccurifthesubwooferisnotconnectedtotheSoundbarmainunit T...

Страница 36: ...stered trademarks of HDMI Licensing LLC in the United States and other countries 13 OPENSOURCE LICENCENOTICE To send inquiries and requests regarding open sources contact Samsung via Email oss request samsung com 14 IMPORTANT NOTESABOUT SERVICE Figures and illustrations in this User Manual are provided for reference only and may differ from actual product appearance An administration fee may be ch...

Страница 37: ...er power 25mW at 5 725GHz 5 825GHz NOTES Samsung Electronics Co Ltd reserves the right to change the specifications without notice Weight and dimensions are approximate For more information about the power supply and power consumption refer to the label attached to the product Label Bottom of the Soundbar Main Unit OverallStandbyPowerConsumption W 2 9W Bluetooth Portdeactivationmethod Press the Bl...

Страница 38: ...ories or literature indicates that the product and its electronic accessories e g charger headset USB cable should not be disposed of with other household waste at the end of their working life To prevent possible harm to the environment or human health from uncontrolled waste disposal please separate these items from other types of waste and recycle them responsibly to promote the sustainable reu...

Страница 39: ...ng Dieses Symbol zeigt an dass es sich bei der mit diesem Symbol gekennzeichneten Nennspannung um eine Gleichspannung handelt Achtung Gebrauchsanweisung beachten Dieses Symbol weist den Benutzer an weitere sicherheitsrelevante Informationen der Gebrauchsanweisung zu entnehmen WARNUNG Setzen Sie das Gerät nicht Nässe oder Feuchtigkeit aus um die Gefahr eines Brandes bzw eines elektrischen Schlags z...

Страница 40: ...Ihr Produkt ist nicht für den gewerblichen Einsatz vorgesehen Verwenden Sie dieses Produkt nur für den privaten Bereich Wenn Ihr Produkt oder die CD bei kalten Temperaturen aufbewahrt wurden kann Kondensation auftreten Wenn Sie das Gerät bei kaltenTemperaturen transportiert haben warten Sie mit der Inbetriebnahme circa 2 Stunden bis das Gerät Raumtemperatur erreicht hat 5 Die in diesem Produkt ver...

Страница 41: ...bindung zwischen Subwoofer und Soundbar 6 Manuelles Verbinden des Subwoofers bei Fehlschlagen der automatischen Verbindung 7 04 AnschlussanihrFernsehgerät 9 Methode 1 Verbindung mit einem Kabel 9 Verbindung mit einem optischen Kabel 9 Einen Fernseher über ein HDMI Kabel verbinden 10 Methode 2 Drahtlose Verbindung 11 Verbindung eines Fernsehers per Bluetooth 11 05 VerbindeneinesMobilgeräts 13 Verbi...

Страница 42: ...ng 24 Verwenden der verborgenen Tasten 25 Ausgabe Spezifikationen für die unterschiedlichen Sound Effekt Modi 25 09 InstallierenderWandhalterung 26 Vorsichtsmaßnahmen für die Installation 26 Komponenten für die Anbringung an der Wand 26 Soundbar von der Wand abnehmen 29 10 Softwareaktualisierung 29 Updateverfahren 30 Wenn UPDATE nicht angezeigt wird 30 11 Fehlerbehebung 31 12 Lizenz 32 13 Bekanntm...

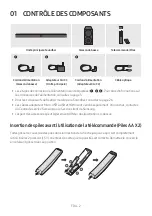
Страница 43: ...iehe Seite 26 zu den Wandhalterungskomponenten Micro USB auf USB Adapter und HDMI Kabel sind separat erhältlich Wenden Sie sich hierzu an ein Samsung Servicezentrum oder den Kundendienst von Samsung Das Aussehen des Zubehörs kann etwas von den Abbildungen oben abweichen EinlegenderBatterienvorderVerwendungderFernbedienung AA BatterienX2 Schieben Sie den Batteriedeckel in Pfeilrichtung bis er volls...

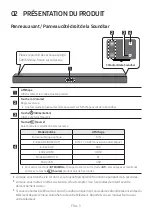
Страница 44: ...ARC Automatische Umwandlung AUX Eingang AUX HDMI Eingang HDMI BLUETOOTH Modus BT USB Modus USB Zum Einschalten des Modus BTPAIRING schalten Sie die Quelle auf den Modus BT um und halten Sie dann die taste Quelle länger als 5 Sekunden lang gedrückt Nach dem Anschluss des Netzkabels muss 4 bis 6 Sekunden gewartet werden bis der Netzschalter bedient werden kann Wenn Sie dieses Gerät einschalten verge...

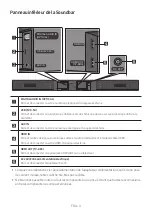
Страница 45: ... AUXIN An den analogen Ausgang eines externen Geräts anschließen HDMIIN Gibt digitale Video und Audiosignale über ein HDMI Kabel simultan ein An den HDMI Ausgang eines externen Geräts anschließen HDMIOUT TV ARC An die HDMI ARC Buchse an einem Fernseher anschließen DC24V Stromversorgungseingang Den Netzadapter anschließen Ziehen Sie wenn Sie das Stromkabel des AC DC Adapters von der Steckdose trenn...

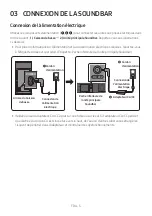
Страница 46: ...uf dem Etikett am Gerät Etikett Unterseite des Soundbar Hauptgeräts POWER Rückseitedes Subwoofers 1 Stromkabel Stromanschluss HDMI OUT TV ARC DC 24V DC 24V HDMI IN DC 24V Unterseitedes Soundbar Hauptgeräts 2 Netzadapter 3 Stromkabel Stromanschluss Achten Sie darauf dass der Netzadapter flach auf einem Tisch oder dem Fußboden liegt Wenn Sie den Netzadapter in hängender Position mit dem Netzkabelein...

Страница 47: ...ers LED Status Beschreibung Abhilfe Blau Ein Erfolgreich verbunden normaler Betrieb Blinkend Verbindung wird wieder hergestellt Prüfen Sie ob das Stromkabel richtig am Soundbar Hauptgerät angeschlossen ist oder warten Sie einige Zeit Falls das Blinken andauert versuchen Sie den Subwoofer manuell anzuschließen Weitere Informationen finden Sie auf Seite 7 Rot Ein Standby bei ausgeschaltetem Soundbar...

Страница 48: ...DSET in der Anzeige der Soundbar und erlischt dann S u r r o u n d S O U N D M O D E B l u e t o o t h P O W E R V O L W O O F E R S O U N D B A R 5 Sec IDSET 5 Wenn die blaue Anzeigeleuchte an dem Subwoofer blinkt schalten Sie die Stromversorgung der Soundbar durch Drücken der Strom Taste auf der rechten Seite der Haupteinheit oder der Fernbedienung ein 6 Wenn die Verbindung erfolgreich hergestel...

Страница 49: ...Haupteinheit und dem drahtlosen Subwoofer befindet funktioniert die Anlage möglicherweise gar nicht weil das drahtlose Signal Metall nicht durchdringen kann VORSICHTSMASSNAHMEN Es sind Antennen für den drahtlosen Empfang in den drahtlosen Subwoofer eingebaut Halten Sie die Einheiten fern von Wasser und Feuchtigkeit Für eine optimale Wiedergabeleistung stellen Sie sicher dass der Bereich um den dra...

Страница 50: ...ltung anzupassen Methode1 VerbindungmiteinemKabel VerbindungmiteinemoptischenKabel DIGITAL AUDIO IN OPTICAL USB 5V 0 5A AUX IN OPTICAL OUT OptischesKabel UnterseitederSoundbar D IN RechteSeitederSoundbar 1 Verbinden Sie den Anschluss DIGITALAUDIOIN OPTICAL der Soundbar über ein optisches Digitalkabel mit dem Anschluss OPTICAL OUT des Fernsehers 2 Drücken Sie die Taste Quelle auf der rechten Seite ...

Страница 51: ...wer Link nicht funktionieren Diese Funktion ist nur im Modus D IN verfügbar EinenFernseherübereinHDMI Kabelverbinden ÜberprüfenSie ARC am HDMIIN AnschlussIhresFernsehers HDMI OUT TV ARC HDMI IN HDMI IN ARC HDMI Kabel nichtenthalten UnterseitederSoundbar TVARC ÜberprüfenSiedenHDMIOUT TV ARC AnschlussamSoundbar Hauptgerät RechteSeitederSoundbar 1 Bei eingeschalteter Soundbar und eingeschaltetem Fern...

Страница 52: ...rnseher über Bluetooth verbunden wird können Sie einen Stereoton ohne lästige Kabel hören Es kann nur ein Fernseher gleichzeitig verbunden werden DieersteVerbindung 1 Drücken Sie die Taste Quelle auf der rechten Seite oder der Fernbedienung und wählen Sie dann den Modus BT 2 Ändern Sie BT zu BTPAIRING Falls BTREADY angezeigt wird halten Sie die Taste Quelle auf der rechten Seite der Soundbar oder ...

Страница 53: ... Soundbar und dem Bluetooth Gerät 10 m überschreitet Die Soundbar schaltet sich nach 5 Minuten im Bereitschaftszustand automatisch aus Die Soundbar könnte unter den folgenden Umständen die Bluetooth Suche oder Verbindung eventuell nicht korrekt ausführen Wenn die Soundbar von einem starken elektrischen Feld umgeben ist Falls mehrere Bluetooth Geräte gleichzeitig mit der Soundbar gekoppelt werden W...

Страница 54: ...r BD DVD Player Set Top Box Spielkonsole RechteSeitederSoundbar 1 OptischesKabel X X Verbinden Sie den Anschluss DIGITALAUDIOIN OPTICAL am Hauptgerät über ein optisches Digitalkabel mit dem Anschluss OPTICAL OUT des Quellgeräts Y Y Wählen Sie den Modus D IN durch Drücken der Taste Quelle auf der rechten Seite oder der Fernbedienung 2 Audio AUX Kabel X X Verbinden Sie den Anschluss AUXIN Audio am H...

Страница 55: ...kseite des Geräts über ein HDMI Kabel nicht enthalten mit dem Anschluss HDMI OUT Ihres Digitalgeräts 2 Verbinden Sie den Anschluss HDMIOUT TV ARC auf der Rückseite des Geräts über ein HDMI Kabel nicht enthalten mit dem Anschluss HDMI IN Ihres Fernsehers 3 Drücken Sie die Taste Quelle auf derrechten Seite oderderFernbedienung undwählen Sie dann den Modus HDMI 4 DerModus HDMI wird auf dem Anzeigefel...

Страница 56: ... Buchse Typ A am anderen Ende mit dem Micro USB Anschluss Ihrer Soundbar Das Micro USB auf USB Adapterkabel ist separat erhältlich Wenden Sie sich hierzu an ein Samsung Servicezentrum oder den Kundendienst von Samsung 2 Verbinden Sie das USB Gerät mit der Buchse des Adapterkabels 3 Drücken Sie die Taste Quelle auf der rechten Seite oder der Fernbedienung und wählen Sie dann USB 4 Auf dem Anzeigebi...

Страница 57: ...z 56 128kbps Wave_Format_MSAudio2 16KHz 48KHz 56 128kbps aac AAC 16KHz 96KHz 48 320kbps AAC LC 16KHz 96KHz 128 192kbps 5 1 Kanal 320kbps HE AAC 24KHz 96KHz 48 64kbps 5 1 Kanal 160kbps wav 16KHz 48KHz Bis zu 3000kbps ogg OGG 1 1 0 16KHz 48KHz 50 500kbps flac FLAC 1 1 0 FLAC 1 2 1 16KHz 96KHz Bis zu 3000kbps Sind zu viele Ordner und Dateien auf dem USB Gerät gespeichert kann es einige Zeit dauern bi...

Страница 58: ...Sekunden gedrückt um BTPAIRING anzuzeigen 3 Wählen Sie AV SamsungSoundbarMxxxM Series aus der Liste aus Wenn eine Soundbar mit dem Bluetooth Gerät verbunden ist wird Bluetooth Gerätename BT in der vorderen Anzeige angezeigt 4 Geben Sie Musikdateien auf dem über Bluetooth verbundenen Gerät über die Soundbar aus FallsdasGerätnichtverbundenwerdenkann Falls die Auflistung der zuvor verbundenen Soundba...

Страница 59: ...alten werden z B Mikrowellen WLAN Geräte etc Der Soundbar unterstützt SBC data 44 1kHz 48kHz Nur an ein Bluetooth Gerät anschließen das die A2DP AV Funktion unterstützt Es kann keine Verbindungen zwischen dem Soundbar und Bluetooth Geräten hergestellt werden die nur die HF Freisprech Funktion unterstützen Nachdem Sie eine Verbindung zwischen der Soundbar und einem Bluetooth Gerät hergestellt haben...

Страница 60: ...Bluetooth ist eine neue Technologie mit der es möglich ist Bluetooth fähige Geräte über eine kurze Funkverbindung miteinander zu verbinden Ein Bluetooth Gerät kann Störungen erzeugen oder falsch funktionieren wenn Das Empfangs Sendesystem eines Bluetooth Geräts oder der Haupteinheit mit einem Körperteil berührt wird Die Funkübertragung durch Wände Ecken oder Bürotrennwände behindert wird Interfere...

Страница 61: ...Google Play Store herunter ImPlayStoresuchennach SamsungAudioRemote StartenderSamsungAudioRemoteApp Tippen Sie zum Starten und Verwenden der Samsung Audio Remote App auf dem Smartphone oder Tablet auf das Audio Remote Symbol und folgen Sie der Bildschirmanleitung AudioRemote Die Samsung Audio Remote App ist nur kompatibel mit Android Mobiltelefonen und Mobilgeräten mit Android OS 3 0 oder höher ...

Страница 62: ...des Frequenzband einzustellen 150Hz 300Hz 600Hz 1 2KHz 2 5KHz 5KHz und 10KHz sind wählbar Links Rechts und können jeweils auf eine Einstellung zwischen 6 6 Oben Unten eingestellt werden Wenn Video und Audio zwischen dem Fernseher und der Soundbar nicht synchron ist wählen Sie in den Soundeinstellungen AUDIOSYNC aus und legen dann mithilfe der Tasten Oben Unten eine Audioverzögerung zwischen 0 und ...

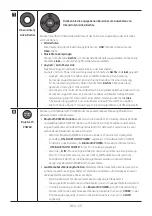
Страница 63: ...odus im BT Modus halten Sie die taste Quelle länger als 5 Sekunden lang gedrückt Siehe Seite 17 für Einzelheiten AutoPowerDown Funktion In folgenden Situationen wird das Gerät automatisch ausgeschaltet Modus D IN HDMI BT USB Wenn seit mehr als 5 Minuten kein Audiosignal empfangen wurde Modus AUX Wenn das Audio AUX Kabel seit 5 Minuten getrennt ist Wenn bei angeschlossenem Audio AUX Kabel 8 Stunden...

Страница 64: ... MODE Bluetooth POWER Bluetooth POWER Drücken um die Bluetooth POWER oder die Lautstärkebeschränkungsfunktion zu aktivieren und zu deaktivieren BluetoothPOWER Funktion Wenn sich die Soundbar im Standby Modus befindet und die Bluetooth POWER Funktion auf Ein steht wird die Soundbar automatisch eingeschaltet und verbindet sich per Bluetooth mit dem Gerät wenn Sie ein zuvor verbundenes Bluetooth Gerä...

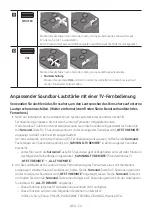
Страница 65: ...rsaufexterne Lautsprechereinzustellen WeitereInformationenfindenSieimBenutzerhandbuchdes Fernsehers Nach der Installation der Soundbar können Sie die Lautstärke der Soundbar mit der IR Fernbedienung anpassen die mit dem Samsung Fernseher mitgeliefert wurde Falls Sie diese Funktion nicht verwenden wollen wenn die Soundbar eingeschaltet ist halten Sie die Surround Taste für 5 Sekunden gedrückt In de...

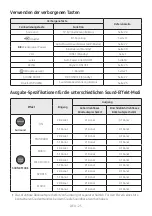
Страница 66: ...usgang Außerdrahtloses Rücklautsprecherkit Einschließlichdrahtloses Rücklautsprecherkit Surround Surround VOL WOOFER SOUND MODE Bluetooth POWER ON 2 0 Kanal 2 1 Kanal 4 1 Kanal 5 1 Kanal 2 1 Kanal 4 1 Kanal SOUNDMODE Surround VOL WOOFER SOUND MODE Bluetooth POWER STANDARD 2 0 Kanal 2 1 Kanal 4 1 Kanal 5 1 Kanal 2 1 Kanal 4 1 Kanal MUSIC 2 0 Kanal 2 1 Kanal 4 1 Kanal 5 1 Kanal 2 1 Kanal 4 1 Kanal C...

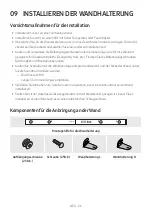
Страница 67: ... Fixieren Sie die Befestigungsschrauben falls möglich mit Wandverankerungen Kaufen Sie Schrauben für die Wandmontage entsprechend der Art und der Dicke der Wand an der Sie die Soundbar montieren wollen Durchmesser M5 Länge 35 mm oder länger empfohlen Schließen Sie die Kabel vom Gerät an externe Geräte an bevor sie die Soundbar an der Wand installieren Stellen Sie sicher dass das Gerät ausgeschalte...

Страница 68: ...PE 616mm B TYPE 360mm 3 Drücken Sie die Spitze eines Stifts oder einen spitzen Bleistift durch die Mitte der B TYPE Bilder an beiden Enden der Montagehilfe um die Löcher für die Aufhängungsschrauben zu markieren Entfernen Sie dann die MontagehilfefürdieWandhalterung CENTER LINE A B B A A TYPE 616mm B TYPE 360mm B CENTER LINE 4 Bohren Sie mit einem geeigneten Bohrer an jeder Markierung ein Loch in ...

Страница 69: ...Soundbar befinden RückseitederSoundbar RechtesEndederSoundbar Die linke und rechte Halterung haben eine unterschiedliche Form Achten Sie darauf sie korrekt zu positionieren WandhalterungR WandhalterungL 7 Montieren Sie die Soundbar mithilfe der befestigten Wandhalterungen indem Sie die Wandhalterungen an die Aufhängungsschrauben an der Wand hängen Kippen Sie die Soundbar leicht um beide Aufhängung...

Страница 70: ...s Fernsehers falls der Fernseher an einer Wand befestigt ist Wenn Sie das Gerät nicht an der Wand installieren installieren Sie es zu Ihrer eigenen Sicherheit auf einer sicheren flachen Oberfläche von der es nicht herunterfallen kann 10 SOFTWAREAKTUALISIERUNG SamsungkanninZukunftAktualisierungenfür dasFirmwaresystemderSoundbaranbieten USB Anschluss HDMI OUT TV ARC DC 24V DC 24V USB 5V 0 5A AUX IN ...

Страница 71: ...ossen Dieses Produkt verfügt über eine DUAL BOOT Funktion Wenn die Firmware nicht aktualisiert werden kann können Sie sie erneut aktualisieren WennUPDATEnichtangezeigt wird 1 Schalten Sie die Soundbar aus trennen Sie das Speichergerät mit den Update Dateien und verbinden Sie es anschließend erneut mit dem USB Anschluss der Soundbar 2 Ziehen Sie das Stromkabel der Soundbar ab schließen Sie es erneu...

Страница 72: ...unktion zu deaktivieren IstdieLautstärkeaufdasMinimumeingestellt Passen Sie die Lautstärke an DieFernbedienungfunktioniertnicht SinddieBatterienleer Tauschen Sie sie gegen neue aus IstderAbstandzwischenFernbedienungundSoundbar Hauptgerätzugroß Gehen Sie mit der Fernbedienung näher an das Soundbar Hauptgerät heran DieroteLEDamSubwooferblinktundderSubwoofergibtkeinenTonwider DiesesProblemkannauftret...

Страница 73: ...es and other countries 13 BEKANNTMACHUNG ZUOPENSOURCE LIZENZEN Wenn Sie Fragen bezüglich des Themas Open Source haben wenden Sie sich bitte per E Mail unter der Adresse an Samsung oss request samsung com 14 WICHTIGE HINWEISEZUM KUNDENDIENST Die Abbildungen in dieser Anleitung dienen nur als Referenz und können sich vom aktuellen Produkt unterscheiden Es kann eine Gebühr erhoben werden wenn a Ein T...

Страница 74: ...rleistung 25mW bei 5 725GHz 5 825GHz HINWEISE Samsung Electronics Co Ltd behält sich das Recht auf unangekündigte Änderungen vor Gewicht und Abmessungen können von den Angaben abweichen Weitere Informationen zur benötigten Stromversorgung und zum Stromverbrauch finden Sie auf dem Etikett am Gerät Etikett Unterseite des Soundbar Hauptgeräts Gesamtstromverbrauchim Bereitschaftszustand W 2 9W Bluetoo...

Страница 75: ...er dazugehörigen Dokumentation gibt an dass das Produkt und Zubehörteile z B Ladegerät Kopfhörer USB Kabel nach ihrer Lebensdauer nicht zusammen mit dem normalen Haushaltsmüll entsorgt werden dürfen Entsorgen Sie dieses Gerät und Zubehörteile bitte getrennt von anderen Abfällen um der Umwelt bzw der menschlichen Gesundheit nicht durch unkontrollierte Müllbeseitigung zu schaden Helfen Sie mit das A...

Страница 76: ...ominale indiquée par le symbole est une tension CC Mise en garde Consulter le mode d emploi ce symbole avertit l utilisateur qu il doit consulter le manuel d utilisation pour en savoir plus sur les informations relatives à la sécurité AVERTISSEMENT Afin de diminuer les risques d incendie ou de choc électrique n exposez pas cet appareil à la pluie ou à l humidité ATTENTION POUR PRÉVENIR LES CHOCS É...

Страница 77: ...ctionnement Votre produit n est pas prévu pour un usage industriel Ce produit ne peut être utilisé qu à des fins personnelles Une condensation peut se former si le produit ou un disque a été stocké à basse température Si vous devez transporter l ensemble pendant l hiver attendez environ 2 heures que l appareil ait atteint la température de la pièce avant de l utiliser 5 Les piles utilisées dans ce...

Страница 78: ...onnexion automatique entre le Caisson de basse et la Soundbar 6 Connexion manuelle du Caisson de basse si la connexion automatique échoue 7 04 ConnexionàvotreTéléviseur 9 Méthode 1 Connexion avec un câble 9 Connexion à l aide d un câble optique 9 Connexion d un téléviseur à l aide d un câble HDMI 10 Méthode 2 Connexion sans fil 11 Connexion à un téléviseur via Bluetooth 11 05 ConnexionàunAppareilE...

Страница 79: ... la Soundbar avec une télécommande de téléviseur 24 Utilisation des touches dissimulées 25 Spécifications de sortie pour les différents modes d effets sonores 25 09 InstallationduSupportMural 26 Précautions d installation 26 Composants de fixation au mur 26 Retrait de la Soundbar du mur 29 10 MiseàjourduLogiciel 29 Procédure de mise à jour 30 Si UPDATE ne s affiche pas 30 11 Dépannage 31 12 Licenc...

Страница 80: ...5 Pour les composants de fixation murale de la Soundbar consultez la page 26 Les câbles adaptateur Micro USB à USB et HDMI sont vendus séparément Pour l achat contactez un Centre de service Samsung ou le Service client de Samsung L aspect des accessoires peut légèrement différer des illustrations ci dessus Insertiondespilesavantl utilisationdelatélécommande PilesAAX2 Faites glisser le couvercle de...

Страница 81: ...que D IN Entrée ARC HDMI OUT D IN TV ARC Conversion automatique Entrée AUX AUX Entrée HDMI HDMI Mode BLUETOOTH BT Mode USB USB Pour activer le mode BTPAIRING changez la source sur le mode BT puis appuyez et maintenez enfoncée la touche Source pendant plus de 5 secondes Lorsque vous branchez le cordon CA la touche Marche Arrêt fonctionne pendant 4 à 6 secondes Lorsque vous mettez l unité sous tensi...

Страница 82: ... numérique analogique d un appareil externe HDMIIN Permet l entrée de signaux numériques vidéo et audio simultanément à l aide du câble HDMI Permet de connecter la sortie HDMI d un appareil externe HDMIOUT TV ARC Permet de connecter une prise jack HDMI ARC sur un téléviseur DC24V Entréed alimentationélectrique Permet de connecter l adaptateur CA CC Lorsque vous débranchez le câble d alimentation d...

Страница 83: ...it Étiquette Partie inférieure de l unité principale Soundbar POWER ArrièreduCaisson debasse 1 Cordon d alimentation Connexionde l alimentation électrique HDMI OUT TV ARC DC 24V DC 24V HDMI IN DC 24V Partieinférieurede l unitéprincipale Soundbar 2 AdaptateurCA CC 3 Cordon d alimentation Connexionde l alimentation électrique Veillez à poser l adaptateur CA CC à plat sur une table ou sur le sol Si l...

Страница 84: ...ndebasse LED État Description Résolution Bleu Activé Connexion réussie fonctionnement normal Clignotement Récupération de la connexion Vérifiez si le câble d alimentation sur l unité principale Soundbar est connecté correctement ou attendez un moment Si le clignotement continue essayez de connecter manuellement le Caisson de basse Voir page 7 Rouge Activé En veille avec l unité principale de la So...

Страница 85: ...dbar pendant 1 3 secondes puis disparaît S u r r o u n d S O U N D M O D E B l u e t o o t h P O W E R V O L W O O F E R S O U N D B A R 5 Sec IDSET 5 Quand l indicateur bleu sur le Caisson de basse clignote mettez la Soundbar sous tension en appuyant sur la touche Alimentation sur le côté droit de l unité principale ou sur la télécommande 6 Lorsque la connexion est établie avec succès l indicateu...

Страница 86: ... en béton armé ou métallique se trouve entre l unité principale et le subwoofer sans fil le système risque de ne pas fonctionner du tout car le signal sans fil ne peut pas passer à travers le métal PRÉCAUTIONS Les antennes de réception sans fil sont intégrées au subwoofer sans fil Gardez les unités à l abri de l eau et de l humidité Pour des performances d écoute optimales assurez vous que la zone...

Страница 87: ... ainsi que le volume et la coupure du son Méthode1 Connexionavecuncâble Connexionàl aided uncâbleoptique DIGITAL AUDIO IN OPTICAL USB 5V 0 5A AUX IN OPTICAL OUT Câbleoptique PartieinférieuredelaSoundbar D IN CôtédroitdelaSoundbar 1 Raccordez la prise DIGITALAUDIOIN OPTICAL de la Soundbar à la prise OPTICAL OUT du téléviseur à l aide d un câble optique numérique 2 Appuyez sur la touche Source sur l...

Страница 88: ... Link ne fonctionne pas Cette fonction est disponible uniquement en mode D IN Connexiond untéléviseuràl aided uncâbleHDMI Contrôlede ARC auport HDMIINdevotretéléviseur HDMI OUT TV ARC HDMI IN HDMI IN ARC CâbleHDMI nonfourni PartieinférieuredelaSoundbar TVARC ContrôlezleportHDMIOUT TV ARC de l unitéprincipaleSoundbar CôtédroitdelaSoundbar 1 Avec la Soundbar et le téléviseur allumés connectez le câb...

Страница 89: ... de Bluetooth vous pouvez écouter le son stéréo sans tracas de câblage Seul un téléviseur à la fois peut être connecté Connexioninitiale 1 Appuyez sur la touche Source sur le panneau côté droit ou la télécommande puis sélectionnez BT 2 Changez BT sur BTPAIRING Si BTREADY apparaît appuyez et maintenez enfoncée la touche Source sur le panneau côté droit de la Soundbar ou sur la télécommande pendant ...

Страница 90: ...etooth sera perdue si la distance entre la Soundbar et l appareil Bluetooth dépasse 10 m La Soundbar s éteint automatiquement après 5 minutes en état Prêt Il se peut que la Soundbar ne puisse pas effectuer correctement la recherche Bluetooth ou la connexion dans les circonstances suivantes En cas de champ électrique puissant autour de la Soundbar En cas d appariement simultané de plusieurs apparei...

Страница 91: ... Boîtierdécodeur Consoledejeu CôtédroitdelaSoundbar 1 Câbleoptique X X Raccordez DIGITALAUDIOIN OPTICAL de l unité principale à la prise OPTICAL OUT de l appareil source à l aide d un câble optique numérique Y Y Sélectionnez le mode D IN en appuyant sur la touche Source sur le panneau côté droit ou sur la télécommande 2 Câbleaudio AUX X X Raccordez AUXIN Audio de l unité principale à la prise AUDI...

Страница 92: ...e HDMI non fourni de la prise HDMIIN au dos du produit à la prise HDMI OUT de votre appareil numérique 2 Raccordez un câble HDMI non fourni de la prise HDMIOUT TV ARC au dos du produit à la prise HDMI IN de votre téléviseur 3 Appuyez surla touche Source surle panneau côté droit ou la télécommande puis sélectionnez HDMI 4 Le mode HDMI s affiche surle panneau d affichage de la Soundbaretvous pouvez ...

Страница 93: ...e standard Type A à l autre extrémité à la prise Micro USB de la Soundbar Le câble adaptateur Micro USB à USB est vendu séparément Pour l achat contactez un Centre de service Samsung ou le Service client de Samsung 2 Raccordez votre périphérique USB à l extrémité femelle du câble adaptateur 3 Appuyez sur la touche Source sur le panneau côté droit ou la télécommande puis sélectionnez USB 4 USB appa...

Страница 94: ... 48 KHz 56 128 kbps Wave_Format_MSAudio2 16 48 KHz 56 128 kbps aac AAC 16 96 KHz 48 320 kbps AAC LC 16 96 KHz 128 192 kbps 5 1 canaux 320 kbps HE AAC 24 96 KHz 48 64 kbps 5 1 canaux 160 kbps wav 16 48 KHz jusqu à 3000 kbps ogg OGG 1 1 0 16 48 KHz 50 500 kbps flac FLAC 1 1 0 FLAC 1 2 1 16 96 KHz jusqu à 3000 kbps Si votre périphérique USB contient trop de dossiers et de fichiers la Soundbar mettra ...

Страница 95: ...plus de 5 secondes pour afficher BTPAIRING 3 Sélectionnez AV SamsungSoundbarMxxxM Series dans la liste Lorsqu une Soundbar est connectée à l appareil Bluetooth Nomdel appareilBluetooth BT apparaît sur l affichage avant 4 Lisez des fichiers musicaux à partir de l appareil connecté via Bluetooth via la Soundbar Silaconnexiondel appareiléchoue Si la liste de Soundbar connectées précédemment par ex AV...

Страница 96: ...s micro ondes des appareils LAN sans fil etc Le Soundbar prend en charge les données SBC 44 1 kHz 48 kHz Effectuez uniquement la connexion à un périphérique Bluetooth qui prend en charge la fonction A2DP AV Vous ne pouvez pas connecter le Soundbar à un périphérique Bluetooth qui prend en charge uniquement la fonction HF Mains libres Lorsque vous avez apparié la barre audio à un périphérique Blueto...

Страница 97: ...on sans fil courte distance Ce périphérique Bluetooth peut générer du bruit ou créer des dysfonctionnements en fonction des conditions d utilisation lorsque Une partie du corps de l appareil est en contact avec le système de réception transmission du périphérique Bluetooth ou du système Soundbar Il est soumis à des variations électriques provenant d obstructions provoquées par un mur un coin ou de...

Страница 98: ...sur Google Play Recherchez SamsungAudioRemote Lancementdel applicationSamsungAudioRemote Pour lancer et utiliser l application Samsung Audio Remote appuyez sur l icône Audio Remote sur votre téléphone puis suivez les instructions affichées à l écran AudioRemote L application Samsung Audio Remote n est compatible qu avec les téléphones portables Android qui exécutent la version 3 0 d Android ou une...

Страница 99: ...us pouvez sélectionner parmi 150 Hz 300 Hz 600 Hz 1 2 KHz 2 5 KHz 5 KHz et 10 KHz Gauche Droite et chaque réglage peut être défini entre 6 6 Haut Bas Si l image et le son ne sont pas synchronisés entre votre téléviseur et la Soundbar sélectionnez AUDIOSYNC dans les paramètres audio puis réglez le décalage audio de 0 à 300 millisecondes à l aide des touches Haut Bas Sauf le mode USB La synchronisat...

Страница 100: ...ING en mode BT appuyez et maintenez enfoncée la touche Source pendant plus de 5 secondes Reportez vous à la page 17 pour les détails FonctionAutoPowerDown L appareil s éteint automatiquement dans les situations suivantes Mode D IN HDMI BT USB S il n y a pas de signal audio pendant 5 minutes Mode AUX Si le câble audio AUX est déconnecté pendant 5 minutes Si aucune TOUCHE n est activée pendant 8 heu...

Страница 101: ... ON Surround VOL WOOFER SOUND MODE Bluetooth POWER Bluetooth POWER Appuyez sur cette touche pour activer et désactiver la fonction Bluetooth POWER ou la fonction de restriction du volume FonctionBluetoothPOWER Si la Soundbar est en mode de veille et la fonction Bluetooth POWER est activée lorsque vous allumez un appareil Bluetooth connecté précédemment la Soundbar s allume automatiquement et se co...

Страница 102: ...externes Pourplusd informations reportez vousaumanueld utilisateurdu téléviseur Après avoir installé la Soundbar vous pouvez régler le volume de la Soundbar à l aide de la télécommande IR fournie avec le téléviseur Samsung Si vous ne voulez pas utiliser cette fonction une fois la Soundbar activée appuyez et maintenez enfoncée la touche Surround pendant 5 secondes OFF TVREMOTE apparaît sur l affich...

Страница 103: ...ffet Entrée Sortie Sanskitd enceintesarrière sansfil Aveckitd enceintesarrière sansfil Surround Surround VOL WOOFER SOUND MODE Bluetooth POWER ON 2 0 canaux 2 1 canaux 4 1 canaux 5 1 canaux 2 1 canaux 4 1 canaux SOUNDMODE Surround VOL WOOFER SOUND MODE Bluetooth POWER STANDARD 2 0 canaux 2 1 canaux 4 1 canaux 5 1 canaux 2 1 canaux 4 1 canaux MUSIC 2 0 canaux 2 1 canaux 4 1 canaux 5 1 canaux 2 1 ca...

Страница 104: ...aque métallique bois etc Si possible fixez les vis portantes dans les poteaux Achetez les vis de support mural selon le type et l épaisseur du mur sur lequel vous souhaitez monter la Soundbar Diamètre M5 Longueur 35 mm ou plus recommandés Connectez les câbles depuis l unité aux appareils externes avant d installer la Soundbar sur le mur Assurez vous que l unité est éteinte et débranchée avant de l...

Страница 105: ...0mm 3 Appuyez avec la pointe d un stylo ou d un crayon bien taillé au centre des images B TYPE à chaque extrémité du guide pour marquer les trous des vis portantes puis retirez le Guidedefixationmurale CENTER LINE A B B A A TYPE 616mm B TYPE 360mm B CENTER LINE 4 À l aide d une mèche appropriée faites un trou dans le mur au niveau de chaque marque Si les marques ne correspondent pas aux positions ...

Страница 106: ...bar ArrièredelaSoundbar ExtrémitédroitedelaSoundbar Les fixations droite et gauche ont des formes différentes Veillez à bien les positionner FixationmuraleD FixationmuraleG 7 Installez la Soundbar sur laquelle sont fixés les Supportsdefixationmurale en accrochant les Supportsdefixationmurale sur les Visdefixation sur le mur Inclinez légèrement la Soundbar pour insérer les deux têtes de Visdefixati...

Страница 107: ...éléviseur est monté sur un mur Pour votre sécurité si vous ne montez pas l unité sur un mur installez la sur une surface plate et solide où elle ne risque pas de tomber 10 MISEÀJOURDU LOGICIEL Samsungpeutproposerdesmisesàjourpourle microprogrammedusystèmedelaSoundbar prochainement PortUSB HDMI OUT TV ARC DC 24V DC 24V USB 5V 0 5A AUX IN HDMI IN DIGITAL AUDIO IN OPTICAL USB 5V 0 5A Câbleadaptateur ...

Страница 108: ... équipé de la fonction DUAL BOOT Si la mise à jour du micrologiciel échoue vous pouvez exécuter à nouveau la mise à jour SiUPDATEnes affichepas 1 Éteignez la Soundbar déconnectez et ensuite reconnectez le périphérique de stockage qui contient le fichier de mise à jour au port USB de la Soundbar 2 Débranchez le cordon d alimentation de la Soundbar rebranchez le puis allumez la Soundbar La mise à jo...

Страница 109: ...pour annuler cette fonction Levolumeest ilrégléàsonminimum Réglez le volume Latélécommandenefonctionnepas Lespilessont elleusées Remplacez avec des piles neuves Est cequeladistanceentrelatélécommandeetl unitéprincipaleSoundbaresttropgrande Rapprochez la télécommande de l unité principale Soundbar LaLEDrougesurlecaissondebasseclignoteetlecaissondebasseneproduitaucunson Ceproblèmepeutseproduiresilec...

Страница 110: ...E Pour toute requête et demande concernant les sources ouvertes contactez Samsung via e mail à l adresse oss request samsung com 14 REMARQUE IMPORTANTEÀ PROPOSDU SERVICE Les figures et les illustrations du présent Manuel d utilisation sont fournies à titre de référence uniquement et peuvent différer de l apparence du produit réel Des frais supplémentaires pourront vous être facturés dans les cas s...

Страница 111: ...ission SRD max 25 mW à 5 725 GHz 5 825 GHz REMARQUES Samsung Electronics Co Ltd se réserve le droit de modifier les caractéristiques sans préavis Le poids et les dimensions sont approximatifs Pour plus d informations sur l alimentation et la consommation électriques reportez vous à l étiquette collée sur le produit Étiquette Bas de l Unité Principale Soundbar Consommationélectriquetotaleenveille W...

Страница 112: ...oduit ses accessoires ou sa documentation indique que ni le produit ni ses accessoires électroniques usagés chargeur casque audio câble USB etc ne peuvent être jetés avec les autres déchets ménagers La mise au rebut incontrôlée des déchets présentant des risques environnementaux et de santé publique veuillez séparer vos produits et accessoires usagés des autres déchets Vous favoriserez ainsi le re...

Страница 113: ...ne contrassegnata con questo simbolo è di tipo CC Attenzione consultare le Istruzioni per l uso Questo simbolo indica all utente la necessità di consultare il manuale dell utente per ottenere ulteriori informazioni sulla sicurezza AVVERTENZA Per ridurre i rischi d incendio e di scosse elettriche non esporre l apparecchio a pioggia o umidità ATTENZIONE PER EVITARE SCOSSE ELETTRICHE INSERIRE CORRETT...

Страница 114: ...re il cavo di alimentazione dalla presa di corrente Il prodotto non è destinato all uso industriale Questo prodotto è destinato esclusivamente all uso personale Se il prodotto o il disco vengono conservati a basse temperature potrebbe formarsi della condensa Trasportando l unità in inverno attendere circa 2 ore prima di utilizzarla in modo che ritorni a temperatura ambiente 5 Le batterie utilizzat...

Страница 115: ...ofer 6 Connessione automatica tra il subwoofer e la Soundbar 6 Connessione manuale del subwoofer in caso di connessione automatica non riuscita 7 04 CollegamentoallaTV 9 Metodo 1 Collegamento mediante un cavo 9 Collegamento tramite un cavo ottico 9 Collegamento di una TV tramite un cavo HDMI 10 Metodo 2 Connessione wireless 11 Connessione di una TV mediante Bluetooth 11 05 Collegamentodiundisposit...

Страница 116: ...l telecomando di una TV 24 Utilizzo dei tasti nascosti 25 Specifiche di uscita per diverse modalità di effetti sonori 25 09 Installazionedelsupportoaparete 26 Precauzioni per l installazione 26 Componenti per il montaggio a parete 26 Rimozione della Soundbar dalla parete 29 10 Aggiornamentodelsoftware 29 Procedura per l aggiornamento 30 Se non compare la scritta UPDATE 30 11 Risoluzionedeiproblemi...

Страница 117: ...gio a parete della Soundbar consultare la pagina 26 I cavi adattatori da micro USB a USB e i cavi HDMI sono venduti separatamente Per effettuarne l acquisto contattare un Centro servizi Samsung o l Assistenza clienti Samsung L aspetto degli accessori può variare leggermente dalle illustrazioni riportate sopra Inserimentodellebatterieprimadell utilizzodeltelecomando 2batterieAA Far scorrere il cope...

Страница 118: ...e Consente di selezionare il modo di ingresso della sorgente Mododiingresso Visualizzazione Ingresso digitale ottico D IN Ingresso ARC HDMI OUT D IN TV ARC Conversione automatica Ingresso AUX AUX Ingresso HDMI HDMI Modo BLUETOOTH BT Modo USB USB Per attivare il modo BTPAIRING cambiare la sorgente passando al modo BT quindi tenere premuto il tasto Sorgente per almeno 5 secondi Quando si inserisce i...

Страница 119: ...ar AUXIN Collegare all uscita analogica di un dispositivo esterno HDMIIN Consente l ingresso di segnali audio e video contemporaneamente utilizzando un cavo HDMI Collegare all uscita HDMI di un dispositivo esterno HDMIOUT TV ARC Collegare alla presa jack HDMI ARC di una TV DC24V Ingressoalimentazione Collegare l adattatore CA CC Quando si disconnette il cavo di alimentazione dell adattatore CA CC ...

Страница 120: ...Etichetta Fondo dell unità principale della Soundbar POWER Retrodelsubwoofer 1 Cavodi alimentazione Collegamentoalla reteelettrica HDMI OUT TV ARC DC 24V DC 24V HDMI IN DC 24V Fondodell unità principaledella Soundbar 2 AdattatoreCA CC 3 Cavodi alimentazione Collegamento allareteelettrica Assicurarsi di poggiare l adattatore CA CC orizzontalmente su un tavolo o sul pavimento Se si posiziona l adatt...

Страница 121: ...one riuscita funzionamento normale Lampeggiante Ripristino della connessione Verificare che il cavo di alimentazione sia collegato correttamente all unità principale della Soundbar o attendere qualche istante Se continua a lampeggiare provare a connettere manualmente il subwoofer Consultare la pagina 7 Rosso Acceso Standby con l unità principale della Soundbar spenta Verificare che il cavo di alim...

Страница 122: ...ndi poi scompare S u r r o u n d S O U N D M O D E B l u e t o o t h P O W E R V O L W O O F E R S O U N D B A R 5 Sec IDSET 5 Quando l indicatore blu del subwoofer lampeggia accendere la Soundbar premendo il tasto Alimentazione sul lato destro dell unità principale o sul telecomando 6 Una volta stabilita con successo la connessione l indicatore blu sul retro del subwoofer smette di lampeggiare e ...

Страница 123: ...incipale e il subwoofer si frappone una parete metallica o di cemento armato il sistema potrebbe non funzionare affatto in quanto il segnale wireless non è in grado di attraversare il metallo PRECAUZIONI Le antenne di ricezione wireless sono integrate nel subwoofer wireless Tenere le unità al riparo da acqua e umidità Per prestazioni di ascolto ottimali assicurarsi che l area circostante il diffus...

Страница 124: ...olume e alla funzione di muto Metodo1 Collegamentomedianteuncavo Collegamentotramiteuncavoottico DIGITAL AUDIO IN OPTICAL USB 5V 0 5A AUX IN OPTICAL OUT Cavoottico FondodellaSoundbar D IN LatodestrodellaSoundbar 1 Collegare la presa jack DIGITALAUDIOIN OPTICAL della Soundbar alla presa jack OPTICAL OUT della TV con un cavo ottico digitale 2 Premere il tasto Sorgente sul pannello laterale destro o ...

Страница 125: ...disponibile solamente nel modo D IN CollegamentodiunaTVtramiteuncavoHDMI Verificarelapresenzadel ARC presso laportaHDMIINdellapropriaTV HDMI OUT TV ARC HDMI IN HDMI IN ARC CavoHDMI nonfornitoin dotazione FondodellaSoundbar TVARC VerificarelaportaHDMIOUT TV ARC dell unitàprincipale dellaSoundbar LatodestrodellaSoundbar 1 Con la Soundbar e la TV accese collegare il cavo HDMI non fornito in dotazione...

Страница 126: ...ossibile percepire l audio stereo senza i fastidi dovuti al cablaggio È possibile connettere solo una TV alla volta Laconnessioneiniziale 1 Premere il tasto Sorgente sul pannello laterale destro o sul telecomando quindi selezionare il modo BT 2 Passare da BT a BTPAIRING Se viene visualizzato il messaggio BTREADY tenere premuto il tasto Sorgente sul pannello laterale destro della Soundbar o sul tel...

Страница 127: ...ar e il dispositivo Bluetooth supera i 10 m La Soundbar si spegne automaticamente dopo 5 minuti nello stato Pronto La Soundbar potrebbe non essere in grado di effettuare la ricerca o la connessione Bluetooth correttamente nelle seguenti condizioni Se la Soundbar è circondata da un potente campo elettrico Se si effettua l associazione di diversi dispositivi Bluetooth con la Soundbar in contemporane...

Страница 128: ...bar LettoreBD DVD Decoder Consolepervideogiochi LatodestrodellaSoundbar 1 Cavoottico X X Collegare il DIGITALAUDIOIN OPTICAL ell unità principale alla presa jack OPTICAL OUT del dispositivo sorgente utilizzando un cavo ottico digitale Y Y Selezionare il modo D IN premendo il tasto Sorgente sul pannello laterale destro o sul telecomando 2 Cavoaudio AUX X X Collegare l AUXIN Audio dell unità princip...

Страница 129: ...tazione dalla presa jack HDMIIN situata sul retro del prodotto alla presa jack HDMI OUT del dispositivo digitale 2 Collegare un cavo HDMI non fornito in dotazione dalla presa jack HDMIOUT TV ARC situata sul retro del prodotto alla presa jack HDMI IN della TV 3 Premere il tasto Sorgente sul pannello laterale destro o sul telecomando quindi selezionare il modo HDMI 4 Il modo HDMI èvisualizzato sul p...

Страница 130: ... femmina tipo A dall altro lato alla presa jack micro USB della Soundbar Il cavo adattatore da micro USB a USB è venduto separatamente Per effettuarne l acquisto contattare un Centro servizi Samsung o l Assistenza clienti Samsung 2 Collegare il dispositivo USB all estremità femmina del cavo adattatore 3 Premere il tasto Sorgente sul pannello laterale destro o sul telecomando quindi selezionare il ...

Страница 131: ...1 16KHz 48KHz 56 128kbps Wave_Format_ MSAudio2 16KHz 48KHz 56 128kbps aac AAC 16KHz 96KHz 48 320kbps AAC LC 16KHz 96KHz 128 192kbps 5 1 canali 320 kbps HE AAC 24KHz 96KHz 48 64kbps 5 1 canali 160 kbps wav 16KHz 48KHz fino a 3000 kbps ogg OGG 1 1 0 16KHz 48KHz 50 500kbps flac FLAC 1 1 0 FLAC 1 2 1 16KHz 96KHz fino a 3000 kbps Se nel dispositivo USB sono presenti troppi file e cartelle la Soundbar p...

Страница 132: ...telecomando per almeno 5 secondi per visualizzare BTPAIRING 3 Selezionare AV SamsungSoundbarMxxxM Series all elenco visualizzato Quando una Soundbar è connessa al dispositivo Bluetooth nel display frontale viene visualizzato il messaggio NomedispositivoBluetooth BT 4 Riprodurre file musicali dal dispositivo connesso tramite Bluetooth tramite la Soundbar Seildispositivononriesceaconnettersi Se la v...

Страница 133: ...ad esempio forni a microonde LAN wireless e così via devono essere tenuti lontano dall unità principale della Soundbar Il Soundbar supporta i dati SBC 44 1kHz 48kHz Effettuare il collegamento esclusivamente a un dispositivo Bluetooth che supporti la funzione A2DP AV Non è possibile collegare il Soundbar a un dispositivo Bluetooth che supporta soltanto la funzione HF Hands Free Una volta stabilito ...

Страница 134: ...ispositivi compatibili con Bluetooth attraverso una connessione wireless a breve raggio Il dispositivo Bluetooth può provocare rumorosità o malfunzionamenti a seconda delle condizioni di utilizzo se Una parte del corpo è a contatto con il sistema di ricezione di trasmissione del dispositivo Bluetooth o dell Soundbar È soggetto a variazioni elettriche dovute a interferenze derivanti da riflessioni ...

Страница 135: ...ng Audio Remote da Google Play Ricercadimercato SamsungAudioRemote Avviodell appSamsungAudioRemote Per avviare e utilizzare l app Samsung Audio Remote toccare l icona Audio Remote sul dispositivo smart e seguire le istruzioni su schermo AudioRemote L app Samsung Audio Remote è compatibile solo con telefoni cellulari Android e dispositivi mobili con Android OS 3 0 o versioni successive ...

Страница 136: ...za È possibile effettuare una selezione Sinistro Destro tra 150 Hz 300 Hz 600 Hz 1 2 KHz 2 5 KHz 5 KHz e 10 KHz ogni selezione può essere ulteriormente regolata su un impostazione di 6 6 Su Giù Se il video e l audio della TV e della Soundbar non sono sincronizzati selezionare AUDIOSYNC in Impostazioni audio quindi impostare il ritardo audio tra 0 300 millisecondi utilizzando i tasti Su Giù Ad ecce...

Страница 137: ... modo BTPAIRING nel modo BT tenere premuto il tasto Sorgente per più di 5 secondi Per i dettagli consultare la pagina 17 FunzioneAutoPowerDown L unità si spegne automaticamente nelle situazioni elencate di seguito Modalità D IN HDMI BT USB Se non è presente un segnale audio per 5 minuti Modalità AUX Se il cavo audio AUX è scollegato per 5 minuti Se non è presente alcun input KEY per 8 ore quando i...

Страница 138: ...luetooth POWER Bluetooth POWER Premere per attivare o disattivare la funzione Bluetooth POWER o la limitazione del volume FunzioneBluetoothPOWER Se la Soundbar è nel modo standby e la funzione Bluetooth POWER è accesa all accensione di un dispositivo Bluetooth già connesso in precedenza la Soundbar si accende automaticamente e si connette al dispositivo tramite Bluetooth Se la funzione di Bluetoot...

Страница 139: ...erno Per ulterioriinformazioni consultareil manualeutentedellaTV Dopo aver installato la Soundbar è possibile regolare il volume della Soundbar utilizzando il telecomando a infrarossi fornito in dotazione con una TV Samsung Se non si desidera usufruire di questa opzione è sufficiente tenere premuto il tasto Surround per 5 secondi quando la Soundbar è accesa Sul display della Soundbar viene visuali...

Страница 140: ...ita Esclusokitdidiffusori posterioriwireless Inclusokitdidiffusori posterioriwireless Surround Surround VOL WOOFER SOUND MODE Bluetooth POWER ON 2 0 canali 2 1 canali 4 1 canali 5 1 canali 2 1 canali 4 1 canali SOUNDMODE Surround VOL WOOFER SOUND MODE Bluetooth POWER STANDARD 2 0 canali 2 1 canali 4 1 canali 5 1 canali 2 1 canali 4 1 canali MUSIC 2 0 canali 2 1 canali 4 1 canali 5 1 canali 2 1 can...

Страница 141: ...gno ecc Se possibile fissare le viti di supporto ai montanti della parete Acquistare viti per il montaggio a parete a seconda della tipologia e dello spessore del muro su cui si intende montare la Soundbar Diametro M5 Lunghezza si consiglia 35 mm o maggiore Collegare i cavi dall unità ai dispositivi esterni prima di installare la Soundbar sulla parete Assicurarsi che l unità sia spenta e scollegat...

Страница 142: ...ita temperata forare il centro delle immagini B TYPE su ciascuna estremità della guida per contrassegnare i punti destinati ai fori delle viti di supporto quindi rimuovere la Guidaperilmontaggioaparete CENTER LINE A B B A A TYPE 616mm B TYPE 360mm B CENTER LINE 4 Utilizzando una punta da trapano delle giuste dimensioni praticare un foro nella parete in corrispondenza di ciascun segno Se i segni no...

Страница 143: ... RetrodellaSoundbar EstremitàdestradellaSoundbar I supporti di sinistra e di destra hanno forme diverse Assicurarsi di posizionarli correttamente SupportoapareteD SupportoapareteS 7 Installare la Soundbar con gli annessi Supportipermontaggioaparete appendendo i Supportipermontaggioa parete alle Rondelledifissaggio sulla parete Inclinare leggermente la Soundbar per inserire le teste di entrambe le ...

Страница 144: ... la TV è montata a parete Per motivi di sicurezza se non si monta l unità a parete si raccomanda di installarla su una superficie piana e sicura da dove è improbabile che cada 10 AGGIORNAMENTO DELSOFTWARE InfuturoSamsungpotrebbefornire aggiornamentidelfirmwaredelsistemadella Soundbar PortaUSB HDMI OUT TV ARC DC 24V DC 24V USB 5V 0 5A AUX IN HDMI IN DIGITAL AUDIO IN OPTICAL USB 5V 0 5A Cavoadattato...

Страница 145: ...tto ha una funzione DUAL BOOT Se il firmware non riesce a completare l aggiornamento sarà possibile aggiornare nuovamente il firmware Senoncomparelascritta UPDATE 1 Spegnere la Soundbar scollegare e ricollegare il dispositivo di archiviazione che contiene i file di aggiornamento alla porta USB della Soundbar 2 Scollegare il cavo di alimentazione della Soundbar ricollegarlo quindi accendere la Soun...

Страница 146: ...oèattiva Premere il tasto VOL per annullare la funzione Ilvolumeèimpostatoalminimo Regolare il volume Iltelecomandononfunziona Lebatteriesonoesaurite Sostituirle con batterie nuove Ladistanzatrailtelecomandoel unitàprincipaledellaSoundbarètroppa Avvicinare il telecomando all unità principale della Soundbar IlLEDrossosulsubwooferlampeggiaeilsubwoofernonemettealcunsuono Ilproblemapuòverificarsiseils...

Страница 147: ...N SOURCE Per inviare richieste e domande sulle open source contattare Samsung tramite e mail oss request samsung com 14 NOTA IMPORTANTESUL SERVIZIO Le figure e le illustrazioni del presente manuale utente sono fornite soltanto come riferimento Possono differire rispetto all aspetto effettivo del prodotto È possibile che vengano addebitate delle spese amministrative nei seguenti casi a l uscita del...

Страница 148: ...rasmettitore SRD 25 mW a 5 725 GHz 5 825 GHz NOTE Samsung Electronics Co Ltd si riserva il diritto di modificare le specifiche senza preavviso Peso e dimensioni sono approssimativi Per ulteriori informazioni sull alimentazione e il consumo di energia vedere l etichetta applicata al prodotto Etichetta Fondo dell Unità Principale della Soundbar Consumoenergeticocomplessivoin standby W 2 9W Bluetooth...

Страница 149: ...n devono essere smaltiti con altri rifiuti al termine del ciclo di vita Per evitare eventuali danni all ambiente o alla salute causati dallo smaltimento dei rifiuti non corretto si invita l utente a separare il prodotto e i suddetti accessori da altri tipi di rifiuti conferendoli ai soggetti autorizzati secondo le normative locali Gli utenti domestici in alternativa alla gestione autonoma di cui s...

Страница 150: ... 93 33 kosztpołączeniawedługtaryfy operatora www samsung com pl support HUNGARY 0680SAMSUNG 0680 726 7864 www samsung com hu support Country Contact Centre Web Site AUSTRIA 0800 SAMSUNG 0800 7267864 OnlyforDealers 0810 112233 www samsung com at support SWITZERLAND 08007267864 0800 SAMSUNG www samsung com ch support German www samsung com ch_fr support French CZECH 800 SAMSUNG 800 726786 www samsun...

Отзывы: