background image

ENG - 9

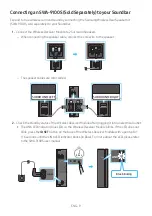
Connecting an SWA-9100S (Sold Separately) to your Soundbar

Expand to true wireless surround sound by connecting the Samsung Wireless Rear Speaker Kit  

(SWA-9100S, sold separately) to your Soundbar. 

1. 

Connect the Wireless Receiver Module to 2 Surround Speakers.


– When connecting the speaker cable, connect the core wire to the speaker.

SURROUND-RIGHT

SURROUND-RIGHT


– The speaker cables are color coded.

SURROUND-LEFT

ID SET

L

R

SURROUND SPEAKERS OUT

SPEAKER IMPEDANCE : 3Ω

POWER

ID SET

L

R

SURROUND SPEAKERS OUT

SPEAKER IMPEDANCE : 3Ω

SURROUND-RIGHT

SURROUND-LEFT

SURROUND-RIGHT

2. 

Check the standby status of the Wireless Receiver Module after plugging it into an electrical outlet.


The LINK LED indicator (blue LED) on the Wireless Receiver Module blinks. If the LED does not 
blink, press the 

ID SET

 button on the back of the Wireless Receiver Module with a pen tip for 

5~6 seconds until the LINK LED indicator blinks (in Blue). For more about the LED, please refer 
to the SWA-9100S user manual.

ID SET

L

R

SURROUND SPEAKERS OUT

SPEAKER IMPEDANCE : 3Ω

POWER

POWER

ID SET

SURROUND SPEAKERS OUT

SPEAKER IMPEDANCE : 3Ω

STANDBY

LINK

STANDBY

LINK

Blue blinking

5 Sec

Содержание HW-A445

Страница 1: ...HW A445 FULL MANUAL Imagine the possibilities Thank you for purchasing this Samsung product To receive more complete service please register your product at www samsung com register...

Страница 2: ...is symbol instructs the user to consult the user manual for further safety related information WARNING To reduce the risk of fire or electric shock do not expose this appliance to rain or moisture To...

Страница 3: ...and receiver Connecting the equipment to an outlet that is on a different circuit than the radio or TV Consulting the dealer or an experienced radio TV technician for help FCCRadiationExposureStatemen...

Страница 4: ...the power requirements listed on the identification sticker located on the bottom of your product Install your product horizontally on a suitable base furniture with enough space around it for ventil...

Страница 5: ...lation components connections and product specifications FULLMANUAL You can access the FULL MANUAL on Samsung s on line customer support center by scanning the QR code on the left To see the manual on...

Страница 6: ...matic connection between the Subwoofer and the Soundbar 6 Manually connecting the Subwoofer if automatic connection fails 7 Connecting an SWA 9100S Sold Separately to your Soundbar 9 04 Connectingtoyo...

Страница 7: ...tput specifications for the different sound effect modes 24 09 InstallingtheWallMount 25 Installation Precautions 25 Wallmount Components 25 10 PlacingtheSoundbaronaTVstand 27 11 SoftwareUpdate 28 Upd...

Страница 8: ...supply and power consumption refer to the label attached to the product Label Bottom of the Soundbar Main Unit To purchase additional components or optional cables contact a Samsung Service Center or...

Страница 9: ...e level appears on the Soundbar s front display Source Button Selects the source input mode Inputmode Display Optical Digital input D IN BLUETOOTH mode BT USB mode USB To turn on BTPAIRING mode change...

Страница 10: ...ut of an external device USB 5V0 5A Connect a USB device here to play music files stored on the USB device through the Soundbar POWER Connect the Soundbar s AC power cable When disconnecting the power...

Страница 11: ...ations below For more information about the required electrical power and power consumption refer to the label attached to the product Label Bottom of the Soundbar Main Unit RearofSubwoofer PowerCord...

Страница 12: ...ofer LED Status Description Resolution Blue On Successfully connected normal operation Blinking Recovering the connection Check if the power cable attached to the main Soundbar unit is connected prope...

Страница 13: ...fer turns off and the blue indicator blinks 5 Sec RearofSubwoofer 2 Press and hold the Upbutton on the remote control for at least 5 seconds The IDSET message appears on the display of the Soundbar fo...

Страница 14: ...he Soundbar near the Soundbar interference may cause some sound interruption The maximum transmission distance of the main unit s wireless signal is about 32 8 ft 10 m but may vary depending on your o...

Страница 15: ...WER IDSET L R SURROUNDSPEAKERSOUT SPEAKERIMPEDANCE 3 SURROUND RIGHT SURROUND LEFT SURROUND RIGHT 2 Check the standby status of the Wireless Receiver Module after plugging it into an electrical outlet...

Страница 16: ...logoisonthetop CAUTION If your Soundbar was playing music when it connects to the SWA 9100S you may hear some stuttering from the woofer as the connection finalizes 4 Check if the LINK LED is solid bl...

Страница 17: ...as well as the volume and mute Method1 ConnectingwithaCable When the audio in a broadcast is encoded in Dolby Digital and the Digital Output Audio Format on your TV is set to PCM we recommend that yo...

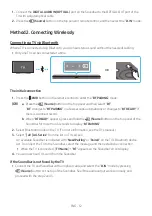
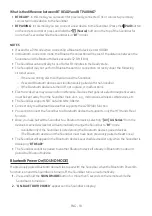
Страница 18: ...r changes to BTREADY if there is a connect record b When BTREADY appears press and hold the Source button on the top panel of the Soundbar for more than 5 seconds to display BTPAIRING 2 Select Bluetoo...

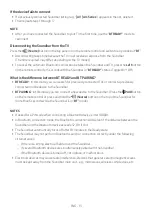
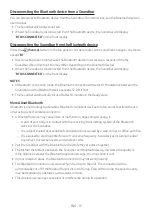
Страница 19: ...ted mobile device to the Soundbar BTPAIRING In this mode you can connect a new device to the Soundbar Press the PAIR button on the remote control or press and hold the Source button on the top of the...

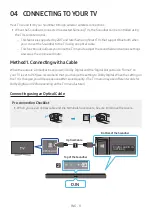
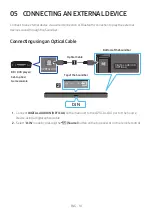
Страница 20: ...ingusinganOpticalCable OPTICAL OUT USB 5V 0 5A DIGITAL AUDIO IN OPTICAL TopoftheSoundbar D IN OpticalCable BottomoftheSoundbar BD DVDplayer Set topbox Gameconsole 1 Connect DIGITALAUDIOIN OPTICAL on t...

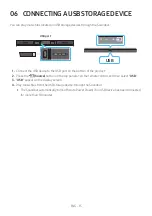
Страница 21: ...OPTICAL USBport 1 Connect the USB device to the USB port on the bottom of the product 2 Press the Source button on the top panel or on the remote control and then select USB 3 USB appears in the displ...

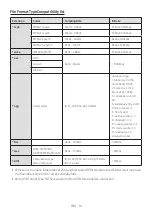
Страница 22: ...size 0 1024 2 block size 1 512 block size 1 4096 3 codebook counter 64 4 codebook entry 640 5 floor counter 2 6 floor type 0 7 residua counter 2 8 dimension 2 9 mapping counter 2 10 mode counter 2 11...

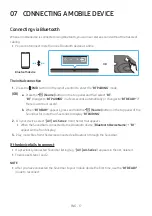
Страница 23: ...s to BTREADY if there is a connect record b When BTREADY appears press and hold the Source button on the top panel of the Soundbar for more than 5 seconds to display BTPAIRING 2 On your device select...

Страница 24: ...enerate electromagnetic waves must be kept away from the Soundbar main unit e g microwaves wireless LAN devices etc The Soundbar supports SBC data 44 1kHz 48kHz Connect only to a Bluetooth device that...

Страница 25: ...tooth Bluetooth is a technology that enables Bluetooth compliant devices to interconnect easily with each other using a short wireless connection A Bluetooth device may cause noise or malfunction depe...

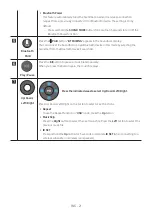
Страница 26: ...E VOL WOOFER SOUND MODE PAIR Press to cycle through the available sound modes STANDARD SURROUNDSOUND orBASSBOOST STANDARD Outputs the original sound SURROUNDSOUND Provides a wider sound field than sta...

Страница 27: ...g the Soundbar from the Bluetooth device s search list Play Pause VOL WOOFER SOUND MODE PAIR Press the p button to pause a music file temporarily When you press the button again the music file plays V...

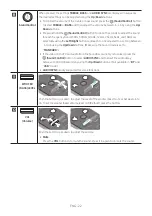
Страница 28: ...ized press the SoundControl button to select AUDIOSYNC and then set the audio delay between 0 300milliseconds by using the Up Down buttons Not available in BT and USB mode AUDIOSYNC is only supported...

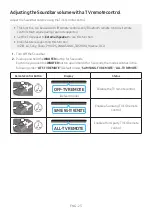
Страница 29: ...Off the Soundbar 2 Push up and hold the WOOFER button for 5 seconds Each time you push the WOOFER button up and hold it for 5 seconds the mode switches in the following order OFF TVREMOTE Default mode...

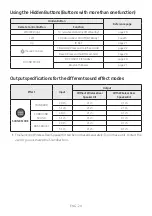
Страница 30: ...E DRC ON OFF Standby page 20 Bluetooth Power page 21 Outputspecificationsforthedifferentsoundeffectmodes Effect Input Output WithoutWirelessRear SpeakerKit WithWirelessRear SpeakerKit SOUNDMODE Surrou...

Страница 31: ...ng to the type and thickness of the wall you want to mount the Soundbar on Diameter M5 Length 1 3 8 inches 35 mm or longer recommended Connect cables from the unit to external devices before you insta...

Страница 32: ...ppropriately sized drill bit drill a hole in the wall at each marking If the markings do not correspond to the positions of studs make sure you insert appropriate anchors into the holes before you ins...

Страница 33: ...Wall Mounts and then slide the Bracket Wall Mounts down so that the Bracket Wall Mounts rest securely on the Holder Screws 10 PLACINGTHE SOUNDBARONA TVSTAND Place the Soundbar on a TV stand 1 2inches...

Страница 34: ...Important Make sure there are no music files on the USB thumb drive This may cause the firmware update to fail 2 Go to https www samsung com us support downloads on your computer select Enter Model N...

Страница 35: ...USB device while updates are being applied After the update is completed the user setup in the Soundbar is initialized so you can reset your settings We recommend you write down your settings so that...

Страница 36: ...Select Soundbar The cable connection to the Soundbar may not be loose Remove the cable and connect again Remove the power cord completely reconnect and turn the power on Reset the product and try aga...

Страница 37: ...to the Soundbar If a part of your body is in contact with the Bluetooth transceiver or the product is installed on metal furniture sound may drop out Check the installation environment and conditions...

Страница 38: ...product can wake with a button press on the chassis from sleep mode ENERGYSTARqualifiedmodelonly Theother models As an ENERGY STAR Partner Samsung has determined that this product or product models m...

Страница 39: ...10 75 AMPLIFIER Rated Output power 40W x 2 6 ohm Supported play formats DTS 2 0 sound is played in DTS format LPCM 2ch Dolby Audio supporting Dolby Digital DTS Subwoofer Name PS WA45T Weight 9 5 lbs...

Страница 40: ...which damage this product or result in service problems incorrect electrical line voltage fluctuations and surges customer adjustments and failure to follow operating instructions cleaning maintenance...

Страница 41: ...Ltd All rights reserved QUESTIONS OR COMMENTS Country IN THE US 1 800 SAMSUNG 726 7864 www samsung com us support Samsung Electronics America Inc 85 Challenger Road Ridge eld Park NJ 07660 Samsung Ser...

Отзывы: