background image

8_


installing your dryer 

installing your dryer

TOOLS NEEDED FOR INSTALLATION

Hire a professional to install this dryer properly. If there is a service call performed as a result of poor setup, 
adjustment, and connection, it is considered the responsibility of the installer. If you install the dryer, you are 
responsible.
Make sure you have everything necessary for proper installation.

1. 

A GROUNDED ELECTRICAL OUTLET is required. See Electrical Requirements.

2. 

A POWER CORD for electric dryers (except Canada).

3. 

GAS LINES (if a gas dryer) must meet national and local codes.

4. 

EXHAUST SYSTEM – must be rigid metal or flexible stiff-walled metal exhaust ducting. 
See the exhaust requirements on pages 8-10.

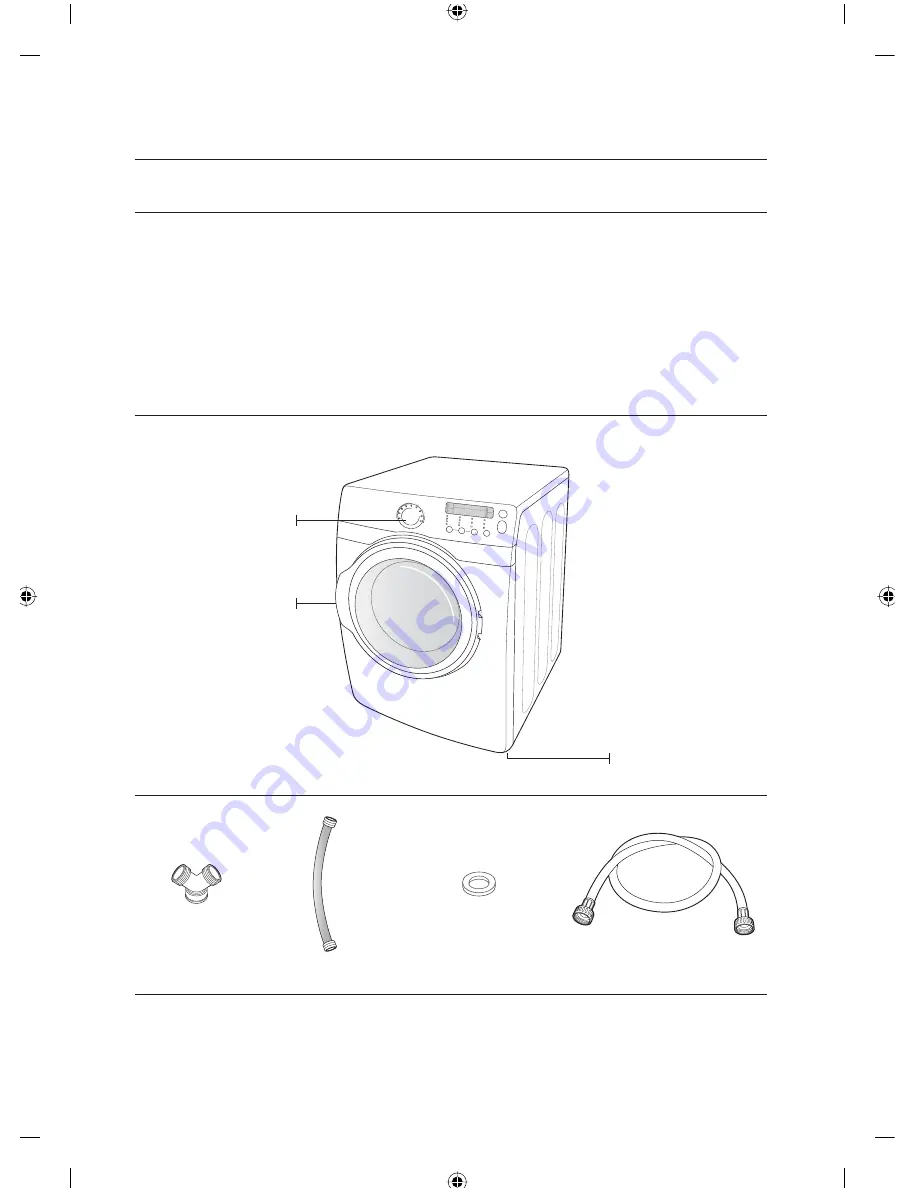
SEE DRYER EXTERIOR

“Y”-connector

Short inlet hose

Rubber Washer

Long inlet hose

Adjustable legs

Control panel

Door

DV350AE-02821A-05_EN.indd   Sec5:8

DV350AE-02821A-05_EN.indd   Sec5:8

2011-03-28   ¿ÀÈÄ 4:01:00

2011-03-28   ¿ÀÈÄ 4:01:00

Содержание DV350AE Series

Страница 1: ...ng this Samsung product To receive more complete service or accessory parts please register your product at or contact www samsung com register 1 800 SAMSUNG 726 7864 DV350AE DV350AG DV350AE 02821A 05_EN indd 1 DV350AE 02821A 05_EN indd 1 2011 03 28 ÀÈÄ 4 00 32 2011 03 28 ÀÈÄ 4 00 32 ...

Страница 2: ...utomatically set the drying time Precision drying has never been easier than with Samsung 5 Time Saving Our cycles are designed with you in mind All our dryers are designed to dry your clothes in less time just 42 minutes Giving you time for more important things in life 6 Energy Saving Samsung dryers are super energy efficient You can dry up to 3 01 pounds of laundry with 1kWh Also both the large...

Страница 3: ...e the risk of fire or explosion or to prevent property damage personal injury or death Do not store or use gasoline or other flammable vapors and liquids near this or any other appliance Do NOT attempt Do NOT disassemble Do NOT touch Follow directions explicity Unplug the power plug from the wall socket Make sure the machine is grounded to prevent electric shock Call the service center for help Cl...

Страница 4: ...t tamper with controls 8 Do not repair or replace any part of the appliance or attempt any servicing unless specifically recommended in the user maintenance instructions or in published user repair instructions that you understand and have the skills to carry out 9 Do not use fabric softeners or products to eliminate static unless recommended by the manufacturer of the fabric softener or product 1...

Страница 5: ...rs some spot removers turpentine waxes and wax removers Items containing foam rubber may be labeled latex foam or similarly textured rubber like materials must not be dried on a heat setting Heated foam rubber materials can under certain circumstances produce fire by spontaneous combustion Do not allow children or pets to play on in or in front of the appliance Close supervision is necessary when ...

Страница 6: ...r spontaneous combustion increases when items containing vegetable oil or cooking oil are exposed to heat Heat sources such as your dryer can warm these items allowing an oxidation reaction in the oil to occur Oxidation creates heat If this heat cannot escape the items can become hot enough to catch fire Piling stacking or storing these kinds of items may prevent heat from escaping and can create ...

Страница 7: ...or Reversal OPERATING INSTRUCTIONS TIPS 22 22 Overview of the control panel 25 Child lock 25 Drum Light 25 Changing The Language 26 Rack Dry 27 Clean the lint filter 27 Load the dryer properly 27 Getting started CARE AND CLEANING 28 28 Control Panel 28 Tumbler 28 Stainless Steel Tumbler 28 Dryer Exterior 28 Dryer Exhaust System SPECIAL LAUNDRY TIPS 29 29 Special laundry tips TROUBLESHOOTING 30 30 ...

Страница 8: ...for proper installation 1 A GROUNDED ELECTRICAL OUTLET is required See Electrical Requirements 2 A POWER CORD for electric dryers except Canada 3 GAS LINES if a gas dryer must meet national and local codes 4 EXHAUST SYSTEM must be rigid metal or flexible stiff walled metal exhaust ducting See the exhaust requirements on pages 8 10 SEE DRYER EXTERIOR Y connector Short inlet hose Rubber Washer Long ...

Страница 9: ...rafts and entry of wildlife Never use an exhaust hood with a magnetic damper The hood should have at least 12 inches 30 5 cm of clearance between the bottom of the hood and the ground or other obstruction The hood opening should point down Never install a screen over the exhaust outlet To avoid lint buildup do not exhaust the dryer directly into a window well Do not exhaust under a house or porch ...

Страница 10: ...xhaust kit Instructions are included with the kit It s important to make sure the room has enough fresh air The dryer must be located where there is no air flow obstruction On gas dryers adequate clearance as noted on the data plate must be maintained to ensure adequate air for combustion and proper dryer operation THE DRYER MUST NOT BE INSTALLED OR STORED IN AN AREA WHERE IT WILL BE EXPOSED TO WA...

Страница 11: ...from being blown into the room In the United States All dryers must be exhausted to the outside The required exhaust duct is 4inch 102mm in diameter Only those foil type flexible ducts if any specifically identified for use with the appliance by the manufacturer and that comply with the Outline for Clothes Dryer Transition Duct Subject 2158A shall be used The duct shall not be assembled with screw...

Страница 12: ...s gas supply connection Your dryer must be disconnected from the gas supply pipe system during any pressure testing of the system DO NOT reuse old flexible metal gas lines Flexible gas lines must be design certified by the American Gas Association CGA in Canada Any pipe joint compound used must be resistant to the action of any liquefied petroleum gas As a courtesy most local gas utilities will in...

Страница 13: ...ce the risk of electrical shock by providing a path of least resistance for the electrical current Gas models Your dryer has a cord with an equipment grounding conductor and a grounding plug The plug must be plugged into an appropriate outlet that is properly installed and grounded in accordance with all local codes and ordinances Do not modify the plug provided with your dryer if it doesn t fit t...

Страница 14: ...ower supply cord kit marked for use with a dryer that is U L listed and rated at a minimum of120 240 volts 30 ampere with three No 10 copper wire conductors terminated with closed loop terminals open end spade lugs with turned up ends or with tinned leads Do not reuse a power supply cord from an old dryer The power cord electric supply wiring must be retained at the dryer cabinet with a suitable U...

Страница 15: ...Y connector cannot be attached directly to the cold water faucet the short hose must be used 2 Turn the cold water faucet off 3 Attach short inlet hose to cold water faucet Screw on coupling by hand until it is seated on the faucet 4 Using pliers tighten the coupling with an additional two thirds turn Do not overtighten as it may damage the coupling 5 Attach Y connector to brass male end of small ...

Страница 16: ...nd washer side by side to allow access to gas electrical and exhaust connections Lay two of the carton cushion tops on the floor Tip your dryer on its side so it will lay across both cushion tops 2 Set your dryer back in an upright position 3 To ensure that the dryer provides optimal drying performance it must be level To minimize vibration noise and unwanted movement the floor must be a perfectly...

Страница 17: ...MODELS IMPORTANT All U S models are produced for a 3 WIRE SYSTEM CONNECTION The dryer frame is grounded to the neutral conductor at the terminal block A 4 WIRE SYSTEM CONNECTION is required for new or remodeled construction mobile homes or if local codes do not permit grounding through neutral If the 4 wire system is used the dryer frame cannot be grounded to the neutral conductor at the terminal ...

Страница 18: ...system connections 1 Loosen or remove the center terminal block screw 2 Connect the neutral wire white or center wire of the power cord to the center silver colored terminal screw of the terminal block Tighten screw 3 Connect the other wires to outer terminal block screws Tighten screws 4 Tighten the strain relief screws 5 Insert the tab of the terminal block cover into your dryer s rear panel slo...

Страница 19: ...e leveling legs 8 At this time make sure all gas connections on gas models exhaust and electrical connections are complete Plug in your dryer and check operation by using the checklist below 9 GAS MODELS ONLY DV350AG The burner may not ignite initially due to air in the gas line Allowing your dryer to operate on a heat setting will purge the line If the gas does not ignite within 5 minutes turn yo...

Страница 20: ...s possible 4 Clean all old ducts before installing your new dryer Be sure the vent flap opens and closes freely Inspect and clean the exhaust system annually Don t let a poor exhaust system slow drying by 1 Restricting your dryer with a poor exhaust system 2 Using a plastic thin foil or non metal flexible duct 3 Unnecessarily using long ducts that have many elbows 4 Having crushed or clogged ducts...

Страница 21: ...e two screws on the opposite side of the door hinge 10 Place the door on the other side and reattach it to the dryer 6 Remove two screws from the holder lever 11 Reattach the holder lever 7 Remove a screw from the door hinge 12 Reattach the screws in the remaing holes The screw mentioned in STEP 4 may not exist 01 installing your dryer WARNING DV350AE 02821A 05_EN indd Sec5 21 DV350AE 02821A 05_EN...

Страница 22: ...erature Sanitize This course allows you to sanitize garments by permeating high temperature heat deep into the fabric during the drying cycle Use this course to keep your bedding and curtains clean through sanitization Time Dry Time Dry allows you to select the desired cycle time in minutes Turn the Cycle Selector dial to Time Dry then press the Adjust Time up arrow to set the drying time Press th...

Страница 23: ...rics or for leaving some moisture in the clothing at the end of the cycle Damp Dry is designed to partially dry items Use for items that lay flat or hang to dry Temp Selection Button To select the correct temperature for the load press the Temp button An indicator light will illuminate next to the desired temperature Press the button repeatedly to scroll through the settings High For sturdy cotton...

Страница 24: ...Wrinkle Prevent button to activate this feature The indicator light above the pad will illuminate when Wrinkle Prevent is selected The load is dry and can be removed at any time during the Wrinkle Prevent cycle Adjust Time Time can be added or subtracted from the automatically set times in the Manual Dry cycles Time Dry Quick Dry Wrinkle Release cycles To add or subtract time from the cycle press ...

Страница 25: ...tor DRUM LIGHT Lights the dryer drum while the dryer is running Setting releasing If you want to set or release the Drum Light press both the Dry Level and Temp buttons simultaneously It can be set while your dryer is not only running but also when it is stopped If you do not turn the Drum Light off within 4 minutes of turning it on it is automatically turned off CHANGING THE LANGUAGE You may chan...

Страница 26: ...ulate 5 Close the dryer door 6 Use only the Time Dry Temp selection Extra Low cycle Select the time according to the moisture and weight of the items Start the dryer It may be necessary to reset the timer if a longer drying time is needed SUGGESTED ITEMS SUGGESTED TEMP SETTINGS Washable sweaters block to shape and lay flat on rack Heat Extra Low Stuffed toys cotton or polyester fiberfilled Heat Ex...

Страница 27: ... as excessive wrinkling of some fabrics GETTING STARTED 1 Load your dryer loosely DO NOT overload 2 Close the door 3 Select the appropriate cycle and options for the load see pages 20 21 4 Press the Start Pause button 5 The dryer indicator light will illuminate 6 The estimated cycle time will appear in the display The time may fluctuate to better indicate drying time remaining in the cycle When th...

Страница 28: ...equent loads STAINLESS STEEL TUMBLER To clean the stainless steel tumbler use a damp cloth with a mild non abrasive cleaner suitable for stainless steel surfaces Remove the cleaner residue and dry with a clean cloth DRYER EXTERIOR The entire dryer has a high gloss finish Clean with a soft damp cloth Do not use abrasive substances Protect the surface from sharp objects as they may scratch or damage...

Страница 29: ...move as soon as possible Cloth Diapers Use the Normal cycle and the High temperature settings for soft fluffy diapers Down filled Items jackets sleeping bags comforters etc Use the Normal cycle and the Low or Extra Low temperature setting Adding a couple of dry towels shortens drying time and absorbs moisture Pillows Use the Normal cycle Add a couple of dry towels to help the tumbling action and t...

Страница 30: ...or objects such as coins loose buttons nails etc Remove promptly It is normal to hear the dryer gas valve or heating element cycle on and off during the drying cycle Be sure the dryer is leveled properly as outlined in the installation instruction It is normal for the dryer to hum due to the high velocity of air moving through the dryer drum and exhaust system Dries unevenly Seams pockets and othe...

Страница 31: ...mple a pair of black linen pants Divide larger loads into smaller loads for drying Check pockets thoroughly before washing and drying clothes Garments still wrinkled after Wrinkle Care Small loads of 1 to 4 items work best Load fewer garments Load similar type garments Odors remain in clothing after Refresh Fabrics containing strong odors should be washed in a normal cycle Water drips from nozzle ...

Страница 32: ...bE2 Unit detects a button is being pressed for over 30secs or button is stuck Make sure a button is NOT being pressed continuously Try restarting the cycle If the problem continues call for service od Invalid Dry time Call for service hE Invalid heating Temp Call for service Et EEPROM is not communicating properly Try restarting the cycle If the problem continues call for service FE Invalid power ...

Страница 33: ...Do Not Tumble Dry Water Temperature High No Steam added to iron Hot Medium Do Not Iron Warm Low Dryclean Cold Any Heat Dry Clean Bleach No Heat Air Do Not Dry Clean Any Bleach when needed Iron Dry or Steam Temperatures Line Dry Hang to Dry Only Non Chlorine color safe Bleach when needed High Drip Dry Tumble Dry Cycle Medium Dry Flat Normal Low Permanent Press Wrinkle Resistant Wrinkle Control Gent...

Страница 34: ...nimals and small children cannot get trapped inside the appliance DECLARATION OF CONFORMITY This appliance complies with UL2158 SPECIFICATIONS TYPE FRONT LOADING DRYER DIMENSIONS Div Inches cm Div Inches cm A Height 38 6 98 1 C Depth with door open 90 49 124 5 B Width 27 68 6 D Depth 30 9 78 3 WEIGHT 121 3lb 55kg HEATER RATING 5300 W POWER CONSUMPTION NO HEAT 268 W HEATING 5445 W A B C D DV350AE 0...

Страница 35: ...change Normal dry 32 min 29 min 3 min Delicates Low No change Normal dry 27 min 24 min 3 min Sanitize High No change More dry 60 min 55 min 5 min Manual Dry Time Dry High 40 min 37 min 3 min Quick Dry High No change 30 min 27 min 3 min Steam Cycles Refresh High No change 15 min 14 min 1 min Wrinkle Care High No change 20 min 19 min 1 min 06 appendix DV350AE 02821A 05_EN indd Sec10 35 DV350AE 02821...

Страница 36: ...o be defective during the limited warranty period specified above All replaced parts and products become the property of SAMSUNG and must be returned to SAMSUNG Replacement parts and products assume the remaining original warranty or ninety 90 days whichever is longer This limited warranty covers manufacturing defects in materials and workmanship encountered in normal noncommercial use of this pro...

Страница 37: ...E PRODUCT SOLD BY SAMSUNG AND CAUSING THE ALLEGED DAMAGE WITHOUT LIMITING THE FOREGOING PURCHASER ASSUMES ALL RISK AND LIABILITY FOR LOSS DAMAGE OR INJURY TO PURCHASER AND PURCHASER S PROPERTY AND TO OTHERS AND THEIR PROPERTY ARISING OUT OF THE USE MISUSE OR INABILITY TO USE THIS PRODUCT THIS LIMITED WARRANTY SHALL NOT EXTEND TO ANYONE OTHER THAN THE ORIGINAL PURCHASER OF THIS PRODUCT IS NONTRANSF...

Страница 38: ...US ONLINE AT U S A 1 800 SAMSUNG 726 7864 www samsung com MEXICO 01 800 SAMSUNG 726 7864 www samsung com Code No DC68 02821A 05_EN DV350AE 02821A 05_EN indd Sec11 38 DV350AE 02821A 05_EN indd Sec11 38 2011 03 28 ÀÈÄ 4 01 12 2011 03 28 ÀÈÄ 4 01 12 ...

Страница 39: ...s por adquirir este producto Samsung Para que podamos brindarle un servicio más completo registre su producto en www samsung com register 1 800 SAMSUNG 726 7864 DV350AE DV350AG DV350AE 02821A 05_MES indd 1 DV350AE 02821A 05_MES indd 1 2011 03 28 ÀÈÄ 3 59 57 2011 03 28 ÀÈÄ 3 59 57 ...

Страница 40: ...illa que con Samsung 5 Ahorro de tiempo Los ciclos están diseñados pensando en usted Todas nuestras secadoras están diseñadas para secar su ropa en menos tiempo sólo en 42 minutos Así le queda tiempo para las cosas más importantes de la vida 6 Ahorro de energía Las secadoras Samsung son súper eficientes en el consumo de energía Puede secar hasta 3 01 lb 1 36 kg de ropa con 1 kWh Además tanto la gr...

Страница 41: ... o para evitar daños materiales lesiones físicas o la muerte No almacene ni utilice gasolina u otros vapores o líquidos inflamables cerca de este o cualquier otro electrodoméstico NO intente hacer nada NO desarme NO toque Siga las instrucciones fielmente Desenchufe el cable de alimentación eléctrica del tomacorriente de pared Asegúrese de que la máquina tenga buena conexión a tierra para evitar de...

Страница 42: ...e reemplace ni intente realizar el mantenimiento de cualquier pieza del electrodoméstico salvo que esté recomendado específicamente en las instrucciones de mantenimiento del usuario o en las instrucciones de reparación para el usuario publicadas y que a su juicio usted tenga la habilidad para llevarlas a cabo 9 No use suavizante para ropa o productos para evitar la estática salvo que el fabricante...

Страница 43: ... que contengan goma espuma puede estar catalogada como espuma de látex o materiales semejantes a la goma y con textura similar en la opción de secado con calor Los materiales de goma espuma que reciben calor pueden en ciertas circunstancias provocar incendios por combustión espontánea No permita que los niños o las mascotas jueguen sobre el electrodoméstico dentro de él o frente a él Se requiere d...

Страница 44: ... o aceite de cocina son expuestas al calor Las fuentes de calor tales como la secadora pueden calentar estas prendas y permitir que se produzca la oxidación del aceite a modo de reacción La oxidación genera calor Si dicho calor no tiene forma salir las prendas pueden calentarse lo suficiente como para prenderse fuego Amontonar apilar o guardar este tipo de prendas puede impedir que el calor salga ...

Страница 45: ...ersión de la puerta MANUAL DE INSTRUCCIONES SUGERENCIAS 22 22 Descripción general del panel de control 25 Seguro para niños 25 Luz del tambor 25 Cambio del idioma 26 Secado en estante 27 Limpie el filtro para pelusas 27 Cargue la secadora de manera adecuada 27 Cómo comenzar CUIDADO Y LIMPIEZA 28 28 Panel de control 28 Tambor 28 Tambor de acero inoxidable 28 Exterior de la secadora 28 Sistema de dr...

Страница 46: ...XIÓN A TIERRA Consulte la sección Requisitos eléctricos 2 UN CABLE DE ALIMENTACIÓN para las secadoras eléctricas excepto en Canadá 3 Los CONDUCTOS DE GAS si se trata de una secadora a gas deben cumplir con los códigos locales y nacionales 4 El SISTEMA DE DRENAJE debe consistir en un conducto de drenaje de metal rígido o flexible con un recubrimiento de metal resistente Consulte los requisitos para...

Страница 47: ... tiro que gire hacia afuera para evitar el reflujo de aire y el ingreso de insectos o plantas Nunca utilice una tapa de drenaje con un regulador de tiro magnético La tapa debe tener 12 pulgadas 30 5 cm de espacio libre como mínimo entre la parte inferior de la tapa y el suelo u otra obstrucción La abertura de la tapa debe apuntar hacia abajo Nunca instale un filtro sobre la salida del drenaje Para...

Страница 48: ...ficiente aire fresco La secadora debe estar ubicada donde el aire pueda fluir sin inconvenientes Para las secadoras a gas se debe mantener el espacio libre suficiente tal como figura en la placa de información para garantizar que haya aire suficiente para la combustión y el funcionamiento adecuado de la secadora NO SE DEBE INSTALAR O GUARDAR LA SECADORA EN UN ÁREA DONDE QUEDE EXPUESTA AL AGUA Y O ...

Страница 49: ... un drenaje con salida hacia el exterior El conducto de drenaje requerido tiene 4 pulgadas 102 mm de diámetro Sólo se utilizarán conductos flexibles tipo lámina metálica si los hubiera identificados específicamente para su utilización con el electrodoméstico por el fabricante y que cumplan con el Esquema para conductos de transición de secadora de ropa Tema 2158A El conducto no se montará con torn...

Страница 50: ...nte de la conexión del suministro de gas de la secadora Su secadora debe estar desconectada del sistema de suministro de gas durante las pruebas de presión del sistema NO vuelva a utilizar el viejo conducto de gas de metal flexible El diseño del conducto de gas flexible debe estar certificado por la Asociación Americana del Gas CGA en Canadá Todo compuesto de unión de tuberías utilizado debe ser r...

Страница 51: ...scarga eléctrica al ofrecer una vía de menos resistencia a la corriente eléctrica Modelos a gas Su secadora tiene un cable con un conductor de conexión a tierra del equipo y un enchufe de conexión a tierra El enchufe debe conectarse a un tomacorriente adecuado que esté correctamente instalado y conectado a tierra en conformidad con todos los códigos y ordenanzas locales No modifique el enchufe pro...

Страница 52: ...de cables de alimentación eléctrica rotulado para que se lo utilice con la secadora es decir que cuente con certificación U L y categorizado en un mínimo de 120 240 voltios 30 A con tres conductores de cobre N 10 que finalicen en terminales de bucle cerrado pernos de pala de tipo abierto con extremos rebatidos o con conductores de estaño No vuelva a utilizar un cable de alimentación eléctrica de u...

Страница 53: ...ector en forma de Y no puede conectarse directamente a la llave de agua fría se debe utilizar la manguera corta 2 Cierre la llave de agua fría 3 Conecte la manguera de entrada corta a la llave de agua fría Enrosque la unión a mano hasta que se asiente en la llave de agua 4 Ajuste la unión con dos tercios de giro adicionales utilizando la pinza No ajuste demasiado ya que se puede dañar la unión 5 A...

Страница 54: ...permitir el acceso a las conexiones de gas eléctricas y de drenaje Coloque dos de las protecciones superiores de cartón en el piso Incline la secadora hacia uno de los laterales de modo tal que quede atravesando ambas protecciones 2 Vuelva a colocar la secadora en posición vertical 3 La secadora debe estar nivelada para garantizar un secado óptimo Para minimizar las vibraciones los ruidos y los mo...

Страница 55: ...s los modelos estadounidenses fueron fabricados para una CONEXIÓN DE SISTEMAS DE 3 CABLES El armazón de la secadora está conectado a tierra al conductor neutro del bloque de terminales Se requiere una CONEXIÓN DE SISTEMAS DE 4 CABLES para las construcciones nuevas o remodeladas las casas rodantes o si los códigos locales no permiten la conexión a tierra a través del neutro Si se utiliza un sistema...

Страница 56: ...e 3 CABLES 1 Afloje o retire el tornillo central del bloque de terminales 2 Conecte el cable neutro cable blanco o central del cable de alimentación a la terminal de tornillo central de color plateado del bloque de terminales Ajuste el tornillo 3 Conecte los demás cables a los tornillos externos del bloque de terminales Ajuste los tornillos 4 Ajuste los tornillos con dispositivo de alivio de tensi...

Страница 57: ... de que todas las conexiones de gas en los modelos a gas y las conexiones eléctricas y del drenaje estén completas Enchufe la secadora y controle el funcionamiento utilizando la lista de verificación que figura más abajo 9 SÓLO MODELOS A GAS DV350AG Es posible que al principio el quemador no se encienda debido a la presencia de aire en el conducto de gas Permitir que la secadora funcione con la op...

Страница 58: ...pie todos los viejos conductos antes de instalar la nueva secadora Asegúrese de que la ventilación se abra y se cierre sin inconvenientes Inspeccione y limpie el sistema de drenaje todos los años No permita que un sistema de drenaje defectuoso demore el secado 1 restringiendo a la secadora con un sistema de drenaje defectuoso 2 utilizando un conducto flexible de plástico con un recubrimiento delga...

Страница 59: ...os tornillos del lado opuesto de la bisagra de la puerta 10 Coloque la puerta sobre el lado contrario y vuelva a fijar a la secadora 6 Retire los dos tornillos de la placa de apoyo 11 Vuelva a conectar la placa de apoyo 7 Retire un tornillo de la bisagra de la puerta 12 Vuelva a colocar los tornillos en los orificios restantes Es posible que no exista el tornillo que se mencionó en el PASO 4 01 in...

Страница 60: ...ara secar prendas sensibles al calor a baja temperatura de secado Sanitize Desinfección este programa le permite desinfectar las prendas impregnando la tela con calor a alta temperatura durante el ciclo de secado Utilice este ciclo para mantener su ropa de cama y cortinas limpias por medio de la desinfección Time Dry Secado con temporizador este ciclo le permite seleccionar el tiempo del ciclo des...

Страница 61: ...secado sea completo La opción Less Dry Menos seco es la más adecuada para telas livianas o paraque quede algo de humedad en las prendas al final del ciclo La opción Damp Dry Centrifugado parcial fue concebida para secar las prendas parcialmente Utilícela para las prendas que deban secarse en posición horizontal o colgarse Botón de selección Temperatura Para seleccionar la temperatura correcta para...

Страница 62: ...90 minutos de secado intermitente con aire fresco al final de ciclo para reducir la formación de arrugas Presione el botón Wrinkle Prevent Prevención de arrugas para activar dicha función La luz del indicador arriba de la tecla se iluminará cuando se seleccione Wrinkle Prevent Prevención de arrugas La carga está seca y puede ser retirada en cualquier momento durante el ciclo Wrinkle Prevent Preven...

Страница 63: ...LUZ DEL TAMBOR Enciende el tambor de la secadora mientras se realiza el secado Configuración y liberación Si desea configurar o liberar esta función presione simultáneamente los botones Dry Level Nivel de secado y Temp Temp Puede configurarse no sólo cuando su secadora está en funcionamiento sino también cuando está detenida Si no apaga la luz del tambor en los 4 minutos después de que se encienda...

Страница 64: ...puerta de la secadora 6 Utilice únicamente el tiempo de secado selección Temp Extra Baja ciclo Seleccione el tiempo según la humedad y el peso de las prendas Encienda la secadora Posiblemente sea necesario reajustar el temporizador si se requiere más tiempo de secado PRENDAS SUGERIDAS OPCIONES DE TEMP SUGERIDAS Suéteres lavables dóblelos y colóquelos en posición horizontal sobre el estante Calor E...

Страница 65: ...en algunas telas CÓMO COMENZAR 1 Cargue la secadora dejando algo de espacio libre NO la sobrecargue 2 Cierre la puerta 3 Seleccione el ciclo y las opciones adecuadas para la carga consulte las páginas 20 21 4 Presione el botón de Inicio Pausa 5 Se iluminará la luz del indicador de la secadora 6 El tiempo del ciclo calculado aparecerá en la pantalla Es posible que el tiempo fluctúe para indicar mej...

Страница 66: ...a las cargas subsiguientes TAMBOR DE ACERO INOXIDABLE Para limpiar el tambor de acero inoxidable use un paño humedecido con un limpiador suave no abrasivo adecuado para superficies de acero inoxidable Elimine los residuos del limpiador y seque con un paño limpio EXTERIOR DE LA SECADORA Toda la secadora tiene un acabado brillante Limpie con un paño suave y húmedo No use sustancias abrasivas Proteja...

Страница 67: ...ultados y retírelos lo antes posible Pañales de tela Utilice el ciclo Normal Normal y la temperatura High Alta para pañales suaves y mullidos Prendas con relleno de plumas chaquetas bolsas de dormir edredones etc Utilice el ciclo Normal Normal y la opción de temperatura Low Baja o Extra Low Extrabaja Agregar toallas secas acorta el tiempo de secado y absorbe la humedad Almohadas Utilice el ciclo N...

Страница 68: ...cado uniforme Verifique que la lavadora esté drenando en forma correcta para extraer el agua de la carga adecuadamente Es posible que la carga sea demasiado pequeña como para secarse correctamente Agregue algunas toallas Hace ruido Verifique si en la carga hay objetos tales como monedas botones flojos clavos etc Retírelos de inmediato Es normal escuchar el ruido de la válvula de gas de la secadora...

Страница 69: ... limpiar el filtro durante el ciclo Algunas telas producen pelusa por ejemplo una toalla de algodón blanco con mucho pelo y deben secarse por separado de las prendas que atrapan pelusa por ejemplo un par de pantalones de lino negro Divida las cargas grandes en cargas más pequeñas para el secado Revise bien los bolsillos antes de lavar y secar las prendas Prendas arrugadas después del ciclo Wrinkle...

Страница 70: ...écnico bE bE2 La unidad detecta un botón que se ha presionado más de 30 segundos o que está trabado Asegúrese de que NO haya botones presionados constantemente Pruebe reiniciar el ciclo Si el problema continúa llame al servicio técnico od Tiempo de secado no válido Solicite servicio técnico hE Temperatura no válida Solicite servicio técnico Et EEPROM no se comunica correctamente Pruebe reiniciar e...

Страница 71: ...to Sin vapor agregado a la plancha Hot Media No planchar Cálida Bajo Limpiar en seco Fría Cualquier calor Limpiar en seco Lejía Sin calor aire No limpiar en seco Cualquier lejía cuando sea necesaria Temperaturas de secado con plancha o vapor Secar colgado tender Sólo lejía sin cloro con protección para ropa de color cuando sea necesaria Alto Colgar para que escurra Ciclo de secado en secadora Medi...

Страница 72: ... niños pequeños no puedan quedar atrapados dentro del electrodoméstico DECLARACIÓN DE CONFORMIDAD Este electrodoméstico cumple con la norma UL2158 ESPECIFICACIONES TIPO LAVADORA DE CARGA FRONTAL DIMENSIONES Div Pulgadas cm Div Pulgadas cm A Altura 38 6 98 1 C Profundidad con la puerta abierta a 90 49 124 5 B Ancho 27 68 6 D Profundidad 30 9 78 3 PESO 121 3lb 55kg POTENCIA DEL CALENTADOR 5300 W CON...

Страница 73: ...l 32 min 29 min 3 min Prendas delicadas Low No change Baja Sin cambios Normal dry Secado normal 27 min 24 min 3 min Desinfección High No change Alta Sin cambios Más seco 60 min 55 min 5 min Secado manual Secado con temporizador Alto 40 min 37 min 3 min Quick Dry Secado rápido High No change Alta Sin cambios 30 min 27 min 3 min Steam Cycles Ciclos de vapor Refresh Refrescar High No change Alta Sin ...

Страница 74: ...ctos nuevos o reacondicionados si se comprueba que es defectuoso durante el período limitado de la garantía especificado anteriormente Todas las piezas y los productos reemplazados pasan a ser propiedad de SAMSUNG y deben ser devueltos a SAMSUNG Las piezas y los productos reemplazados asumen la garantía original restante o noventa 90 días el período que sea el más prolongado La presente garantía l...

Страница 75: ...E NINGUNA ÍNDOLE CONTRA SAMSUNG SUPERARÁ EL PRECIO DE COMPRA DEL PRODUCTO VENDIDO POR SAMSUNG Y CAUSANTE DEL PRESUNTO DAÑO SIN LIMITAR LO PRECEDENTE EL COMPRADOR ASUME TODO EL RIESGO Y LA RESPONSABILIDAD POR PÉRDIDA DAÑO O LESIÓN AL COMPRADOR Y A LOS BIENES DEL COMPRADOR Y A TERCEROS Y A SUS BIENES DERIVADOS DEL USO USO INCORRECTO O INCAPACIDAD PARA USAR EL PRESENTE PRODUCTO LA PRESENTE GARANTÍA L...

Страница 76: ...S EN LÍNEA EN U S A 1 800 SAMSUNG 726 7864 www samsung com MEXICO 01 800 SAMSUNG 726 7864 www samsung com N º de código DC68 02821A 05_MES DV350AE 02821A 05_MES indd Sec11 38 DV350AE 02821A 05_MES indd Sec11 38 2011 03 28 ÀÈÄ 4 00 21 2011 03 28 ÀÈÄ 4 00 21 ...

Отзывы: