background image

07
Advanced Function 

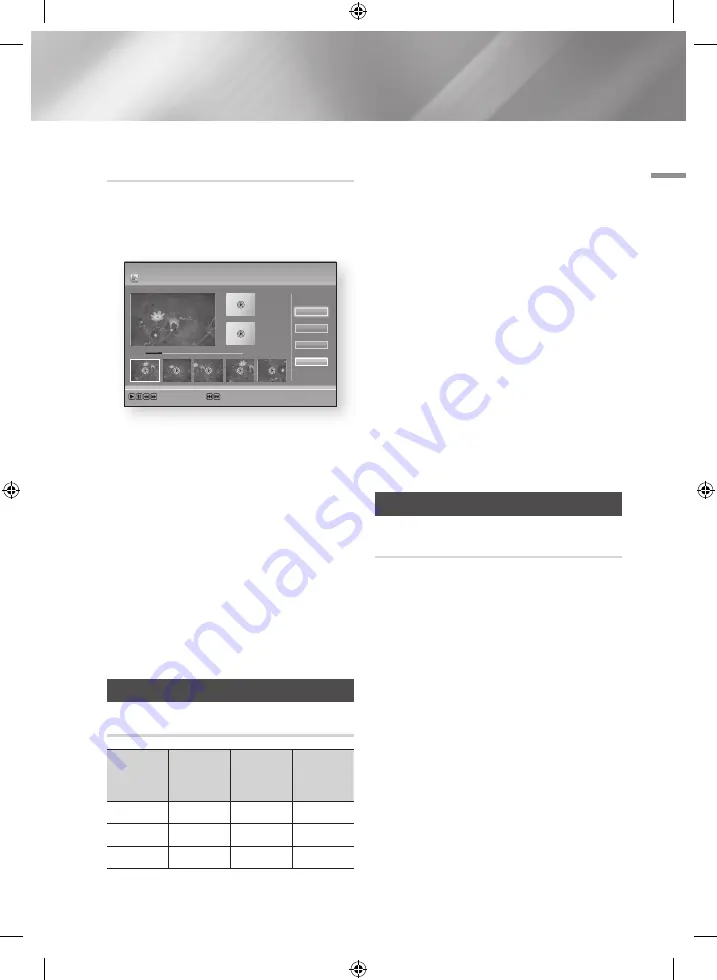
Splitting a Section of a Title (Partial 

Delete)

Follow Steps 1 through 3 in the ‘Edit the Recorded 

Title’.

1. 

Select the 

Partial Delete

, then press the 

v


button.

2. 

Press the 

v

 button at the starting point. 

The image and starting point time is displayed 

in the section deletion starting point window.

•  Select the start and end points of the 

section you want to delete using the 

playback related buttons.

3. 

Press the 

v

 button at the end point. 

The image and end point time is displayed in 

the Section deletion ending point window.

4. 

Press the 

v

 button to select Delete.

5. 

Select 

OK

, then press the 

v

 button.

 |NOTE |


\

The minimum length of delete section should be longer 

than 10 seconds.

Copy

Copying Videos, Music or Photos

Contents

HDD/DISC/

AllShare  

;

 USB

DISC/USB/

AllShare  

;

 HDD

HDD/DISC/

USB  

;

 AllShare

Music

Supported

Supported

Supported

Photos

Supported

Supported

Supported

Videos

Supported

Supported

Supported

•  Disc (CD-DA/CD-R/CD-RW, DVD±R(Finalise)/ 

DVD+RW/DVD-RW(Finalise)) 

;

 HDD or USB

•  PTP USB is not available when you copy to 

USB.

•  The broadcast signal can be recorded on HDD 

but copy feature is not supported.

1. 

Press the 

HOME

 button. 

The home screen will be displayed.

2. 

In Stop mode, connect the USB storage 

device to the USB port on the front panel of 

the product.

3. 

Select the desired contents type, then press 

the 

v

 button.

4. 

Select the desired contents.

5. 

Press the 

TOOLS

 button.

6. 

Select the 

Send

, then press the 

v

 button.

7. 

Press the 

v

 button to check desired files.

8. 

Select the 

Send

, then press the 

v

 button.

To cancel the copying in progress, press the 

v

 button. 

3D functions

3D Converter

This function can convert the 2D output of 2D 

contents into 3D.

1. 

Connect this product to a TV that supports 

3D using an HDMI cable.

2. 

When you play 2D contents, press the 

2D

3D

 button on the remote control to 

convert 2D into 3D contents.

3. 

You can toggle between 2D and 3D by 

pressing the 

2D

3D

 button repeatedly. 

If you are playing 3D contents in the 3D 

mode, you cannot use this function.

Part 1

00:00:00

 AllShare Play Recorded TV  

|


Partial Delete 

|


No title

 Playback Controls  

 Scene Search  

<

 Jump  

>

 Move

  "

 Enter

00:00:33 / 00:08:21

+

Part 2

00:00:00

End

Delete

Return

Start

English  

59


|

02230A-BD-E8900M-XU-ENG.indd   59

2012-05-02   오후 1:49:24

Содержание BD-E8300M

Страница 1: ...u for purchasing this Samsung product To receive more complete service please register your product at www samsung com register BD HDD Combo user manual BD E8300M BD E8500M BD E8900M 02230A BD E8900M XU ENG indd 1 2012 05 02 오후 1 48 54 ...

Страница 2: ...vers are available from your dealer If the fitted plug is not suitable for the power points in your house or the cable is not long enough to reach a power point you should obtain a suitable safety approved extension lead or consult your dealer for assistance However if there is no alternative to cutting off the plug remove the fuse and then safely dispose of the plug Do not connect the plug to a m...

Страница 3: ...ype plug has two blades and a third grounding prong The wide blade or the third prong are provided for your safety If the provided plug does not fit into your outlet consult an electrician for replacement of the obsolete outlet 10 Protect the power cord from being walked on or pinched particularly at plugs convenience receptacles and the point where it exits the apparatus 11 Only use attachments a...

Страница 4: ...tact the nearest customer service centre for technical assistance Do not use the product Using the product as it is may cause a fire or an electric shock Using the 3D function IMPORTANT HEALTH AND SAFETY INFORMATION FOR 3D PICTURES Read and understand the following safety information before using the 3D function Some viewers may experience discomfort while viewing 3D TV such as dizziness nausea an...

Страница 5: ...roperly in 3D play mode You must use a high speed HDMI cable for proper output of the 3D signal Stay at least three times the width of the screen from the TV when watching 3D images For example if you have a 46 inch screen stay 138 inches 11 5 feet from the screen Place the 3D video screen at eye level for the best 3D picture When the product is connected to some 3D devices the 3D effect may not f...

Страница 6: ...d 3 Connecting to a Stereo Amplifier with an Audio Cable 20 Connecting to a Network Router 20 Wired Network 20 Wireless Network Settings 21 The Setup Procedure 21 The Home Screen 21 Accessing the Settings Screen 22 Buttons on the Remote Control used for the Settings menu 23 Settings Menu Functions 32 Networks and the Internet 32 Configuring Your Network Connection 34 Wi Fi Direct 35 Soft AP 36 All...

Страница 7: ...ced Function 55 Recording 55 Checking Available Storage Size 55 Recording the current TV channel you are watching 56 Simultaneous Recording 57 Timeshift function 58 Playing the Recorded Title 58 Editing the Recorded Title 58 Splitting a Section of a Title Divide into two 59 Splitting a Section of a Title Partial Delete 59 Copy 59 Copying Videos Music or Photos 59 3D Functions 59 3D Converter 60 Ad...

Страница 8: ...E The product may not play certain CD RW R and DVD RW R because of the recording conditions If a DVD RW R has not been recorded properly in DVD video format it will not be playable Your product will not play content that has been recorded on a DVD RW R at a bit rate that exceeds 10Mbps Your product will not play content that has been recorded on a BD RE R at a bit rate that exceeds 25Mbps Playback...

Страница 9: ...ot play The Region Number for this product is displayed on the rear panel of the product Disc Type Region Code Area Blu ray Disc a North America Central America South America Korea Japan Taiwan Hong Kong and South East Asia b Europe Greenland French territories Middle East Africa Australia and New Zealand c India China Russia Central and South Asia DVD VIDEO 1 The U S U S territories and Canada 2 ...

Страница 10: ...is encoded by a supported codec listed above a file might not be played if its content has a problem Normal playback is not guaranteed if the file s container information is wrong or the file itself is corrupted Files having higher Bit rate frame rate than indicated in the table above may stutter when played back Seek skip function is not available if the file s index table is damaged When you pla...

Страница 11: ...s Powerdivx psb Internal Xsub AVI SubStation Alpha MKV Advanced SubStation Alpha MKV SubRip MKV MPEG 4 Timed text MP4 Music File Support File Extension Type Codec mp3 MPEG MPEG1 Audio Layer 3 m4a mpa aac MPEG4 AAC flac FLAC FLAC ogg OGG Vorbis wma WMA WMA Picture File Support File Extension Type Resolution jpg jpeg JPEG 15360x8640 png PNG 1920x1080 bmp BMP 1920x1080 mpo MPO 15360x8640 Notes on the...

Страница 12: ...be corrupted or lost You can repair or format a USB device on your Desktop PC MS Windows OS only Connect a USB device before using the Timeshift and Recorded TV functions Do not use a USB memory stick We do not support a USB memory stick We recommend using a USB HDD with at least 5400 rpm but a USB HDD of RAID type is not supported To use the Timeshift mode or the Recorded TV function a connected ...

Страница 13: ...trademarks of Matsushita Electronic Industrial Co Ltd and Sony Corporation NOTE Some AVCHD format discs may not play depending on the recording condition AVCHD format discs need to be finalized x v Color offers a wider colour range than normal DVD camcorder discs Accessories Check for the supplied accessories below FUNCTION TV SOURCE POWER RECEIVER DIGITAL SUBTITLE INPUT 1 2 3 4 5 6 7 8 9 PANDORA ...

Страница 14: ...t out with your hands since dropping the CI CAM with CI or CI CARD may cause damage to it Insert the CI CAM with CI or CI CARD in the direction marked on the card The location of the CI card slot may be different depending on the model CI CAM with CI or CI CARD is not supported in some countries and regions check with your authorized dealer If you have any problems please contact a service provide...

Страница 15: ...ack information during playing a content in Disc USB HDD or display the information of TV channel Press to search backwards or forwards Press to skip backwards or forwards Stops playback or recording TV volume adjustment Mutes the speakers of your TV Displays channel lists on the screen Press this to pause a playback or pause the Timeshift function Press this to play or start the Timeshift functio...

Страница 16: ...de SAMSUNG TV POWER 01 02 03 04 05 06 07 08 09 AIWA TV POWER 82 ANAM TV POWER 10 11 12 13 14 15 16 17 18 BANG OLUFSEN TV POWER 57 BLAUPUNKT TV POWER 71 BRANDT TV POWER 73 BRIONVEGA TV POWER 57 CGE TV POWER 52 CONTINENTAL EDISON TV POWER 75 DAEWOO TV POWER 19 20 23 24 25 26 27 28 29 30 31 32 33 34 EMERSON TV POWER 64 FERGUSON TV POWER 73 FINLUX TV POWER 06 49 57 FORMENTI TV POWER 57 FUJITSU TV POWE...

Страница 17: ...rated if the audio cable is placed too close to the power cable If you want to connect to an AV receiver please refer to the AV receiver connection pages See page 19 The number and position of terminals may vary depending on your TV set Please refer to the user manual of your TV If there is only one audio input terminal on the TV connect it to the AUDIO OUT Red white terminal of the product CAUTIO...

Страница 18: ...d to connect an audio cable Depending on your TV certain HDMI output resolutions may not work Please refer to the user manual of your TV When you connect the product to the TV using the HDMI cable for the first time or to a new TV the HDMI output resolution will be automatically set to the highest supported by the TV A long HDMI cable may cause a screen noise If this occurs set Deep Colour to Off ...

Страница 19: ...eo signal from the product appears on your TV and you hear the audio signal through your audio system Method 1 Connecting to an HDMI supported AV receiver Use an HDMI cable not included Best quality Recommended Method 2 Connecting to an AV receiver with Optical input Use an Optical Cable not included Better quality You will hear sound only throuugh the front two speakers with Digital Output set to...

Страница 20: ...rently being used If the channel set for the wireless router is currently being used by another device nearby it will result in interference and communication failure If you select the Pure High throughput Greenfield 802 11n mode and set the Encryption type on your router or router to WEP TKIP or TKIP AES WPS2Mixed the product will not support a connection in compliance with new Wi Fi certificatio...

Страница 21: ...el Lets you configure your TV channels with features such as country and auto tune 4 Schedule Manager Lets you set or edit recording schedules 5 Settings Opens the Settings menu To select an option on the Home screen 1 Use the buttons to move the cursor so that it highlights your choice and then press v button NOTE In the Home menu screen it will switch to DTV Channel mode after 3 minutes When acc...

Страница 22: ...m and individual option is explained in detail on screen To view an explanation use the buttons to select the function menu item or option The explanation will usually appear on the screen A short description of each Settings function starts on the next page Additional information on some of the functions is also in the Appendix of this manual DIGITAL SUBTITLE INPUT 1 2 3 4 5 6 7 8 9 PANDORA SUBTI...

Страница 23: ...Blu ray DVD Resolution Set the output resolution of the HDMI video signal The number indicates the number of lines of video per frame The i and p indicate interlaced and progressive scan respectively The more lines the higher quality DTV Smart Resolution Use this function to automatically optimise screen resolution for digital broadcasts NOTE When you use the BD wise function this menu will not ap...

Страница 24: ...l be controlled automatically based on the information provided by the Dolby TrueHD Soundtrack This setting is same with On for Dolby Digital and Dolby Digital Plus Off You can enjoy original sound without compressing Dynamic Range of the sound On The Dynamic Range is compressed appropriately by boosting low level sound and reducing extremely loud sound Downmixing Mode Select Downmix method for st...

Страница 25: ... TV does not support Dolby Digital bitstream input via HDMI no specific setting is required If the TV supports Dolby Digital bitstream input via HDMI set Digital Output to PCM By doing so the Connected Device will not require further setup If the DTV Program you are watching is produced according to EBU R128 The Average Loudness between MPEG1 Layer2 Audio and Dolby Digital Dolby Digital Plus audio...

Страница 26: ... not correspond to actual or desired programme numbers Manual Tuning Scans for a channel manually and stores in the product When scanning has finished channels are updated in the channel list Cable Search Option Sets additional search options such as the frequency and symbol rate for a cable network search Transfer Channel List This function can import or export the channel map You should connect ...

Страница 27: ...rol this product Share hard drive Set whether to share contents from this product with other network connected devices such as mobile devices Device Name Lets you input a name for the product that will identify it on your networks BD Live Settings Set various BD Live function BD Live allows you to access extra features available on some Blu ray discs if you are connected to the Internet BD Live In...

Страница 28: ... product s Timeshift and other implemented functions require a certain amount of HDD space allocated internally the total size shown in the Storage Device Manager of Settings menu may differ from the HDD s capacity shown in the manual See page 55 Device Manager You can connect a wireless USB keyboard or mouse to the USB port on the front of the product Keyboard settings Lets you configure a wirele...

Страница 29: ...ve been assigned an age rating or numeric rating that indicates the maturity level of the content These numbers help you control the types of Blu ray Disc DVDs that your family can watch When you access this function the security screen appears Enter the your Security password The default password is 0000 DTV Channel Lock You can lock some channels using the Channel Lock function so that children ...

Страница 30: ... of the menu box DivX Video On Demand View DivX VOD Registration Codes to purchase and play DivX VOD contents Common Interface Show the CI Menu Information screen CI Menu This enables the user to select from the CAM provided menu Select the CI Menu based on the menu PC Card Application Info View information on the CAM Conditional Access Module inserted into the CI slot and on the CI CAM with CI or...

Страница 31: ...card is not authorized for this service The credit of your smart card has expired 4 No smart card is inserted Smart card is not inserted correctly Support Software Update Software Update menu lets you upgrade your product s software to the latest version Contact Samsung Provides contact information for assistance with your product Remote Management Remote management lets our Call Centre access you...

Страница 32: ...1 Select Start in the Network Settings screen and then press the v button The product detects the wired connection verifies the network connection and then connects to the network Ğ Ğ Wired Manual If you have a static IP address or the Automatic procedure does not work you ll need to set the Network Settings values manually After following Steps 1 to 3 above 1 Select Start in the Network Settings ...

Страница 33: ...onnection is already established Ğ Ğ Wireless General Automatic After following Steps 1 to 3 in Configuring Your Network Connection on page 32 1 Select Start in the Network Settings screen and then press the v button The product searches for and then displays a list of the available networks 2 Select the desired network and then press the v button 3 Select Next and then press the v button again 4 ...

Страница 34: ...ndows computers For instructions see Getting the Network Settings Values on page 33 10 When done highlight OK and then press v button The Network Status screen appears The product verifies the network connection and then connects to the network When it is done highlight OK and then press v button Ğ Ğ WPS PBC After following Steps 1 to 3 in Configuring Your Network Connection on page 32 1 Select St...

Страница 35: ...the PIN code in the pop up and then enter it into the appropriate field in the Wi Fi Direct device you want to connect 4 The Connecting pop up appears followed by the Connected pop up When it closes you should see the device listed on the Wi Fi Direct screen as connected NOTE The wired or wireless network connection will be disconnected when you use the Wi Fi Direct function Some Wi Fi Direct devi...

Страница 36: ...Lets you input a name for the product that will identify it on your networks Upgrading Software The Software Update menu allows you to upgrade the product s software for performance improvements or additional services Never turn the product off or back on manually during the update process 1 In the Home screen select the Settings and then press the v button 2 Select Support and then press the v bu...

Страница 37: ... name as the zip file 9 Copy the folder to a USB flash drive 10 Make sure no disc is inserted in the product and then insert the USB flash drive into the USB port of the product 11 In the product s menu go to Settings Support Software Update 12 Select By USB NOTE There should be no disc in the product when you upgrade the software using the USB Host jack When the Software update is done check the ...

Страница 38: ... check the software details in the software update menu Do not turn off the product during the software update It may cause the product to malfunction Standby Mode Upgrade You can set the Standby Mode Upgrade function so that the product downloads new upgrade software when it is in Standby mode In Standby mode the product is off but its Internet connection is active This allows the product to down...

Страница 39: ...n press the v button Depending how the contents are arranged you will see either folders individual files or both 3 Select the desired files 4 Press the RETURN button to exit a folder or to return to Home screen screen NOTE You must remove the USB storage device safely by Performing the Safely Remove USB function in order to prevent possible damage to the USB memory If you insert a disc when playi...

Страница 40: ...hed Blu ray DVD CD disk contents will not be listed in My List Using the AllShare Play Function AllShare Play lets you play Videos Photos or Music located in your PC or your DLNA compatible devices Facebook SugarSync and Family Story on the BD HDD Combo with network connection To use AllShare with your PC you must install AllShare software on your PC NOTE Once the connection is established you can...

Страница 41: ...anage your login account on Smart Hub Some services may require creating account and subscription to a website of corresponding service To download the AllShare software To use AllShare with your PC you must install AllShare software on your PC You can download the PC software and get detailed instructions for using AllShare from the Samsung com website 1 Go to www samsung com 2 Click Support at t...

Страница 42: ...ocated in your PC on the BD HDD Combo You can view shared files of your computer on your BD HDD Combo You can get detailed instructions for using AllShare from the Samsung com website Playing content located in your Mobile device on the BD HDD Combo You can view shared files of your Mobile device to your BD HDD Combo You can get detailed instructions for using AllShare from the Samsung com website...

Страница 43: ...rch and then press the v button 2 Use the buttons to select a chapter and then press the v button FUNCTION TV SOURCE POWER RECEIVER DIGITAL SUBTITLE INPUT 1 2 3 4 5 6 7 8 9 PANDORA SUBTITLE SUBTITLE INPUT DISC MENU TITLE MENU 0 POPUP A B C D SMART HUB SEARCH BD TV TV MUTE TV SOURCE TTX MIX SOCIAL REC REC PAUSE 2D 3D CH LIST HOME GUIDE Playback related buttons The player does not play sound in Sear...

Страница 44: ...ture mode Dynamic Increases sharpness and brightness Standard Choose this setting for most viewing applications Movie The best setting for watching movies User Lets you adjust the sharpness and noise reduction function respectively NOTE When you use the BD wise function this menu will not appear Audio Select to set the desired audio language Subtitle Select to set the desired subtitle language You...

Страница 45: ...nal options Repeating Tracks on an Audio CD You can set the product to repeat tracks on an audio CD CD DA MP3 1 During playback use the button to select in the lower right corner of the screen and then press the v button 2 Use the to select the repeat mode you want Off One Song or All and then press the v button Shuffling Tracks on an Audio CD You can set the product to play tracks on an audio CD ...

Страница 46: ...r select individual tracks the Playlist will not change Cancel cancels any changes you made on the Play Select screen When you return to the Playback screen the Playlist will be unchanged Ripping 1 Insert a USB device into the USB jack on the rear of the product 2 With the Playback screen displayed press the TOOLS button The Tools menu appears 3 Use the buttons to select Rip and then press the v b...

Страница 47: ...picture information NOTE Depending on the disc or storage device the Tools menu may differ All options may not be displayed To enable the background music function the photo file must be in the same storage media as the music file However the sound quality can be affected by the bit rate of the MP3 file the size of the photo and the encoding method You can t enlarge the subtitle and PG graphic in ...

Страница 48: ...e v button again 6 To stop the slide show press the RETURN button NOTE After the slide show begins you can control the slide show by pressing the TOOLS button and displaying the Slide Show menu See Using the Tools Menu page 47 Send Select Send to upload selected files to Picasa Facebook SugarSync or Family Story To use Send you need to establish an account with the on line site and then log in usi...

Страница 49: ...v button 2 Repeat for each track or file you want to remove NOTE You can also move to Select All on the right and then press the v button to select all tracks or files 3 Select Remove on the right side and then press the v button Play Current Group After you have sorted by Artist Genre Album Title Latest Date Earliest Date or Monthly select a group that is the result of the sort for example all pi...

Страница 50: ...ction function respectively NOTE This menu can not be displayed when you use the BD wise function Audio Language Select to set the desired audio language Dual I II Select to set the desired audio Arial Select to change a signal Edit Favourites Select to Edit Favourites Signal Information Select to check the signal information PIP Select to display PIP screen PIP If you select On you can use PIP fu...

Страница 51: ...ive view Not available With regard to if the scrambled channel is displayed in the sub screen will be disabled Release the PIP mode and activate it again Then will be supported With regard to if the scrambled channel is displayed in the main screen will be disabled Release the PIP mode and activate it again Then will be supported Editing Channels Channel List 1 Press the CH LIST button on the remo...

Страница 52: ...then select Edit Channel Number Set this menu to Enable Sorting Select this to sort channels Channel Info Select this to check the channel information of selected or checked channel Delete Select this to delete the channel Select All Select this to select all channels Deselect All Select this to deselect all channels Viewing the Guide Screen The EPG Electronic Programme Guide information is provid...

Страница 53: ...he Home screen and then press the v button 2 Press the RED A button 3 Select Schedule Viewing or Schedule Recording and then press the v button 4 Fill the input items and then press the v button NOTE In the guide view Schedule Viewing and Schedule Recording schedules are not displayed Using the Teletext Service If DTV programme supports teletext signal you can use teletext service For Teletext inf...

Страница 54: ...rresponding coloured button 5 1 Displays the available sub page 6 2 Displays the next Teletext page 7 3 Displays the previous Teletext page 8 6 Displays the index contents page at any time while you are viewing Teletext 9 0 Selects the Teletext mode LIST FLOF If pressed during LIST mode switches the mode to List savemode In List save mode you can save a Teletext page into a list using the 8 store ...

Страница 55: ...s calculated assuming that 1KB 1 000 Bytes However the operating system of the product calculates the capacity of HDD capacity assuming that 1KB 1 024 Bytes and therefore detected capacity by this product is about 93 of HDD Manufacturer representation E g for a 1TB 1000GB HDD this product detect as 931 3 GB CAUTION It is recommended to use recorded or edited files with the product for private purp...

Страница 56: ...us Recording of Two TV Channels 1 While a TV channel is being recorded move to other TV channel that you want to record 2 Press the REC Button The recording will be started NOTE Recording two different paid channel channels at the same time is not supported Watching different TV channels that is not under recording You can watch yet another channel while recording two TV channels at the same time ...

Страница 57: ...becomes not available such as switching to another application an analogue channel or changing the input source Timeshift stops without a notification and will resume automatically as soon as the source is switched to Digital TV The history function supports only for records of switching within channels of Digital TV source If switched to an analog channel history and Timeshift will stop functioni...

Страница 58: ...n then press the v button 2 Select the Recorded TV then press the v button The Recorded TV List will be displayed 3 Select the desired device then press the v button 4 Select the title you want to play then press the v button The selected title will be played back Editing the Recorded Title 1 In the Recorded TV screen select the desired title you want to edit 2 Press the TOOLS button 3 Select the ...

Страница 59: ...able when you copy to USB The broadcast signal can be recorded on HDD but copy feature is not supported 1 Press the HOME button The home screen will be displayed 2 In Stop mode connect the USB storage device to the USB port on the front panel of the product 3 Select the desired contents type then press the v button 4 Select the desired contents 5 Press the TOOLS button 6 Select the Send then press...

Страница 60: ...viewing converted 3D contents press the TOOLS button 2 Press the buttons to select 3D Depth and then press the v button 3 Adjust the 3D Depth using the buttons Viewing DTV with the 3D effect You can experience 3D effect with all live TV programme and recorded TV programme 1 During watching the TV programme or playing recorded TV programme press the 2D 3D button on your remote control The 3D menu w...

Страница 61: ...anual downloads NOTE The web location of the Smart Hub manual is subject to change without notice Smart Hub at a Glance 1 Your Video Provides recommendations for videos based on your tastes 2 Search Provides an integrated search of your video providers and connected AllShare devices 3 Recommended Displays recommended contents managed by Samsung 4 Commercial Displays the Smart Hub Guide an introduc...

Страница 62: ...ssage will appear The playback of Flash videos is not supported E commerce for purchasing proudcts online is not supported ActiveX is not supported Web Browser at a Glance 1 Control Panel Displays the various Web Browser functions Moves to the previous page Moves to the last page before going back Reloads the current page so that it is refreshed on the screen Moves to the Home screen of the Web Br...

Страница 63: ...bile device should be connected via Wi Fi The connection can be established as follows 1 BD HDD Combo and mobile device are Connected to the same wireless Router 2 Mobile device is connected to BD HDD Combo directly via Soft AP function in Network Menu 3 If your mobile device supports Wi Fi Direct it can connect to BD HDD Combo directly via Wi Fi Direct function in Network Menu Dual View Enjoy TV ...

Страница 64: ...c format versions are supported by this product new and existing disc formats may be revised changed updated improved and or supplemented some discs are produced in a manner that allows specific or limited operation and feature during playback some features may be optional additional features may have been added after the production of this product or certain available features may be subject to d...

Страница 65: ...echnology to limit the use of unauthorized copies of some commercially produced film and videos and their soundtracks When a prohibited use of an unauthorized copy is detected a message will be displayed and playback or copying will be interrupted More information about Cinavia technology is provided at the Cinavia Online Consumer Information Centre at http www cinavia com To request additional in...

Страница 66: ...able through this device Samsung is neither responsible nor liable for customer service related to the content and services Any question or request for service relating to the content or services should be made directly to the respective content and service providers Samsung is neither responsible nor liable for customer service related to the content and services Any question or request for servi...

Страница 67: ...ploit Rovi Data the Rovi Technology the Rovi Databases or the Rovi Servers except as expressly permitted herein You agree that your non exclusive licence to access the Rovi Databases and to use the Rovi Data the Rovi Technology and the Rovi Servers will terminate if you violate these restrictions If your licence terminates you agree to cease any and all use of the Rovi Data the Rovi Technology and...

Страница 68: ...LL BE OBTAINED BY YOUR USE OF THE ROVI TECHNOLOGY OR ANY ROVI SERVER IN NO CASE WILL ROVI BE LIABLE TO YOU OR ANY THIRD PARTY FOR ANY CONSEQUENTIAL OR INCIDENTAL DAMAGES OR FOR ANY LOST PROFITS OR LOST REVENUES RESULTING FROM YOUR USE OF ROVI DATA THE ROVI TECHNOLOGY OR OTHERWISE Open Source Licence Notice In the case of using open source software Open Source Licences are available on the product ...

Страница 69: ...lution setting automatically defaults to BD Wise and BD Wise appears in the Resolution menu If the product is connected to a device that does not support BD Wise you can not use the BD Wise function For proper operation of BD Wise set the BD Wise menu of both the product and the TV to On Digital Output Be sure to select the correct Digital Output or you will hear no sound or just loud noise If the...

Страница 70: ... Samsung TV has an Anynet logo then it supports the Anynet function Media Play Selecting the Audio Language The indicator will not appear on the screen if the BONUSVIEW section does not contain any BONUSVIEW audio settings The languages available through the Audio Language function depend on the languages that are encoded on the disc This function or certain languages may not be available Some Blu...

Страница 71: ...576i 480i Movie Frame Auto 24Fs 1080 24F 1080 24F 480i 1080i 1080i 1080i 576i 480i 576i 480i 720p 720p 720p 576i 480i 576i 480i 576p 480p 576p 480p 576p 480p 576i 480i 576i 480i 576i 480i 576i 480i DVD playback Output Setup HDMI connected HDMI not connected HDMI Mode VIDEO Mode VIDEO Mode BD Wise 576i 480i 576i 480i Auto Max Resolution of TV input 576i 480i 1080p 1080p 576i 480i 1080i 1080i 576i 4...

Страница 72: ...s please wait for 15 seconds before returning to the previous resolution Do you want to change the resolution appears If you select Yes the TV s screen will go blank for 15 seconds and then the resolution will revert to the previous resolution automatically If the screen stays blank after you have changed the resolution remove all discs and then press and hold the button on the front of the produc...

Страница 73: ...S Re encoded Dolby Digital DTS HD High Resolution Audio Up to PCM 7 1ch PCM 2ch DTS HD High Resolution Audio DTS Re encoded DTS Re encoded Dolby Digital DTS HD Master Audio Up to PCM 7 1ch PCM 2ch DTS HD Master Audio DTS Re encoded DTS Re encoded Dolby Digital Audio Stream on DVD PCM PCM 2ch PCM 2ch PCM 2ch PCM 2ch PCM 2ch PCM 2ch Dolby Digital Up to PCM 5 1ch PCM 2ch Dolby Digital Dolby Digital D...

Страница 74: ...d Effects Decodes the main feature audio and BONUSVIEW audio stream together into PCM audio and adds Navigation Sound Effects then re encodes the PCM audio into DTS bitstream Decodes the main feature audio and BONUSVIEW audio stream together into PCM audio and adds Navigation Sound Effects then re encodes the PCM audio into Dolby Digital bitstream If the Source Stream is 2ch or mono Re encoded Dol...

Страница 75: ...me that is out of range Play mode differs from the Setup Menu selection Some of the functions selected in the Setup Menu may not work properly if the disc is not encoded with the corresponding function The screen ratio cannot be changed The Screen Ratio is fixed on your Blu ray DVD disc This is not a problem with the product No audio Make sure you have selected the correct Digital Output in the Au...

Страница 76: ...t support HDCP High bandwidth Digital Content Protection AllShare function I can see folders shared through AllShare but I cannot see the files AllShare shows only files corresponding to the Videos Photos and Music categories Files that do not correspond to these categories may not be displayed Video is played intermittently Check if the network is stable Check if the network cable is properly con...

Страница 77: ...hedule Recording recording and Timeshift function does not work Using lower quality USB storage device not supporting Recording function can cause this kind of problem It is recommended to use USB HDD storage device Recommended specification of USB HDD is at least 5400 rpm USB HDD of RAID type is not supported NOTE When the factory default settings are restored all stored user BD data is deleted R...

Страница 78: ...Channel 2Vrms 10 Digital TOS Link Optical Network Ethernet 100BASE TX Terminal Wireless LAN Built in Security WEP OPEN SHARED WPA PSK TKIP AES WPA2 PSK TKIP AES WPS PBC Supported HDD Capacity BD E8300M 320GB BD E8500M 500GB BD E8900M 1TB Network speeds equal to or below 10Mbps are not supported Design and specifications are subject to change without prior notice For the power supply and power cons...

Страница 79: ...by this warranty 4 This product is not considered to be defective in materials nor workmanship by reason that it requires adaptation in order to conform to national or local technical or safety standards in force in any Country other than the one for which the product was originally designed and manufactured This warranty will not cover and no re imbursement will be made for such adaptation nor an...

Страница 80: ...return system Contact SAMSUNG WORLD WIDE If you have any questions or comments relating to Samsung products please contact the SAMSUNG customer care centre Area Contact Centre Web Site ALBANIA 42 27 5755 www samsung com AUSTRIA 0810 SAMSUNG 7267864 0 07 min www samsung com BELGIUM 02 201 24 18 www samsung com be Dutch www samsung com be_ fr French BOSNIA 05 133 1999 www samsung com BULGARIA 07001 ...

Отзывы: