background image

26

English

Using 

the 
Sma
rtThings 

App

To use the SmartThings app, connect the product to the network in the sequence described below. 


The images shown may differ depending on your smartphone model, OS version and manufacturer.


You need to set up the Wi-Fi access point only when connecting the product to a Wi-Fi network. Once the product is connected, you can 

use the SmartThings app via Wi-Fi, 3G, LTE, 5G or more wireless networks. 


If the WiFi disconnects, please follow the instructions on the Samsung SmartThings app via your mobile device or tablet.
You can easily install the SmartThings app or use the product with your smartphone by scanning the QR code on the attached label.

SmartThings app

1  


Checking the power connections

C

heck if the power is connected to the product and 

the access point.

2

  Setting up and connecting to a Wi-Fi 

access point using your smartphone

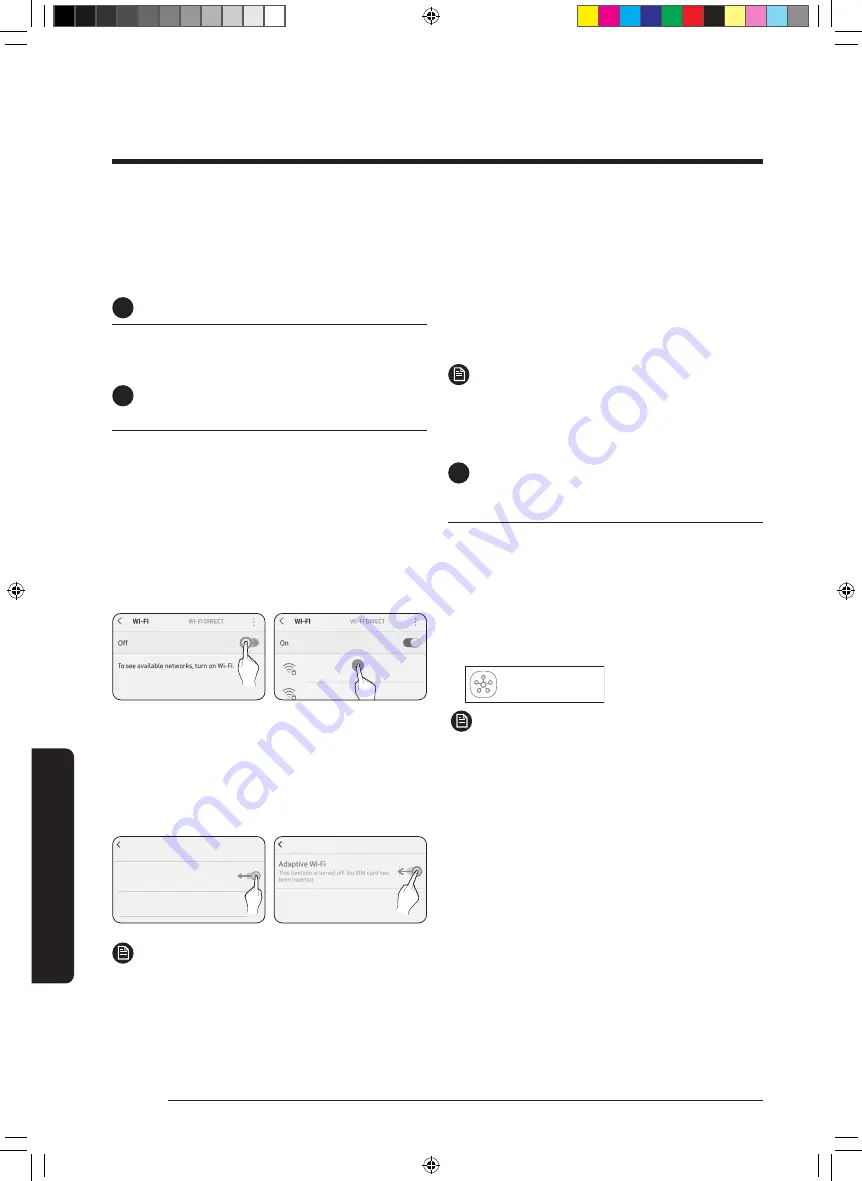
To connect the product to a Wi-Fi network, 

turn on Wi-Fi at "Settings > Wi-Fi", and then 

select the access point to connect to

• 

Only alphanumeric characters are supported for 

wireless access point names (SSIDs). If an SSID has 

a special character, rename it before connecting to 

it.

• 

This product supports only Wi-Fi 

2.4 GHz

.

SAMSUNG_2G

SAMSUNG_5G

On

Select

Turning off "Switch to mobile data" at 

"Settings > Wi-Fi" on your Smartphone

• 

If "Switch to mobile data" or "Adaptive Wi-Fi" is 

turned on, you cannot connect to the network. Be 

sure to turn off these functions before connecting 

to the network.

Advanced

Switch to mobile data

Insert SIM card to use mobile data.

Advanced

Off

Off

 NOTE

• 

The setup may differ depending on your 

smartphone model, OS version and manufacturer.

Checking the Internet connectivity

• 

After connecting to Wi-Fi, check that your 

smartphone is connected to the Internet.

 NOTE

• 

A firewall may prevent your smartphone from 

connecting to the Internet. Contact your Internet 

service provider for troubleshooting.

3

  Downloading the SmartThings 

app and registering your Samsung 

account

Downloading the SmartThings app

• 

Search for "SmartThings" on Play Store or App 

Store, and download the SmartThings app to your 

smartphone.

• 

If the SmartThings app is already installed on 

your smartphone, update it to the latest version.

SmartThings (Samsung Connet)

Samsung Electronics Co., Ltd.


 NOTE

• 

The SmartThings app supports Android OS 7.0 or 

later (with at least 2 GB RAM) and iOS 12.0 or later. 

The app is optimized for iPhone 6s or later and 

Samsung smartphones (Galaxy S and Note series).


The updates of the SmartThings app or the 

functions supported by it may be discontinued for 

the previously supported OS versions due to the 

reasons such as usability and security.

• 

The SmartThings app may change without 

prior notice to improve product usability and 

performance.

Using the SmartThings App

DB68-11173A-00_IB_ACR AX9500A_Small PET_AA_EN_.indd   26

DB68-11173A-00_IB_ACR AX9500A_Small PET_AA_EN_.indd   26

2021-07-22   오전 10:58:56

2021-07-22   오전 10:58:56

Содержание AX350 935 Series

Страница 1: ...ngthisSamsungAirPurifier Beforeoperatingthisunit pleasereadthismanualcarefullyandretainitforfuturereference DB68 11173A 00_IB_ACR AX9500A_Small PET_AA_EN_ indd 1 DB68 11173A 00_IB_ACR AX9500A_Small PET_AA_EN_ indd 1 2021 07 22 오전 10 58 48 2021 07 22 오전 10 58 48 ...

Страница 2: ... 16 UsingtheAirPurifier 19 Turning on off the airpurifier Changing the operation mode 19 Lock function Filterreplacement reminder 20 Airoutlet setting Checking airquality 21 Cleaning and Maintenance 23 Cleaning the airpurifierexterior 23 Cleaning and drying the filters 25 Usingthe SmartThingsApp 26 SmartThings app 26 Appendix 29 Before Requesting Service 29 DB68 11173A 00_IB_ACR AX9500A_Small PET_...

Страница 3: ...adiation Exposure Statement This equipment complies with FCC radiation exposure limits set forth foran uncontrolled environment This equipment should be installed and operated with minimum distance 20cm between the radiator yourbody IC Radiation Exposure Statement This equipment complies with IC RSS 102 radiation exposure limits set forth for an uncontrolled environment This equipment should be in...

Страница 4: ...nd the powercord Using a multi socket with otherproducts orextending the powercord may cause electric shock orfire Using a voltage convertermay cause electric shock orfire Failing to meet the exact voltage frequency and orrated current may cause electric shock orfire Do not install the airpurifierneara heat source and flammable objects orin areas that are highly humid ordusty Avoid exposure to oil...

Страница 5: ...ns to avoid electric shock orfire Whenyou disconnect the powercord pull it bythe plug Do not pull the cord itself Follow instructions to avoid electric shock orfire Do not forciblybend pull twist ortie the powercord into a knot Do not hang it on a metallic object or put a heavyobject on it Do not put the cord in a small gap between heavyobjects orforciblypush it behind the airpurifier Follow instr...

Страница 6: ...trike the productwith excessive force orpull orpress the front panel forcefully Failure to do so may result in fire a product malfunction injury noise ordeformation Store the plastic package awayfrom children ordiscard it according to the law Follow instructions to protect children from a risk of suffocation Do not insertyourfingerorotherobjects into the airinlet oroutlet Take special care to prot...

Страница 7: ...orfire Do not use bug repellent orothersprayproducts on the airpurifier They can be harmful and may cause electric shock fire ormalfunction Do not submerge the airpurifier Follow instructions to avoid malfunction Do not handle the productwithwet hands Follow instructions to avoid electric shock This appliance can be used bychildren aged from 8years and above and personswith reduced physical sensor...

Страница 8: ...eused bywashing them with water NOTE Do NOTuse types of filters otherthan those originally supplied with the product When purchasing a filterforreplacement be sure to confirm that it is the same type as the filter originally supplied with the product PackageContents DB68 11173A 00_IB_ACR AX9500A_Small PET_AA_EN_ indd 8 DB68 11173A 00_IB_ACR AX9500A_Small PET_AA_EN_ indd 8 2021 07 22 오전 10 58 50 20...

Страница 9: ...lecting Filter 05 PETDeodorization Filter 06 Pre filter Front of main unit 01 07 03 02 04 05 06 AirPurifierOverview 01 Clip wire 02 Button unit 03 Airoutlet Bespoke panel 04 Display 05 Front mesh 06 Frame 07 Pull handle both bottom sides AirPurifierOverview Rearof main unit 04 05 06 02 03 01 DB68 11173A 00_IB_ACR AX9500A_Small PET_AA_EN_ indd 9 DB68 11173A 00_IB_ACR AX9500A_Small PET_AA_EN_ indd 9...

Страница 10: ...ion 01 Shows the PM10 PM2 5 PM1 0 and GAS levels with colourindicators 02 Shows the operation mode 03 Shows the PM10 PM2 5 and PM1 0 status 04 Shows the concentrations of PM10 PM2 5 and PM1 0 and the GAS status NOTE PM10 Dust in the airwith a diameterof10 orless Fine particles about1 5 of the diameterof a human hair PM2 5 Dust in the airwith a diameterof 2 5 orless Fine particles about1 20 of the ...

Страница 11: ...uct will not work if you do not push the power adapterall the way in CAUTION Exercise caution to ensure that the adapteris not damaged Do NOTuse a damaged adapter It can cause electric shock orfire Removingthe poweradapter Remove the device poweradapteras shown in the figure To combine orseparate devices first be sure to remove the poweradapters DB68 11173A 00_IB_ACR AX9500A_Small PET_AA_EN_ indd ...

Страница 12: ...be sure to remove the powerplug STEP1 Opening the rearpanel Hold both uppersides of the rearpanel Gently lift and pull the panel towards yourself to remove it Remove the clip wire from the rearof the main unit STEP2 Remove the pre filter STEP3 Removing the pet deodorization filter DB68 11173A 00_IB_ACR AX9500A_Small PET_AA_EN_ indd 12 DB68 11173A 00_IB_ACR AX9500A_Small PET_AA_EN_ indd 12 2021 07 ...

Страница 13: ...ve the plastic packaging from the pet deodorization filterand dust collecting filter PETDeodorizationFilter DustCollectingFilter DB68 11173A 00_IB_ACR AX9500A_Small PET_AA_EN_ indd 13 DB68 11173A 00_IB_ACR AX9500A_Small PET_AA_EN_ indd 13 2021 07 22 오전 10 58 52 2021 07 22 오전 10 58 52 ...

Страница 14: ...p at the bottom of the main unit to fasten the filter Confirm that the filterattachment direction is correct before attaching it STEP2 Attaching the pet deodorization filter STEP3 Attaching the pre filter Insert the tabs on the filterinto the slots at the bottom of the main unit 1 2 1 2 AirPurifierOverview DB68 11173A 00_IB_ACR AX9500A_Small PET_AA_EN_ indd 14 DB68 11173A 00_IB_ACR AX9500A_Small P...

Страница 15: ...ith surrounding odours and the room smells bad replace the filters and turn off the filterreplacement reminder NOTE Keep the doors and windows closed when the product is operating if circumstances allow Note that concentration of carbon dioxide increases if the product is used with the doors and windows closed foran extended period of time Ventilate the room regularly Some subtle smells present in...

Страница 16: ...cissors to cut off the top of the zipperbag STEP4 Attaching the pet mesh filter Open the fixing holderfrom the pre filter and locate the fourfastening spots Locate the slots on the pet mesh filter Insert the tabs on the pre filterinto the slots on the pet mesh filter and then press the middle of the tab so that it clicks into place Pre filter Petmeshfilter Fixing holder Bump DB68 11173A 00_IB_ACR ...

Страница 17: ... the rearpanel Attach the clip wire to the rearof the main unit Insert the tabs on the panel into the slots at the bottom of the main unit and then press the top center of the panel to fasten it 1 2 DB68 11173A 00_IB_ACR AX9500A_Small PET_AA_EN_ indd 17 DB68 11173A 00_IB_ACR AX9500A_Small PET_AA_EN_ indd 17 2021 07 22 오전 10 58 54 2021 07 22 오전 10 58 54 ...

Страница 18: ...them Replacewithnewfilters Thepetdeodorizationfilteranddustcollectingfilterareconsumables Youwillbechargedforreplacingthesefilters regardlessoftheremainingwarrantyterm FiltersforreplacementcanbepurchasedfromthenearestSamsungElectronicswebsite Pet deodorizationfilter Thepetdeodorizationfilterisahigh performancefilterthateffectivelyremovesdailyodoursincludingtoiletandfood smells Iftheroomhasanexcess...

Страница 19: ...e Sleep Pet Smart IfyouswitchthedevicetoSleepmode thefrontpanelcloses the deviceoperatesatthelowestfanspeedandthecolourairquality indicatoronlyilluminates IfyouchangetheoperationmodeafterusingSleepmodefor morethan10seconds Sleepmodeturnsoffandthe sensor ready indicatorappears InSmartmode thefanspeedisautomaticallyadjusted High Medium Low dependingonthesurroundingdustand odourconditionstokeeptheroo...

Страница 20: ...lters turnonthedeviceandthenpressandholdthe buttonformore than3secondstoresetthefilterreplacementtime Achimesoundis playedandthefrontdisplaypopsupamessageaskingyoutoconfirm toresetthefilterreplacementtime Toresetthefilterreplacementtime pressthe button Ifyoudo notwanttoreset pressthe button Ifyoupressthe button Filterisreset appearsonthedisplay Youshouldalsoresetthefilterreplacementtimebypressinga...

Страница 21: ...umberof airoutlets does not change automatically Checking airquality The concentrations of PM10 PM2 5 and PM1 0 are shown and the airqualityand GAS level are shownwith colour indicators depending on the PM10 PM2 5 PM1 0 and GAS levels Among PM10 PM2 5 PM1 0 and GAS the value with the worst airquality is displayed If all items have lowvalues the concentrations of PM10 PM2 5 and PM1 0 are displayed ...

Страница 22: ...due to the HVAC or ventilation system ordraughtywindowframes The gas level can be affected by odorous household items such as airfresheners deodorants and detergents If different types of airpurifiers are used in the same room the PM concentration readings may not match as aircirculates The PM concentration readings mayvary depending on the product and PM meter If the intensity of gas odour is con...

Страница 23: ...d CAUTION Do NOTput dust into the sensorinlet Cleaning and dryingthefront panel STEP1 Removing the front panel Hold both uppersides of the front panel and pull towards yourself Remove the clip wire from the front of the main unit STEP2 Removing the front mesh Turn the front panel over Hold the pulls in the upperportion and remove the mesh STEP3 Cleaning and drying the front mesh Usewaterorasoftclo...

Страница 24: ... the tabs on the panel into the slots at the bottom of the main unit and then press the top centerof the panel to fasten it Front panel model names bycolour The bespoke panel is replaceable a replacement panel can be purchased from the Samsung Electronics website Frontpanelcolour Panelmodelname StripeGray CFX H8YA0 StripeDeepGreen CFX H8YB0 PU LL PULL 2 1 2 1 Cleaning and Maintenance DB68 11173A 0...

Страница 25: ...e superfine fibres may become damaged When washing the pet mesh filter use lukewarm water orwatercolderthan 25 If you use waterhotterthan 40 the filterexteriormay deform Drying the filters Keep the filters in the shade until fully dry avoiding exposure to direct sunlight CAUTION The pet mesh filteris a consumable component If you wash orclean it forreuse the filterexteriormay deform orbecome damag...

Страница 26: ...work Be sure to turn off these functions before connecting to the network Advanced Switch to mobile data Insert SIM card to use mobile data Advanced Off Off NOTE The setup may differdepending on your smartphone model OS version and manufacturer 3 Checking the Internet connectivity Afterconnecting to Wi Fi check that your smartphone is connected to the Internet NOTE A firewall may prevent yoursmart...

Страница 27: ...ually Airpurifier Samsung Scan Airpurifier Samsung Air purifier By device type By device type Select Select 2 Connecting the SmartThings app toyour product Followthe instructions displayed on the SmartThings app to connect to yourproduct For information on how to use the SmartThings app select the How To menu on the app NOTE If any pop up window appears on the top of the smartphone while connecting...

Страница 28: ...an yourPC such as an airconditionerand an airpurifier to the Internet Open SourceAnnouncement The software included in this product contains open source software You mayobtain the complete corresponding source code fora period of threeyears afterthe last shipment of this product bycontacting oursupport team via http opensource samsung com Please use the Inquiry menu It is also possible to obtain t...

Страница 29: ...se sounds are normal motornoises that may occurduring zero point calibration when the front panel is moved When the product is operating a sensoroperation sound such as a hissing sound can be audible When you want to sleep orrest in a quiet environment select the Sleep mode When the product stops operation a hissing sound can be audible as the fan operation stops Odours Strange smell comesfromthe ...

Страница 30: ...reign materials and clean the unit if necessary In winterseason during initial operation of the product shortly after delivery condensation occurs inside the sensors due to temperature difference between the indoors and outdoors As a result the PM concentration readings may reach 999 m and the airquality indicatormay illuminate red This is a temporary issue and will disappearafter1 to 2 hours of o...

Страница 31: ...Environment are an average of atmospheric particulate matterreadings measured for1 or24 hours The PM10 and PM2 5 levels you see on the product are real time measurements and may differfrom the official values Display Thefilterreplacement indicatoris kept lit up Afterreplacing with newfilters press and hold the button for more than 3 seconds to turn off the filterreplacement reminder The displayout...

Страница 32: ...msung com us support CANADA 1 800 SAMSUNG 726 7864 1 844 SAM PAYS 726 7297 www samsung com ca support English www samsung com ca_fr support French QUESTIONS OR COMMENTS DB68 11173A 00_IB_ACR AX9500A_Small PET_AA_EN_ indd 32 DB68 11173A 00_IB_ACR AX9500A_Small PET_AA_EN_ indd 32 2021 07 22 오전 10 58 58 2021 07 22 오전 10 58 58 ...

Отзывы: