background image

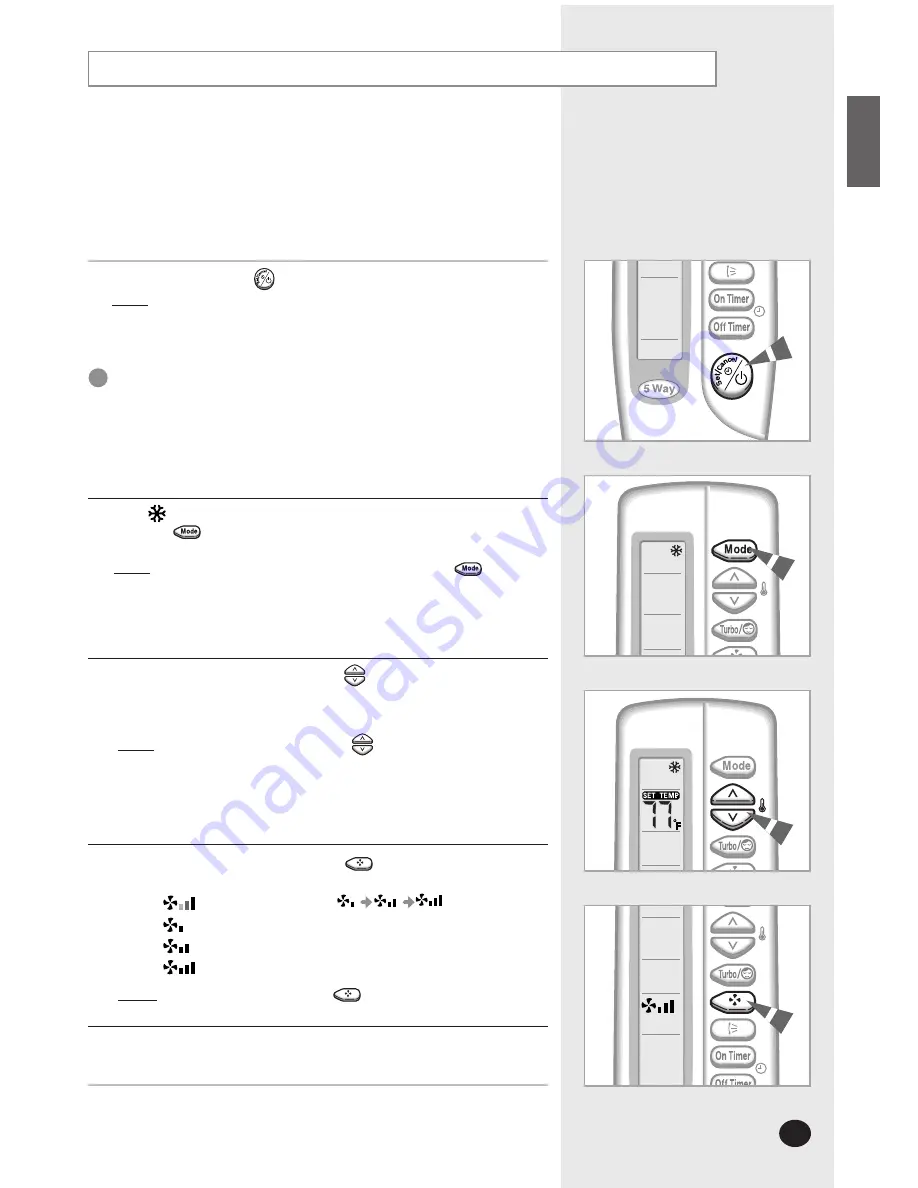
Cooling Your Room

1

If necessary, press the       (ON/OFF) button.

Result:

The 5 Way indicator on the indoor unit lights up.

The air conditioner starts up in the mode selected   

when the unit was last used.

The indoor unit beeps.

The air conditioner is fitted with a protection mechanism to
prevent the unit from being damaged when it is started 
immediately after being:

Plugged in

Stopped

lt will start up normally after three minutes.

IM

PORTANT

If the       is not displayed at the top of the remote control, 
press the          button on the remote control one or more times until it 
appears.

Result:

The indoor unit beeps each time you press the         button.

The air conditioner runs in COOL mode.

2

You can change modes at any time.

N

N

N

N

o

o

o

o

tt

tt

e

e

e

e

To adjust the temperature, press the       buttons one or more times
until the required temperature is displayed.
Possible temperatures are between 65°F(18°C) and 86°F(30°C) 
inclusive.

Result:

Each time you press the       buttons: 

- The temperature is adjusted by 1°F
- The indoor unit beeps

The air conditioner starts cooling, provided that the room 

temperature is higher than the selected temperature; 
the fan will, however, operate.

3

Select the fan speed by pressing the        button one or more times
until the required setting is displayed:

Automatic (rotated :                           ) 

Low

Medium

High

Result:

Each time you press the        button, the indoor unit beeps.

4

To control the direction of the air flow, refer to page 16 and 17.

5

You must select the Cool mode if you wish to adjust the:

Cooling temperature

Fan speed when cooling

E-

11

ENGLISH

Содержание AQ09A6MAF/KCV

Страница 1: ...eat Acondicionador de aire del tipo partido Refrigeraci n y Calefacci n Climatiseur type Split Refroidissement et Chauffage E S F DB98 15773A 1 ESPA OL FRAN AIS AQ09A5 6 MAF AQ12AA B MCF AQ18A9 0 RCF...

Страница 2: ...distance should not be more than 23ft 7m from the air conditioner If applicable WARNING DURING OPERATION Never store or ship the air conditioner upside down or sideways to avoid damage to the compres...

Страница 3: ...ating Your Room 12 Changing the Room Temperature Quickly 13 Removing Excess Humidity 14 Airing Your Room 15 Adjusting the Air Flow Direction Vertically 16 Adjusting the Air Flow Direction Horizontally...

Страница 4: ...ndicator Remote Control Sensor SAVING indicator ON OFF 5 Way selection button For details on the 5 Way refer to page 9 N N N No o o ot t t te e e e Indoor Unit 30 Air filter under the grille Air flow...

Страница 5: ...Valve Outdoor Unit Outdoor Unit Air Inlet Rear Air Outlet Connection Valve Air Inlet Rear Air Outlet Connection Valve Outdoor Unit Air Inlet Rear Air Outlet Connection Valve Outdoor Unit UQ09A5 6 MAF...

Страница 6: ...DRY FAN HEAT Turbo Sleep mode selection button Swing button On Timer button Off Timer button ON OFF Timer Set Cancel button Fan speed adjustment button Temperature adjustment buttons Temperature setti...

Страница 7: ...ake full advantage of the unit s features The booklet is organized as follows The following figures are shown on pages from 4 to 6 Indoor and outdoor units Remote control buttons and display They will...

Страница 8: ...batteries or different kinds of batteries together Batteries may be completely discharged after 12 months even if they have not actually been used You must insert or replace the remote control batter...

Страница 9: ...press the button Each 5 Way indicator on the indoor unit lights up in order Selecting with the Remote Control Even if the air conditioner has been turned on via the ON OFF button on the unit operatio...

Страница 10: ...any time If necessary press the ON OFF button Result The 5 Way indicator on the indoor unit lights up The air conditioner starts up in the mode selected when the unit was last used The indoor unit be...

Страница 11: ...de 2 You can change modes at any time N N N No o o ot t t te e e e To adjust the temperature press the buttons one or more times until the required temperature is displayed Possible temperatures are b...

Страница 12: ...t t te e e e You can change modes at any time 3 To adjust the temperature press the buttons one or more times until the required temperature is displayed Possible temperatures are between 61 F 16 C an...

Страница 13: ...starts up in the mode selected when the unit was last used The indoor unit beeps 2 Press the button Result The temperature and fan settings are adjusted automatically The air conditioner cools or hea...

Страница 14: ...utes 2 If the is not displayed at the top of the remote control press the button on the remote control one or more times until it appears Result The indoor unit beeps each time you press the button Th...

Страница 15: ...mote control press the button on the remote control one or more times until it appears Result The indoor unit beeps each time you press the button The air conditioner runs in FAN mode The temperature...

Страница 16: ...he outer blade is adjusted vertically RECOMMENDATION When Adjust the blade to face Cooling Upwards Heating Downwards 2 If you want the blade to move up and down automatically when the air conditioner...

Страница 17: ...ades Just as the outer air flow blade can be adjusted vertically the inner blades can be adjusted horizontally 1 Adjust each set of inner blades to the required position by pushing or pulling them sid...

Страница 18: ...ton to complete the setting Result The remaining time is displayed Blinking of the timer indicator stops The selected mode and the temperature on the display disappear after 10 seconds The air conditi...

Страница 19: ...inking of the timer indicator stops The air conditioner will switch off automatically when the counter displayed on the remote control reaches the set time and disappears the Off timer setting 2 If yo...

Страница 20: ...The air conditioner will be controlled as indicated in the illustrations below Cooling The desired temperature is increased by 2 F every hour When it has been increased by 4 F after two hours the tem...

Страница 21: ...may form in the outdoor unit when heating is selected If this happens The heating operation is stopped The Deice mode is triggered automatically for about seven minutes No intervention is required fro...

Страница 22: ...and drip from the surface of the indoor unit if it is used for long periods Mode Outdoor Temperature Indoor Temperature Indoor Humidity Heating 32 F to 75 F approx 81 F or less 0 C to 24 C approx 27...

Страница 23: ...has heavy dusts 1 Open the front grille by pulling on the tabs on the lower right and left sides of the indoor unit 2 09 12 30 Disassemble the front grille by pulling it forwards 7 Reassemble the air...

Страница 24: ...in front of the outdoor unit Check that the required temperature has been set correctly Increase the fan speed If the air flow is directed downwards use the remote control to direct it upwards Check...

Страница 25: ...N N No o o ot t t te e e e Do not remove the packing from a deodorizing filter until you wish to use the filter as it will lose its properties The air conditioner can be fitted with a deodorizing and...

Страница 26: ...es Connections Liquid Line O D Suction Line O D Factory Pre charge Max Line length Max Height Difference inch mm inch mm ft m ft m ft m Dimensions Weight W X H X D Net Weight inch mm Ibs kg W X H X D...

Страница 27: ...bs kg AQ24A1 2 RC AQ30C1 2 BC 23500 24000 6 8 10 0 477 512 59 5 4 30000 30000 6 8 10 0 671 706 58 7 2 10 5 208 230V 60Hz 208 230V 60Hz 2350 2400 14 3100 3100 AQ24A1 2 RC AQ30C1 2 BC UQ24A1 2 RC UQ30C1...

Страница 28: ...ELECTRONICS Printed in Korea THIS AIR CONDITIONER IS MANUFACTURED BY ESTE AIRE ACONDICIONADO HA SIDO FABRICADO POR CE CLIMATISEUR EST FABRIQUE PAR...

Отзывы: