56
EB 8384-6S EN
Mounting and start-up
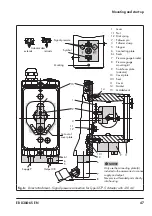
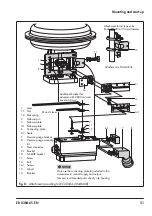
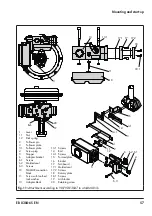
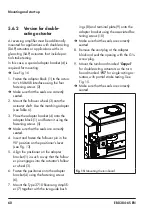
6. Insert the molded seal (17.1) into the
turnboard (17) and mount the turnboard
to the adapter block (13) using the
screws (17.2).
7. Mount the blank plate (18) to the turn-
board using the screws (18.1). Make
sure that the seals are correctly seated.
A solenoid valve can also be mounted in
place of the blank plate (18). The orientation
of the turnboard (17) determines the mount-
ing position of the solenoid valve. Alterna
-
tively, a restrictor plate can be mounted
(
u
8. Fasten the adapter block (13) to the
NAMUR connection block using the
screws (13.1).
9. Insert the vent plug into the Exh. connec-
tion.
10. Place the positioner on the adapter block
(13) in such a manner that the follower
pin (2) rests on the top of the follower
plate (3, 3.1). Adjust the lever (1) corre-
spondingly.
Fasten the positioner to the adapter block
(13) using the two fastening screws (6.3).
Make sure the molded seal (6.2) is prop-
erly seated.
11. For
single-acting actuators without air
purging
, connect the Y1 port of the
adapter block to the signal pressure con-
nection of the actuator. Seal the Y2 port
with a blanking plug.
For
double-acting actuators and actua-
tors with air purging
, connect the Y2
port of the adapter block to the signal
pressure connection of the second actua-
tor chamber or spring chamber of the
actuator.
5.6 Attachment according to
VDI/VDE 3847-2
Attachment according to VDI/VDE 3847-2
for PFEIFFER SRP (single-acting) and DAP
(double-acting) rotary actuators in sizes 60
to 1200 with NAMUR interface and air
purging of the actuator's spring chamber al-
lows the direct attachment of the positioner
without additional piping.
Additionally, the positioner can be replaced
quickly while the process is running by
blocking the air in single-acting actuators.
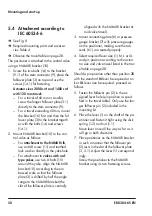
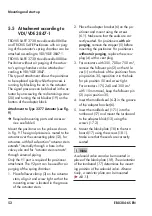
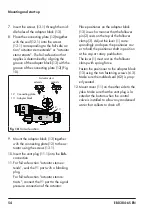
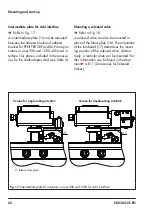
Procedure to block the actuator in place
1. Unscrew the red retaining screw (1).
2. Turn the air blocker (2) on the bottom of
the adapter block according to the in-
scription.
Note
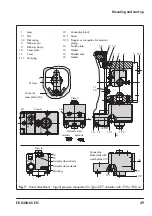
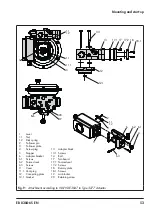
6.2 6.1
6
4
6.3
5
1
2
16
3
3.1
11
18
18.1
13.1
13
17.2
17
17.1
10
3
Exh.
19
20
14
14.1
1.1
1.2
1
Lever
1.1
Nut
1.2
Disk spring
2
Follower pin
3
Follower plate
3.1
Follower plate
4
Screw plug
5
Stopper
6
Adapter bracket
6.1
Screws
6.2
Molded seal
6.3
Screws
10
NAMUR connection
block
11
Screw with toothed
lock washer
13
Adapter block
13.1 Screws
14
Bolt
14.1 Screws
15
Formed plate
16
Bracket
17
Turnboard
17.1 Molded seal
17.2 Screws
18
Dummy plate
18.1 Screws
19
Air blocker
20
Retaining screw
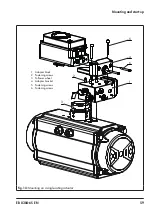
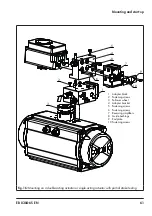
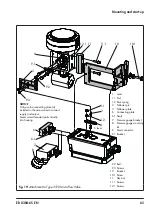
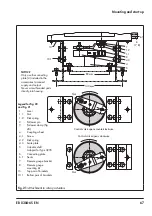
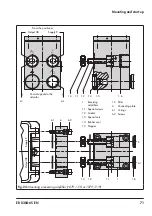
Fig. 11:
Attachment according to VDI/VDE 3847 to a NAMUR rib
Содержание TROVIS SAFE 3730-6
Страница 12: ...12 EB 8384 6S EN...
Страница 16: ...16 EB 8384 6S EN...
Страница 22: ...22 EB 8384 6S EN...
Страница 40: ...40 EB 8384 6S EN...
Страница 42: ...42 EB 8384 6S EN...
Страница 82: ...82 EB 8384 6S EN...
Страница 90: ...90 EB 8384 6S EN...
Страница 96: ...96 EB 8384 6S EN...
Страница 132: ...132 EB 8384 6S EN...
Страница 152: ...152 EB 8384 6S EN...
Страница 155: ...EB 8384 6S EN 155...
Страница 156: ...156 EB 8384 6S EN...
Страница 157: ...EB 8384 6S EN 157...
Страница 158: ...158 EB 8384 6S EN...
Страница 159: ...EB 8384 6S EN 159...
Страница 160: ...160 EB 8384 6S EN...
Страница 161: ...EB 8384 6S EN 161...
Страница 162: ...162 EB 8384 6S EN...
Страница 163: ...EB 8384 6S EN 163...
Страница 164: ...164 EB 8384 6S EN...
Страница 165: ...EB 8384 6S EN 165...
Страница 166: ...166 EB 8384 6S EN...
Страница 167: ...EB 8384 6S EN 167...
Страница 182: ...182 EB 8384 6S EN...
Страница 183: ...EB 8384 6S EN 183...


