


70
EB 8384-6S EN
Mounting and start-up
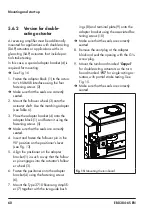
5.9
Reversing amplifier for
double-acting actuators
For the use with double-acting actuators, the
positioner must be fitted with a reversing am
-
plifier, e.g. the SAMSON Type 3710 Revers
-
ing Amplifier (see Mounting and Operating
Instructions
u
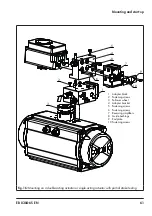
If a different reversing amplifier (item no.
1079-1118 or 1079-1119) is used, follow the
mounting instructions described in sec-
The following applies to all reversing am-
plifiers:
The signal pressure of the positioner is sup-
plied at the output 1 of the reversing amplifi
-
er. An opposing pressure, which equals the
required supply pressure (Z) when added to
the pressure at output 1, is applied at output
2.
The following relationship applies:
output 1 + output 2 = Supply pressure (Z).
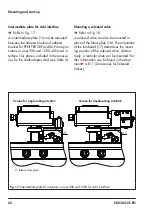
Connect output 1 to the signal pressure con-
nection on the actuator that causes the valve
to open when the pressure rises.
Connect output 2 to the signal pressure con-
nection on the actuator that causes the valve
to close when the pressure rises.
Î
Set slide switch on positioner to AIR TO
OPEN.
How the outputs are marked depends on the
reversing amplifier used:
−
Type 3710:
Output 1/2 = Y
1
/Y
2
−
1079-1118 and 1079-1119:
Output 1/2 = A
1
/A
2
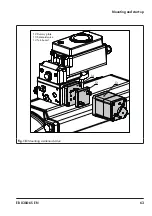
5.9.1
Reversing amplifier
(1079-1118 or 1079-
1119)
Î
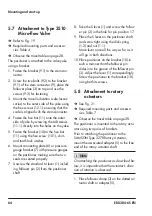
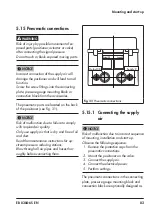
1. Mount the connecting plate (6) from the
accessories in Table 7 to the positioner.
Make sure that both O-rings (6.1) are
seated correctly.
2. Thread the special nuts (1.3) from the ac-
cessories of the reversing amplifier into
the boreholes of the connecting plate.
3. Insert the gasket (1.2) into the recess of
the reversing amplifier and slide both the
hollowed special screws (1.1) into the
connecting boreholes
A
1
and
Z
.
4.
Place the reversing amplifier onto the
connecting plate (6) and screw tight us-
ing both the special screws (1.1).
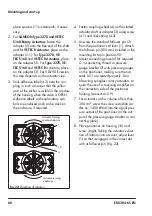
5.
Use a screwdriver (8 mm wide) to screw
the enclosed filters (1.6) into the connec
-
tion boreholes
A
1
and
Z
.
Air can escape uncontrolled from the signal
pressure connection.
Do not unscrew the sealing plug (1.5) out of
the reversing amplifier.
The rubber seal (1.4) is not required and can
be removed when the sealing plug is used.
6.
After initialization, set Code 16 (Pressure
limit) to No.
Note
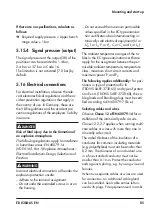
A
1
1.5
1.6
1.3
6.2
6
6.1
1.2
1.1
1
1.6
Z
A
2
1.4
A
1
A
2
Z
A
1
Output 38
Supply 9
Output 38
Supply
9
1.3
1.2
1.1
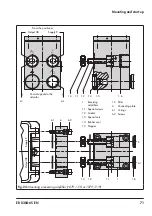
From the positioner
Control signals to the
actuator
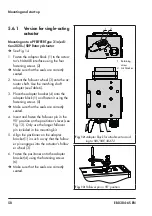
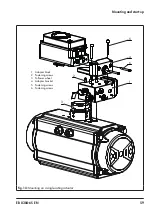
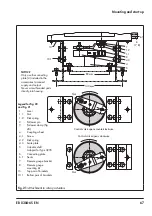
1
Reversing
amplifiers
1.1 Special screws
1.2 Gasket
1.3 Special nuts
1.4
Rubber seal
1.5 Stopper
1.6 Filter
6
Connecting plate
6.1 O-rings
6.2 Screws
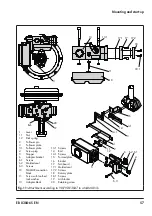
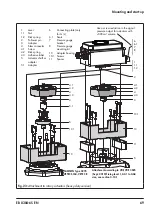
Fig. 24:
Mounting a reversing amplifier (1079-1118 or 1079-1119)
NOTICE
!
Note
Содержание TROVIS SAFE 3730-6
Страница 12: ...12 EB 8384 6S EN...
Страница 16: ...16 EB 8384 6S EN...
Страница 22: ...22 EB 8384 6S EN...
Страница 40: ...40 EB 8384 6S EN...
Страница 42: ...42 EB 8384 6S EN...
Страница 82: ...82 EB 8384 6S EN...
Страница 90: ...90 EB 8384 6S EN...
Страница 96: ...96 EB 8384 6S EN...
Страница 132: ...132 EB 8384 6S EN...
Страница 152: ...152 EB 8384 6S EN...
Страница 155: ...EB 8384 6S EN 155...
Страница 156: ...156 EB 8384 6S EN...
Страница 157: ...EB 8384 6S EN 157...
Страница 158: ...158 EB 8384 6S EN...
Страница 159: ...EB 8384 6S EN 159...
Страница 160: ...160 EB 8384 6S EN...
Страница 161: ...EB 8384 6S EN 161...
Страница 162: ...162 EB 8384 6S EN...
Страница 163: ...EB 8384 6S EN 163...
Страница 164: ...164 EB 8384 6S EN...
Страница 165: ...EB 8384 6S EN 165...
Страница 166: ...166 EB 8384 6S EN...
Страница 167: ...EB 8384 6S EN 167...
Страница 182: ...182 EB 8384 6S EN...
Страница 183: ...EB 8384 6S EN 183...