background image

A

U

D

I

O

XP100 • XP200 • XP300

OWNERS MANUAL

Содержание Expedition Pro XP100

Страница 1: ...A U D I O XP100 XP200 XP300 OWNERS MANUAL ...

Страница 2: ...tado especialmente en los enchufes receptáculos y en el punto en el que salen de la unidad 11 Desconecte de la corriente este aparato durante las tormentas eléctricas o cuando no lo vaya a usar durante un periodo de tiempo largo 12 Dirija cualquier posible reparación solo al servicio técnico oficial Deberá hacer que su aparato sea reparado cuando esté dañado de alguna forma como si el cable de cor...

Страница 3: ... Expedition Pro XP100 19 Expedition Pro XP200 21 Expedition Pro XP300 23 Consignes de positionnement et de montage 27 Specifications 57 DEUTSCHE Einleitung 29 Produktmerkmale des Expedition Pro Systems 30 Expedition Pro XP100 32 Expedition Pro XP200 34 Expedition pro XP300 36 Anweisungen zur Positionierung und Montage 40 Zubehör für die Expedition Pro Lautsprechersysteme 42 Specifications 57 ESPAÑ...

Страница 4: ...luding a 500 watt active subwoofer our EX500 a rechargable Lead Acid GelCel battery pack and a rear panel mountable cassette recorder with pitch control There s even a prewired custom compartment that accommodates any of three different Samson wireless receivers In this manual you ll find a more detailed description of the features of all three Expedition Pro systems as well as a guided tour throu...

Страница 5: ... used as an onstage wedge monitor Integral 1 3 8 pole mount receptacle and convenient fly points allow the Expedition Pro to be pole mounted or flown using standard PA hardware The XP100 is a passive cabinet that can be used with any power amplifier rated at up to 250 watts into 8 ohms It requires no power and provides dual Speakon and 1 4 connectors that allow multiple XP100s to be daisy chained ...

Страница 6: ... mounting bracket which allows any Expedition Pro enclosure to be flown from the ceiling the RB 2030 rechargable battery cartridge which pro vides up to two hours of power to either the XP200 or XP300 from its dual Lead Acid GelCel batteries and the TD30 cassette recorder which fits neatly into a special compartment above the XP300 s mixer to provide background music and or to record meetings or p...

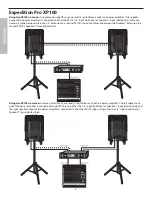
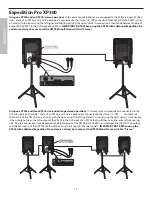
Страница 7: ...tandard 1 4 connector to daisy chain one XP100 to another See below for interconnection diagrams 4 Speakon extension Alternatively you can use this Speakon connector to daisy chain one XP100 to another See below for interconnection diagrams Speakon Wiring Interconnecting the XP100 5 SPEAKON SPEAKON Using one XP100 A single mono signal bus or aux send is routed from a mixer to a power amplifier One...

Страница 8: ...ion to a second XP100 s input solid line or between the Speakon extension to a second XP100 s Speakon input dotted line Using two XP100s in stereo A stereo signal bus or aux send is routed from a mixer to a power amplifier The left speaker out put of the power amplifier is connected to one XP100 using either the 1 4 input solid line or Speakon input dotted line and the right speaker output of the ...

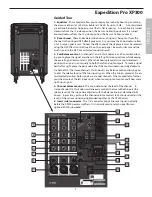
Страница 9: ...meter shows how much battery power remains as it is being charged Power switch off or depleted Power switch on 6 Volume control This knob sets the level of the XP200 s built in power amplifiers 7 Output connector This balanced male XLR connector carries line level out put signal from the XP200 It is used to send signal to a second XP200 being daisy chained see interconnection diagram on the follow...

Страница 10: ...d from a mixer to one XP200 s XLR input and a con nection is made between that XP200 s XLR output to a second XP100 s XLR input Using two XP200s in stereo A stereo signal bus or aux send is routed from a mixer with the left side connected to one XP200 s XLR input and the right side connected to the other XP200 s XLR input ENGLISH 8 ...

Страница 11: ...When the knob is placed at its center detented position the signal is sent equally to both the left and right outputs To route a signal hard left or right place the pan knob either fully counterclockwise or fully clockwise In channel 3 4 the stereo channel this knob acts as a Balance control allowing you to alter the relative levels of the two input signals When the knob is placed at its cen ter d...

Страница 12: ...l to a second XP300 or XP200 being daisy chained see the interconnection diagram on the following page or to an optional EX500 subwoofer Note that the signal being output from these con nectors is dependent upon the setting of the Mono Stereo switch see 9 above When set to Stereo the Left XLR connector carries left signal only and the Right XLR connector carries right signal only when set to Mono ...

Страница 13: ...ge to either 4 professional or 10 consumer level 20 Power switch Use this to turn power to the XP300 on or off If an optional RB 2030 rechargable battery pack is installed it will charge when this switch is in the Off position Interconnecting the XP300 2 Using one XP300 In this example microphones are connected to the XLR mic inputs of chan nels 1 and 2 and a stereo keyboard is connected to the st...

Страница 14: ...XP300 and three XP200s extended range stereo operation In this example microphones are connected to the XLR mic inputs of channels 1 and 2 of an XP300 and a stereo keyboard is connected to the stereo 1 4 TRS connector of channel 3 4 of the XP300 using a Y cord with the tip carrying the left signal and the ring carrying the right signal A connection is then made between the Left output of the XP300...

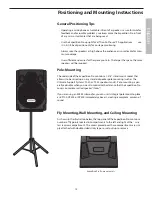
Страница 15: ... 1 3 8 stand mount socket that allows it to be raised up on any standard speaker pole mounting such as the Ultimate Support Systems TS 30 or TS 33 speaker stands Pole mounting is gen erally advisable when you want to maximize the distance that the Expedition Pro covers sometimes called speaker throw If you are using an EX500 subwoofer you can use its integral pole mount to place an XP100 XP200 or ...

Страница 16: ...mounting bracket in environments where the Expedition Pro needs to be flown In fixed installations where you wish to mount the Expedition Pro to a ceiling use the OmniMount model 100 STMP mount as shown in the illustration below In fixed installations where you wish to mount the Expedition Pro from a wall use the OmniMount model 100 WB mount as shown in the illustration below Top of Expedition Pro...

Страница 17: ... matter pairs a powerful 500 watt amplifier with a heavy duty 15 low frequency driver in order to provide deep low end response A built in stereo electronic crossover allows the EX500 to operate either in mono or as a common subwoofer in a stereo system It features an all steel grill and rigid corners as well as an integral 1 3 8 pole mount receptacle The RB 2030 rechargable battery cartridge whic...

Страница 18: ...dont un Subwoofer actif 500 Watts modèle EX500 un accumulateur Lead Acid rechargeable ainsi qu une platine cassette avec variateur de hauteur à loger en face arrière Il existe même un compartiment précâblé pour accueillir un système sans fil Samson Ce manuel vous donne une description détaillée des caractéristiques des trois enceintes de la gamme Expedition Pro ainsi qu un tour d horizon de leurs ...

Страница 19: ...un dessin en charge pavillonnaire avec guide d onde elliptique permettant d éliminer quasiment toute diffraction sonore Possibilité d utiliser les Expedition Pro comme bains de pied de scène grâce au pivot intégré Le réceptacle pour pied 1 3 8 et les points d ancrage permettent de monter les Expedition Pros sur un pied ou une perche et de les fixer suspendre au moyen d accessoires standard L XP100...

Страница 20: ... ont maintes fois été prouvés sur les scènes du monde entier Vous avez le choix entre les récepteurs UHF UM1 ou M32 ou le modèle VHF VM1 De très nombreux accessoires sont proposés en option En voici quelques uns MP 1030 support permettant de suspendre l enceinte Expedition Pro au plafond RB 2030 accu mulateur rechargeable à double batterie Lead Acid GelCel qui offrent deux heures d autonomie aux X...

Страница 21: ...re en cascade Vous pouvez trouver ci dessous les schémas de connexion 4 Embase Speakon d extension Cette embase Speakon permet de relier une XP100 à une autre en cascade Vous pouvez trouver ci dessous les schémas de con nexion Câblage des embases Speakon Connexions à l XP100 19 SPEAKON SPEAKON 1 1 2 2 NOT CONNECTED Emploi d une seule XP100 Reliez un signal mono bus ou départ auxiliaire du mélangeu...

Страница 22: ...ck ligne pleine de la seconde XP100 ou l embase Speakon d extension à l entrée Speakon de la seconde XP100 ligne pointillée Emploi de deux XP100 en stéréo Reliez un signal stéréo bus ou départ auxiliaire du mélangeur à l amplificateur de puissance Reliez ensuite la sortie HP gauche de l amplificateur de puissance à la première XP100 sur l entrée Jack ligne pleine ou sur l entrée Speakon ligne poin...

Страница 23: ...lorsque l XP200 est en cours d utilisation batteries en cours de consommation ou lorsqu elle est éteinte batteries en cours de chargement 6 Potentiomètre de volume Ce potentiomètre permet de fixer le volume des amplificateurs de puissance de l XP200 7 Connecteur de sortie Connecteur XLR mâle symétrique auquel est dirigé le signal de sortie niveau ligne de l XP200 Ce connecteur permet également de ...

Страница 24: ...geur à l entrée XLR de l XP200 puis reliez la sortie XLR de la première XP200 à l entrée XLR de la seconde XP200 Emploi de deux XP200 en stéréo Reliez le canal gauche d un signal stéréo bus ou départ auxiliaire provenant du mélangeur à l entrée XLR de la première XP200 puis le signal droit à l entrée XLR de la seconde XP200 FRANÇAIS 22 ...

Страница 25: ... la distorsion 3 Réglage de panoramique balance Sur les voies 1 et 2 ce potentiomètre sert de réglage de panoramique et permet de placer le signal dans le champ stéréo gauche droit tout en conservant un niveau de signal constant En position centrale crantée le signal est transmis de manière égale aux sorties gauche et droite Pour envoyer un signal exclusivement à la sortie gauche ou droite il suff...

Страница 26: ...la somme des signaux placés sur la gauche de l espace sonore au niveau du mélangeur La sortie droite se charge alors de transmettre le signal du canal droit somme des signaux placés sur la droite de l espace sonore au niveau du mélangeur à une seconde enceinte Veuillez vous reporter aux schémas d interconnexion en page 24 25 pour de plus amples détails 10 Sorties L XP300 est équipée de deux sortie...

Страница 27: ...nsion Veillez à ce que ce sélecteur soit dans la position correspondante à la tension en vigueur dans votre pays avant d allumer l XP300 19 Sélecteur de niveau nominal Ce sélecteur permet de fixer le niveau nominal de l entrée Jack stéréo de la voie 3 4 voir n 6 en page précédente sur 4 niveau professionnel ou 10 niveau grand public 20 Interrupteur d alimentation Permet de mettre l XP300 sous et h...

Страница 28: ...Emploi d une XP300 et de trois XP200 configuration stéréo étendue Dans cet exemples reliez les microphones aux entrées micro XLR des voies 1 et 2 de l XP300 ainsi qu un clavier stéréo au connecteur Jack 6 35 mm stéréo de la voie 3 4 de l XP300 par le biais d un câble en Y avec signal gauche sur pointe et signal droit sur bague Reliez ensuite la sortie gauche de l XP300 à l entrée XLR d une XP200 l...

Страница 29: ...s Expedition Pro disposent sous leur dessous d une renfoncement pour pied 1 3 8 permettant de les fixer sur n importe quel pied d enceinte stan dard pieds Ultimate Support Systems TS 30 ou TS 33 par exemple En général il est recommandé de monter les enceintes sur pied pour optimiser leur couverture ou portée Le Subwoofer EX500 est équipé d un fixation intégrée permettant de venir placer une XP100 ...

Страница 30: ...cessoires de suspension standards Pour les installations fixes nécessitant le montage au plafond de l enceinte Expedition Pro servez vous d une fixation OmniMount modèle 100 STMP voir illustration ci des sous Pour les installation fixes nécessitant le montage mural de l enceinte Expedition Pro servez vous d une fixation OmniMount modèle 100 WB voir illustration ci dessous Vue de dessus d une Exped...

Страница 31: ...Darüber hinaus sind optionale Erweiterungen erhältlich wie der 500 Watt Aktiv Subwoofer EX500 ein Akku Set Lead Acid GelCel und ein auf der Rückseite montier barer Kassettenrekorder mit Pitch Regler Es ist übrigens sogar ein anschlussbereites Fach zur Aufnahme einer der Samson Funkempfänger vorhanden Dieses Handbuch gibt Ihnen eine detaillierte Beschreibung der Merkmale der drei Lautsprechersystem...

Страница 32: ... Stative geeignete Gehäuse sowie passende Verankerungspunkte erlauben die Installation der Expedition Pro auf Stativ bzw hängend mittels Standard PA Zubehör Der XP100 ist ein passiver Lautsprecher der an beliebigen Verstärkern bis zu 250 Watt an 8 Ohm betrieben werden kann Er braucht keinen Netzanschluss und stellt je zwei Speakon und Klinken Buchsen zu Verfügung womit bei Bedarf mehrere XP100 kas...

Страница 33: ...dem VHF Modell VM1 Eine breite Palette optionalen Zubehörs unter anderem des MP1030 einer Haltevorrichtung die den Expedition Pro Systemen die Unter Decken Montage ermöglicht dem RB 2030 einem Akku mit Doppel Lead Acid GelCel Speichern der dem XP200 oder XP300 so zwei Stunden Netzunabhängigkeit erlaubt sowie der TD30 Kassettenrekorder der in ein spezielles Fach oberhalb des Mischers im XP300 einge...

Страница 34: ...n XP100 mit einem anderen zu verketten Siehe Anschluss Schemata unten 4 Zusatz Speakon Buchse Alternativ kann man diesen Speakon Anschluss zur Verkettung zweier XP100 verwenden Siehe Anschluss Schemata unten Verkabelung per Speakon Buchsen Verbindung der XP100 32 SPEAKON SPEAKON 1 1 2 2 NOT CONNECTED Betrieb eines einzigen XP100 Ein einzelnes Mono Signal Bus oder Aux Send geht vom Mischer zum Vers...

Страница 35: ...g durchgezogene Linie des zweiten XP100 oder die Zusatz Speakon Buchse an den Speakon Eingang des zweiten XP100 punktierte Linie anschließen Stereo Betrieb zweier XP100 Ein Stereo Signal Bus oder Aux Send geht vom Mischer zum Verstärker Der linke Lautsprecherausgang des Verstärkers wird an einen XP100 an den Klinken Eingang durchgezogene Linie oder an den Speakon Eingang punktierte Linie angeschlo...

Страница 36: ...en Restkapazität hier ablesen sowohl bei Benutzung des XP200 Verbrauch oder wenn er ausgeschaltet ist Laden 6 Volume Regler Bestimmt die Lautstärke der eingebauten Verstärker des XP200 7 Ausgang Dieser symmetrische XLR Anschluss trägt das Line Pegel Ausgangssignal des XP200 Wird verwendet um ein Signal an einen zweiten kaskadierten XP200 anzuschließen siehe Anschluss Schemata auf der folgenden Sei...

Страница 37: ...XLR Eingang des XP200 Dann den XLR Ausgang des ersten XP200 an den XLR Eingang des zweiten XP200 anschließen Stereo Betrieb zweier XP200 Den linken Kanal eines Stereo Signals Bus oder Aux Send das vom Mischer kommt mit dem XLR Eingang des einen XP200 dann das Signal des rechten Kanals mit dem XLR Eingang des anderen XP200 verbinden DEUTSCHE 35 ...

Страница 38: ... die Plazierung des Signals im Links Rechts Stereo Feld unter Beibehaltung des Gesamt Signalpegels In Mittelstellung geht das Signal zu gleichen Teilen zum linken und rechten Ausgang Um das Signal ausschließlich nach links oder nach rechts zu senden stellen Sie den Regler entsprechend ganz nach links oder rechts Im Kanal 3 4 Stereo Kanal fungiert dieser Regler als Balance Steuerung und erlaubt die...

Страница 39: ...s Mischers abgenom menen Signale und der rechte Ausgang kann dazu genutzt werden ein Signal vom rechten Kanal d h das auf der rechten Seite des Mischers abgenommene Signal an einen zweiten Lautsprecher zu senden Siehe Anschluss Schemata auf den Seiten 38 39 für mehr Details 10 Ausgänge Die zwei XLR Buchsen tragen das Line Pegel Ausgangssignal vom XP300 Sie dienen zur Weiterleitung des Signals an e...

Страница 40: ...XP300 einschalten 19 Nominalpegel Dieser Wahlschalter erlaubt die Festsetzung des Nominalpegels des Stereo Line Eingangs von Kanal 3 4 siehe 6 auf der vorhergehenden Seite auf 4 professio nell oder 10 Amateurbereich 20 Netzschalter Dies ist der Ein Aus Schalter des XP300 Wenn das optionale RB2030 Akku Set installiert ist lädt sich der Akku auf sobald der XP300 ausgeschaltet wird Anschluss des XP30...

Страница 41: ...drei XP200 Breitband Stereo Bei diesem Anschlussbeispiel werden die Mikrofone mit den XLR Mik Eingängen der Kanäle 1 und 2 des XP300 verbunden genauso wie ein Stereo Keyboard mit den Stereo Klinken Buchsen von Kanal 3 4 des XP300 mit Hilfe eines Y Kabels Spitze trägt das linke der Ring das rechte Signal Dann wird der linke Ausgang des XP300 an den XLR Eingang eines XP200 angeschlossen beide tragen...

Страница 42: ...Expedition Pro hat eine Vertiefung für ein 1 3 8 Stativ die Anbringung auf jedem beliebigen Standard Lautsprecherstativ gestattet wie z B die TS 30 oder TS 33 Lautsprecherstative von Ultimate Support Systems Stativmontage ist im Allgemeinen dann angezeigt wenn der größtmögliche bes challte Bereich erzielt werden soll Eine integrierte Befestigungsvorrichtung des EX500 Subwoofer erlaubt die Montage ...

Страница 43: ...0 ist kompatibel zu Standard Kabeln und Zubehör die der hängenden Installation dienen Für Festinstallationen in Form von Deckenmontage verwenden Sie eine OmniMount Befestigung Modell 100 STMP siehe Abbildung unten In Festinstallationen in Form von Wandmontage verwenden Sie eine OmniMount Oberseite des Expedition Pro mit installierter MP1030 Haltevorrichtung Montage der MP1030 Haltevorrichtung von ...

Страница 44: ...Watt Verstärker mit einem 15 Hochleistungs Bassfrequentreiber Die interne elektronische Stereo Frequenzweiche erlaubt den Betrieb des EX500 entweder in Mono allein oder als gemeinsamen Subwoofer in einem Stereo System Er ist mit einem Stahlgitter und verstärkten Ecken aus gestattet wie mit einer integrierten 1 3 8 Stativ Aufnahmevorrichtung Das RB2030 Akku Set der dem XP200 oder XP300 dank seiner ...

Страница 45: ... activo de 500 vatios nuestro EX500 una batería recargable de ácido y una grabadora de cassette que puede ser montada en el panel trasero con control de tono Incluso dispone de un compartimento pre cableado exclusivo que puede albergar uno de entre tres receptores inalámbricos Samson distintos En este manual encontrará una descripción más detalladas de las características de los tres sistemas Expe...

Страница 46: ... monitor de escenario increíble Un receptáculo de montaje integral de barra de 1 3 8 y puntos de anclaje adecuados permite montar el Expedition pro sobre una barra o colgarlo usando piezas standard de sistemas PA El XP100 es un recinto pasivo que puede ser usado con cualquier etapa de potencia que desarrolle hasta 250 vatios a 8 ohmnios No necesita corriente y dispone de conectores doble Speakon y...

Страница 47: ... los siguientes la abraza dera de montaje MP 1030 que permite colgar del techo cualquiera de los recintos Expedition pro el cartucho de pila recargable RB 2030 que le ofrece hasta dos horas de alimentación para el XP200 o XP300 por medio de sus dos pilas de ácido GelCel y la grabadora de cassette TD30 que puede ser colocada dentro de un comparti mento especial que está encima del mezclador del XP3...

Страница 48: ...tor standard de 6 3 mm para conectar en serie un XP100 con otro Vea más abajo los diagramas de interconexión 4 Extensión Speakon Utilice este conector Speakon para conectar en serie un XP100 con otro Vea más abajo los diagramas de interconexión Cableado Speakon Interconexión del XP100 46 SPEAKON SPEAKON 1 1 2 2 NOT CONNECTED Uso de un único XP100 Una señal mono única bus o envío aux iliar es dirig...

Страница 49: ...rada del segundo XP100 línea conti nua o entre la extensión Speakon y la entrada Speakon de un segundo XP100 línea de puntos Uso de dos XP100s en stereo Una señal stereo bus o envío auxiliar es enviada desde una mesa de mezclas a una etapa de potencia La salida de altavoz izquierda de la etapa de potencia es conectada a un XP100 usando bien la entrada de 6 3 mm línea continua o la entrada Speakon ...

Страница 50: ...le mostrará la carga de la pila cuando esté cargándola interruptor Power apagado o cuando se esté usando interruptor Power encendido 6 Control de volumen este mando giratorio ajusta el nivel de las etapas de potencia internas del XP200 7 Conector de salida Este conector XLR balanceado macho da salida a la señal de salida con nivel de línea del XP200 Se utiliza para pasar señal a un segundo XP200 q...

Страница 51: ...ada XLR de uno de los XP200 y después se realiza una conexión entre la salida XLR de este XP200 y la entrada XLR de un segundo XP200 Uso de dos XP200s en stereo Una señal stereo bus o envío auxiliar es enviada desde un mezclador con el lado izquierdo conectado a la entrada XLR de un XP200 y el lado derecho conectado a la entrada XLR del otro XP200 ESPAÑOL 49 ...

Страница 52: ...quierda dere cha manteniendo el nivel global de la señal constante Cuando el mando está colocado en su posición central muesca la señal es enviada por igual a ambas salidas izquierda y derecha Para dirigir una señal completamente a la izquierda o la derecha coloque el mando de pan orama completamente a la izquierda o la derecha En el canal 3 4 el canal stereo este mando actúa como un control de ba...

Страница 53: ... señal de salida con nivel de línea del XP300 Se utilizan para enviar señal a un segundo XP300 o XP200 que esté conectado en cadena vea el diagrama de interconexión en la página siguiente o a un subwoofer opcional EX500 Tenga en cuenta que la señal de salida que está siendo enviada desde estos conectores depende del ajuste del interruptor Mono Stereo vea el punto 9 anterior Cuando lo ajuste a Ster...

Страница 54: ...nancia Ajusta la entrada TRS de nivel de línea del canal 3 4 vea el punto 6 de la página anterior a nivel profesional 4 o no profesional 10 20 Interruptor Power Utilice este interruptor para encender o apagar el XP300 Si ha instalado una pila recargable opcional RB2030 esta pila se cargará cuando coloque este interruptor en la posición Off Interconexión del XP300 2 Uso de un único XP300 En este ej...

Страница 55: ...00 funcionamiento stereo con rango ampliado En este ejemplo hemos conectado micrófonos a las entradas XLR de los canales 1 y 2 de un XP300 y hemos conectado un teclado stereo a la clavija TRS stereo de 6 3 mm del canal 3 4 del XP300 usando un cable en Y con la señal izquierda en la punta y la derecha en el anillo Después hemos hecho una conexión entre la salida izquierda del XP300 y la entrada de ...

Страница 56: ...n soporte de 1 3 8 que le permitirá colocar la unidad encima de cualquier soporte de altavoces standard como los stands de altavoces Ultimate Support TS 30 o TS 33 El montaje sobre soporte de barra es en general recomendable cuando quiera conseguir maximizar la distancia de cobertura del Expedition llamada a veces en los altavoces alcance Si está usando un subwoofer EX500 puede usar su receptáculo...

Страница 57: ...configura ciones en las que el Expedition deba quedar flotando En instalaciones fijas en las que quiera montar el Expedition colgado de un techo use el montaje OmniMount modelo 100 STMP tal como puede ver en la ilustración de abajo En instalaciones fijas en la que quiera montar el Expedition colgado de una pared utilice el OmniMount modelo 100 WB tal como puede ver en la siguiente ilustración Part...

Страница 58: ... un potente ampli ficador de 500 vatios con un cabezal de frecuencias graves de 15 y alto rendimiento para ofrecerle una respuesta profunda y potente en los super graves Un crossover o separador de frecuencias stereo electrónico interno permite al EX500 funcionar tanto en mono o como un subwoofer normal de un sistema stereo Dispone de una parrilla metálica y esqui nas rígidas así como un receptácu...

Страница 59: ... 5 voice coil Kapton Former 50 oz barium ferrite magnet HF Driver all models 1 compression driver Stereo Mixer Section XP300 only Inputs 2 Mic Line XLR TRS 1 Stereo Line w Mic TRS RCA XLR Outputs 4 Balanced XLR Frequency Response 10 Hz 50 kHz Crosstalk 70 dB 1 kHz Equalization Frequencies 100 Hz Low 10 kHz High Effects DSP Reverb with 6 Presets Mounting all models Integral 1 3 8 Pole Mount Recepta...

Страница 60: ...Samson Technologies Corp Phone 1 800 3 SAMSON 1 800 372 6766 Fax 516 364 3888 www samsontech com ...

Отзывы: