5-10
EB 8355-2 EN
Installation
The pin must not slip out of the bracket
once installed.
6. Check whether the correct range spring
has been installed as listed in Table 5-6.
7.
Range spring 1 is installed as standard.
If necessary, replace it with range spring
2 included in the accessories and fix it at
the outer hook-in holes.
8. Perform positioner setting (see sec-
tion
5.3.3
Attachment to rotary
actuators
Î
Required mounting parts and accesso-
ries: Table 5-7
Î
See
Attachment to rotary actuators complies with
VDI/VDE 3845 (September 2010) require
-
ments. The rotary motion of these actuators
is converted into a linear motion required by
the pneumatic control unit of the positioner
using the cam disk of the actuator shaft and
a feeler roll on the positioner lever.
Double-acting springless rotary actuators re-
quire the use of a
reversing amplifier
on the
connection side of the positioner housing
(see section
5.3.4).
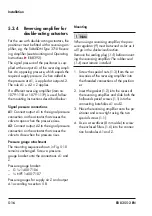
When using a reversing amplifier, the pres
-
sure regulator (9,
clockwise as far as it will go (see sec-
tion
5.4.2).
When attaching the positioner to the
SAMSON Type 3278 Rotary Actuator
, left), the inside of the actuator and
the unused reverse side of the diaphragm
are purged with the positioner's exhaust air.
Additional piping is not required.
When attaching the positioner to actuators
from other manufacturers, the reverse side of
the diaphragm can be purged with air over
a pipe connection installed between the ac-
tuator and intermediate piece.
Î
Check whether the correct range spring
has been installed as listed in
range spring 1 is installed as standard. If
necessary, replace it with range spring 2
included in the accessories and fix it at
the outer hook-in holes.
a) Mounting the lever with
feeler roll
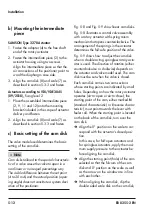
1. Place the lever with feeler roll (3) on the
side of the lever (5) opposite to where
the press nuts are located and secure it
using the supplied screws (6) and wash-
ers.
2. Attach the spring contained in the ac-
cessories kit (order no. 1400-6660) to
the back of the positioner housing (see
Fig. 5-4).
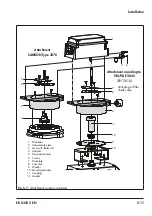
1
6
3
7
7
8
2
4
8
2
11
12
9
10
5
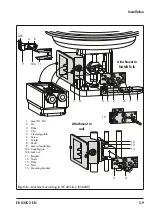
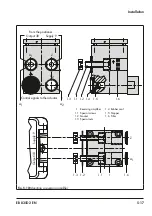
Attachment according to
VDI/VDE 3845
(09/2010)
Attachment
SAMSON Type 3278
1 Positioner
2 Intermediate piece
3 Lever with feeler roll
4 Adapter
5 Transmission lever
6 Screws
7
Dial plate
8 Cam disk
9 Washer
10 Mounting bracket
11 Coupling
12 Gasket
Vent plug or filter
check valve
Fig. 5-7:
Attachment to rotary actuators
Содержание 3767
Страница 10: ...1 6 EB 8355 2 EN...
Страница 14: ...2 4 EB 8355 2 EN...
Страница 58: ...6 2 EB 8355 2 EN...
Страница 60: ...7 2 EB 8355 2 EN...
Страница 70: ...10 2 EB 8355 2 EN...
Страница 72: ...11 2 EB 8355 2 EN...
Страница 74: ...12 2 EB 8355 2 EN...
Страница 76: ...13 2 EB 8355 2 EN...
Страница 78: ...14 2 EB 8355 2 EN...
Страница 79: ...EB 8355 2 EN 14 3...
Страница 80: ...14 4 EB 8355 2 EN...
Страница 81: ...EB 8355 2 EN 14 5...
Страница 88: ...14 12 EB 8355 2 EN...
Страница 89: ...EB 8355 2 EN 14 13...
Страница 90: ...14 14 EB 8355 2 EN...
Страница 91: ...EB 8355 2 EN 14 15...
Страница 92: ...14 16 EB 8355 2 EN...
Страница 93: ...EB 8355 2 EN 14 17...
Страница 94: ...14 18 EB 8355 2 EN...
Страница 95: ...EB 8355 2 EN 14 19...
Страница 96: ...14 20 EB 8355 2 EN...
Страница 97: ...EB 8355 2 EN 14 21...
Страница 98: ...14 22 EB 8355 2 EN...
Страница 99: ...EB 8355 2 EN 14 23...
Страница 100: ...14 24 EB 8355 2 EN...
Страница 101: ...EB 8355 2 EN 14 25...
Страница 102: ...14 26 EB 8355 2 EN...
Страница 103: ...EB 8355 2 EN 14 27...
Страница 104: ...14 28 EB 8355 2 EN...
Страница 109: ......
Страница 110: ...2 EB 8355 2 EN...
Страница 111: ...EB 8355 2 EN 3...

