


5-2
EB 8321 EN
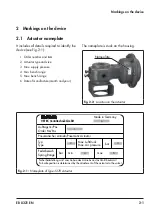
Installation
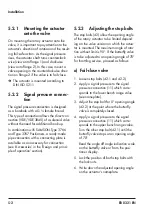
5.2.1
Mounting the actuator
onto the valve
On mounting the rotary actuator onto the
valve, it is important to pay attention to the
actuator's direction of rotation and the result-
ing fail-safe action. As the signal pressure
rises, the actuator shaft turns counterclock-
wise (view onto flange 1) and clockwise
(view onto flange 2). In this case, mount a
valve opening in the counterclockwise direc-
tion on flange 2 if the valve is to fail-close.
Î
The actuator is mounted according to
DIN ISO 5211.
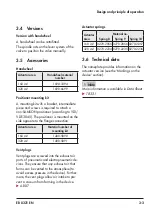
5.2.2
Signal pressure connec
-
tion
The signal pressure connection is designed
as a borehole with a G ¼ female thread.
This type of connection allows the direct con-
nection (VDE/VDE 3845) of a solenoid valve
without the need for additional hook-up.
In combination with SAMSON Type 3766
and Type 3767 Positioners, a ready-made
pipe connection with a connecting plate is
available as an accessory for connection
(see 'Accessories' in the 'Design and princi-
ple of operation' section).
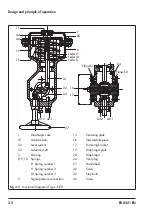
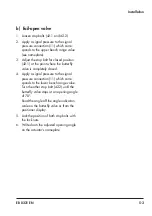
5.2.3
Adjusting the stop bolts
The stop bolts (42) allow the opening angle
of the rotary actuator to be limited depend-
ing on the valve version on which the actua-
tor is mounted. The maximum angle of rota-
tion without limit is 90°. If the butterfly valve
is to be adjusted to an opening angle of 70°
for throttling service, proceed as follows:
a) Fail-close valve
1.
Loosen stop bolts (42.1 and 42.2).
2.
Apply a signal pressure to the signal
pressure connection (11) which corre-
sponds to the lower bench range value
(see nameplate).
3.
Adjust the stop bolt for 0° opening angle
(42.2) at the point where the butterfly
valve is completely closed.
4. Apply a signal pressure to the signal
pressure connection (11) which corre-
sponds to the upper bench range value.
Turn the other stop bolt (42.1) until the
butterfly valve stops at an opening angle
of 70°.
Read the angle off angle indication scale
on the butterfly valve or from the posi-
tioner display.
5. Lock the position of both stop bolts with
the lock nuts.
6.
Write down the adjusted opening angle
on the actuator's nameplate.
Содержание 3278
Страница 10: ...1 6 EB 8321 EN...
Страница 12: ...2 2 EB 8321 EN...
Страница 18: ...3 6 EB 8321 EN...
Страница 22: ...4 4 EB 8321 EN...
Страница 26: ...5 4 EB 8321 EN...
Страница 28: ...6 2 EB 8321 EN...
Страница 30: ...7 2 EB 8321 EN...
Страница 36: ...9 2 EB 8321 EN...
Страница 38: ...10 2 EB 8321 EN...
Страница 40: ...11 2 EB 8321 EN...
Страница 42: ...12 2 EB 8321 EN...
Страница 44: ...13 2 EB 8321 EN Annex 44 24 46 62 6 60 56 18 14 17 28 20 16 47 19 2 10 9 8 5 35 58 53 52 42 25 1 40 54 50 22 27...
Страница 46: ...13 4 EB 8321 EN...
Страница 47: ......


