

Index revision : A
20
7129
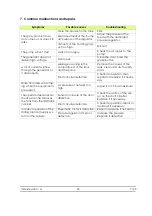
5. Cleaning
Before any operation on the insulating cabinet, refer to the Health and Safety instructions (
).
WARNING :
• The ISOCUBE equipment cleaning operations must conform to standard NF EN 50348.
• Before any maintenance operations, discharge the equipment to the earth (by opening
the door of the ISOCUBE), disconnect the AC power cord, dump the product from the
hoses (cut off the air supply and dump the air).
5.1. Ongoing maintenance
• It is very important to maintain the ISOCUBE In a perfect state of cleanliness (without drip-
ping product).
• Operate in a well ventilated and explosive-proof area, with the generator out of service.
Dry the cleaned areas well before restarting.
• The interior of the cabinet is designed to remain dry and clean. If a fluid leak occurs, clean
it up. Search for the causes of the leak and repair them.
• Regularly check the earth connection of all of the booth's mechanical parts and the parts
to be painted. The earth resistance must be lower than or equal to 1 M
Ω
(500 V measure-
ment voltage).
• Operate with a multimeter in the ohmmeter position between the earth terminal of the
ISOCUBE and the earth terminal of the electrical socket on the power cord. The value
must not exceed 2
Ω
.
5.1.1. Insulating cabinet
The use of a low or high pressure water spray is prohibited (except for the receptacle
).
Clean with water or with a non-aggressive, non-greasy, non-flammable solvent. Do not use
butyl-glycol.
5.1.1.1. External part except electro-pneumatic strip
• Clean with a cloth soaked in water or non-aggressive, non-greasy and non-flammable sol-
vent. Do not use butyl-glycol.
• Dry the non-accessible parts (door hinges for example) with a dry cloth and/or com-
pressed air under moderate pressure (max. 2 bars - 30 psi).
5.1.1.2. Internal part
• Clean with a cloth soaked in water or non-aggressive, non-greasy and non-flammable sol-
vent. Do not use butyl-glycol.
• Dry very carefully with compressed air, particularly in difficult to access or inaccessible
areas with a cloth. Finish drying the large surfaces with a perfectly dry cloth.
• Pay specify attention to drying the following points:
• The interior surface and the door frame, including and especially the metal frame.
• The bottom of the cabinet and over a height of at least 300 mm to 400 mm.
• The receptacle


