Basics of Your Thermometer
Normal Body Temperature
Troubleshooting
normal forehead
temp range
Temperature readings are different from person to person and also vary depending
upon the body location from which the temperature is measured. Forehead
temperatures tend to be comparable to oral temperatures and approximately 1˚ lower
than rectal temperatures for the same individual. Temperature readings are affected
by many factors including exercise, drinking hot or cold beverages prior to taking a
reading as well as technique.
“Normal” temperature refers to each individual’s average temperature while healthy.
You may want to measure and record your child’s temperature a few times when he
or she is well, so that you will know what is normal for your own child. On average,
temperature ranges are as follows:
TEMPERATURE
METHOD
Forehead
NORMAL
TEMPERATURE
97°F to 99.5°F
FEVER
RANGE
99.6°F +
Display Meaning
Recommended Action
Display Recommended Action
•
Error 3, the ambient temperature is not within range
•
Error 5-9, the system is not functioning properly
•
Forehead Mode: Temperature taken is higher than 108°F (+42.2°C)
•
Liquid Mode: Temperature taken is higher than 176°F (+80°C)
•
Forehead Mode: Temperature taken is lower than 89.6°F (+32°C)
•
Liquid Mode: Temperature taken is lower than -7.6°F (–22°C)
• Device cannot be powered on to the ready stage
• Allow the thermometer to rest in a room for at least 15 minutes at room temperature.
• Remove batteries, wait 1 minute and repower unit. If the message reappears, contact Consumer
Care.
• Allow the thermometer to rest in a room for at least 15 minutes at room temperature.
• Target is too cold to read using this thermometer. If in forehead mode, try moving unit closer to
the forehead.
• Remove batteries, wait 1 minute, and repower unit. If the message reappears, contact Consumer
Care.
NOTE: Room temperature is between 50°F and 104°F (10°C - 40°C).
•
Batteries are low. Replace them. (See Battery Information section).
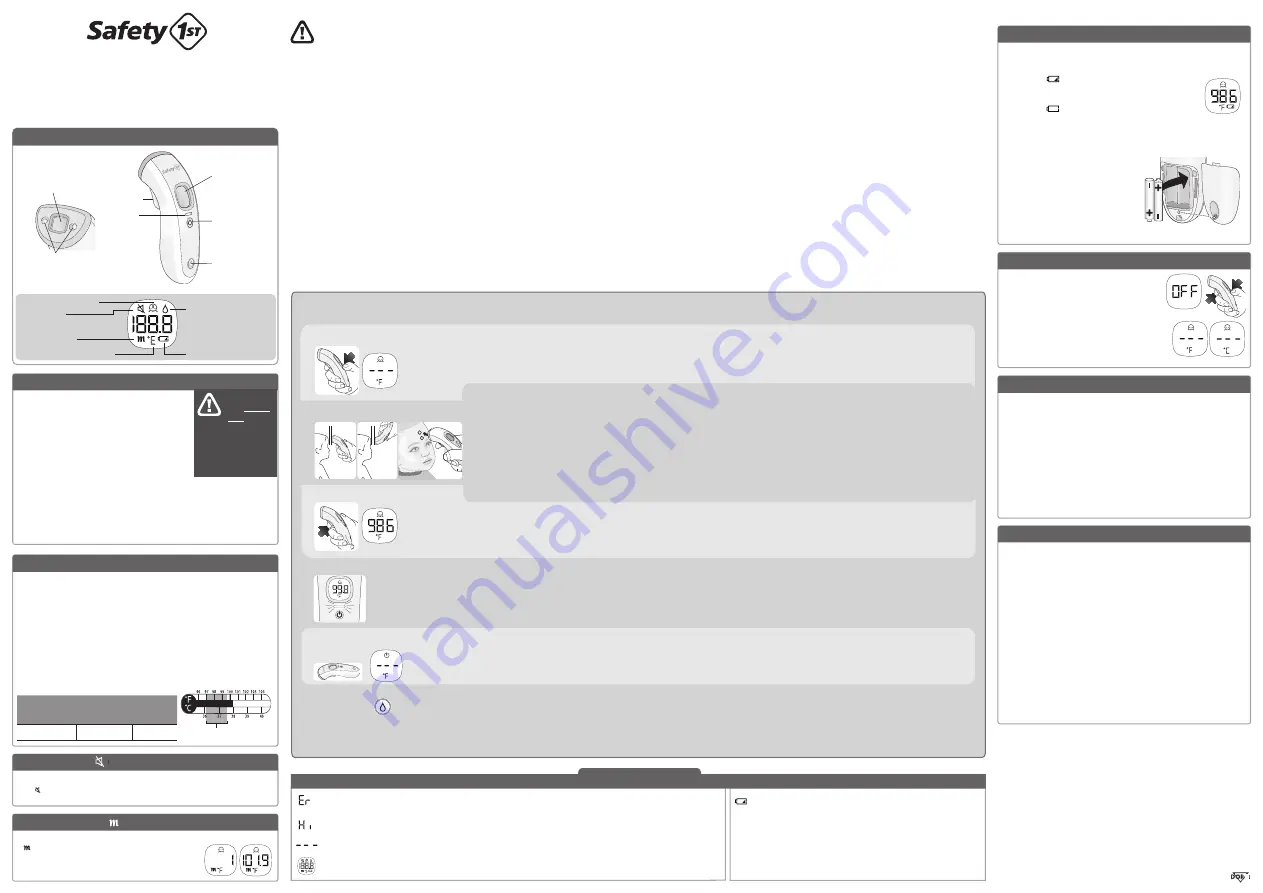
Press and release the ON/MEMORY button. Thermometer runs a brief self-check, then beeps and displays the ready screen. The unit will default to FOREHEAD
MODE. POSITION LIGHTS at front of unit come on automatically. Prep the forehead by making sure it is clear of hair and sweat. If child has recently been in a very
warm or very cold environment, wait a few minutes for their skin to adjust to room temperature before taking their temp.
Once unit is positioned, press and hold the READ TRIGGER button on the rear of the thermometer for about 1 second or until the screen lights up, displays
temperature reading, and beeps (if not in mute mode.)
The unit gives one long beep when temp is in normal range. Thermometer gives additional beeps and the fever bar lights up when elevated temp is detected.
NOTE: High, prolonged fever requires medical attention, especially for young children. Please contact your physician. Fever chart included.
After a reading is complete, the WAIT icon will flash for 5 seconds. After those 5 seconds are complete, the unit will return to READY mode. Thermometer beeps
and shuts off automatically after about 30 seconds in READY mode.
This thermometer can also be used to take no-touch temperatures of liquids like bath water and milk/formula. Unit defaults into FOREHEAD MODE every time
you turn it on. To switch to LIQUID MODE, simply press the MODE button on the handle of the thermometer. NOTE: To return to FOREHEAD MODE, press MODE
button again. NOTE: Once in LIQUID MODE, positioning lights and fever bar are no longer needed.
How to Measure Temperature
Switch Between Fahrenheit & Celsius
Technical Specifications
How to Install/Replace the Batteries
1 If unit is not off already, hold the POWER/MEMORY
button for 6 seconds. Release when you see the
word “OFF” appear on the screen.
2 While unit is still off, hold down READ TRIGGER
button and then POWER/MEMORY button. Hold
both down for about 5 seconds.
3 After about 5 seconds, unit will power on in the
new mode.
NOTE: Switching between F/C clears the memory on the unit.
This thermometer comes with the batteries outside of the unit. If this is your
first time using this unit, start with step 1 below.
Low Battery Warning:
• When the
icon appears on the display screen when
powering up and using the thermometer, the batteries are low
but may still work for a very short time.
• When the
icon appears and flashes by itself on the screen
the batteries are exhausted and need to be replaced.
To Install Batteries:
1 Use a Phillips head screwdriver to loosen battery cover screw.
Remove cover.
2 Remove old batteries
3 Insert two AAA (or equivalent) batteries,
correctly positioned with positive “+” and
negative “-” as shown in illustration.
4 Place the battery cover on the
thermometer and tighten the
screw to secure it in place.
• This is NOT an ear thermometer. Take temperature measurements from the center of
forehead. • Use caution when taking temperature readings of bath water and liquids. This product is not intended to touch
the person or item whose temperature is being measured. • ALWAYS supervise your child when using the thermometer.
NEVER allow your child to use it alone.
• NEVER allow children to play with this thermometer. It is not a toy. This is a sensitive electronic device and may be damaged
if not used properly under parental supervision. • DO NOT expose the thermometer to extreme temperatures, humidity, direct
sunlight or shock, and/or dust. • Keep battery out of child’s reach. Swallowing a battery could be fatal. Battery should not be
charged or placed into extreme heat as they may explode. • Used batteries should be disposed of properly.
Other Battery Information: We recommend alkaline batteries for longer battery life. DO NOT mix old and new batteries.
DO NOT mix alkaline, standard (carbon zinc) or rechargeable (nickel-cadmium) batteries. Non-rechargeable batteries are not
to be recharged. Rechargeable batteries are to be removed from the unit before being charged. Rechargeable batteries are only
to be charged under adult supervision. Only batteries of the same or equivalent type as recommended are to be used. Batteries
are to be inserted with the correct polarity. The supply terminals are not to be short-circuited. Check that all contact surfaces are
clean and bright before installing batteries. DO NOT disassemble for any reason other than inserting or replacing batteries.
Make sure the thermometer has been at room temperature for 30 minutes before use.
Please be sure to read all warnings, instructions and
notations before using this product. Please keep these
instructions as they contain important information.
Forehead Mode
Mute
Liquid Mode
Low Battery
Memory
Unit of Measure (F/C)
LCD Display
ON/MEASURE
Button with
Auto Shut-Off
Mode Button
Temperature
Sensor Lens
WARNING
User’s Guide TH104
AAA Batteries (2) Screw
Battery Cover
Precise Position Forehead Thermometer
One (1) Year Limited Warranty
Dorel Juvenile Group, Inc. warrants to the original purchaser that this product
(Thermometer), is free from material and workmanship defects when used under normal
conditions for a period of one (1) year from the date of purchase. Should the product contain
defects in material or workmanship Dorel Juvenile Group, Inc., will repair or replace the
product, at our option, free of charge. Purchaser will be responsible for all costs associated
with packaging and shipping the product to Dorel Juvenile Group Consumer Relations
Department at the address noted on the front of this document and all other freight or
insurance costs associated with the return. Dorel Juvenile Group will bear the cost of
shipping the repaired or replaced product to the purchaser. Product should be returned in its
original package accompanied by a proof of purchase, either a sales receipt or other proof
that the product is within the warranty period. This warranty is void if the owner repairs or
modifies the product or the product has been damaged as a result of misuse.
This warranty excludes any liability other than that expressly stated previously, including but
not limited to, any incidental or inconsequential damages.
SOME STATES DO NOT ALLOW THE EXCLUSION OR LIMITATION OF INCIDENTAL OR
CONSEQUENTIAL DAMAGES, SO THE ABOVE LIMITATION OR EXCLUSION MAY NOT
APPLY TO YOU.
THIS WARRANTY GIVES YOU SPECIFIC LEGAL RIGHTS, AND YOU MAY ALSO HAVE
OTHER RIGHTS THAT MAY VARY FROM STATE TO STATE.
Measurement Temperature Range:
Forehead Mode: 89.6°F to 108.0°F (32°C to 42.2°C)
Liquid Mode: -7.6°F to 176.0°F (-22°C to 80°C)
Measurement Accuracy:
Forehead Mode: +/- 0.4°F (0.2°C) within 95°F to 107.6°F (35 to 42°C)
+/- 0.5°F (0.3°C) For other range
Liquid Mode: +/- 0.5°F (0.3°C) within 71.6°F to 108°F (22 to 42.2°C)
/- 0.4% or +/- 0.4°F (0.2°C) whichever is greater.
Operation Environment: 50°F to 104.0°F (10 to 40°C)
Humidity up to 85% (non condensing)
Storage Environment: -4°F to 122°F (-20 to +50°C)
Humidity up to 85% (non condensing)
Care and Maintenance
Cleaning Temperature Sensor Lens:
• Clean very gently with a soft, alcohol-moistened cloth.
• Do not use an excessive amount of alcohol.
• Do not pour alcohol directly on sensor.
Cleaning Thermometer Body:
• Use a soft, dry cloth to clean thermometer body.
Notes:
• DO remove battery if stored for a long period of time.
• DO store thermometer in a dry place at room temperature.
• DO take special care not to scratch the sensor or display window.
• DO NOT use abrasive cleaning agents, thinners or benzene for cleaning.
• DO NOT expose thermometer to extreme temperatures, humidity or direct sunlight.
• DO NOT drop thermometer.
• DO NOT submerge any part of the product in water.
Position Lights
Read Trigger
Fever Light
•
For best accuracy, wait one minute between temperature measurements so that thermometer has time to
re-acclimate to the room’s temperature.
•
Do not return this product to the place of purchase. If any parts are missing, email support@djgusa.
zendesk.com, or chat with us at www.safety1st.com. You can also call Consumer Care at (800) 544-1108.
Have ready the model number (TH104) and date code (manufacture date located on package).
•
Install new batteries and re-try function before calling Consumer Care on electronics.
1. Turn Thermometer On and Prep Forehead
2. Position Thermometer
3. Measure Temperature
4. Fever Reading Indicator
5. Wait timer &
Auto Shut-Off
6. Liquid Mode
The POSITION LIGHTS are LED lights and are meant to help you feel confident about how you are aiming and distancing the unit.
-AIMING: The SENSOR LENS points at the area of the forehead between the two red POSITION LIGHTS. The right spot to aim the SENSOR LENS is
at the base of the forehead, just above the eyebrows. So, when properly positioned, the LOWER POSITION LIGHT should be between the eyebrows.
-DISTANCE: For accurate temperatures, the unit should be within 1.5 inches (4 cm) of the forehead. When the unit is 1.5 inches from the forehead,
the UPPER POSITIONING LIGHT will be directly above the LOWER POSITIONING LIGHT (vertically.) When closer or farther away, the lights move
away from each other in opposite directions.
Hint: If a child is uncomfortable seeing the thermometer coming toward his face, try turning the thermometer upside-down.
The POSITIONING LIGHTS work the same when the thermometer is upside down.
Memory
While unit is ON, press the ON/MEM button. The number “1” will appear with the
“ ” icon to indicate this is the first reading in the memory.
Release the ON/MEM button to see the reading. Press the
ON/MEM button again to toggle through up to 25 records.
Mute Function
To set to mute: While unit is ON, press the ON/MEM button for 3 seconds until you see
the “ ” icon appear. Then release ON/MEM button.
©2019 Dorel Juvenile Group, Inc. Safety 1st™ and the Safety 1st logo and
design are trademarks of Dorel Juvenile Group, Inc. Safety 1st™ y el logotipo
de Safety 1st y su diseño son marcas comerciales de Dorel Juvenile Group, Inc.
(800) 544-1108 www.safety1st.com. Styles and colors may vary. Los estilos
y los colores pueden variar. Made in CHINA. Hecho en CHINA. Distributed by
(distribuido por) Dorel Juvenile Group, Inc., 2525 State St., Columbus, IN 47201-
7494. Dorel Juvenile Canada, 2855 Argentia Road, Unit 4, Mississauga, ON L5N
8G6. Importado y Distribuido en Chile por: Comercial e Industrial Silfa S.A. - San
Ignacio 0201 / Parque Industrial Portezuelo Quilicura, Santiago Chile. Fono (562)
2339 9000. En Perú por: Comexa S.A. - Los Libertadores 455 – San Isidro, Lima –
Perú. Fono (511) 4469014. En Centro América, Caribe y Ecuador por: Best Brands
Group S.A. – Av. Balboa, Bay Mall Plaza, Planta Baja, local 9, Panamá. - Fono:
(507) 300 2884. En Colombia por: Baby Universe S.A.S. - Vía 40 No. 77-29,
Barranquilla, Colombia - Fono: (575) 353 1110 Importador: DJGM, S.A. DE C.V.
Gabriel Mancera No. 1041 Col. Del Valle, Benito Juárez C.P. 03100 México, Ciudad
de México R.F.C. DJG140305GN9 Tel. (55) 67199202 04/22/19 4358-7665B
PLEASE NOTE:
The sensor
lens is the
most delicate part
of the thermometer.
To ensure accurate
readings it must be
clean and intact.


