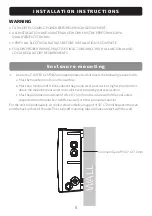
S.R.Smith Star Series Скачать руководство пользователя страница 6

6

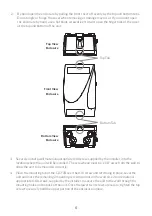
2.  By hand open the enclosure by pulling the front cover off evenly by the top and bottom tabs. 

Do not angle or ‘hinge’ the cover when removing or damage may occur. If you cannot open 
the enclosure by hand, use a flat blade screwdriver to twist open the finger tabs of the cover 
at the top and bottom of the unit.

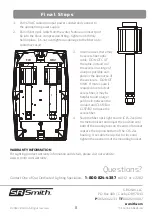
3.  Securely install a wall material appropriate #10 screw, supplied by the installer, into the 

location where the unit will be installed. The screw head must be 1 1/8” away from the wall to 
allow the unit to be mounted correctly.

4.  Place the mounting tab of the CLSFJB over the #10 screw and let it hang in place. Level the 

unit and mark the remaining 2 mounting screw locations on the wall. Use 2 more material 
appropriate #10 screws, supplied by the installer, to secure the unit to the wall through the 
mounting holes on the back of the unit. Once the lower two screws are secure, tighten the top 
screw to securely hold the upper portion of the enclosure in place.

Top View 

Enclosure

Front View 

Enclosure

Bottom View 

Enclosure

  Top Tab

  Bottom Tab

Содержание Star Series

Страница 1: ...structions Read all instructions before attempting to perform installation work Suitable for Wet Locations Suitable for Outdoor Use Type 3R Rainproof Enclosure FOR USE WITH POOL AND SPA PRODUCTS 40054...

Страница 2: ...RTANT SAFETY INFORMATION 3 Electrical Ratings 4 Recommended Tools and Supplies 4 INSTALLATION INSTRUCTIONS 5 Enclosure mounting 5 Input Low Voltage Supply Line 7 Fiber Optic Cable Conduit Connection 7...

Страница 3: ...r higher than 8 inches above the maximum pool water level whichever provides greatest elevation The unit must be positioned a minimum of 4 feet 1 2 m from the inside wall of the pool unless separated...

Страница 4: ...ning the conduit knockouts 2 Application appropriate and approved rain tight or wet location conduit hubs Note Every installation will have at least two multi conduits one or more for low voltage inpu...

Страница 5: ...area that meets the following requirements a Must be mounted on a flat vertical surface b Must be a minimum of 4 inches above the ground level pool deck or higher than 8 inches above the maximum pool...

Страница 6: ...it will be installed The screw head must be 1 1 8 away from the wall to allow the unit to be mounted correctly 4 Place the mounting tab of the CLSFJB over the 10 screw and let it hang in place Level t...

Страница 7: ...input power and fiber optic cables 2 Using a hole saw open the knockouts for the size of the conduit or 1 being installed 3 Attach an approved rain tight or wet location hub to the conduit After the h...

Страница 8: ...ases there may be excess fiber optic cable DO NOT CUT the cable instead coil the excess in as large of a loop as possible and place in the open area of the enclosure DO NOT KINK If more space is requi...

Отзывы: