7
5.
2QHIXOORLOWDQNZLOOHQDEOH\RXWRXVHWKHVDZIRU
40 min.
Recommended chain lubricating oil
Ŷ
The manufacturer recommends you use only Ryobi
FKDLQVDZOXEULFDWLQJRLO$YDLODEOHIURP\RXUDXWKRULVHG
5\RELVHUYLFHFHQWUH
HOLDING THE CHAIN SAW
See page 13-14.
Always hold the chain saw with your right hand at the rear
handle and your left hand at the front handle. Grip both
KDQGOHVZLWKWKHWKXPEVDQG¿QJHUVHQFLUFOLQJWKHKDQGOHV
Ensure that your left hand is holding the front handle so
that your thumb is underneath.
WARNING
Always keep the power cable tidy and away from the
area of cutting. Apart from the danger of electrocution,
untidy cables cause falls and trips.
STARTING THE CHAIN SAW
See page 14.
1. Connect to power outlet. Make sure the chain brake
is in the run position by pulling back on the lever/hand
guard.
2.
7RVWDUWWKHPDFKLQH3XOOWKHWULJJHUUHOHDVHDQGWKHQ
press the on/off trigger.
CHECKING AND OPERATING CHAIN BRAKE
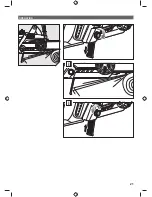
1. Engage the chain brake by rotating your left hand
around the front handle. Allow the back of your hand to
push the chain brake lever/hand guard toward the bar
while the chain is rotating rapidly. Be sure to maintain
both hands on the saw handles at all times.
2. Reset the chain brake back into the Run position by
grasping the top of the chain brake lever/hand guard
and pulling toward the front handle until you hear a
click.
WARNING
If the chain brake does not stop the chain immediately, or
if the chain brake will not stay in the run position without
assistance, take the saw to an authorised service centre
for repair prior to use.
TRANSPORTATION AND STORAGE
See page 26, 27.
Ŷ
Stop the product, disconnect from its power supply and
allow it to cool before storing or transporting.
Ŷ
Clean all foreign material from the product. Store it in
DFRROGU\DQGZHOOYHQWLODWHGSODFHWKDWLVLQDFFHVVLEOH
to children. Keep away from corrosive agents such
DV JDUGHQ FKHPLFDOV DQG GHLFLQJ VDOWV 'R QRW VWRUH
outdoors.
Ŷ
Fit guide bar cover before storing the unit, or during
transportation.
Ŷ
For transportation, secure the machine against
movement or falling to prevent injury to persons or
damage to the machine.
MAINTENANCE
WARNING
Use only original manufacturer’s replacement parts,
accessories and attachments. Failure to do so can
cause possible injury, poor performance and may void
your warranty.
WARNING
Servicing requires extreme care and knowledge
DQG VKRXOG EH SHUIRUPHG RQO\ EH D TXDOL¿HG VHUYLFH
technician. For service we suggest you return the
product to your nearest authorized service center for
repair. When servicing, use only identical replacement
parts.
WARNING
Disconnect from the power supply before adjustment,
maintenance or cleaning. Failure to do so could result in
serious personal injury.
Ŷ
You may only make adjustments or repairs described
in this manual. For other repairs, contact the authorized
service agent.
Ŷ
Consequences of improper maintenance may cause
the chain brake and other safety features to not function
correctly, thus increasing the potential for serious
injury. Keep your chainsaw professionally maintained
and safe.
Ŷ
Sharpening the chain safely is a skilled task. Therefore
the manufacturer strongly recommends that a worn or
dull chain is replaced with a new one, available from
your authorised Ryobi service centre. The part number
is available in the product specification table in this
manual.
Ŷ
Follow instructions for lubricating and chain tension
checking and adjustment.
Ŷ
After each use, clean the product with a soft dry cloth.
Ŷ
Check all nuts, bolts and screws at frequent intervals
for security to ensure the product is in safe working
condition. Any part that is damaged should be properly
repaired or replaced by an authorized service centre.
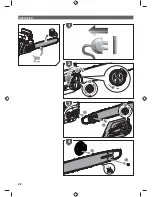
REPLACING GUIDE BAR AND SAW CHAIN
See page 22 - 23.
1. Disconnect the product from its power supply. Wear
protective gloves.
2. Unscrew the guide bar locking knob by turning it
counterclockwise until the sprocket cover comes loose.
3. Remove the sprocket cover. Remove the bar and saw
chain from unit.
4. To replace the bar with a new one, loosen the screw of
the chain tension assembly. Mount the chain tension
assembly on to the new bar and tighten the screw.
Содержание RCS2340
Страница 1: ...ORIGINAL INSTRUCTIONS Electric Chainsaw RCS2340...
Страница 12: ...10 UNPACKING x 1 x 1 x 1 x 1...
Страница 13: ...11 Know your product KNOW YOUR PRODUCT 3 4 8 1 2 9 10 13 12 11 14 15 16 7 5 6 17...
Страница 14: ...12 GETTING STARTED 3 1 2 1 2 6 5...
Страница 15: ...13 GETTING STARTED 7 3 4 mm 1 2 3 4...
Страница 16: ...14 GETTING STARTED 3 2 1 8...
Страница 17: ...15 OVERVIEW p 17 p 18 p 19 p 20...
Страница 18: ...16 OVERVIEW 2 1 p 21 p 22 p 24 p 25 p 26 p 27...
Страница 19: ...17 OPERATION 1 3 2 5 cm 2 in 5 cm 2 in 1...
Страница 20: ...18 OPERATION 1 2 2 2 1...
Страница 21: ...19 OPERATION 1 2 1 3 2 3 2 1 2 3 1 3...
Страница 22: ...20 OPERATION...
Страница 23: ...21 OPERATION...
Страница 24: ...22 OPERATION 2 1 1 2 1 2 1 1 3 2 2 1 3 4...
Страница 25: ...23 OPERATION 3 2 1 4 3 1 2 3 4 mm 6 5 7 8...
Страница 26: ...24 OPERATION 3 4 mm 2 1 3 4...
Страница 27: ...25 MAINTENANCE 2 1...
Страница 28: ...26 STORAGE 3 1 2 2 1 2 4 1 3...
Страница 29: ...27 STORAGE 20160913v1 3 1 2 2 1 2 4 1 3...
Страница 31: ......


