manualshive.com logo in svg
background image

Ryobi RY48ZTR75/100 Riding Mower

Electrical Components Troubleshooting and Testing

J.Davis 4-18-2019

Anderson, South Carolina

Содержание Homelite RY48ZTR75/100

Страница 1: ...Ryobi RY48ZTR75 100 Riding Mower Electrical Components Troubleshooting and Testing J Davis 4 18 2019 Anderson South Carolina...

Страница 2: ...witches 25 2 Testing Headlight Assembly 26 Testing Accelerator angular transducers 27 Testing Brake Switch 28 Testing Beeper 29 Testing Seat Switch 30 Testing Master Blade Motor Controller 31 Testing...

Страница 3: ...rotective equipment such as rubber gloves and safety glasses Dangerous voltages currents are present Exercise caution at all times This manual assumes knowledge of basic electrical equipment such as D...

Страница 4: ...nd a controller for each motor for each motor A brushless motor and controller for each of the 2 blades A brushless motor controller to drive each rear wheel These Drive Motor Controllers also contain...

Страница 5: ...an be quickly tested by applying voltage to the two terminals Brushless motors can be recognized by 3 wires These 3 wires require a controller to operate them and to fire these 3 phases in a precise f...

Страница 6: ...ing the mower If you print this document we recommend printing it in landscape mode and in color A Block Diagram shows the general flow to visualize how the mower is connected and a chart shows genera...

Страница 7: ...ghts Accelerator Note A detailed wire harness diagram is located later in this document USB Important Master and slave have a communication link If one blade motor or controller fails BOTH will shut d...

Страница 8: ...converter Mower should be fully charged if possible Before disassembly Attempt to charge mower note any error LED indications Check for voltage at charge port Check USB Indicator and Headlights are fu...

Страница 9: ...rks when the key is turned on test replace the 48 to 12V DC converter and 5A fuse as necessary Note this fuse is a common part available at any automotive store 8 If the mower will not drive a Make su...

Страница 10: ...n this function will be used in many of the following procedures Also note where the red and black jacks of the test leads are connected to the DMM If you are unfamiliar with a DMM please read the sec...

Страница 11: ...Other Helpful Tools and Parts 11 12V output 5V output Table of Contents...

Страница 12: ...Component Locations 12 Headlights Seat Switch Beeper DC DC converter Brake Switch Accelerator transducers Access panel under seat Charge port Table of Contents Controllers Neutral zero Switches...

Страница 13: ...Controllers and Label Locations 13 Deck Motor Controller Drive Motor Controller 2 Drive Motor Controller Shown with passenger leg panel removed Table of Contents...

Страница 14: ...y takes considerable pressure to separate the halves If you can not separate by hand you may need a blunt instrument to push in the hole in the direction indicated Note that one half of the connector...

Страница 15: ...ertightened as this can cause the fuse to twist and break If fuse is blown replace only with the same physical size and same Amperage and Voltage 15 IMPORTANT If the main fuse is blown find the source...

Страница 16: ...cator LED Charger Interlock 16 Note If a valid voltage Cannot be read the electronics built into the charge port may be bad In this event Find the blue connector which connects directly to the batteri...

Страница 17: ...Control Panel 17 Table of Contents Power Switch Headlights Low HighDrive Speed Blade power Switch AKA PTO Switch Low High Blade Cutting Speed Fuel Gauge USB Charge Port...

Страница 18: ...red button is PUSHED IN the switch is OPEN very HIGH resistance or no continuity typical 12K Ohms when in circuit or open when removed from circuit Note Make sure spade lugs are secure They should be...

Страница 19: ...ed LED should light polarity of probes does not matter 4 Set DMM to Resistance mode This is a latching switch Pressing the button alternates between open and closed switch 1 Disconnect Main Power from...

Страница 20: ...d switch This test procedure is the same as the headlight switch procedure The only difference is these switches are momentary When the button is held in the switch is closed When the button is releas...

Страница 21: ...ween Red and black wire below left 4 Measure battery voltage between black and blue wires below right Approximately 51V fully charges no load 21 Table of Contents Percent Charge remaining Approximate...

Страница 22: ...y between green and red wire ON position Continuity between green and red wire AUX position Not used at time of this writing Note this switch operates at 48V DC 22 Table of Contents 1 Set DMM to DC Vo...

Страница 23: ...and black wire Note The spade lug is larger than the lug 1 Power ON Mower 2 Set DMM to measure DC Volts 3 Connect a scrap USB cord with one end removed 4 Measure 5V between the red and black wire USB...

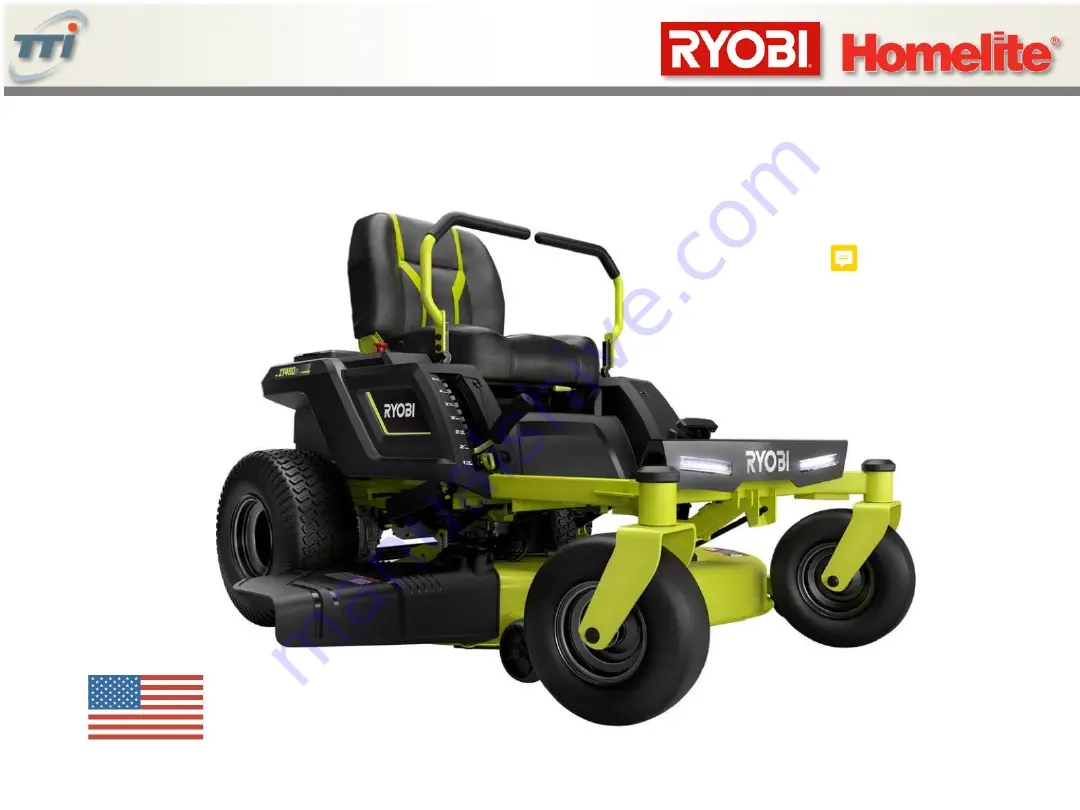
Страница 24: ...Testing the Zero Switches 24 A zero switch is located at the base of each steering arm Table of Contents...

Страница 25: ...nect probes 2 With switch NOT pressed measure no continuity 3 With switch pressed measure continuity 4 Make sure wires and connector are in good shape and wires don t pull loose Note the switches are...

Страница 26: ...Headlights 3 Set DMM to measure DC Volts 4 Measure for 12V at harness Nominal current 275mA To test Headlight module independently 1 Disconnect Headlight from wire harness 2 Supply 12V to the connecto...

Страница 27: ...mates with black wire on harness 3 Place probes on White signal wire and black ground 4 Slowly turn the accelerator with a coin Voltage should change gradually between 0V and approx 4 7V 1 Set DMM to...

Страница 28: ...lack and red contacts Continuity when plunger is not pressed High resistance when plunger is pressed Plunger contacts 1 Set DMM to measure DC Volts 2 Disconnect brake switch connector 3 Measure DC Vol...

Страница 29: ...a beep To test on the mower With power on remove yourself from the seat Please note it may take up to 1 minute for beeper To activate To measure the voltage at the harness 1 Set DMM to measure DC Volt...

Страница 30: ...nce 3 Disconnect seat switch connectors 4 Measure continuity when switch is pressed 5 Measure very high resistance when switch is released To Measure the harness 1 Turn ON the mower 2 Set DMM to DC Vo...

Страница 31: ...eavy red wire power and heavy black ground wire to check for short circuit Typical resistance 1 56M Ohms Check resistance of controller output 1 Set DMM to Resistance Mode 2 Check continuity between a...

Страница 32: ...Ohms Diode Check Test Power and Ground Resistance at output circuitry 1 Set DMM to DIODE MODE 2 Connect black lead of DMM to heavy black wire ground 3 Sequentially connect red probe to each of the hea...

Страница 33: ...om controller 2 Set DMM to Resistance mode 3 Measure between any 2 pins 4 Measure between other pins 5 Measurements should be nearly identical 33 Table of Contents IMPORTANT IGNORE the N L and G label...

Страница 34: ...y green and heavy yellow wire on motor 3 Measure resistance between heavy green and heavy blue wire on motor 4 Measurements should be nearly identical and close to 0 Ohms Nomimal resistance 0 1Ohm 34...

Страница 35: ...oving Set DMM to DC Volts 1 connect red probe to red wire power 2 Black probe to black wire ground 3 Should measure 4 5V Leave black probe connected to black wire 1 touch red probe to yellow wire Slow...

Страница 36: ...FF mower 2 Disconnect all wires from motor to mower 3 Apply 5V red to red black to black Note a scrap USB cord and USB cell phone charger can be used to supply 5V 36 Repeat measurements from previous...

Страница 37: ...ge 3 If fuse is bad replace only with same type and Amperage 12V 2A automotive fuse 1 Turn mower on Set DMM to DC Volts 2 Measure 48V between Red and black wire as indicated 3 Check for 12V output at...

Страница 38: ...Testing DC DC converter Fuse 38 To test the DC to DC converter fuse remove the rubber cap Test continuity where indicated If fuse is bad replace only with same fuse value Table of Contents...

Страница 39: ...nder the red caps Alternate method to test relay independent of mower 1 unbolt one leg of diode if equipped 2 Set DMM to measure Resistance 3 Connect DMM to large terminals 4 Apply 12V to small termin...

Страница 40: ...rrow black lead at black arrow DMM should read approx 7V 5 Reverse the red and black leads DMM should read open circuit 6 Replace or reconnect diode IMPORTANT Make sure diode is installed correctly Ba...

Страница 41: ...esult in step 3 3 Connect a jumper wire as shown any insulated wire will do 4 Green charge LED should glow as shown 5 Mower should shut down relay clicks headlights go out 6 Remove the jumper wire 7 A...

Страница 42: ...he blue connector as shown red to red black to black 8 Reconnect main battery connection 9 The Charger LED should blink green 10 This is a temporary test Remove wires immediately after test Test shoul...

Страница 43: ...res Be sure connections are secure and will not short together or against other objects CONNECT MAIN POWER LAST Alligator clips Alligator clips Charger indicator Refer to Charger Error Codes RED BLACK...

Страница 44: ...Battery Charger Error Codes 44 Table of Contents...

Страница 45: ...e the unit 7 over temperature return both levers to open and try operate again wait 30 minute and try again replace drive controllers 8 hall sensor fault return both levers to open and try operate aga...

Страница 46: ...nnector Set DMM to measure RESISTANCE At room temperature measurement should be approximately 10K Ohms As the sensor is heated the resistance will decrease If sensor is bad or has broken connection th...

Страница 47: ...Wire Harness Diagram 47 Table of Contents...

Страница 48: ...off PTO ensure blade motors stop 9 Press Drive speed button Verify drive speed should change between high and low 10 Press Blade speed button Verify blade speed should change between high and low 11...

Страница 49: ...you were born with the most powerful trouble shooting tools Eyes LOOK for signs of wear deformation disconnection pinched wires charger LED patterns Ears LISTEN for beeps error codes clicks relay squ...

Страница 50: ...is noted by the Greek Omega symbol Which resembles a horse shoe or upside down u Measuring resistance is often used to detect continuity Or a break in a wire or switch A Diode is a device that allows...

Страница 51: ...set to the correct Setting and probes are inserted into the correct jacks To measure DC voltage 1 first set the DMM to measure voltage ensuring DC NOT AC setting 2 Touch the black probe to ground 3 T...

Страница 52: ...o the correct setting Power must be OFF when measuring resistance To measure DC voltage 1 First set the DMM to measure resistance 2 Touch the black probe to one point 3 Touch the red probe to the othe...

Страница 53: ...19 added source for 125A 58V main fuse at Mouser com https www mouser com ProductDetail Littelfuse 14256316122 qs sGAEpiMZZMsh2y49K8ANrTdpOrToc 252bEOWEps5yIgKK0 3d 4 18 2019 Added extended beep code...

Отзывы: