1
INSTRUCTIONS AND WARRANTY
MODEL NO. RHCM50
VIVAĆE CAPSULE COFFEE MAKER
WITH MILK FROTHER
Страница 1: ...1 INSTRUCTIONS AND WARRANTY MODEL NO RHCM50 VIVA E CAPSULE COFFEE MAKER WITH MILK FROTHER...
Страница 2: ...te iv Before First Use v Recommended Coffee Capsule Type c Operating Instructions i Indicator Light Guide ii Filling or Re filling the Water Reservoir iii Rinsing the Appliance and Its Internal Piping...
Страница 3: ...ator system Illuminated control panel Intelligent pre brewing function reaches the ideal brewing temperature for optimal coffee and flavour extraction Decalcification function Automatic and programmab...
Страница 4: ...hysical sensory or mental capabilities or lack of experience and knowledge unless they have been given supervision or instruction concerning use of the appliance by a person responsible for their safe...
Страница 5: ...xtension cord the appliance or plug point Do not place the extension cord in a position where it can be pulled on by children or animals or tripped over 22 This appliance is not suitable for outdoor u...
Страница 6: ...ting as it is hot 43 Do not remove the lid of the Milk Frother during heating or frothing or while the Milk Frother is in operation as scalding may occur 44 Do not use the Milk Frother to heat oil wax...
Страница 7: ...comply with the above mentioned pre cautions and instructions could affect the safe operation of this machine CAUTION PRESSURE In order to avoid possible burns to body parts and or other injury from...
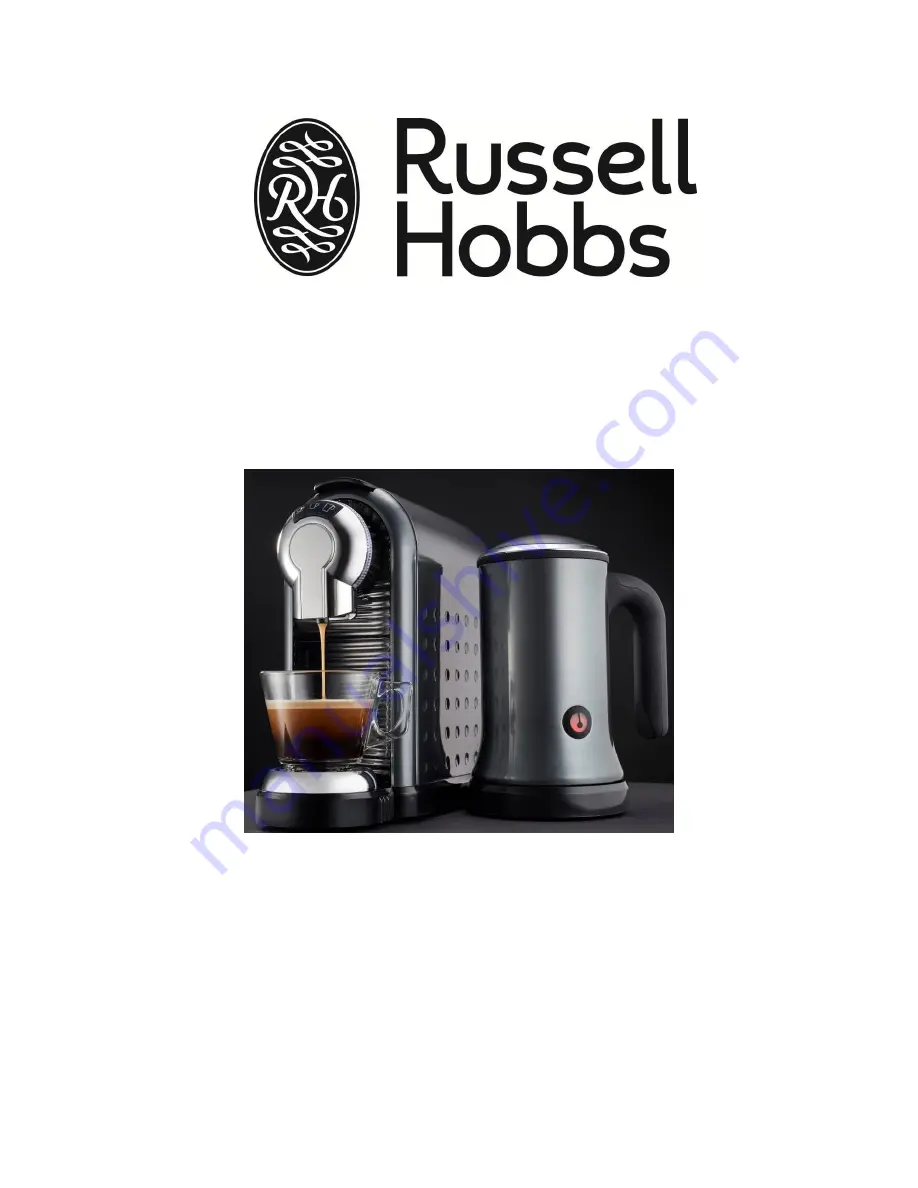
Страница 8: ...ng Handle G Water Reservoir with handle removable B Control Panel with buttons H Power Cord C Coffee Dispenser Spout I Main Power Switch ON OFF D Drip Tray Set J Used Capsule Container Bin Short espre...
Страница 9: ...is forced through finely ground coffee Popular in Europe it is a more full bodied brew than regular drip coffee because of its richness Espresso is usually served in demitasse cups CAPPUCCINO A drink...
Страница 10: ...fectly it was quality tested with water before leaving our factory Caution improper handling of electrical equipment is dangerous and can be lethal Please pay attention to the safety precautions in th...
Страница 11: ...d Round Indicator Light situated just above the control panel Solid steady red light First use Refer to Rinsing the Appliance and its Internal Piping Solid steady red light The water reservoir may be...
Страница 12: ...me or after long periods of not operating the appliance the machine must be rinsed out This short procedure will rinse and clean the internal piping thoroughly First note that there are two ways to fi...
Страница 13: ...r to maximum level mark 2 Plug the appliance in to the power outlet and turn the appliance ON 3 The lights on the control panel buttons will start flashing The blue lights in the used capsule containe...
Страница 14: ...D shown in PARTS DIAGRAM or hot water will run out when opening handle o a large bowl 250ml size or larger is placed under the dispenser spout 8 Now press the Lungo coffee button 9 Press the middle bu...
Страница 15: ...6 Press the middle button in order to choose the preferred setting Referring to the status table Status Description Function Solid steady red round indicator light Disable the pre brewing function Bl...
Страница 16: ...hour it is suggested to brew water first in order to remove the residual taste of the last cup which was brewed REFILLING THE INTERNAL CIRCUIT SHOULD THE WATER RESERVOIR RUN EMPTY DURING BREWING It is...
Страница 17: ...rogramming the dispensing size will have been recorded in the appliances memory For next use press the button normally and press only once 7 You may program the other buttons if desired Note the volum...
Страница 18: ...from the electrical outlet when not in use and before cleaning Ensure that the power button is set to OFF 0 EMPTYING THE USED CAPSULE CONTAINER BIN AND THE DRIP TRAY The used capsule container bin ho...
Страница 19: ...ith a dry cloth 3 Never use abrasive cleaning agents or materials use e g dry rags or kitchen paper STEAMING OUT STORAGE TRANSPORT Prior to long periods of not using the machine or for storage or tran...
Страница 20: ...tice an increase in the time required to brew espresso or when there is excessive steaming The frequency of cleaning depends upon the hardness of the water used Drinking water varies according to regi...
Страница 21: ...is dissolved completely 5 Turn the main switch OFF 6 Press the Short Espresso button and hold it pressed down 7 Turn the main switch ON simultaneously 8 Release the Short Espresso button once two 2 be...
Страница 22: ...er OFF 2 Press the Lungo button and hold it pressed in 3 Switch the coffee maker ON while the Lungo button is still being pressed 4 Release the Lungo button after three 3 seconds or when you hear two...
Страница 23: ...e full The capsule is deformed Empty the used capsule container bin Push the capsule down with your finger or close the handle and open it once again There is steam when the operating handle is opened...
Страница 24: ...f the dispenser spout The heating system remains warm Occasional drops are normal it is not a defect Coffee comes out in drips coffee goes into the used capsule container bin The ground coffee in the...
Страница 25: ...fee Maker 5 Use a cup to fill the non stick carafe with water up to the lower MAX level mark 6 Gently position the carafe over the electrical connector on the power base 7 To avoid spillage make sure...
Страница 26: ...To make cold frothed milk To make hot frothed milk less than 120S To heat milk less than 180s 1 Choose to use the whisk or to use the Milk Frother without it depending on the mode you select If you ch...
Страница 27: ...150ml or at least filled to MIN mark Now check that the lid is securely in place Afterward press the ON OFF button briefly the red light turns on to start frothing Once the frothing process is comple...
Страница 28: ...the jug After the Milk Frother turns itself OFF discard soapy water Pour fresh clean water into the jug and discard repeat until all the soap residue is completely removed Wipe out with damp cloth WAR...
Страница 29: ...G THE APPLIANCE Ensure that the unit is switched to the OFF position Unplug the coffee maker from the power outlet Clean all the parts as instructed above Ensure that all parts are dry before storing...
Страница 30: ...eriod the appliance should be returned to an approved Home of Living Brands Pty Limited service centre Servicing outside the warranty period is still available but will however be chargeable CHANGING...
Страница 31: ...m Mocha Latte Serving Size Short Espresso Pour milk into the milk frother to the upper maximum level and heat to create frothed milk Extract an espresso capsule into the cup by pressing the short espr...
Страница 32: ...e into the cup by pressing the short espresso button Empty the capsule from the chamber then press the normal espresso button to add hot water Variations Iced Latte Double shot of espresso 90ml fruit...
Страница 33: ...his warranty subject to legislative requirements This warranty shall be valid only where the customer has not broken the product himself or used the product for something that it is not supposed to be...