149
appendix 1:
System Status & Faults Troubleshooting
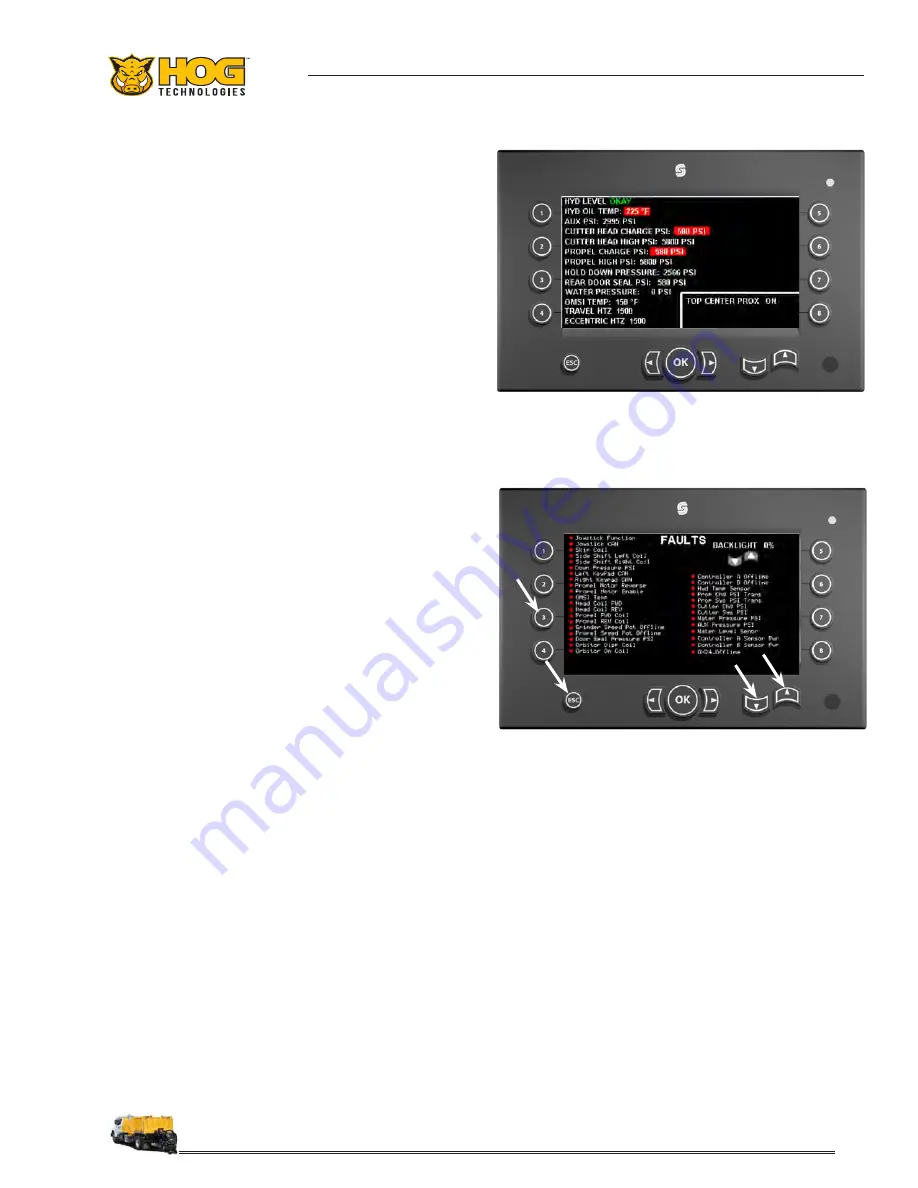
System Status Screen
The STATUS screen displays the current status
of primary cutter systems on one screen. This
screen provides the operator with a snapshot of
real time pressure, temperature or HTZ of all cut-
ter systems.
To navigate to the STATUS screen, make sure you
are on the Main Screen. Then press button (1)
once. Press the escape button to return to the
Main Screen.
digital controller Faults Screen
The digital control panel has a troubleshooting
guide built into the program. To navigate to the
FAULTS screen, make sure you are on the Main
Screen, then press button (3) once.
A red icon next to a fault indicates that fault is
active and the component requires attention. No
red icon indicates the component is operating
properly.
troubleshooting wires & cables
Sometimes a fault is caused by a faulty cable
connection. When a fault is displayed, start by
inspecting the connectors at each connection for
a loose connection or pins that are pushed in or
bent. Disconnect the plugs and press gently on
each pin to be sure that it is seated properly. If the
pin moves, it is not seated in the connector body.
Check the terminal blocks in the OTB for loose
wires or wires touching each other. Check indi-
vidual wires by disconnecting the wire at one
end and using a multi-meter to check the wire
for continuity.
Test For Broken Cable Wires
Disconnect the cable at both ends. Use a multi-
meter in the continuity/resistance mode and place
the leads on the same numbered pins on each
end of the cable. You should get a reading close
to Zero Ohms. If you don’t, the wire is broken or
one of the pins is not connected properly to the
wire. First check the connectors to be sure that
the wire is properly connected to the pins. If the
connections are good there is a broken wire in
the cable and the cable will need to be replaced.
Test For Shorted Cable Wires
Disconnect the cable at both ends. Use a multi-
meter in the continuity/resistance mode and place
the leads between the different pins on one end
of the cable, be sure to check each combination
of pins (i.e. for a 3 conductor cable check A & B,
B & C, and A & C). If you find a short, check the
connectors to be sure that the pins or wires are
not touching each other. If the connectors are
okay, then there is a short within the cable and it
will need to be replaced.
FAULTS Screen
The image above shows the FAULTS screen. To view this screen,
press button (3) twice on the MAIN screen. A red icon next to
the fault description indicates the fault is active. Use the UP/
DOWN arrows to change screen brightness. Press ESC to exit
the FAULTS screen and return to the MAIN screen.
STATUS Screen
The image above shows the STATUS screen. To view this screen,
press button (3) once while on the MAIN screen. Press ESC to
exit the STATUS screen and return to the MAIN screen.
Содержание RH7500
Страница 1: ...RH7500 Operations Manual ...
Страница 2: ......
Страница 6: ...6 NOTES ...
Страница 10: ...10 NOTES ...
Страница 19: ...19 Section 1 Safety Information ...
Страница 20: ...20 NOTES ...
Страница 108: ...108 NOTES ...
Страница 150: ...150 NOTES ...
Страница 155: ...155 Appendix 3 Tools Spare Parts ...
Страница 156: ...156 Appendix 3 Tools Spare Parts ...
Страница 158: ...158 NOTES ...
Страница 163: ......


