background image

3
0


Operation


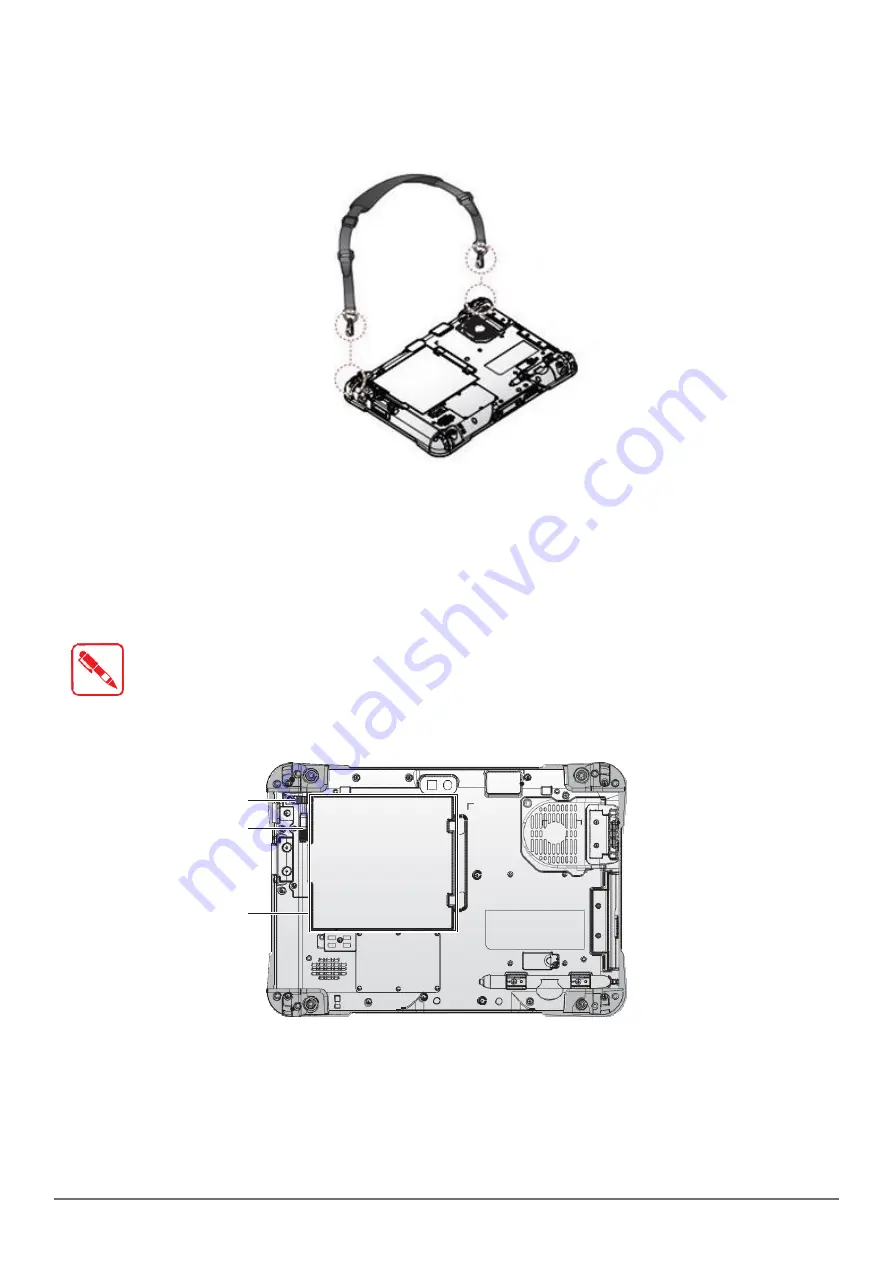
Removing the Shoulder Strap


1.  Press in the clips to release them from the D-rings.


2.  Remove the clips.


Figure 37.  Removing the Shoulder Strap


Installing the Standard Battery


The following instructions are for both standard and external batteries. The external battery is an 
optional component. Only use components specifically designed for this device. Contact your local 
representative for ordering information.


Make sure the power switch is switched to ON before installing the standard/external 
battery. See 

“First Time Use” 

on page 17.


1.  Place the device display side down on a clean work surface.


2.  Locate the battery.


Locking Switch 
Release Button


Battery


Figure 38.  Rear View: Locating the Battery


Содержание PX501C8H

Страница 1: ...PX501 Gen III User s Manual...

Страница 2: ...e United States and or other countries Microsoft products are licensed to OEMs by Microsoft Licensing Inc a wholly owned subsidiary of Microsoft Corporation The Bluetooth word mark and logos are regis...

Страница 3: ...Battery Safety Statement 5 Chapter 1 Introduction About This Guide 6 Unpacking the Device 6 Technical Specifications 6 PX501 Configuration Options 8 Parts List 9 Identifying the Device 10 Identifying...

Страница 4: ...Standard Battery 34 Connecting to a Wireless Network 35 Chapter 4 Using BIOS Setup Utility When to Use the BIOS Setup Utility 37 Accessing the BIOS Setup Utility 37 Installation an Operating System 3...

Страница 5: ...ed Information Current information and manuals are available for download at the following website http www ruggon com Conventions Bolded or underlined text is used to emphasize the designated informa...

Страница 6: ...plugging in the connector keep it evenly aligned to prevent bending the connector pins Intended Use The PX501 rugged tablet is equipped with multi functional terminals for stationary and mobile appli...

Страница 7: ...ronmental Hazards Do not use the PX501 in locations near with flammable gases or vapor The use of electrical equipment in explosive environments can be dangerous Turn off the device when near a gas st...

Страница 8: ...y energy and if not installed and used in accordance with the instruction manual may cause harmful interference to radio communications Operation of this equipment in a residential area is likely to c...

Страница 9: ...e as reported to the FCC is 0 55 W kg when placed next to the body CE Marking This product has passed the CE test for environmental specifications when shielded cables are used for external wiring We...

Страница 10: ...e to inspect all components and accessories Contact your representative if there are any missing or damaged items See Contacting RuggON on page 52 Technical Specifications Table 1 Technical Specificat...

Страница 11: ...nector 12 pin DC IN Jack x1 Micro SIM Card Slot x1 Audio Jack x1 headphone microphone combo USB 3 01 x2 type A x1 type C x1 RS 232 x1 Micro HDMI x1 Ethernet x1 Security TPM TPM 1 2 BIOS On Off for I O...

Страница 12: ...re I Procedure V Operation and storage temperature MIL STD 810G Method 501 5 and 502 5 Humidity MIL STD 810G Method 507 5 Humidity Procedure II Aggravated Cycles Fig 507 5 7 IP rating IP65 Operating T...

Страница 13: ...he PX501 is shipped with the following items All other accessories are sold and ordered separately For help contact your local RuggON sales representative See Contacting RuggON on page 52 PX501 Power...

Страница 14: ...iew See Front View on page 11 for further information 3 Rear view See Rear View on page 14 for further information 4 Right view See Side View on page 13 for further information 5 Rubber bumpers Easy t...

Страница 15: ...can 4 Battery LED Display battery status see LED Status on page 12 5 Wi Fi LED The Wi Fi LED lights to indicate Wi Fi is enabled 6 FN LED The FN LED lights when the function switch on 7 Home key Windo...

Страница 16: ...charging no battery FN Blue On FN function switch on Blue Off FN function switch off Wi Fi Blue On Wi Fi on Blue Off Wi Fi off Bottom View Table 5 Bottom View 1 2 3 Figure 3 Bottom View No Item Descri...

Страница 17: ...partment cover Open to access the left I O port 4 Tether hole Digitizer or stylus can be tethered to it 5 USB 3 1 Connect USB devices to the PX501 6 Audio jack Connect a 3 5 mm jack for a headphone or...

Страница 18: ...For installing a barcode reader Optional 4 Fan Embedded fan for cooling 5 Securing holes Secure the bumpers and the optional D rings for the handstrap and shoulder strap 6 Expansion bay Remove the co...

Страница 19: ...ction 15 7 7 28 11 2 3 0 9 Dimensions The following image lists the device dimensions without add ons mm inches Figure 7 Front View Dimensions Figure 8 Side View Dimensions 23 0 9 280 11 fn f1 f2 fn 1...

Страница 20: ...ft clicking icons on a desktop computer screen The following actions are available through the use of the digitizer Open applications Choose commands in menu Select options in dialog box or drop down...

Страница 21: ...c wrist straps or place the device on an anti static mat First Time Use PX501 is under Battery Ship Mode and will not power on to preserve the battery and prevent power loss To enable Regular Mode and...

Страница 22: ...lace 2 Push in the cover to seal the DC IN compartment Figure 11 Closing the DC IN Cover The DC IN cover must be inserted correctly to prevent internal damage to the device Powering the Device On and...

Страница 23: ...SIM Card Optional The device includes a micro SIM card slot for cellular and wireless connection Only a micro SIM card is supported in the slot Check with your network or cellular service provider for...

Страница 24: ...izer only for touching the screen Using it for any other purpose may damage the digitizer and result in scratches on the screen The digitizer uses electromagnetic induction and may not work properly n...

Страница 25: ...he PX501 is protected during transport by a transparent film This film should remain on the front display during assembly to avoid damage to the front display surface Only remove the film once all of...

Страница 26: ...compartment cover Left view Right view Left I O Compartment Cover Right I O Compartment Cover Figure 17 Side View Locating the I O Compartment Cover 3 Unlock the latch Only available for the left I O...

Страница 27: ...over Right I O Compartment Cover Figure 20 Side View Locating the I O Compartment Cover 3 Flip the I O compartment cover and install Figure 21 Installing the I O Compartment Cover 4 Lock the latch Onl...

Страница 28: ...upport USB 2 0 or USB 3 0 devices 1 Open the left I O compartment cover See Opening the I O Compartment Cover on page 22 2 Connect to USB device via USB cable Connect Ethernet Cabling Figure 23 Connec...

Страница 29: ...t I O compartment cover See Opening the I O Compartment Cover on page 22 2 Connect the audio cable Figure 25 Connect Audio Cabling Connect Micro HDMI Cabling Connect to HDMI devices via micro HDMI cab...

Страница 30: ...The PX501 can be optionally equipped with a handstrap a carrying handle or a shoulder strap for convenience and choice Select the accessory that is right for your needs The handstrap can be installed...

Страница 31: ...he D rings are tightly secured before installing the handstrap Figure 29 Installing the D rings 3 Connect the handstrap on the D rings When the handstrap is installed the digitizer can be placed under...

Страница 32: ...ing the Handstrap 1 Unlock the handstrap from the D rings Figure 31 Removing the Handstrap 2 Remove the D rings Figure 32 Removing the D rings 3 Secure the bumper and the PX501 with screws Figure 33 S...

Страница 33: ...re 34 Connecting the Carrying Handle Removing the Carrying Handle 1 Press in the clips to release them from the D rings 2 Remove the clips Figure 35 Removing the Carrying Handle Connecting the Shoulde...

Страница 34: ...ries The external battery is an optional component Only use components specifically designed for this device Contact your local representative for ordering information Make sure the power switch is sw...

Страница 35: ...e click is heard Figure 39 Installing the Battery 6 Slide the locking switch on the top left side to lock the battery Figure 40 Locking the Battery Make sure the latch is securely locked to prevent th...

Страница 36: ...ngle the left side up to remove Figure 43 Removing the Battery Checking Battery Status You can check battery status without turning on PX501 When PX501 is off press Barcode trigger key and the LED ind...

Страница 37: ...ms bar tap Settings to open the Settings menu 4 In Settings tap the Network icon to display the Networks connection settings 5 The Wi Fi menu displays By default the Wi Fi menu is set to Off Tap the b...

Страница 38: ...OS Setup Utility The BIOS Setup Utility screens shown in this chapter are for your reference only The actual images or settings on your tablet computer may differ The BIOS Setup Utility program may ha...

Страница 39: ...n Installation an Operating System Setting Up a Windows 10 InstallationEnvironment There are several settings in BIOS that must be modified before you can install a Windows 10 operating system Use the...

Страница 40: ...tup Utility see Accessing the BIOS Setup Utility on page 34 2 Navigate to APP Menu Main Boot Features 3 Locate the Legacy Boot setting and tap on the menu to select On enable legacyboot Figure 47 Main...

Страница 41: ...y 1 Navigate to APP Menu Exit and tap Exit SavingChanges Figure 48 Exit the BIOS Utility 2 A prompt display tap Yes to save the configuration The BIOS settings are configured and the Windows 7 operati...

Страница 42: ...the procedure as described 1 Go to APP Menu Security Account s PasswordStatus 2 Tap the Enter icon next to Setup the Supervisor Password to access the virtual keyboard Figure 49 Security Account s Pa...

Страница 43: ...etup Utility Changing a Supervisor Password 1 Navigate to APP Menu Security Account s PasswordStatus 2 Tap the Enter icon next to Setup Supervisor Password 3 Enter the current supervisor password 4 En...

Страница 44: ...ice to the AC adapter to prevent a sudden loss of power during the BIOS updating process 1 Contact your technical sales or technical representative to obtain the correct BIOS file 2 Copy the BIOS file...

Страница 45: ...41 Using BIOS Setup Utility 6 Tap Update Security Figure 53 Update Security 7 From the Update Security screen tap Recovery then tap Restart now Figure 54 Recovery...

Страница 46: ...device to select a boot up preference Figure 55 Use a Device 9 From the Use a device menu tap Internal Shell to open the commandscreen Make sure connect the PX501 to the AC adapter to prevent a sudde...

Страница 47: ...urn off your device or interfere with the reflash process until the process is complete 13 Once the process is complete the PX501 automatically reboots The BIOS is now updated Updating EC Connect the...

Страница 48: ...ocumentation through the RuggON official site http www ruggon com Figure 58 DashON Overview Function Description EXIT Minimize DashON and return to the desktop Button Lock Lock or unlock all the physi...

Страница 49: ...evice Power Plan Manage how your tablet uses power Info Viewer View system specifications The menu is for display only Display Switch Choose a display mode when connect to another output device Pass t...

Страница 50: ...data Your computer now shows you are not connected to the network A Move closer to an access point or to a different location to reestablish communications until you reconnect with the network Q The...

Страница 51: ...ars to be locked up and you cannot enter data A Restart the computer Call Product Support Simple instructions please contact the dealer contact ruggon representative or leave a message visit the RuggO...

Страница 52: ...amage the surface Use a high pressure cleaner the additional risk of water entering the PX501 maydamage the electronics or touch screen Touch Screen Use neutral detergent or isopropyl alcohol on a cle...

Страница 53: ......

Отзывы: