Ruckus Wireless, Inc. | QS_ZF2925_070329 — vABC]
QUICK SETUP GUIDE
Ruckus Wireless ZF2925
MediaFlex Hotspot
Access Point
This
Quick Setup Guide
describes in step-by-step detail how to
set up a Ruckus Wireless ZF2925
Access Point
(AP), serving users
in a wi-fi hotspot. The process includes reconfiguring your PC/
laptop to connect to the Ruckus AP through the Ruckus
Wireless
Web Admin Interface
. At the conclusion of setup, you can place
and connect your hotspot AP at your site and put it in use.
Package Contents
• One ZF2925 Access Point
• One 1-meter/3-foot Cat5 Ethernet cable
• One AC power adapter
• One wall-mounting kit, plus printed instructions
• One
Quick Setup Guide
(this publication)
Required Equipment
• A PC or laptop running Windows 2000 or Windows XP
• A modem (DSL or cable), E1/T1 router, or other device pro-
vided by your Internet Service Provider, that brings web
access to your site.
• A network switch or a VLAN-capable DSL/Internet gateway
device that supports the 802.1Q VLAN-tagging protocol.
1
After unpacking your Ruckus Wireless AP from the package,
place it next to your PC/laptop.
2
Temporarily disconnect your PC/laptop from any local net-
work (if connected).
3
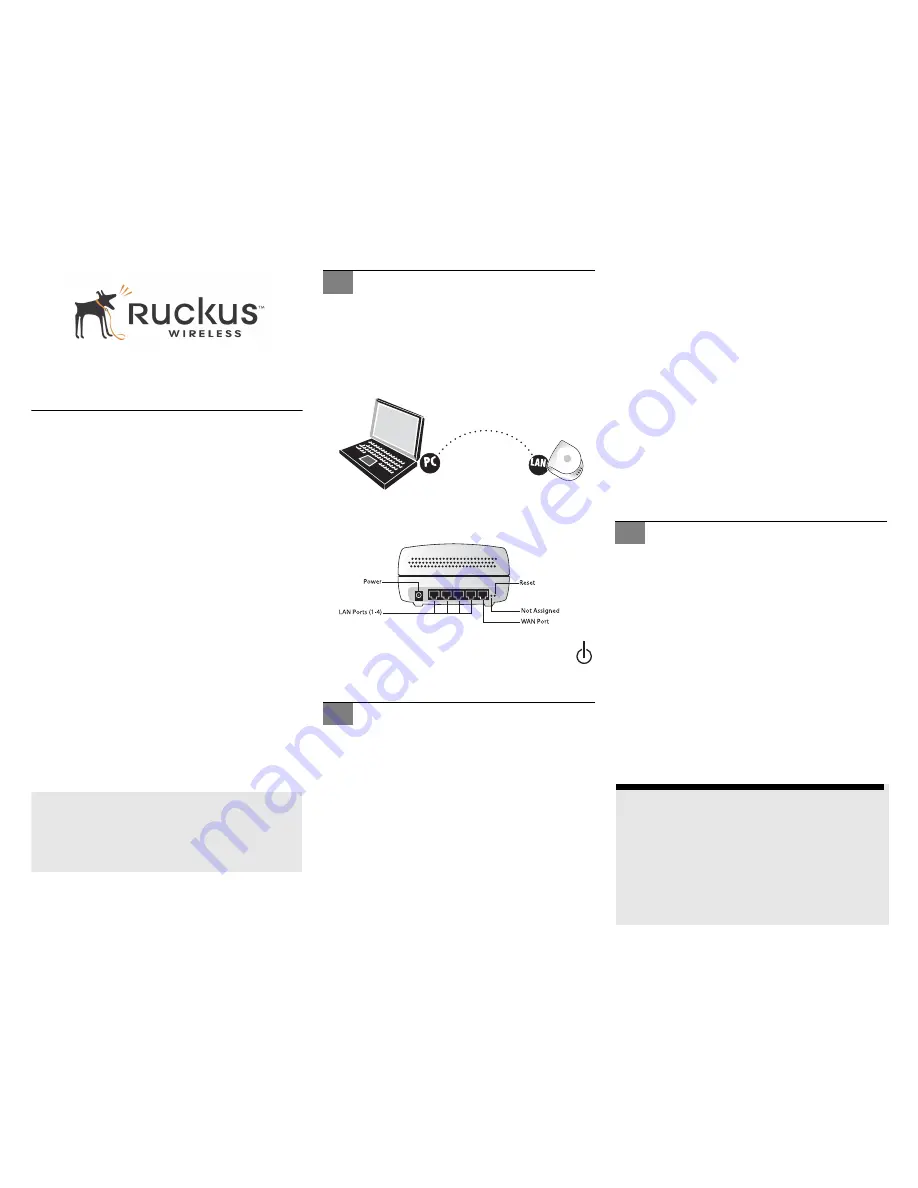
Using the Ethernet cable provided in the Ruckus package,
connect your PC/laptop network port to one of the four
LAN ports on the AP.
•
Do not connect the cable to the AP WAN port
. Instead,
connect it to any of the other ports (labelled “1-4”) on
the back of the AP—as shown below.
4
Using the AC adapter included in the package, con-
nect the AP to a convenient (and protected) power
source. After a minute, verify that the AP’s
Power
LED (
shown right
) is a steady green.
1
On your Windows 2000 or XP PC, open the Network Con-
nections (or Network and Dial-up Connections) control
panel according to how the Start menu is set up:
Start-> Settings-> Network Connections
Start-> Control Panel-> Network Connections
2
When the Network Connections window appears (XP or
2000), right-click the icon for “Local Area Connection” and
choose
Properties
.
ALERT!
—Make sure you don’t open the Properties dialog
box for the wireless network.
3
When the Local Area Connection Properties dialog box
appears, select
Internet Protocol (TCP/IP)
from the scroll-
ing list, and click
Properties
.
The TCP/IP Properties dialog box appears.
4
IMPORTANT— Write down all of the currently active set-
tings so you can restore your computer to its current con-
figuration later (when this process is complete).
5
Select
Use the following IP address
(if it’s not already
active) and make the following entries:
IP Address
192.168.0.22 (or any address in
the 192.168.0.x network)
Subnet mask
255.255.255.0
Default gateway
192.168.0.1
Preferred DNS server
192.168.0.1
• You can leave the
Alternate DNS server
field empty.
6
Click
OK
to save your changes and exit first the TCP/IP
Properties dialog box, then the Local Area Connection
Properties dialog box.
Your changes are put into effect immediately.
As specified earlier, the AP should be directly connected to
your PC/laptop (through one of the LAN ports), and have been
powered up, ready for setup.
1
On the PC, open a web browser window.
2
In the browser, type this URL to connect to the AP:
https://192.168.0.1
3
Press
Enter
to initiate the connection.
4
When a security alert dialog box appears, click
OK/Yes
to
proceed.
5
When the Ruckus Wireless Admin login page appears, enter
the following:
Username
super
Password
sp-admin
6
Click
Login
.
Important!
ALERT! Before starting this process, inspect your net-
work switch and confirm that it supports the
802.1Q
proto-
col. The
Ruckus Wireless Hotspot Access Point
requires a
VLAN-capable (802.1Q) switch.
1
Connecting the Ruckus AP to your PC
2
Preparing your PC for AP Setup
3
Logging into the AP
Default AP Settings (for your reference)
Network Names (Seeds)
Hotspot1—Hotspot4
Security (Encryption method)
Disabled for each hotspot
Default Management IP Address
192.168.0.1
VLAN mapping
Wireless Hotspot 1 = 11
Wireless Hotspot 2 = 21
Wireless Hotspot 3 = 31
Wireless Hotspot 4 = 41
Management = 51


