RTC HSA 50 Скачать руководство пользователя страница 7

-         7 -

GB

GB

-         6 -

Spaltendüse

: Dieser Aufsatz ist besonders zum Aufsaugen in schwer zugänglichen Spalten und Ritzen 

geeignet, nicht nur am Tisch.

Aufsteckbürste für Spaltendüse

: Mit diesem Aufsatz lösen Sie auch gleichzeitig hartnäckige Krümel, die 

auf der Tischdecke festsitzen.

STAUBBEHÄLTER REINIGEN

Der Staubbehälter sollte möglichst nach jedem Gebrauch gereinigt werden, da sich hier auch feuchte 

Speisereste befinden können. Drücken Sie die Entsperrtaste und nehmen Sie den Staubbehälter ab, wie 

bereits zuvor beschrieben. Nehmen Sie den Filtereinsatz heraus und entleeren Sie den Staubbehälter. 

Wischen Sie den Staubbehälter feucht aus. Nach dem Entleeren setzen Sie den Tischstaubsauger bitte 

wieder zusammen.

Der Staubbehälter ist halb lichtdurchlässig. Halten Sie ihn etwas gegen das Licht, um den Füllstand zu 

überprüfen. Bitte achten Sie darauf, dass der Staubbehälter nicht über die Höchstfüllmarke MAX. hinaus 

gefüllt wird, in diesem Fall lässt die Saugleistung stark nach.

TECHNISCHE SPEZIFIKATIONEN

Netzspannung 

: 30-40V ~ 50Hz

Output 

D.C. 6V, 50 mA

Hinweise zum Umweltschutz

Dieses Produkt darf am Ende seiner Lebensdauer nicht über den normalen Haushaltsabfall entsorgt 

werden, sondern muss an einem Sammelpunkt für das Recycling von elektrischen und elektronischen 

Geräten abgegeben werden. Das Symbol auf dem Produkt, der Gebrauchsanleitung oder der Verpackung 

weist darauf hin.

Die Werkstoffe sind gemäß ihrer Kennzeichnung wiederverwertbar. Mit der Wiederverwendung, der 

stofflichen Verwertung oder anderen Formen der Verwertung von Altgeräten leisten Sie einen wichtigen 

Beitrag zum Schutze unserer Umwelt.

Bitte erfragen Sie bei der Gemeindeverwaltung die zuständige Entsorgungsstelle.

Satz- und Druckfehler vorbehalten.

Ihre Servicehotline für Österreich: +43 36 660 606 66

-         7 -

INSTRUCTION MANUAL          HSA 50          RECHARGEABLE WET / DRY HAND VAC

Dear customer,

Please read these operating instructions through carefully before connecting your device to the mains, in 

order to avoid damage due to incorrect use. Please pay particular attention to the safety information. If you 

pass the device on to a third party, these operating instructions must also be handed over.
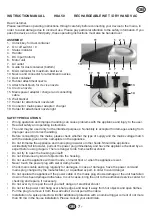
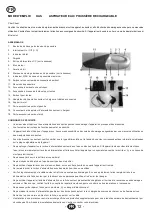
ASSEMBLY

1.  Unlock key for dust container

.  On / off switch I / 0

3.  Status indicator

4.  Handle

5.  DC input (bottom)

6.  Motor unit

7.  Air outlet

8.  Guide for dust container (bottom)

9.  MAX. indicator for maximum dust level

10. Nozzle and connector for attachment nozzles

11. Dust container

1. Rubber attachment nozzle

13. Attachment brush for crevice nozzle

14. Crevice nozzle

15. Mains power adapter / charger and connecting 

cable

16. Wall bracket

17. Holder for attachment nozzle left

18. Connector mains power adapter / charger

19. Holder for attachment nozzle right

11

1

2 3

4

5

6

7

8

9

10

17

18

19

12

13

14

15

16

SAFETY PRECAUTIONS

•  Wrong operation and improper handling can cause problems with the appliance and injury to the user.

•  Read all safety and operating instructions.

•  The unit may be used only for the intended purposes. No liability is accepted for damages arising from 

improper use or incorrect handling.

•  Before connecting to the mains, please check whether the type of supply and the mains voltage match 

with the details given on the nameplate on the appliance.

•  Do not immerse the appliance and mains plug in water or other fluids. Should the appliance 

accidentally fall into water, pull out the power plug immediately and have the appliance checked by an 

expert before using it again. There is danger to life from electrical shock!

•  Do not try to open the housing yourself!

•  Do not introduce any kind of objects into the housing.

•  Do not use the appliance with wet hands, on moist floor or when the appliance is wet.

•  Never touch the power plug with wet or damp hands.

•  Check mains cable and plug regularly for damages. In case of damages, have the power cord and 

mains plug changed by the manufacturer, or a qualified expert, in order to avoid danger.

•  Do not operate the appliance if the power cable or the mains plug shows damage or the unit has fallen 

down or has been damaged otherwise. In such cases, bring the unit to the authorized service center for 

checking and repairs, if necessary.

•  Do not ever try to repair the unit yourself; danger of electrical shock!

•  Do not let the power cord hang over sharp edges and keep it away from hot objects and open flames. 

Pull the plug to remove it from the wall outlet; do not pull at the cable.

•  Installation of a spike protector will offer additional protection with a nominal trigger current of not more 

than 30 mA in the house installation. Please consult your electrician.

Содержание HSA 50

Страница 1: ...HSA 50 AKKU NASS TROCKEN HANDSTAUBSAUGER RECHARGEABLE WET DRY HAND VAC OPLAADBARE NAT DROOG HANDZUIGER ASPIRATEUR EAU POUSSI RE RECHARGEABLE FR NL D GB...

Страница 2: ...r den vorgesehenen Zweck benutzt werden Bei nicht bestimmungsgem em Gebrauch oder falscher Handhabung kann keine Haftung f r evtl auftretende Sch den bernommen werden Vor Anschluss ans Netz pr fen Si...

Страница 3: ...irksystem betrieben zu werden Dieses Ger t ist nicht zur Benutzung durch Personen einschlie lich Kinder mit verminderten k rperlichen sensorischen oder geistigen F higkeiten oder fehlender Erfahrung u...

Страница 4: ...itungen der Batteriehersteller zur sicheren Benutzung und Entsorgung BATTERIEN FACHGERECHT ENTSORGEN Batterien geh ren nicht in den Hausm ll Die Batterien m ssen bei einer Sammelstelle f r Altbatterie...

Страница 5: ...iesem Fall wenden Sie sich bitte an den autorisierten Kundendienst oder an Ihren Fachh ndler Betreiben Sie den Tischstaubsauger keinesfalls ohne Filter das besch digt den Motor MONTAGE DER WANDHALTERU...

Страница 6: ...cht um den F llstand zu berpr fen Bitte achten Sie darauf dass der Staubbeh lter nicht ber die H chstf llmarke MAX hinaus gef llt wird in diesem Fall l sst die Saugleistung stark nach TECHNISCHE SPEZI...

Страница 7: ...necting to the mains please check whether the type of supply and the mains voltage match with the details given on the nameplate on the appliance Do not immerse the appliance and mains plug in water o...

Страница 8: ...as well as due to technical improvements changes of the devices can be done by the manufacturer at any time without announcement Changes of this kind are considered in future versions of this user man...

Страница 9: ...it in water or other liquids Thoroughly dry the unit and all attachments before storing or using the vacuum cleaner again ASSEMBLY DISASSEMBLY OF ATTACHMENTS For thorough cleaning the appliance can be...

Страница 10: ...bled dust container filter unit and filter must be attached at all times To turn the vacuum cleaner off slide the on off switch back in 0 position ATTACHMENT NOZZLES You can use the vacuum cleaner wit...

Страница 11: ...oduct the instructions for use or the packing will inform about the methods for disposal The materials are recyclable as mentioned in its marking By recycling material recycling or other forms of re u...

Страница 12: ...ension du secteur correspondent aux informations indiqu es sur la plaque signal tique de l appareil Ne pas plonger l appareil ou le cordon d alimentation secteur dans l eau ou d autres liquides Si l a...

Страница 13: ...s peuvent tre apport es par le fabricant tout moment sans pr avis Des modifications de ce genre sont possibles dans les futures versions de ce manuel Tous droits r serv s 2 Toutes les figures sont pr...

Страница 14: ...ns l eau ou d autres liquides Essuyez convenablement votre appareil et tous les accessoires avant de le ranger ou de le r utiliser MONTAGE D MONTAGE DES ACCESSOIRES Pour un nettoyage approfondi l appa...

Страница 15: ...rvoir poussi re l unit de filtrage et le filtre doivent tre mont s en permanence Pour teindre l aspirateur glissez le commutateur on off sur la position 0 ACCESSOIRES EMBOUTS Vous pouvez utiliser l as...

Страница 16: ...ilisation ou l emballage indiqueront les proc dures de destruction Comme signal sur son marquage les mat riaux sont recyclables En recyclant du mat riel recyclable ou par d autres formes de r utilisat...

Страница 17: ...laatje op het toestel overeenkomt Dompel het apparaat of de stekker nooit in water of andere vloeistoffen onder Mocht het toestel per ongeluk in het water vallen verwijder onmiddellijk de stekker van...

Страница 18: ...echnische verbeteringen wijzigingen van de apparaten kunnen op elk moment zonder aankondiging door de fabrikant worden gedaan Wijzigingen van deze soort worden in toekomstige versies van deze gebruiks...

Страница 19: ...dere vloeistoffen onder Droog de eenheid en alle hulpstukken grondig v r het opslaan of opnieuw gebruiken van de stofzuiger MONTAGE DEMONTAGE VAN HULPSTUKKEN Voor een grondige reiniging kan het toeste...

Страница 20: ...lter moeten te allen tijde aangebracht zijn Om de stofzuiger uit te zetten schuif de Aan Uit schakelaar naar de 0 stand MONDSTUKKEN U kunt de stofzuiger zonder een mondstuk gebruiken Met behulp van he...

Страница 21: ...p het product de gebruiksinstructies of de verpakking informeren over de methoden voor verwijdering De materialen zijn recyclebaar zoals vermeld in de markering Door recycling materiaalrecycling of an...

Страница 22: ...elvil gos t sban olyan szem ly r sz r l aki felel s biztons guk rt A gyermekekre k l n sen vigy zni kell nehogy j tsszanak a berendez ssel IT Questo apparecchio non destinato all uso da parte di perso...

Страница 23: ...ii cu capacit i fizice senzoriale i mintale reduse sau lipsite de experien i cuno tin e dec t dac se afl sub supraveghere sau au fost instruite privitor la utilizarea aparatului de c tre o persoan res...

Отзывы: