


FO-FDHB5-N-2007-08
Liste de contrôle / Check List:
1 Assemblage du ventilateur interne / Internal Blower Assembly (1.13.HB5.2.DNP)
1 Assemblage de l'interrupteur thermique / Thermal Switch assembly (1.13.H#.1.DNP)
1 Interrupteur de vitesse variable / Variable Speed Switch (940001)
1 Sac contenant 4 connecteurs en fourchette / 1 Bag containing 4 spade connectors (942006)
Notice d'installation et liste de contrôle / Instructions and check list
INITIALES
INITIALS
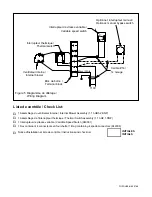
Interrupteur de vitesse variable /
Variable speed switch
Optionnel: interrupteur manuel /
Optional: manual bypass switch
110V
Calibre #14 /
14 Gauge
Interrupteur thermique /
Thermal switch
Ventilateur interne /
Internal blower
Bloc de borne /
Terminal block
Blanc / White
Noir / Black
Figure 5 Diagramme de câblage /
Wiring Diagram