background image

Electro-Pneumatic Positioner 

YT-1000 / 1050 series 

                                                                            Product Manual 


Ver. 1.30 

72 


Maintenance 

8.1 

Pilot valve 

1) 

If  Supply  air  pressure  is  not  stable  or  Supply  air  is  not  clean,  the  positioner  may  not  function 

properly. Air quality and pressure should be checked regularly to see if the air is clean and pressure 

set is normal. 

2) 

If the pilot valve has to be removed from the unit, be cautious not to lose the O-ring attached to 

rear side of the pilot valve and the stabilizing spring between the pilot valve and the torque motor. 

3) 

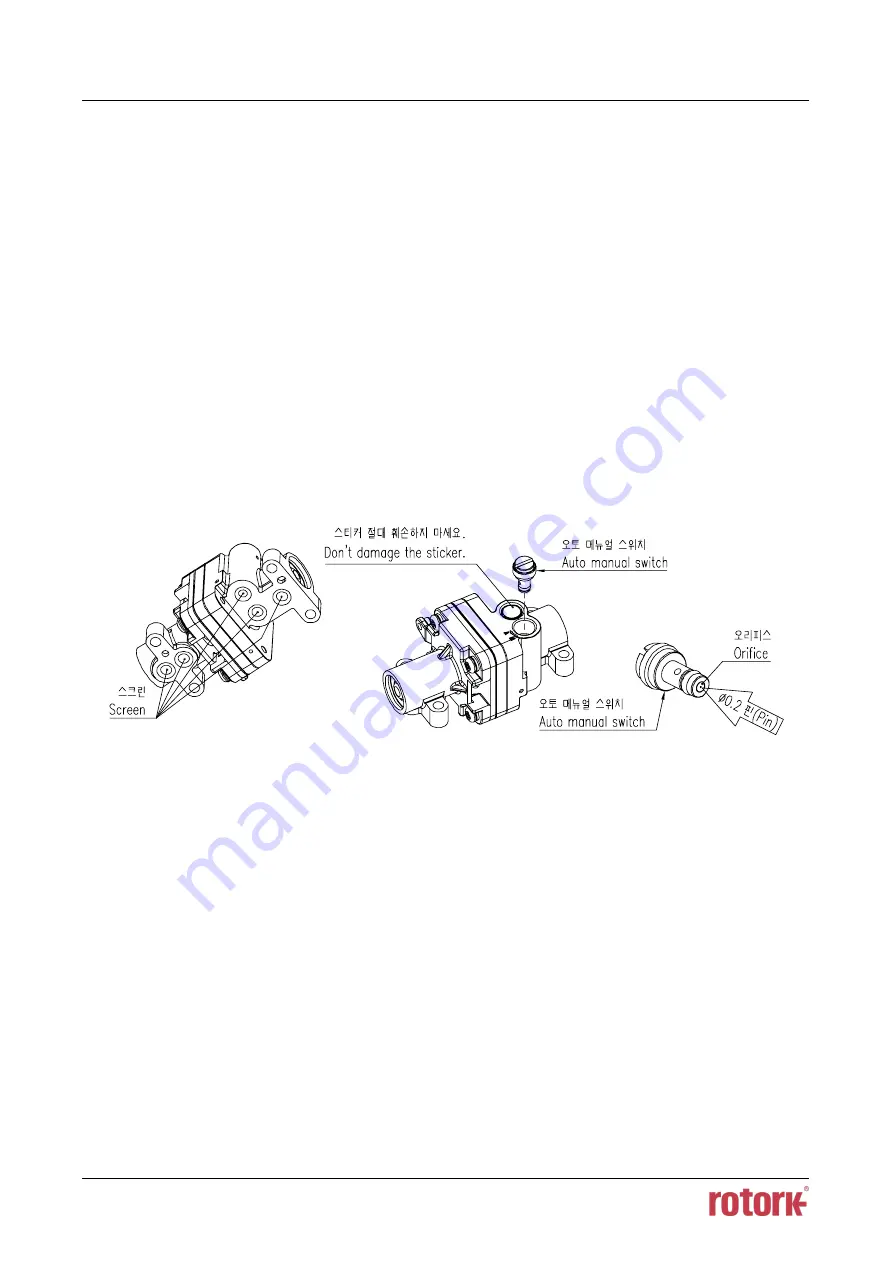
On the back of the Auto Manual switch, there is a fixed orifice (0.3 pie) which could be clogged 

with dusts and other substances and lead to malfunction of the positioner. First of all, remove the 

pilot valve from the positioner and see if the holes on the screens are not clogged. If the screens 

are clean and the positioner is not functioning, remove the Auto-Manual switch and check the back 

of the switch and see if the orifice is clean. Clean the orifice with air and reassemble the switch 

and the pilot valve to the positioner and test once again. If the unit is still not working, use a 0.2 pie 

drill or pin and insert into the orifice hole at the back of the Auto-Manual switch. 


Fig. 8-1:    Pilot unit and Auto manual switch 

 
8.2 

Seals 

Once a year, it is recommend to check if there are any damaged parts of the positioner. If there are 

damaged rubber parts such as diaphragms, o-rings and packings, replace with new ones. 

Содержание YT-1000 Series

Страница 1: ...Electro Pneumatic Positioner PRODUCT MANUAL YT 1000 1050 Series VERSION 1 30 Rotork YTC Limited...

Страница 2: ...3 Specification of Internal L S Limit Switch option 22 2 5 4 Specification of External L S option 23 2 6 Certifications 25 2 6 1 YT 1000 YT 1050 25 2 6 2 YT 1000 25 2 6 3 YT 1050 26 2 6 4 SPTM 6V Exte...

Страница 3: ...2 Tools for installation 43 4 3 Linear positioner Installation 44 4 3 1 Preparing Bracket for the positioner 44 4 3 2 Installation Steps 45 4 4 Rotary positioner Installation 48 4 4 1 Components 48 4...

Страница 4: ...tary positioner 65 7 2 Adjustment Zero Point 66 7 3 Adjustment Span 67 7 4 Adjustment L S Limit Switch Internal Option 67 7 5 Adjustment A M switch Auto Manual 68 7 6 Orifice Installment 69 7 7 Reset...

Страница 5: ...s an accessory of the control valve so please make sure to read the applicable instruction manual of the control valve prior to installation and operation 1 2 Manufacturer Warranty For the safety it i...

Страница 6: ...on Explosion proof type wires and packing should be used Blind plug is required when any port is not being used Ring terminal with surface area of more than 1 25 mm2 with M4 spring washer should be us...

Страница 7: ...adjustment Position transmitter or limit switch is available as internal or external option on the positioner However positioner is non explosion type when internal option has been selected In case o...

Страница 8: ...perature AMBIENT TEMP Indicates the allowable ambient temperature for explosion proof SUPPLY PRESSURE Indicates the supply pressure range SERIAL NUMBER Indicates unique serial number MONTH YEAR Indica...

Страница 9: ...YT 1000 Ex db mb IIB T5 Gb ATEX IECEx TS NEPSI Explosion proof code M of 2 4 1 2 4 2 Product Code or Fig L 4 YT 1000 Ex dmb IIB T5 T4 KCs Explosion proof code M of 2 4 1 2 4 2 Product Code Fig L 5 YT...

Страница 10: ...60 C NBR elastomer Explosion proof code A of 2 4 1 2 4 2 Product Code Fig L 7 YT 1000 Class I Zone 1 Ex d m IIB T5 CSA 40 60 C Silicone elastomer Explosion proof code A of 2 4 1 2 4 2 Product Code Fig...

Страница 11: ...sion proof code C of 2 4 1 2 4 2 Product Code Fig L 10 YT 1000 Ex ia IIC T6 Ga NEPSI Explosion proof code P of 2 4 1 2 4 2 Product Code Fig L 11 YT 1000 Ex dmb IIB T5 TIIS Explosion proof code X of 2...

Страница 12: ...12 Fig L 13 YT 1000 Ex d mb IIB T5 Gb CCC Explosion proof code Z of 2 4 1 2 4 2 Product Code Fig L 14 YT 1000 Ex d mb IIC T6 Gb CCC Explosion proof code B of 2 4 1 2 4 2 Product Code Fig L 15 YT 1000...

Страница 13: ...1 30 13 YT 1050 Fig L 21 YT 1050 Non explosion Explosion proof code N of 2 4 3 Product Code Fig L 22 YT 1050 Non explosion EAC Explosion proof code N of 2 4 3 Product Code Fig L 23 YT 1050 Ex db mb II...

Страница 14: ...1 30 14 Fig L 24 YT 1050 Ex db mb IIB T5 Gb INMETRO Explosion proof code T of 2 4 3 Product Code Fig L 25 YT 1050 1Ex d mb IIB T5 Gb X EAC Explosion proof code E of 2 4 3 Product Code Fig L 26 YT 1050...

Страница 15: ...FM Label Fig L 8 Flameproof enclosure encapsulation IIC KCs Label Fig L 9 Intrinsic safety IIC NEPSI Label Fig L 10 Flameproof enclosure encapsulation IIB TIIS Label Fig L 11 Flameproof enclosure enc...

Страница 16: ...roduct and is not related to explosion proof temperature See 2 6 Certificates for explosion proof temperature 7 8 These are only available for S L in 6 Operating Temp 2 4 2 YT 1000 Rotary series follo...

Страница 17: ...explosion or YT 870 Explosion proof SPTM L S Internal Without LCD Non explosion SPTM L S External With YT 870 Explosion proof 1 Explosion proof M except KCs T F P X Z B G are only available for S in...

Страница 18: ...NPT SPTM 6V Explosion protection for Ex d IIC is certified with KCs NEPSI EAC so this option is available for M KCs NEPSI and C E N Non explosion options in 2 Explosion Proof Only available for 0 in 7...

Страница 19: ...tion IIB EAC Label Fig L 25 Flameproof enclosure encapsulation IIB CCC Label Fig L 26 4 Lever Type Linear 1 2 3 4 10 40 mm 30 70 mm 60 100 mm 100 150 mm Rotary 1 2 3 4 5 M6 x 34L M6 x 63L M8 x 34L M8...

Страница 20: ...uct Manual Ver 1 30 20 3 Please put the name of certificate in a purchase order 4 This option is just the normal operating temperature of the product and is not related to explosion proof temperature...

Страница 21: ...6 Type 4X FM IP66 Explosion Proof 1 Non explosion 2 Flameproof enclosure encapsulation 3 Intrinsic safety 2 Flameproof enclosure encapsulation Refer to 2 6 Certifications for details Ambient Temperatu...

Страница 22: ...fer to 2 6 4 certifications Ambient Temperature Operating 40 85 C 40 185 F Explosion proof Refer to 2 6 4 certifications Weight 1 3 Kg 2 9 lb Painting Polyester Powder Coating Tested under ambient tem...

Страница 23: ...V 3 A 125 V 5 A DC 250 V 0 2 A 125 V 0 4 A 30 V 4 A 14 V 5 A 8 V 5 A Terminal 8 Points Conduit Entry G 1 2 Ingress Protection IP67 Explosion Proof Non explosion Ambient Temperature 25 70 C 13 158 F H...

Страница 24: ...125 V 0 4 A 30 V 4 A 14 V 5 A 8 V 5 A 12 24 V Terminal 8 Points Conduit Entry G 3 4 for CCC 1 2 NPT Ingress Protection Type 4 4X CSA IP67 Explosion Proof Flameproof enclosure Refer to 2 6 5 Certifica...

Страница 25: ...n No 2020322307002521 Ambient temperature 20 60 C 4 140 F EAC TRCU Russia Kazakhstan Belarus Rating 1Ex d mb IIB T5 Gb X IP66 Certification No RU C KR M 62 B 04758 Ambient temperature 40 60 C 40 140 F...

Страница 26: ...fication No TC21196 Ambient temperature 20 70 C 4 158 F TS Rating Ex db mb IIB T5 Gb X Certification No TS 1050008222 Ambient temperature 20 60 C 4 140 F CCC China 1 Rating Ex d mb IIC T6 Gb Certifica...

Страница 27: ...ication No GYJ20 1519X Ambient temperature 40 60 C 40 140 F EAC TRCU Russia Kazakhstan Belarus Rating 1Ex d IIC T6 Gb IP67 Certification No RU C KR MIO62 B 04759 Ambient temperature 60 60 C 76 140 F E...

Страница 28: ...140 X Ambient temperature 20 60 C 4 140 F IECEx Rating Ex db IIC T6 Gb Ex tb IIIC T85 C Db Certification No IECEx EPS 14 0053X Ambient temperature 20 60 C 4 140 F CSA Rating Ex db IIC T6 Class I Zone...

Страница 29: ...Electro Pneumatic Positioner YT 1000 1050 series Product Manual Ver 1 30 29 2 7 Parts and Assembly 2 7 1 YT 1000L 2 7 2 YT 1050L...

Страница 30: ...Electro Pneumatic Positioner YT 1000 1050 series Product Manual Ver 1 30 30 2 7 3 YT 1000R 2 7 4 YT 1000R SPTM Internal...

Страница 31: ...Electro Pneumatic Positioner YT 1000 1050 series Product Manual Ver 1 30 31 2 7 5 YT 1000R Limits Switch Internal...

Страница 32: ...Electro Pneumatic Positioner YT 1000 1050 series Product Manual Ver 1 30 32 2 7 6 YT 1000R SPTM External 2 7 7 YT 1000R Limit Switch External...

Страница 33: ...Electro Pneumatic Positioner YT 1000 1050 series Product Manual Ver 1 30 33 2 8 Product Dimension 2 8 1 YT 1000L Flameproof enclosure 2 8 2 YT 1000L Non explosion proof type or Intrinsic safety...

Страница 34: ...Electro Pneumatic Positioner YT 1000 1050 series Product Manual Ver 1 30 34 2 8 3 YT 1000L Internal SPTM without LCD 2 8 4 YT 1000R Fork Lever type Explosion proof construction for internal pressure...

Страница 35: ...Electro Pneumatic Positioner YT 1000 1050 series Product Manual Ver 1 30 35 2 8 5 YT 1000R Namur type 2 8 6 YT 1000R Dome indicator...

Страница 36: ...Electro Pneumatic Positioner YT 1000 1050 series Product Manual Ver 1 30 36 2 8 7 YT 1000R Internal SPTM without LCD 2 8 8 YT 1000R Internal SPTM with LCD...

Страница 37: ...Electro Pneumatic Positioner YT 1000 1050 series Product Manual Ver 1 30 37 2 8 9 YT 1000R Internal Limit Switch or Limit Switch SPTM...

Страница 38: ...Electro Pneumatic Positioner YT 1000 1050 series Product Manual Ver 1 30 38 2 8 10 YT 1000R External SPTM with LCD...

Страница 39: ...Electro Pneumatic Positioner YT 1000 1050 series Product Manual Ver 1 30 39 2 8 11 YT 1000R External Limit Switch...

Страница 40: ...ic Positioner YT 1000 1050 series Product Manual Ver 1 30 40 2 8 12 YT 1050L Explosion proof construction for internal pressure type 2 8 13 YT 1050R Fork Lever type Explosion proof construction for in...

Страница 41: ...pressure will increase and when there is enough pressure inside the chamber to push the actuator s spring actuator s stem will start to go down and through the feedback lever stem s linear motion will...

Страница 42: ...he chamber of the actuator through OUT1 Then chamber s OUT1 pressure will increase and the actuator s stem will rotate and through the feedback shaft actuator s rotating motion will be transferred to...

Страница 43: ...no remaining pressure in the actuator The positioner has a vent cover to exhaust internal air and drain internal condensation water When installing the positioner make sure the vent cover must be faci...

Страница 44: ...main shaft Bracket bolts and washers for positioner not supplied with the positioner Connection bar not supplied with the positioner 4 3 1 Preparing Bracket for the positioner Proper bracket must be...

Страница 45: ...r yoke 2 Attach the positioner with the bracket to the actuator yoke DO NOT TIGHTEN THE BRACKET COMPLETELY 3 Connect connection bar to the actuator clamp The hole gap on the feedback lever is 6 5 mm s...

Страница 46: ...Proper way to insert connection bar between feedback lever and lever spring 6 Check if feedback lever is vertical to the valve stem at 50 of the valve stroke If it is not vertical adjust the bracket o...

Страница 47: ...n both 0 and 100 the linear lever stopper should not touch the stopping bosses of positioner which is located on the backside of the positioner If the linear lever stopper touches the stopping bosses...

Страница 48: ...its stem rotates 90 degrees Before proceeding with the installation ensure following components are available 4 4 1 Components Positioner Fork lever Only Fork lever type Rotary bracket set 2 pieces 4...

Страница 49: ...ed with the positioner contains two components The bracket is designed to fit onto the actuator with 20 mm 30 mm and 50 mm stem height H according to VDI VDE 3845 standard Please refer to below figure...

Страница 50: ...position of the actuator stem at 0 For single acting actuator it is easy to check 0 point by supplying no pressure to the actuator For double acting actuator check actuator stem s rotation direction c...

Страница 51: ...enter pin 2 mm Dia of the main shaft of the positioner into the hole of center of the fork lever The clamping pin will be locked to the fork lever spring Setting alignment of center of main shaft of t...

Страница 52: ...east 10 C lower than ambient temperature Avoid from dusty air Use 5 micron or smaller filter Avoid oil Comply with ISO 8573 1 or ISA 7 0 01 Supply pressure range is 0 14 0 7 MPa 1 4 7 bar Set air filt...

Страница 53: ...single acting type As input signal ampere increases the supply air pressure will be supplied through Out1 port Fig 5 1 Single acting linear actuator Fig 5 2 Single acting rotary actuator Refer to belo...

Страница 54: ...matic Positioner YT 1000 1050 series Product Manual Ver 1 30 54 Fig 5 4 Setting directions of piping and span for linear RA single actuator Fig 5 5 Setting directions of piping and cam for rotary sing...

Страница 55: ...tuator and the exhausting air from actuator will be exhausted through Out2 of positioner Fig 5 6 Double acting linear actuator Fig 5 7 Double acting rotary actuator Refer to below diagram and check if...

Страница 56: ...Electro Pneumatic Positioner YT 1000 1050 series Product Manual Ver 1 30 56 Fig 5 9 Setting directions of piping and cam for rotary double actuator...

Страница 57: ...osure type 6 2 1 Safety When installing in hazardous and explosive gas area conduit tube or pressure proof packing union must be used The compound charging box should be the flameproof type and must b...

Страница 58: ...tion box and open the junction box cover 2 Connect external wires with ring terminals to corresponding polarities within the junction box terminal block To avoid poor contacts make sure all bolts on t...

Страница 59: ...Non Intrinsic safety type circuit and separate it from any other electric circuits 6 3 1 Connection 1 Open the cover base of the positioner 2 Connect external wires to corresponding polarities on the...

Страница 60: ...on type but old type slide switch was 2 point position type Smart Position Transmitter can be calibrated by 2 or 5 points setting The slide switch has 3 positions as below 1 2 Point position By settin...

Страница 61: ...press and hold the button for 2 seconds and the lamp will flash twice quickly Release the button and then the lamp will flash three times quickly again to confirm that the new setting has been saved 2...

Страница 62: ...ion Position the valve at 100 press and hold the button for 2 seconds and the lamp will flash twice quickly Release the button and then the lamp will flash three times quickly again to confirm that th...

Страница 63: ...ectro Pneumatic Positioner YT 1000 1050 series Product Manual Ver 1 30 63 6 6 Internal L S SPTM Without LCD Refer to above 6 4 1 and 6 4 2 to calibrate the position transmitter Fig 6 7 Connecting cabl...

Страница 64: ...al Ver 1 30 64 7 Adjustments 7 1 Ra or Da Setting 7 1 1 Linear Positioner 1 If the actuator axis moves down when input signal is increased assemble the Span to upper M6 Tap hole like the below figure...

Страница 65: ...reased in case of need re assemble the CAM so that DA Direct Acting lettered surface is facing upward 2 If the actuator axis rotates counter clockwise when input signal in increased in case of need re...

Страница 66: ...rd Fig 7 7 Parts LS internal 7 2 Adjustment Zero Point Set input signal at 4 mA or 20 mA as the initial ampere and rotate the adjuster of zero unit handle upward or downward to adjust actuator s zero...

Страница 67: ...ased If the stroke is too high the span should be decrease 2 Changing span will affect zero point setting so zero point should be set again after span has been adjusted 3 Above two steps are required...

Страница 68: ...be directly supplied from out1 port of positioner to the actuator regardless of input signal ampere On the other hand if the switch is turned clockwise toward A Auto and it is fasten tightly then the...

Страница 69: ...lve stroke Please make sure that the actuator does not move during the re calibration 2 In the junction box Please pull out the potentiometer cable connector from potentiometer PCB Do not pull out wit...

Страница 70: ...Electro Pneumatic Positioner YT 1000 1050 series Product Manual Ver 1 30 70 Fig 7 15 Resetting resistance of potentiometer without LCD Fig 7 16 Resetting resistance of potentiometer with LCD...

Страница 71: ...or split range Replacement If you want to change the normal control of positioner into split range control by 4 12 mA or 12 20 mA please order the split range control span spring from your local deale...

Страница 72: ...with dusts and other substances and lead to malfunction of the positioner First of all remove the pilot valve from the positioner and see if the holes on the screens are not clogged If the screens ar...

Страница 73: ...relay valve 2 Check for a gap or damages between the nozzle and the flapper If damaged please send the product to the corresponding local Rotork YTC Limited office or main office in South Korea for re...

Страница 74: ...ne must be re adjusted as well 3 Check if supply air pressure level is stable from the regulator If the level is unstable the regulator must be replaced Hysteresis is too low 1 In case of double actin...

Страница 75: ...urer Rotork YTC Limited Address 81 Hwanggeum ro 89 Beon gil Yangchon eup Gimpo si Gyeonggi do South Korea Postal code 10048 Tel 82 31 986 8545 Fax 82 70 4170 4927 Email ytc sales rotork com Homepage h...

Отзывы:

Похожие инструкции для YT-1000 Series