background image


Gebrauchsanweisung  ○ 


Mode d’emploi


○ 


Istruzioni per l’uso


○ 


Instruction for use


52


o


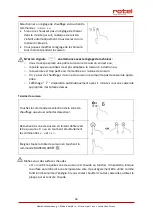
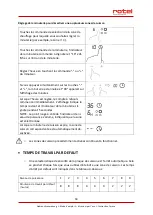
Faites sauter les légumes. Lorsqu'ils sont chauds mais encore croustillants, réglez la 

zone de cuisson sur un niveau plus bas, remettez la viande dans la poêle et


ajoutez 

votre sauce.


o


Remuez doucement les ingrédients pour vous assurer qu'ils sont bien chauds.


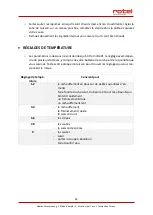
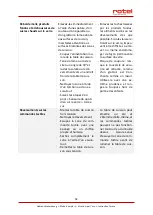
RÉGLAGES DE TEMPÉRATURE 

o


Les paramètres ci

-

dessous ne sont donnés qu'à titre indicatif. Le réglage exact dépen-

dra de plusieurs facteurs, y compris de votre batterie de cuisine et de la quantité que 

vous cuisinez. Testez votre plaque de cuisson pour trouver les réglages qui vous con-

viennent le mieux.


Réglage de tempé-

rature 

Convient pour 

1-2 

-


le réchauffement en douceur de petites quantités d'ali-

ments


-


faire fondre du chocolat, du beurre et pour les aliments qui 

brûlent rapidement


-


un frémissement doux


-


un récha

uffement lent


3-4 

-


le réchauffement


-


le frémissement rapide


-


la cuisson du riz


5-6 

-


les crêpes


7-8 

-


les sautés


-


la cuisson des pâtes


-


les sautés


-


saisir 

-


porter la soupe à ébullition


-


faire bouillir l’eau


Содержание INDUCTIONHOB1140CH

Страница 1: ...auchsanweisung Mode d emploi Istruzioni per l uso Instruction for use U1140CH_BED_DFIE_Rev02_2020 12 22 INDUCTIONHOB1140CH U1140CH GEBRAUCHSANWEISUNG MODE D EMPLOI ISTRUZIONI PER L USO INSTRUCTIONS FOR USE ...

Страница 2: ...ne B 1500 W 2 Kochzone 2300 W B 2600 W 2 Zone 2300 W B 2600 W 2 Zona da 2300 W B 2600 W 2 2300 W zone B 2600 W 3 Kochzone 1800 W B 2000 W 3 Zone 1800 W B 2000 W 3 Zona da 1800 W B 2000 W 3 1800 W zone B 2000 W 4 Kochzone 1800 W B 2000 W 4 Zone 1800 W B 2000 W 4 Zona da 1800 W B 2000 Wv 4 1800 W zone B 2000 W 5 Glasplatte 5 Plaque de verre 5 Piastra in vetro 5 Glass plate 6 Bedienfeld 6 Panneau de ...

Страница 3: ...el timer 2 Timer control 3 Boost Taste 3 Commande de Boost 3 Commando Boost 3 Boost control 4 Heizstufen Regel tasten 4 Commandes de réglage de puis sance 4 Comandi di rego lazione della po tenza 4 Power regulation controls 5 Regler für Leis tung Timer 5 Commandes de régulation de puissance tem porisation 5 Comandi di rego lazione della po tenza e del timer 5 Power Timer regulating controls 6 Bedi...

Страница 4: ...requenz Fréquence nominale Frequenza nominale Rated frequency 7200 W Nenneingangsleistung Puissance d entrée nominale Potenza nominale Rated input power Verkauf und Service Distribution et service après vente Reparto vendita e servizio clienti Sales and Service Schweiz France Rotel AG Parkstrasse 43 5012 Schönenwerd Tel 41 62 787 77 00 office rotel ch Rotel France SARL 313 route du Nant ZA de Magn...

Страница 5: ... 18 Beginn des Garvorgangs 18 Ende des Garvorgangs 19 Verwenden der Boost Funktion 20 Sperren der Bedienelemente 21 Timer Regelung 21 Verwendung des Timers als Kurzzeitmesser 22 Einstellen des Timers zum Ausschalten einer oder mehrerer Kochzonen 23 Standardbetriebszeiten 23 Gartipps 24 Simmern Garen von Reis 24 Anbraten von Steaks 24 Rührbraten 24 Heizstufen 25 Pflege und Reinigung 26 Fehlerbehebu...

Страница 6: ... la minuterie 48 Utilisation de la minuterie comme bip minute 49 Réglage de la minuterie pour désactiver une ou plusieurs zones de cuisson 50 Temps de travail par défaut 50 Conseils de cuisson 51 Mijoter cuire le riz 51 Saisir les steaks 51 Pour les sautés 51 Réglages de température 52 Entretien et nettoyage 53 Dépannage 55 Codes de défaillance et diagnostic 56 Codes de panne et solution 56 Échec ...

Страница 7: ... del timer per spegnere una o più zone di cottura 77 Tempi predefiniti 77 Suggerimenti per la cottura 78 Cottura a fuoco lento cottura del riso 78 Bistecca in padella 78 Frittura al salto 78 Livelli di calore 79 Cura e pulizia 80 Risoluzione dei problemi 82 Codici di guasto e diagnostica 83 Codici di guasto e soluzione 83 Guasto specifico e soluzione 84 Installazione 86 Selezione degli strumenti d...

Страница 8: ...r more cooking zones off 103 Default working times 103 Cooking Tips 104 Simmering cooking rice 104 Searing steak 104 For stir frying 104 Heat Settings 105 Care and cleaning 106 Troubleshooting 107 Failure codes and Diagnostic 108 Failure codes and solution 108 Specific Failure and solution 109 Installation 111 Selection of installation equipment 111 Before locating the fixing brackets 113 Caution ...

Страница 9: ...sen verwendet werden wenn sie beaufsichtigt werden oder bezüglich des sicheren Gebrauchs des Geräts unterwiesen wurden und die daraus resultie renden Gefahren verstanden haben o Dieses Gerät darf nicht von Kindern benutzt wer den o Kinder dürfen nicht mit dem Gerät spielen Kinder dürfen das Gerät nur unter Aufsicht reinigen und pflegen o Trennen Sie das Gerät vom Stromnetz bevor Sie ir gendwelche ...

Страница 10: ... auf das Gerät gestellt werden o Bitte stellen Sie diese Informationen dem Installa teur zur Verfügung da Sie auf diese Weise Installa tionskosten sparen könnten o Um eine Gefährdung zu vermeiden muss dieses Ge rät gemäss dieser Installationsanweisung installiert werden o Das Gerät muss von einer entsprechend qualifizier ten Person fachgerecht installiert und geerdet wer den o Das Gerät sollte an ...

Страница 11: ...t für Kochflächen aus Glaskera mik oder ähnlichem Material die spannungsfüh rende Teile schützen o Metallische Gegenstände wie Messer Gabeln Löf fel und Deckel sollten nicht auf die Kochfläche ge legt werden da sie heiss werden können o Reinigen Sie Ihr Kochfeld nicht mit einem Dampfrei niger o Das Gerät ist nicht für den Betrieb mit einem exter nen Timer oder einer separaten Fernsteuerung vor ges...

Страница 12: ...Sie das Gerät sofort vom Strom netz Trennschalter und wenden Sie sich an einen Fachmann o Schalten Sie das Kochfeld vor der Reinigung oder Pflege am Trennschalter aus o Die Nichtbeachtung dieses Hinweises kann zu ei nem elektrischen Schlag oder zum Tod führen o Das Gerät entspricht den elektromagnetischen Si cherheitsnormen o Personen mit Herzschrittmachern oder anderen elektrischen Implantaten z ...

Страница 13: ...ffe von Kochgeschirr können heiss werden Stel len Sie sicher dass solche Griffe z B von Stielkas serollen nicht über andere eingeschaltete Kochzo nen hinausragen Sorgen Sie dafür dass Kinder die Griffe nicht erreichen können o Die Nichtbeachtung dieses Hinweises kann zu Ver brennungen und Verbrühungen führen o Die extrem scharfe Klinge von Kochfeldschabern wird beim Zurückziehen der Schutzabdeckun...

Страница 14: ...sierbaren Gegenstände z B Kreditkarten Speicherkarten oder elektroni sche Geräte z B Computer MP3 Player in die Nähe des Geräts da diese durch das elektromagne tische Feld des Geräts beeinträchtigt werden kön nen o Verwenden Sie Ihr Gerät niemals zum Erwärmen o der Heizen des Raums o Schalten Sie nach Gebrauch immer die Kochzonen und das Kochfeld wie in dieser Anleitung beschrie ben aus z B über d...

Страница 15: ... wird in der Gebrauchsanweisung ausdrücklich empfohlen Alle sonstigen Wartungs arbeiten sollten von einem qualifizierten Techniker durchgeführt werden o Stellen Sie keine schweren Gegenstände auf Ihr Kochfeld bzw lassen Sie solche nicht auf das Koch feld fallen o Stellen Sie sich nicht auf das Kochfeld o Verwenden Sie kein scharfkantiges Kochgeschirr und ziehen Sie Kochgeschirr nicht über die Indu...

Страница 16: ...Bei spiel in Teeküchen für Mitarbeiter in Läden Büros und anderen gewerblichen Bereichen auf Bauernhöfen durch Kunden in Hotels Motels und anderen wohnähnlichen Bereichen in Frühstückspensionen und ähnlichen Bereichen o WARNUNG Das Gerät und seine zugänglichen Teile werden während des Gebrauchs heiss o Es ist darauf zu achten dass die Heizelemente nicht berührt werden ...

Страница 17: ...sauber und trocken sind und sie nicht von Gegenständen z B einem Küchenutensil oder Tuch bedeckt sind Selbst ein dünner Wasserfilm kann die Bedienung erschweren AUSWAHL DES RICHTIGEN KOCHGESCHIRRS o Verwenden Sie nur Kochgeschirr mit einem für das Induktionskochen geeigneten Boden o Achten Sie auf das Induktionssymbol auf der Verpackung oder auf dem Boden der Pfanne o Ob Ihr Kochgeschirr geeignet ...

Страница 18: ...Sie Ihr Kochgeschirr immer mittig auf die Kochzone o Heben Sie Kochgeschirr immer vom Glaskeramik Kochfeld ab nicht ziehen Das Glas könnte zerkratzen GEBRAUCH Beginn des Garvorgangs Berühren Sie die EIN AUS Taste Auf allen Anzeigen erscheint Stellen Sie ein geeignetes Kochgeschirr auf die ge wünschte Kochzone Stellen Sie sicher dass der Boden des Kochgeschirrs und die Oberfläche der Kochzone saube...

Страница 19: ...indet keine Erwärmung statt wenn sich kein geeignetes Kochgeschirr auf der Kochzone befindet o Die Anzeige verschwindet automatisch nach 1 Minute wenn kein geeignetes Kochgeschirr aufgesetzt ist Ende des Garvorgangs Berühren Sie die Heizzonenauswahlsteuerung die Sie ausschalten möchten Schalten Sie die Kochzone aus indem Sie die Heiz stufeneinstellung nach unten auf 0 stellen oder die Minus und Pl...

Страница 20: ... nach 5 Minuten auf 9 zurück Aktivieren Sie die Boost Funktion Berühren Sie den Regler für die Heizzonenwahl Berühren Sie den Boost Regler B die Zonenan zeige zeigt P und die Leistung erreicht Max Aufheben der Boost Funktion Berühren Sie den Boost Regler B oder die Taste um die Boost Funktion abzubrechen dann kehrt die Kochzone zu ihrer ursprünglichen Einstel lung zurück ODER Berühren Sie die Regl...

Страница 21: ...ltaste kurz gedrückt Wenn sich das Kochfeld im Sperrmodus befindet sind alle Bedienelemente ausser der EIN AUS Taste deaktiviert Sie können das Glaskeramik Kochfeld im Notfall jederzeit mit der EIN AUS Taste ausschalten Bei der nächsten Verwendung muss das Kochfeld jedoch zunächst entsperrt werden TIMER REGELUNG Sie können den Timer auf zwei verschiedene Arten verwenden o Sie können ihn als Kurzze...

Страница 22: ...nus und der Plus Taste wird der Timer Betrieb abgebrochen und wird im Display angezeigt Nach Einstellung der Zeit beginnt der Timer sofort mit dem Herunterzählen Das Display zeigt die ver bleibende Zeit an und die Timer Anzeige blinkt 5 Sekunden lang Sobald die Zeit abgelaufen ist ertönt 30 Sekunden lang ein Piepton und die Timer Anzeige zeigt an Tipp o Berühren Sie die Minus oder Plus Taste einma...

Страница 23: ...0 Wenn die Zeit eingestellt ist beginnt sie sofort her unterzuzählen Im Display wird die verbleibende Zeit angezeigt und die Timer Anzeige blinkt 5 Se kunden lang HINWEIS Der rote Punkt neben der Leistungsstu fenanzeige leuchtet auf und zeigt an dass eine Zone ausgewählt ist Wenn der Kochtimer abläuft wird die entspre chende Kochzone automatisch ausgeschaltet o Zuvor eingeschaltete Kochzonen sind ...

Страница 24: ...niedrigste erforderlich sein damit das Gargut in der empfohlenen Zeit vollständig gegart wird Anbraten von Steaks o Lassen Sie das Fleisch vor dem Garen ca 20 Minuten bei Raumtemperatur stehen o Erhitzen Sie eine schwere Bratpfanne o Bestreichen Sie beide Seiten des Steaks mit Öl Träufeln Sie eine kleine Menge Öl in die heisse Pfanne und legen Sie dann das Fleisch in die heisse Pfanne o Wenden Sie...

Страница 25: ...lungen sind nur Richtwerte Die genaue Einstellung hängt von mehreren Faktoren ab einschliesslich Ihres Kochgeschirrs und der Menge des Gar guts Experimentieren Sie ein wenig mit dem Kochfeld um die für Sie am besten pas senden Einstellungen zu finden Heizstufe Geeignet für 1 2 schonendes Erwärmen kleiner Speisemengen Schmelzen von Schokolade Butter und schnell anbrennen der Lebensmittel leichtes S...

Страница 26: ...Sie die Kochfläche mit einem sauberen Tuch oder Pa piertuch Stellen Sie die Stromver sorgung zum Kochfeld wieder her Wenn die Stromversor gung zum Kochfeld ge trennt ist ist der Warn hinweis für heisse Ober flächen ausgeschaltet die Kochzone kann aber noch heiss sein Seien Sie äusserst vorsichtig Harte Scheuer schwämme einige Nylon Scheuerschwämme und aggressive abrasive Reini gungsmittel können d...

Страница 27: ... sie auf dem Glas ab kühlen sind sie nur noch schwer zu entfernen oder können sogar die Glas oberfläche dauerhaft be schädigen Gefahr von Schnittverlet zungen Nach Zurückzie hen der Schutzabdeckung liegt die Klinge des Scha bers frei Diese Klinge ist extrem scharf Verwen den Sie den Schaber sehr vorsichtig und bewahren Sie ihn sicher und für Kin der unzugänglich auf Spritzer auf den Touchbedienele...

Страница 28: ...en die Fin gerspitze wenn Sie die Be dienelemente berühren Vergewissern Sie sich dass der Bereich der Touchbedie nelemente trocken ist und benutzen Sie Ihre Finger kuppe wenn Sie die Bedien elemente berühren Das Glas wird zerkratzt Scharfkantiges Kochgeschirr Ungeeignete abrasive Scheuerschwämme oder Reinigungsmittel werden verwendet Verwenden Sie Kochgeschirr mit flachen und glatten Bö den Siehe ...

Страница 29: ... ist Verwenden Sie Kochge schirr das für das Indukti onskochen geeignet ist Siehe Abschnitt Auswahl des richtigen Kochge schirrs Zentrieren Sie den Topf und achten Sie darauf dass sein Boden zur Größe der Koch zone passt STÖRUNGSCODES UND DIAGNOSE o Das Induktionskochfeld ist mit einer Selbstdiagnosefunktion ausgestattet Mit diesem Test kann der Techniker die Funktion mehrerer Komponenten überprüf...

Страница 30: ...Gerät ein nachdem die Stromversorgung normal ist E8 Versorgungsspannung liegt über der Nennspannung U1 Kommunikationsfehler Stecken Sie die Verbindung zwischen der Displayplatine und der Powerpla tine wieder ein Tauschen Sie die Netzplatine oder die Displayplatine aus Spezifische Störung und Lösung Störung Problem Lösung A Lösung B Die LED leuchtet nicht wenn das Ge rät eingesteckt ist Die Hilfsst...

Страница 31: ... ist beschädigt tau schen Sie die Leis tungsplatine aus Der Topfdurchmes ser ist zu klein Herd hat sich über hitzt Das Gerät ist über hitzt Warten Sie bis die Temperatur wieder normal ist Drücken Sie die Taste ON OFF um das Gerät neu zu starten Heizzonen der glei chen Seite z B die erste und die zweite Zone zeigen u an Die Netzplatine und die Displayplatine sind falsch ange schlossen Überprüfen Si...

Страница 32: ...chen Schlag und eine Verformung durch die Wärmestrahlung der Heizzo nen wie unten gezeigt zu vermeiden Holz und ähnliche faserige oder wasserziehende Materialien dürfen für die Arbeitsplatte nicht verwendet werden es sei denn es ist imprägniert HINWEIS o Der Sicherheitsabstand zwischen den Seiten des Kochfelds und den Innenflächen der Arbeitsplatte sollte mindestens 3 mm betragen L mm W mm H mm D ...

Страница 33: ...en unerwarteten Stromschlag bei der Arbeit zu vermeiden ist es notwendig einen mit Schrauben befestigten Holzeinsatz in einem Mindestabstand von 50 mm von der Unterseite des Kochfelds anzubringen Befolgen Sie die nachste henden Spezifikationen o An der Aussenseite des Kochfelds befinden sich Lüftungsöffnungen Es muss sicher gestellt werden dass diese Löcher nicht durch die Arbeitsplatte blockiert ...

Страница 34: ...Installation auf keinen Fall berühren siehe Bild Achtung o Die Installation des Kochfelds muss durch qualifiziertes Personal bzw qualifizierte Techniker erfolgen Bitte führen Sie die Installation niemals selbst durch o Das Kochfeld darf nicht an Kühlgeräten Geschirrspülern und Trommeltrocknern montiert werden o Bei der Installation des Kochfelds muss eine optimale Wärmeabstrahlung gewährleis tet w...

Страница 35: ...eratur an keiner Stelle 75 C überschreitet o Prüfen Sie mit einer Elektrofachkraft ob die Hausinstallation ohne Änderungen ge eignet ist Änderungen dürfen nur von einer Elektrofachkraft vorgenommen werden o Der Anschluss an das Stromnetz muss gemäss den geltenden Normen und unter Ver wendung eines einpoligen Trennschalters erfolgen Die Anschlussart ist unten darge stellt 400V 2N 7200W 16A ACHTUNG ...

Страница 36: ...onik Altgeräte WEEE legt fest dass Haushaltsgeräte nicht mit dem normalen Hausmüll entsorgt werden dürfen Alt geräte sind getrennt zu sammeln um einerseits Wiederverwertung und Recycling zu optimieren und andererseits potenzielle Gesundheits und Umweltgefahren zu ver hindern Die durchgestrichene Mülltonne erscheint auf allen Produkten um die Be sitzer an ihre Verpflichtung zur Mülltrennung zu erin...

Страница 37: ...ne supervision ou des instructions concernant l utilisation de l appareil d une manière sûre et s il comprennent les dangers impliqués o Cet appareil ne doit pas être utilisé par des enfants o Les enfants ne doivent pas jouer avec l appareil Le nettoyage et l entretien par l utilisateur ne doivent pas être effectués par des enfants sans surveillance o Débranchez l appareil du réseau électrique ava...

Страница 38: ...être placé sur cet appareil à aucun moment o Veuillez mettre ces informations à la disposition de la personne responsable de l installation de l appa reil car cela peut réduire vos coûts d installation o Afin d éviter tout danger cet appareil doit être ins tallé conformément aux présentes instructions d installation o Cet appareil doit être correctement installé et mis à la terre par une personne ...

Страница 39: ...éramique ou matériau similaire qui protè gent les pièces sous tension o Les objets métalliques tels que les couteaux four chettes cuillères et couvercles ne doivent pas être placés sur la surface de la plaque de cuisson car ils peuvent devenir brûlants o N utilisez pas de nettoyeur à vapeur pour nettoyer votre table de cuisson o L appareil n est pas destiné à être utilisé au moyen d une minuterie ...

Страница 40: ...eignez immédiatement l appareil au niveau de l alimentation secteur interrupteur mu ral et contactez un technicien qualifié o Éteignez la table de cuisson au mur avant le net toyage ou l entretien o Le non respect de ces conseils peut entraîner un choc électrique ou la mort o Cet appareil est conforme aux normes de sécurité électromagnétique o Toutefois les personnes portant un stimulateur car dia...

Страница 41: ...plombent pas les autres zones de cuisson al lumées Laissez les poignées hors de la portée des enfants o Le non respect de ces conseils peut entraîner des brûlures o La lame aiguisée d un grattoir de table de cuisson est exposée lorsque le couvercle de sécurité est ré tracté Utilisez le avec une extrême prudence et rangez le toujours hors de portée des enfants o Ne pas faire preuve de prudence peut...

Страница 42: ...sson comme décrit dans ce manuel c est à dire en utilisant les touches tac tiles Ne vous fiez pas à la fonction de détection de casseroles pour désactiver les zones de cuisson lors que vous enlevez les casseroles o Ne laissez pas les enfants jouer avec l appareil ou s asseoir se tenir debout ou grimper dessus o Ne rangez pas d objets intéressants pour les enfants dans les armoires au dessus de l a...

Страница 43: ...e produits à récurer ni d autres pro duits abrasifs agressifs pour nettoyer votre table de cuisson car ils peuvent rayer le verre à induction o Cet appareil est destiné à être utilisé dans les foyers et pour des applications similaires telles que La cuisine du personnel dans les magasins les bu reaux ou dans d autres environnements de travail Les maisons de ferme Pour des clients dans des hôtels m...

Страница 44: ...u aucun objet par exemple un ustensile ou un chiffon ne les recouvre Même un mince film d eau peut rendre les commandes difficiles à utiliser CHOISIR LA BONNE BATTERIE DE CUISINE o N utilisez que des ustensiles de cuisine avec un fond adapté à la cuisson à induc tion o Recherchez le symbole d induction sur l emballage ou sur le fond de la casserole o Vous pouvez vérifier si votre ustensile de cuis...

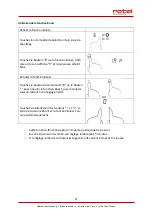
Страница 45: ...a zone de cuisson o Soulevez toujours les casseroles de la plaque de cuisson en céramique ne les glissez pas sinon elles risquent de rayer le verre FONCTIONNEMENT Commencer à cuisiner Appuyez sur la commande MARCHE ARRÊT Tous les indicateurs indiquent Placez une casserole appropriée sur la zone de cuis son que vous souhaitez utiliser Assurez vous que le fond de la casserole et la surface de la zon...

Страница 46: ...sur la zone de cuisson o Il n y a pas de chauffage si la zone de cuisson ne comporte pas de casserole appro priée o L affichage disparaîtra automatiquement après 1 minute si aucune casserole appropriée n est placée dessus Terminer la cuisson Touchez la commande de sélection de la zone de chauffage que vous souhaitez désactiver Désactivez la zone de cuisson en faisant défiler vers le bas jusqu à 0 ...

Страница 47: ...à 0 elle revient à 9 après 5 minutes Activer la fonction Boost Touchez la commande de sélection de la zone de chauffage Touchez le bouton B de la fonction Boost l indi cateur de zone affiche P et la puissance atteint Max Annuler la fonction Boost Touchez le bouton de commande B ou le bouton pour annuler la fonction Boost puis la zone de cuisson revient à son réglage initial OU Touchez simultanémen...

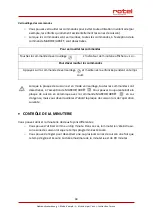
Страница 48: ...ge et maintenez la enfoncée pendant un temps court Lorsque la plaque de cuisson est en mode verrouillage toutes les commandes sont désactivées à l exception de MARCHE ARRÊT Vous pouvez toujours éteindre la plaque de cuisson en céramique avec la commande MARCHE ARRÊT en cas d urgence mais vous déverrouillerez d abord la plaque de cuisson lors de l opération suivante CONTRÔLE DE LA MINUTERIE Vous po...

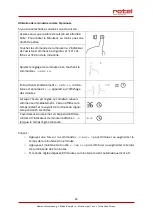
Страница 49: ...En touchant simultanément et la minu terie est annulée et apparaît sur l affichage des minutes Lorsque l heure est réglée le compte à rebours commence immédiatement L écran affichera le temps restant et le voyant de la minuterie cligno tera pendant 5 secondes L avertisseur sonore émet un bip pendant 30 se condes et l indicateur de minuterie affiche lorsque le temps réglé est écoulé Conseil o Appuy...

Страница 50: ...ure est réglée le compte à rebours commence immédiatement L affichage indique le temps restant et l indicateur de la minuterie cli gnote pendant 5 secondes NOTE Le point rouge à côté de l indicateur de ni veau de puissance s allume indiquant que la zone est sélectionnée Lorsque la minuterie de cuisson expire la zone de cuisson correspondante est automatiquement dé sactivée o Les zones de cuisson p...

Страница 51: ...méthode d absorption peuvent nécessiter un réglage plus élevé que le réglage le plus bas pour s assurer que les ali ments sont complètement cuits dans le temps recommandé Saisir les steaks o Laissez reposer la viande à température ambiante pendant environ 20 minutes avant la cuisson o Chauffez une poêle à frire à fond lourd o Badigeonnez les deux côtés du steak d huile Versez une petite quantité d...

Страница 52: ...if Le réglage exact dépen dra de plusieurs facteurs y compris de votre batterie de cuisine et de la quantité que vous cuisinez Testez votre plaque de cuisson pour trouver les réglages qui vous con viennent le mieux Réglage de tempé rature Convient pour 1 2 le réchauffement en douceur de petites quantités d ali ments faire fondre du chocolat du beurre et pour les aliments qui brûlent rapidement un ...

Страница 53: ...incez et essuyez à l aide d un chiffon propre ou d un essuie tout Remettez la table de cuis son sous tension Lorsque l alimentation de la table de cuisson est coupée il n y a pas d indi cation de surface chaude mais la zone de cuisson peut être encore brûlante Soyez extrême ment prudent Les produits à récurer in tensifs certaines éponges à récurer en nylon et les produits de nettoyage abrasifs peu...

Страница 54: ...liments sucrés ou les déversements dès que possible Si on les laisse re froidir sur le verre ils peu vent être difficiles à enle ver ou même endomma ger de façon permanente la surface du verre Risque de coupure lors que le couvercle de sécu rité est rétracté la lame d un grattoir est tran chante comme un rasoir Utilisez le avec une ex trême prudence et ran gez le toujours hors de portée des enfant...

Страница 55: ...e doigt lors que vous touchez les com mandes Assurez vous que la zone de commande tactile est sèche et utilisez la pulpe de votre doigt lorsque vous touchez les commandes Le verre se raye Ustensiles de cuisine à bords rugueux Utilisation d un produit abrasif ou d un produit de nettoyage inapproprié Utilisez des ustensiles de cuisine à fond plat et lisse Voir Choisir la bonne bat terie de cuisine V...

Страница 56: ...r la casserole parce qu elle est trop petite pour la zone de cuisson ou qu elle n est pas correctement centrée sur celle ci Utilisez des ustensiles de cuisine adaptés à la cuisson à induction Voir la section Choisir le bon ustensile de cuisson Centrez la casserole et assu rez vous que son fond cor respond à la taille de la zone de cuisson CODES DE DÉFAILLANCE ET DIAGNOSTIC o La plaque de cuisson à...

Страница 57: ...fiez si l alimentation électrique est normale Mettez l appareil sous tension après que l alimentation électrique soit nor male E8 La tension d alimentation est supé rieure à la tension nominale U1 Erreur de communication Rétablissez la connexion entre le ta bleau d affichage et le tableau d ali mentation Remplacez le tableau d alimentation ou le tableau d affichage Échec et solution spécifiques Éc...

Страница 58: ...t endommagé remplacez la carte d alimentation Le diamètre de la casserole est trop petit La cuisinière a sur chauffé L appareil est en sur chauffe Attendez que la température re vienne à la normale Appuyez sur le bou ton ON OFF pour redémarrer l unité Les zones de chauf fage du même côté par exemple la première et la deu xième zone affi chent u Le tableau d alimen tation et le tableau d affichage ...

Страница 59: ...laires ne doivent pas être utilisés comme matériau pour la surface de travail à moins d être imprégnés pour éviter les chocs électriques et les déformations causées par le rayonnement thermique de la plaque chauffante comme indiqué ci dessous Note o La distance de sécurité entre les côtés de la plaque de cuisson et les surfaces inté rieures du plan de travail doit être d au moins 3 mm L mm W mm H ...

Страница 60: ...uisson ou un choc électrique inattendu lors du travail il est nécessaire de placer un insert en bois fixé par des vis à une distance minimale de 50 mm du bas de la plaque de cuisson Suivez les spécifications ci dessous o Il y a des trous de ventilation à l extérieur de la table de cuisson Vous DEVEZ vous assurer que ces trous ne sont pas obstrués par le plan de travail lorsque vous mettez la plaqu...

Страница 61: ...eures du plan de travail après le montage voir photo Attention o L installation de la plaque de cuisson doit être effectuée par du personnel ou des techniciens qualifiés N effectuez jamais l opération par vous même o La plaque de cuisson ne doit pas être montée sur un équipement de refroidissement un lave vaisselle et un sèche linge o L installation de la plaque de cuisson doit assurer un rayonnem...

Страница 62: ... positionné de manière à ce que sa température ne dépasse à aucun moment 75 C o Vérifiez auprès d un électricien si le système de câblage domestique est adapté sans modification Toute modification ne doit être effectuée que par un électricien quali fié o L alimentation doit être raccordée conformément à la norme en vigueur ou à l aide d un disjoncteur unipolaire La méthode de raccordement est illu...

Страница 63: ...les appareils électroménagers ne doivent pas être éliminés avec les déchets solides urbains normaux Les appareils hors d usage doivent être collectés séparément pour optimiser le coût de réutilisation et de recyclage des matériaux contenus dans la machine tout en évitant les risques potentiels pour la santé publique et l environnement Le symbole de poubelle barrée figure sur tous les produits pour...

Страница 64: ...vvenga sotto il controllo di un supervisore o purché abbiano ricevuto istruzioni su come utilizzare l apparecchio in modo sicuro e abbiano compreso i rischi correlati o Questo apparecchio non deve essere utilizzato dai bambini o I bambini non devono giocare con l apparecchio Non far eseguire operazioni di pulizia o manuten zione a bambini senza supervisione o Scollegare l apparecchio dalla rete el...

Страница 65: ... sull apparecchio o Fornire queste informazioni all installatore dell ap parecchio per ridurre i costi di installazione o Per evitare possibili pericoli installare l apparecchio secondo quanto previsto dalle presenti istruzioni di installazione o L apparecchio può essere adeguatamente installato e messo a terra esclusivamente da un tecnico quali ficato o L apparecchio dev essere collegato ad un ci...

Страница 66: ...le superfici delle piastre in vetroceramica o materiali simili che proteggono parti in tensione o Non appoggiare sulla piastra oggetti metallici quali coltelli forchette cucchiai e coperchi in quanto pos sono accumulare calore o Non utilizzare pulitori a vapore per pulire il piano cottura o L apparecchio non deve essere utilizzato con un ti mer esterno o con un sistema di controllo a distanza sepa...

Страница 67: ...cchio dall ali mentazione elettrica interruttore a parete e con tattare un tecnico qualificato o Spegnere il piano cottura dall interruttore a parete prima di effettuare operazioni di pulizia o manuten zione o L inosservanza di questo punto può essere causa di scariche elettriche o morte o L apparecchio soddisfa i requisiti di sicurezza elet tromagnetica o Tuttavia le persone con pacemaker o altri...

Страница 68: ...ltre zone di cottura accese Tenere i manici al di fuori della portata dei bambini o L inosservanza di questo punto può essere causa di ustioni e scottature o Quando la copertura di sicurezza dei raschietti per piano cottura è ritratta la loro lama tagliente è esposta Prestare la massima attenzione durante l uso e riporre lo strumento al di fuori della portata dei bambini o Operazioni imprudenti po...

Страница 69: ...ramite i comandi touch Quando si tolgono le padelle non affidarsi alla funzione di rilevamento della presenza delle padelle per spegnere le zone di cottura o Impedire ai bambini di giocare con l apparecchio e di sedervisi salirvi o arrampicarvisi sopra o Non riporre nei pensili sopra all apparecchio oggetti che i bambini potrebbero voler raggiungere Il ten tativo da parte dei bambini di arrampicar...

Страница 70: ...fiare il vetro dei fuochi a indu zione non pulire il piano cottura con pagliette o de tergenti abrasivi o L apparecchio è destinato all uso domestico e ad ap plicazioni simili come aree adibite a cucina per il personale di negozi uffici e altri ambienti di lavoro fattorie da parte dei clienti di hotel motel e altri ambienti residenziali in bed breakfast e altri ambienti simili o AVVERTENZA L appar...

Страница 71: ...mpre puliti asciutti e non coperti da oggetti quali utensili o panni Basta una sottile patina d acqua per rendere difficoltoso l uso dei comandi SCEGLIERE LE PENTOLE E LE PADELLE GIUSTE o Utilizzare solo pentole con una base adatta alla cottura a induzione o Cercare il simbolo dell induzione sulla confezione o sul fondo della pentola o È possibile verificare l idoneità delle pentole eseguendo un t...

Страница 72: ...tro della zona di cottura o Per evitare di graffiare il vetro sollevare sempre le padelle dalla piastra in ceramica senza trascinarle o strisciarle GUIDA ALL USO Iniziare la cottura Toccare il comando ON OFF Su tutti gli indicatori si visualizza Disporre una padella idonea sulla zona di cottura de siderata Accertarsi che il fondo della padella e la superficie della zona di cottura siano puliti e a...

Страница 73: ... centrata correttamente sulla zona di cottura o Non si riscalda se non c è una pentola adatta sulla zona di cottura o L indicazione scompare automaticamente dopo 1 minuto se non vi è una pentola adatta Terminare la cottura Toccare il comando di selezione della zona di riscal damento che si desidera disattivare Spegnere la zona di cottura portando il valore a 0 oppure toccando contemporaneamente e ...

Страница 74: ...ale a 0 dopo 5 minuti ritorna a 9 Attivare la funzione Boost Toccare il controllo di selezione della zona di riscal damento Toccare il comando Boost B l indicatore di zona mostra P e la potenza raggiunge il massimo Annullare la funzione Boost Toccare il comando boost B o il tasto per an nullare la funzione Boost quindi la zona di cottura tornerà alla sua impostazione originale O Toccare insieme i ...

Страница 75: ...omandi Tenere premuto il controllo di blocco per qualche secondo Quando le piastre sono bloccate tutti i comandi sono disabilitati ad eccezione del comando ON OFF In caso di emergenza è sempre possibile spegnere la piastra in ceramica con il comando ON OFF ma in seguito occorrerà procedere allo sblocco COMANDO DEL TIMER Il timer può essere utilizzato in due modi diversi o Può essere utilizzato com...

Страница 76: ...oraneamente e il ti mer verrà cancellato e nel display dei minuti com parirà Una volta impostato il tempo desiderato il timer inizierà immediatamente il conto alla rovescia Il di splay indicherà il tempo rimanente e l indicatore del timer lampeggerà per 5 secondi Il cicalino emetterà un bip per 30 secondi e sull in dicatore del timer si visualizzerà una volta sca duto il tempo Suggerimento o Tocca...

Страница 77: ...atamente il conto alla rovescia Il display mostrerà il tempo ri manente e l indicatore del timer lampeggerà per 5 secondi NOTA il punto rosso accanto all indicatore del li vello di potenza si illuminerà indicando che la zona è selezionata Quando il timer di cottura scade la zona di cottura corrispondente si spegne automaticamente o Le zone di cottura precedentemente accese continueranno a funziona...

Страница 78: ...er alcune preparazioni ad esempio per cucinare il riso con il metodo dell assorbi mento possono essere necessarie temperature superiori rispetto al minimo se si vuole garantire una cottura completa entro i tempi consigliati Bistecca in padella o Tenere la carne a temperatura ambiente per circa 20 minuti prima di cuocerla o Riscaldare una padella con fondo pesante o Ungere entrambi i lati della bis...

Страница 79: ... impostazioni dipenderanno da una serie di fattori tra cui le pentole o padelle utiliz zate e la quantità di cibo da cucinare Sperimentando le varie possibilità offerte dalla piastra è possibile individuare le impostazioni che meglio rispondono alle proprie esi genze Livello di calore Idoneo per 1 2 riscaldare delicatamente piccole porzioni sciogliere cioccolato burro e alimenti che bruciano veloc...

Страница 80: ...nno asciutto o con carta assorbente Riaccendere il piano cottura Quando il piano cottura è spento la spia della tem peratura della superficie non si accende ma la zona di cottura potrebbe comunque essere ro vente Procedere con la massima cautela L utilizzo di pagliette ru vide di alcune pagliette in nylon e di detergenti ag gressivi o abrasivi può causare graffi sul vetro Leggere sempre l eti chet...

Страница 81: ...uovere il prima possi bile eventuali macchie di residui fusi sostanze zuc cherate o schizzi Se questi residui vengono lasciati raffreddare potrebbero diventare difficili da ri muovere o addirittura danneggiare il vetro Rischio di taglio quando la copertura di sicurezza dei raschietti per piano cottura è ritratta la loro lama tagliente è esposta Prestare la massima at tenzione durante l uso e ripor...

Страница 82: ... la punta delle dita Accertarsi che l area dei co mandi touch sia asciutta e azionarli utilizzando i polpa strelli Il vetro è graffiato Pentole o padelle con bordi ruvidi Utilizzo di pagliette abrasive o di prodotti per la pulizia non idonei Utilizzare pentole e padelle con fondo piatto e liscio Ve dere la sezione Scegliere le pentole e le padelle giuste Vedere la sezione Cura e pulizia Con alcune...

Страница 83: ...le adatte alla cottura a induzione Vedere il paragrafo Scelta delle pentole giuste Centrare la pentola e assicu rarsi che la sua base corri sponda alle dimensioni della zona di cottura CODICI DI GUASTO E DIAGNOSTICA o Il piano cottura a induzione è dotato di una funzione di autodiagnosi Con questo test il tecnico è in grado di controllare il funzionamento di diversi componenti senza smontare o smo...

Страница 84: ...ndere l unità dopo che l alimenta zione è normale E8 La tensione di alimentazione è supe riore alla tensione nominale U1 Errore di comunicazione Reinserire il collegamento tra il tabel lone e la scheda di alimentazione Sostituire la scheda di alimentazione o il tabellone Guasto specifico e soluzione Guasto Problema Soluzione A Soluzione B Il LED non si ac cende quando l u nità è inserita La scheda...

Страница 85: ... Il circuito di rileva mento della pentola è danneggiato sosti tuire la scheda di ali mentazione Il diametro della pentola è troppo piccolo Il fornello si è surri scaldato L unità è surriscal data Attendere che la temperatura ritorni alla normalità Premere il pulsante ON OFF per riav viare l unità Le zone di riscalda mento dello stesso lato ad es la prima e la seconda zona visualizzerebbero u La s...

Страница 86: ...tra per la super ficie di lavoro scegliere un materiale resistente al calore e isolato non utilizzare legno o simili materiali fibrosi o igroscopici se non impregnati Prendere a riferimento la figura seguente Nota o Tra i lati della piastra e le superfici interne del piano di lavoro dev essere garantita una distanza di sicurezza di almeno 3 mm L mm W mm H mm D mm A mm B mm X mm F mm 590 520 62 58 ...

Страница 87: ...osi alla base della piastra e per prevenire scariche elettriche improvvise durante il lavoro è necessario fissare un inserto in legno da avvitare ad almeno 50 mm dalla base della piastra Seguire le specifiche riportate di seguito o L esterno della piastra è dotato di fori di ventilazione ACCERTARSI che questi fori non vengano coperti dal piano di lavoro quando si monta la piastra o Attenzione la c...

Страница 88: ...ici in terne del piano di lavoro vedi figura Attenzione o La piastra dev essere installata da tecnici qualificati o personale specializzato Non effettuare mai queste operazioni da soli o La piastra non dev essere montata in prossimità di impianti di condizionamento la vastoviglie o asciugatrici a tamburo rotante o Per aumentare l affidabilità dell apparecchio la piastra dev essere installata in ma...

Страница 89: ...arti calde e deve essere posizionato in modo che la sua temperatura non superi i 75 C in nessun punto o Verificare con un elettricista se il sistema di cablaggio domestico è adatto senza alte razioni Eventuali modifiche devono essere effettuate solo da un elettricista qualifi cato o L alimentazione elettrica dev essere collegata nel rispetto delle norme applicabili ov vero utilizzando un interrutt...

Страница 90: ...chiature elettriche ed elettroniche WEEE sancisce che gli elettrodomestici non possono essere smaltiti usando il normale ciclo di rifiuti solidi urbani Le apparecchiature dismesse vanno invece raccolte separa tamente al fine di ottimizzare il costo di riutilizzo e dei materiali di riciclo che compon gono la macchina escludendo così un danno potenziale alla salute pubblica e all am biente Il simbol...

Страница 91: ...ruction concerning use of the appli ance in a safe way and understand the hazards in volved o This appliance must not be used by children o Children must not play with the appliance Cleaning and user maintenance shall not be carried out by children without supervision o Disconnect the appliance from the mains electricity supply before carrying out any work or mainte nance on it Installation o Conn...

Страница 92: ...this appliance must be installed according to these instructions for installa tion o This appliance is to be properly installed and earthed only by a suitably qualified person o This appliance should be connected to a circuit which incorporates an isolating switch providing full disconnection from the power supply o Failure to install the appliance correctly could inval idate any warranty or liabi...

Страница 93: ...RNING Danger of fire do not store items on the cooking surfaces o The cooking process has to be supervised A short term cooking process has to be supervised continu ously o WARNING Unattended cooking on a hob with fat or oil can be dangerous and may result in fire NEVER try to extinguish a fire with water but switch off the appliance and then cover flame e g with a lid or a fire blanket o Do not c...

Страница 94: ...o Failure to follow this advice may result in death o During use accessible parts of this appliance will be come hot enough to cause burns o Do not let your body clothing or any item other than suitable cookware come into contact with the induction glass until the surface is cool o Handles of saucepans may be hot to touch Check saucepan handles do not overhang other cooking zones that are switched...

Страница 95: ...puters MP3 players near the appliance as they may be affected by its electromagnetic field o Never use your appliance for warming or heating the room o After use always turn off the cooking zones and the cooktop as described in this manual i e by using the touch controls Do not rely on the pan detec tion feature to turn off the cooking zones when you remove the pans o Do not allow children to play...

Страница 96: ...duction glass surface as this can scratch the glass o Do not use scourers or any other harsh abrasive cleaning agents to clean your cooktop as these can scratch the induction glass o This appliance is intended to be used in households and for similar applications such as staff kitchen areas in shops offices and other working environments farm houses by clients in hotels motels and other residentia...

Страница 97: ...y and that there is no object e g a utensil or a cloth covering them Even a thin film of water may make the controls difficult to operate CHOOSING THE RIGHT COOKWARE o Only use cookware with a base suitable for induction cooking o Look for the induction symbol on the packaging or on the bottom of the pan o You can check whether your cookware is suitable by carrying out a magnet test Move a magnet ...

Страница 98: ...king zone Always centre your pan on the cooking zone o Always lift pans off the ceramic hob do not slide or they may scratch the glass HOW TO USE Start cooking Touch the ON OFF control All the indicators show Place a suitable pan on the cooking zone that you wish to use Make sure the bottom of the pan and the surface of the cooking zone are clean and dry Touch the heating zone selection control an...

Страница 99: ... small or not properly centered on the cooking zone o No heating takes place unless there is a suitable pan on the cooking zone o The display will automatically disappear after 1 minute if no suitable pan is placed on it Finish cooking Touching the heating zone selection control that you wish to switch off Turn the cooking zone off by scrolling down to 0 or touching the and control together Turn t...

Страница 100: ...equals 0 it will return to 9 after 5 minutes Activate the boost function Touch the heating zone selection control Touch the boost control B the zone indicator shows P and the power reaches Max Cancel the Boost function Touch the control B or the button to cancel the Boost function then the cooking zone will re vert to its original setting OR Touch and control together The cooking zone switches off...

Страница 101: ...o unlock the controls Press and hold the lock control for a short period When the hob is in lock mode all the controls are disabled except the ON OFF You can always turn the ceramic hob off with the ON OFF control in an emergency but you will unlock the hob first in the next operation TIMER CONTROL You can use the timer in two different ways o You can use it as a minute minder In this case the tim...

Страница 102: ...trol By touching the and together the timer is cancelled and will show in the minute display When the time is set the timer will begin to count down immediately The display will show the re maining time and the timer indicator will flash for 5 seconds Buzzer will beep for 30 seconds and the timer indi cator shows when the set time is up Hint o Touch the or control once to decrease or increase the ...

Страница 103: ...ay When the time is set it will begin to count down immediately The display will show the remaining time and the timer indicator flashes for 5 seconds NOTE The red dot next to the power level indica tor will illuminate indicating that zone is selected When cooking timer expires the corresponding cooking zone will be switched off automatically o Previously switched on cooking zones will keep operat...

Страница 104: ...y cooked in the time rec ommended Searing steak o Stand the meat at room temperature for about 20 minutes before cooking o Heat up a heavy based frying pan o Brush both sides of the steak with oil Drizzle a small amount of oil into the hot pan and then lower the meat onto the hot pan o Turn the steak only once during cooking The exact cooking time will depend on the thickness of the steak and how ...

Страница 105: ...ookware and the amount you are cooking Experiment with the hob to find the settings that best suit you Heat setting Suitability 1 2 gentle warming for small amounts of food melting chocolate butter and foods that burn quickly gentle simmering slow warming 3 4 reheating rapid simmering cooking rice 5 6 pancakes 7 8 sautéing cooking pasta 9 stir frying searing bringing soup to the boil boiling water...

Страница 106: ... or scourer is suit able Never leave cleaning resi due on the cooktop the glass may become stained Boiling over melting and hot sugary spills on the glass Remove these immediately with a fish slice palette knife or razor blade scraper suitable for glass cooktops but beware of hot cooking zone surfaces Switch the power to the cooktop off at the wall Hold the blade or utensil at a 30 angle and scrap...

Страница 107: ... in your home or area If you ve checked everything and the problem persists call a qualified technician The touch controls are un responsive The controls are locked Unlock the controls See section Using your cooktop for instructions The touch controls are diffi cult to operate There may be a slight film of water over the controls or you may be using the tip of your finger when touching the control...

Страница 108: ... induction cooking The induction hob cannot detect the pan because it is too small for the cooking zone or not properly cen tred on it Use cookware suitable for induction cooking See sec tion Choosing the right cookware Centre the pan and make sure that its base matches the size of the cooking zone FAILURE CODES AND DIAGNOSTIC o The induction hob is equipped with a self diagnostic function With th...

Страница 109: ...and the power board Replace the power board or the dis play board Specific Failure and solution Failure Problem Solution A Solution B The LED does not come on when unit is plugged in The accessorial power board and the display board are connected incor rectly Check the connec tion The accessorial power board is dam aged Replace the accesso rial power board The display board is damaged Replace the ...

Страница 110: ...to normal Push ON OFF but ton to restart unit Heating zones of the same side Such as the first and the sec ond zone would display u The power board and the display board are connected incorrectly Check the connec tion The display board of communicate part is damaged Replace the display board The Main board is damaged Replace the power board Fan motor sounds abnormal The fan motor is damaged Replac...

Страница 111: ...aterial wood and similar fibrous or hygroscopic material shall not be used as a work surface material unless impregnated to avoid electric shock and deformation caused by the heat radiation from the hotplate as shown below Note o The safety distance between the sides of the hob and the inner surfaces of the work top should be at least 3 mm L mm W mm H mm D mm A mm B mm X mm F mm 590 520 62 58 560 ...

Страница 112: ...he bottom of the hob or getting an unexpected electric shock when working it is necessary to place a wooden insert fixed by screws at a minimum distance of 50 mm from the bottom of the hob Follow the specifications below o There are ventilation holes around the outside of the hob You MUST ensure these holes are not blocked by the worktop when you put the hob into position o Be aware that the glue ...

Страница 113: ...to contact with the inner sur faces of the worktop after installation see picture Caution o The cooker hob must be installed by qualified personnel or technicians Please never conduct the operation by yourself o The cooker hob shall not be mounted to cooling equipment dishwashers and rotary dryers o The installation of the cooker hob must ensure optimum heat radiation to enhance the reliability of...

Страница 114: ... domestic wiring system is suitable without al terations Any alterations must only be made by a qualified electrician o The power supply should be connected in compliance with the relevant standard or using a single pole circuit breaker The method of connection is shown below 400V 2N 7200W 16A ATTENTION This unit is only designed for an operating voltage of 230V Always connect the neutral conducto...

Страница 115: ...waste cycle Exhausted appliances should be collected separately in order to optimise the cost of re using and recycling materials comprising the ma chine while preventing potential damage to public health and the environment The crossed out wheeled bin symbol appears on all products to remind owners of the obligations regarding separate waste collection Owners should contact their local authoritie...

Страница 116: ...lement indiquer votre adresse com plète et si le défaut n est pas évident joindre une note explicative à votre envoi o Impegno di garanzia Ci impegniamo a riparare gratis questo apparecchio qualora malgrado un uso corretto si fosse gua stato durante il periodo di garanzia Eliminiamo tutti i difetti causati da difetti del materiale o di fabbrica La prestazione di garanzia avviene con il ripri stino...

Отзывы: